gmrhodes13
-
Posts
31,219 -
Joined
-
Last visited
-
Days Won
1,070
Content Type
Profiles
Forums
Gallery
Articles
Everything posted by gmrhodes13
-
 Many thanks Mario and the whole DO team. If anyone tells you it gets easier with each application it doesn't, the nervous wait and constant refresh of the forums hoping for an update only to have to wait another day, thank you once again gents
 -
Thank you Sir, I know shame on me, I could have ironed it first, at least it wasn't bushes/bricks or fence
-
Congratulations trooper and welcome to the ranks, you can request Stormtooper access here
-
Elastic straps should really meet the ends of the shoulder bell, your velcro may not be strong enough to hold them in that position when moving arms, just something to check
-
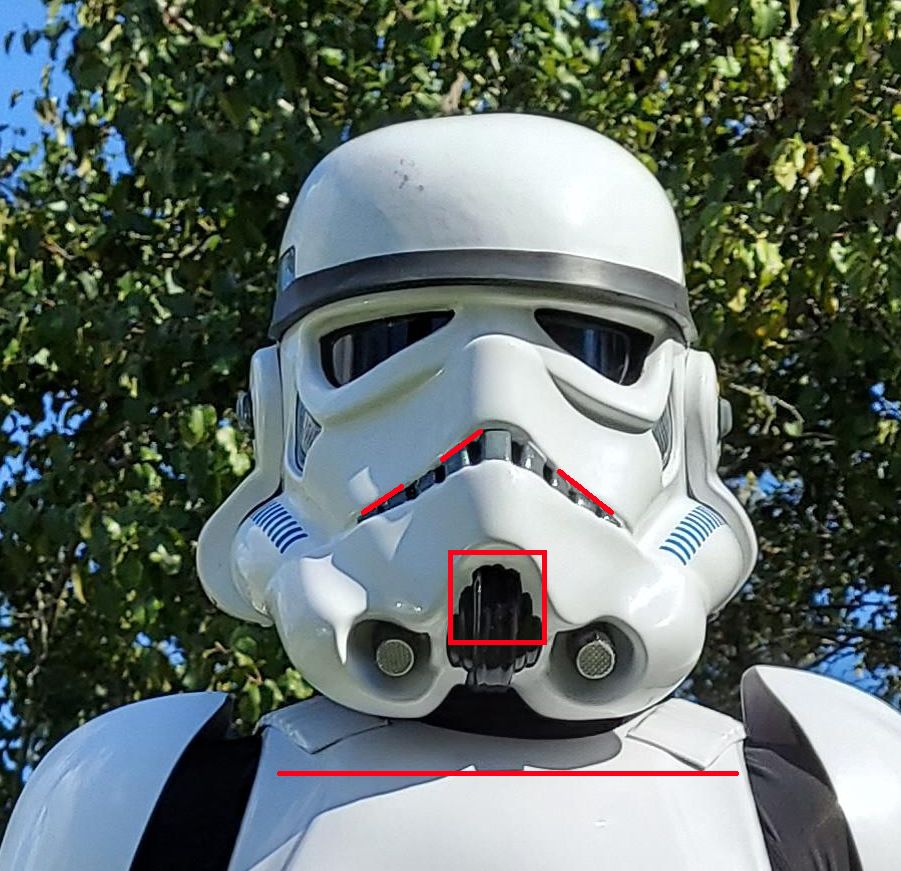
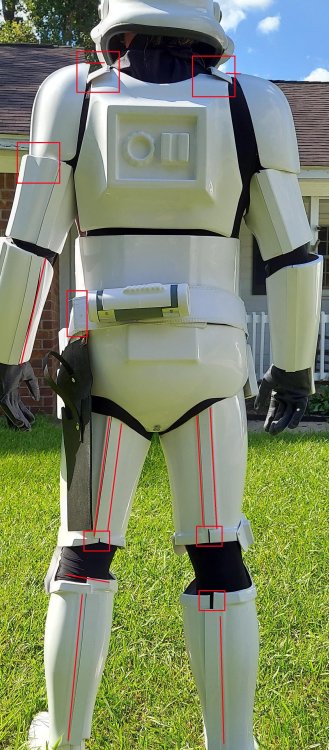
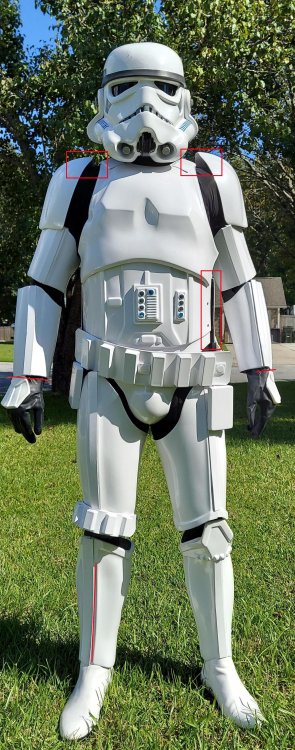
Nice work trooper, we do have a pre approval area for more feed back https://www.whitearmor.net/forum/forum/193-request-tk-pre-approval/ 1-My chest plate keeps wanting to slide behind my ab plate. Any suggestions to fix this? Tighter strapping / double elastic, or even extra straps. 2-Knee plate keeps wanting to go up and under my thigh plate. I get the sense I need to raise both my calves about an inch and that should be solved. Any suggestions on how to implement that? Add foam behind the sniper plate, generally helps, you can also add some foam on the inside rear of the thigh to help bring the thigh backwards at the front 3-I need to attach my belt to the front of the armor a bit more securely, but I have a plan in mind for that. Make sure you have curved your belt, helps to take some stress off, 3 snaps are normally tight enough 4-Popped the seam on my left forearm getting my hand through while wearing my glove with the flexible hand cover. Would it be possible/easier to put the glove on after the forearm? Or do I just need to work the angle a bit better Normally I put the gloves on after the forearms are on, hopefully you roughed both the forearm and coverstrip with some coarse sandpaper before applying glue, helps give something to grip too Watch the closure of your shins, there shouldn't be gaps at the top ridges and alignment. You can also use some ABS paste to fill the lower thigh ridge gaps Position of detonator, not centered. Shoulder straps not sitting center to each side of the backplate. Left bicep not under shoulder Shin coverstrips do not cover all the area before ridges Ideally should be not gap between the backplate and kidney Bit hard to tell if your rivets in the thigh ammo strip have been painted? Same with side rivets, no paint. Alignment of ab to kidney at the top You may also want to trim the length of the belt, it's almost touching your holster straps Should only be 2 connectors for STUNT belt not 4 (HERO), also gap to belt Shoulder bells are sitting high over your shoulders? Bell is pushing up your left, not sure what is going on with the right, does look high do you have straps attached to shoulder straps? Forearms touching handplates, move your biceps and forearms upwards to give some gap Vocoder black paint not very defined No paint on gums Frown is painted gray and does not leave the teeth area. You may also want to check the position of your shoulder straps, appear at different positions but may be the photo/lean You could also add some ABS stips behind your ab/kidney to stop the sides pushing outwards. Glue them to the kidney and they will be forced to stay behind the ab plate.

-
Congratulations trooper and welcome to the EI ranks
-
Huh?
-
Hello and welcome aboard, Redbacks are a great group, I've trooped with then a few times. Pretty much most of your purchases will be from outside Australia although a few bits and pieces are starting to pop up locally. I have ATA and RS, with he ATA being a little better in strength. Another useful thread for you to have a read through Good luck with the researching
-
Does not look like it, still has the recessed area, probably find the tube sits into the recess.
-
Dead Post Links & Broken Photos, How You Can Help
gmrhodes13 replied to Sly11's topic in Forum Help & Support
Costuming and Builds - EU (501st Approved) Legacy Stormtrooper (Joker Squad) - Glen Images replaced https://www.whitearmor.net/forum/topic/15279-jes-gistang-research-thread/ Page 2 complete - gmrhodes13 -
TKC Request for CRL Updates Thread
gmrhodes13 replied to gmrhodes13's topic in Hard Armor (General Discussion)
There's actually quite few thing which need to be updated between the CRL's, hopefully this one will be added to the list, there are a few other CRL's under review currently so not doubt it may not be address straight away. -
Cheers Colin
-
Dead Post Links & Broken Photos, How You Can Help
gmrhodes13 replied to Sly11's topic in Forum Help & Support
Costuming and Builds - EU (501st Approved) Concept Armor - Glen Images replaced https://www.whitearmor.net/forum/topic/25899-ralph-mcquarries-concept-stormtrooper-helmets/ https://www.whitearmor.net/forum/topic/22683-ralph-mcquarries-concept-stormtrooper-armor/ Page 1 complete - gmrhodes13 SECTION COMPLETED Costuming and Builds - EU (501st Approved) MQ Build Threads - Glen Page 1 complete - gmrhodes13 SECTION COMPLETED -
You know I'm going to have to put one of these on my Santa wish list, there are some really nice details in this kit
-
I can give too much info at times and can be missed
-
Very nice case. Glad to see you are making the TD mod for full pipe, looking good
-
TK Monkus' RS Prop Masters ANH-S Build Thread (first build)
gmrhodes13 replied to TK Monkus's topic in ANH Build Threads
There have been some that even using the double snaps and elastic have added all the screws and brackets so it appears screen original from the outside, I don't I prefer not to add screws as you do run a risk of cracking across the screw holes, if you are going to add screws in these lips of the armor it is good to use a strip of ABS behind for extra strength. You can use any method of strapping on the inside, just remember from the outside you want to have the 6 rivets ab/kidney, the "Han" snap upper right corner of the Ab, the two butt plate snaps and the single rivet bottom of the cod -
Tim’s first time build (RS Prop Masters ESB TK)
gmrhodes13 replied to TrickyT81's topic in ESB Build Threads
Looking good, if you check the reference there is a small lip left on the screen helmets BUT many of remove all the excess material as you have drawn, it can give you a little extra viewing area, especially in the inside corners of the eyes. Once you are happy with the trimming you can use some sandpaper on a small block of wood or even just rolled up to sand across the lens area to match the top and bottoms, just helps the lenses sit a little flatter. On lenses some use a full sheet and anchor on either sides, I like to cut the lenses just a little larger than the openings and silicon in place, these can be swapped out later if they get scratched or damaged. Looking good, move along -
Thank you Chemi Cheers Kris Thank you Richard Many thanks Dan
-
Nothing wrong with "poor mans" effects I use them in pretty much all my weapons,. A couple of extra tweaks I like to make are adding an amp socket jack, you wire this to your speaker and you can run a cable up your arm your aker amp, great for loud events like con's. The other is swap out the LED's to highbright versions, like what's in cheap torches, just ups the lighting and you get a nice effect down the barrel. Looking forward to seeing the progress
-
Thank you Mario, I figure I'm around here enough I may as well start my own
-
Thank you Andrew, this armor was payment I received for a commission build I recently completed, so it was basically complete, just needed to bring it up to L3 standards. I never took my HWT to the higher levels, thought it was about time
-
Nice work getting those pieces aligned and all the print lines gone, looking good
-
TK-85421 Requesting HWT EIB Status (ATA) For your consideration: EIB Application = No 9 Costume = Heavy Weapons Trooper Costume CRL Link = https://databank.501st.com/databank/Costuming:TK_hwt Name = Glen "Q" Rhodes TKID = 85421 Forum Name = gmrhodes13 Legion Profile = https://www.501st.com/members/displaymember.php?userID=15264&costumeID=122 Garrison/Squad = Desert Scorpion Garrison Armor = ATA Helmet = ATA Blaster = Scratch build & Doopy Doo's Pauldron = Self made Pouches = Self made Pack = Self made Height = 5'11" Weight = 78kg Grip reflection
-
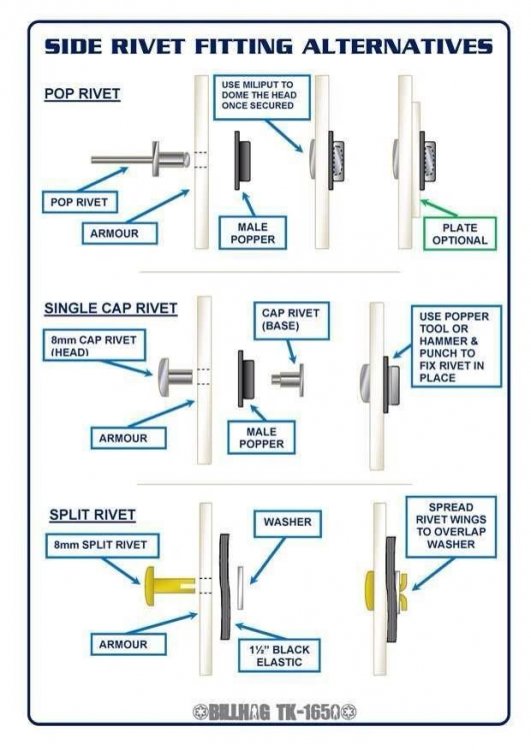
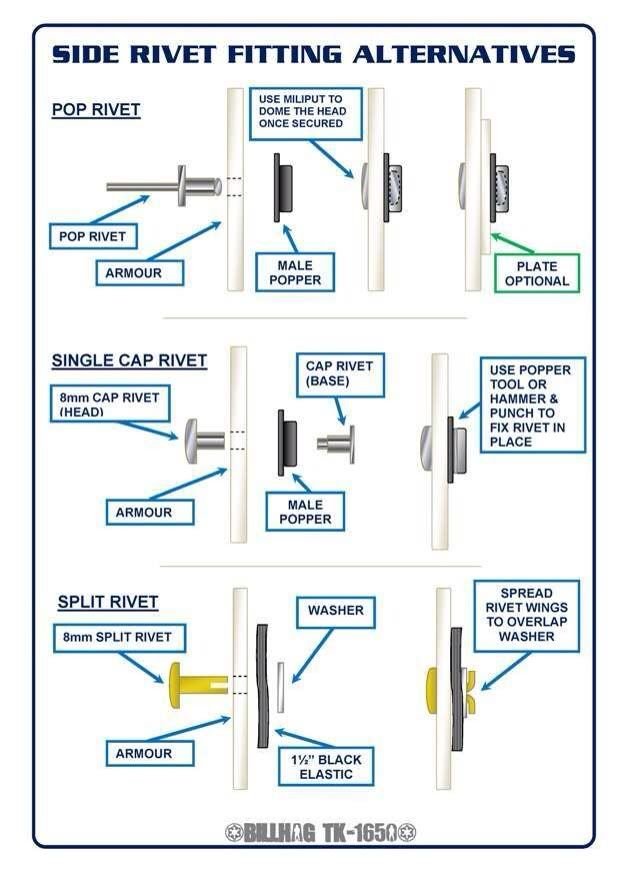
Found this random image with snaps on the rivets And another No 2 in this image shows cap rivets through the snap which is also another option rather than just using the rivets This one they add snaps next to the rivets. Another with snaps using plates for the other side of the snap, this would not allow any give though which the elastic does You could also cut the head off the split rivet and glue over the hole then glue snap plates behind, there are lots of different ways to do it.