


gmrhodes13
-
Posts
31,191 -
Joined
-
Last visited
-
Days Won
1,067
Content Type
Profiles
Forums
Gallery
Articles
Everything posted by gmrhodes13
-
 Unfortunately you may not get a reply as this member has not been on the forum since May 24, 2024
 -
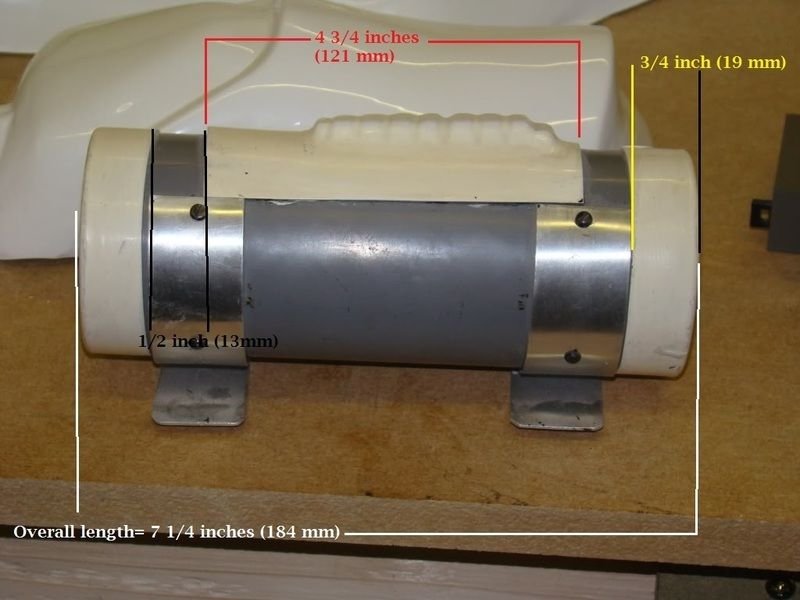
There are no dimensions for these areas, only width, also depends on the position of your clips and how it sits on the belt, reference material: THERMAL DETONATOR ANH Stunt/Hero ESB For Level 2: 1. Clips shall be attached with slotted type flat or dome-head screws, and be black (two per clip). V-head or Philips screws are not permitted. 2. Clips are positioned with little or no gap between the clips and end caps. IMPORTANT: Please observe that the screws closest to the face plate are positioned toward the top of the clip, and that the ends are square and not rounded. Notes: The top of the TD should should sit level (or slightly) higher than the top of the canvas belt. Note the control panel almost hits the top of the clips and the bottom of the clips
.webp.70cab5b31cb6effabe113d1acf537893.webp)
-
Nice work. Don't forget to add some white paint to those thigh ammo strip rivets. Appears your belt came loose in the middle, second photo How to stop shins rotating - I prefer using elastic so it has some give when stretching the legs
-
File Name: N-S9 Starpath Unit Designer: ldroberts626 Last Update: 5/06/2025 File/Link: https://makerworld.com/en/models/1487856-imperial-n-s9-starpath-unit?designId=1487856-imperial-n-s9-starpath-unit#profileId-1555863 Description: This is my recreation of the infamous N-S9 Imperial Starpath Unit stolen by Cassian Andor in Andor Season 1. I tried to make it as “realistic” as possible from what I could interpret from its brief appearances on-screen in the show, its wookiepedia entry, and also took some inspiration from other makers efforts at recreations on the RPF (Thank you!). There is of course some creative license taken in places where there is little or no reference imagery and also to make it as easy to print as possible. The whole thing prints in parts with only a few requiring a few simple, easy to remove supports. It is held together primarily with printed pegs with only the front panel requiring to be glued on. All the greebles are embedded within the model parts and painted in the 3MF file, the only exception being the front handles which print separately to preserve their print quality and allow for easy support removal that wont leave scars. There is also a neat little stand included to display it. The file is painted for the filaments I used, which includes a few different shades of dark greys/silvers which I felt gave it more dimension. You could probably experiment and narrow the amount of filaments down a bit and still get good results if you only have one AMS. The profile also uses Support for PLA to give nice clean, smooth full contact supports on the sides and handles, if you don't have support filament, you could keep these settings and use PETG as the interface instead. I have uploaded the individual STL files if you want to print single colour and paint it, that would look really cool if you have the skills… which i definitely do not! Filaments I used: Elegoo Black PLA Bambu PLA Metal Indium Gold - Gold Greebles on top Polymaker Polyterra PLA Lava Red - Red Buttons on front Ziro Silk PLA Silver Black- ‘Metal’ Side Frame Pieces Ziro PLA-CF Black - Detailing on Top and Bottom Pieces (Bambu PLA-CF Lava Grey would also work) Bambu PLA Basic Silver- Metal detailing on top/bottom, rods on side, front/back panels Overture Matte White PLA- Front greebles Bambu PLA Matte Marine Blue- Front greebles Ziro Transluscent PLA Red- Front ‘displays’ (speed is reduced on these parts to create translucent effect of an old LED display) Bambu Support for PLA- supports all set for full contact, easy removal and smooth clean undersides (can also use PETG) Images:
-
File Name: Stormtrooper Can Holder / Beer mug Designer: RUMcajz Last Update: 5/09/2025 File/Link: https://makerworld.com/en/models/1766778-stormtrooper-can-holder-beer-mug?from=search#profileId-1880314 Description: Can holder in the shape of the StormTrooper Fits long EU cans with a capacity of 0.5L. You can also use my insert for 12oz or 330ml (slim) cans (link below) Recommended print settings: PLA, 0.2mm layers, 2walls, 8%gyroid, Automatic Tree supports (at least 28°) Just use my profile If you want to have the handle on the opposite side, just right-click on the object in the slicer and put mirror by the Y axis. Here is the link to my model of the insert that you can use in 0.5L holders with your 12oz , or 330ml slim cans, and 10mm riser if you want better access to the top. They are scalable, so you can make them smaller or larger in your slicer. https://makerworld.com/cs/models/1499777-can-holder-riser-inserts-12oz-slim-330ml-scalable#profileId-1568806 Happy printing:) Images:
-
Hello and welcome to the forum. Currently new CRL's are in lockdown but the legion web team are hard at work, shouldn't be too much longer.
-
Instructions in the first post of this thread how to find your membership profile link
-
Sha Sha's (Slow) KB FOTK Build for Short Troopers
gmrhodes13 replied to shashachu's topic in TFA Build Threads
Ouch, a difficult area for sure. You may be able to cut off the damaged area in a strip, add a stiffener behind (which will be the base of the closure) then replace with a strip on top, if that makes sense, I bit like a OTTK side shim. Something like this -
Incorrect link, that's to your legion forum profile, not membership profile, have a read of the instructions in the first post of this thread, any issues please reach out.
-
DohF4 Requesting Pre-Approval Review (RS Propmasters)
gmrhodes13 replied to DohF4's topic in Request TK Pre-Approval
There is a piece of plastic glued behind for strength, build thread is here -
Note you want your drop boxes to align with the ends of the plastic belt Drop boxes are vertically aligned with the end of the ammo belt with minimal gap between belt and box.
-
TheSwede’s Night Trooper build.
gmrhodes13 replied to TheSwede's topic in Night Trooper Build Threads
I used the same for weathering, works well and easy to remove or add on if required -
SOLD @ $177,318.74 US
-
Most use a free online image host IMGUR, how to here
-
File Name: Stormtrooper storage, flower pot, can, pen holder Designer: 炫羽3d造物0888*pqd2 Last Update: 4/09/2025 File/Link: https://makerworld.com/en/models/1763384-storage-box-storage-succulent-flower-pot-can-pen-h?from=search#profileId-1876166 Description: Welcome to download, print, and upload pictures of your printed results for reference. If you like it, thank you for your boost Storage Box Storage Succulent Flower Pot Jar Pen Holder 1. Most of the uploaded models are support-free or have optimized supports. Newbie-friendly, one-click printing available on mobile Try not to modify print parameters, you can directly print with one click on your phone If there are supports, use modeling pliers to remove them little by little If you need to assemble, use 502 super glue 2. The images you see are actual photos uploaded after I successfully printed them For more real-life detailed pictures of the model, you can scroll down on the main image and click to enlarge to see details 3. Go to my homepage, and more models can be downloaded 4. The most common reason for beginner print failures is poor adhesion of the first layer. It is recommended to wash the build plate with dish soap before printing Thank you for your boost, I will try to upload more models for everyone to download 5. You may not share, sublicense, sell, rent, host, transfer, or distribute the digital or 3D printed versions of this work, or any derivative works in any other digital or physical format (including but not limited to secondary creations of the item, and hosting on other digital platforms) in any way. These items may not be used for charging fees without permission Images:
-
Updated image 05/09/25 (think I prefer the old one more) https://drive.google.com/file/d/1gUQPWZGdcPmlHIGTgGu0dsV5KyJw28bn/view https://drive.google.com/file/d/1mJdqi4fBeAp5LHPXutWkQrC9vfBmx3MM/view
-
TheSwede’s Night Trooper build.
gmrhodes13 replied to TheSwede's topic in Night Trooper Build Threads
Looking good -
Photos may help us identify your issue
-
You will find with shoulders it's best to have attaching points closer to the front, this helps pull in the shoulders at rest. But if what you have works then stick with it
-
IG-41985 ANH Stunt TK Build Thread! (AM Armor)
gmrhodes13 replied to Artooritoo's topic in ANH Build Threads
Looks good, just the shoulder straps on the ends. Some other AM L3 approved Posted December 20, 2018 · IP Mandatory Information Armor = Armor Master 2.0 Helmet= Armor Master 4.5 Blaster= Quest Design EIB Thread: Optional Height = 6'1" Weight = 235 lb Boots = Imperial Boots Canvas belt = TrooperBay Hand Plates = AM 2.0 Hard Electronics= Ukswraths hovi mic and fans Neck Seal = Darman Holster = Darman Adjustments from EIB Feedback: Helmet frown, painted the edge after the uncut tooth. Got wire and created new brackets for the chest piece edge that are 1/2 inch longer so the chest sits lower. Added outer edge elastic straps to hold the butt plate flush with the lower back. Tapered the forearms around the wrist by 2cm. Any more and I'd have a hard time getting my hands through. Trimmed the front thigh cover strip to be 20mm instead of 30mm. Used the 2nd belt cover, trimmed the corners less than the first and added the raised rivet covers vs the sunk covers on the old one. AB button plates, square the edges and touch up the button paint. Adjust left forearm to bicep strap a cm or two longer to line up better with right. Armor Photos Full Body Front Full Body Back Full Right Full Left Right Side Detail Left SIde Detail Armor Details Gloves DL GUIDE: CHEST/BACK PLATE (Including shoulder connections) ANH Stunt/Hero ESB Note: While some troopers like to keep a significant amount of the return edges on the arm opening areas of the back and chest plates, as seen in the reference images below they were actually minimal for the most part, but leaving them on will not affect approval at levels 2 or 3. Chest and back shall be connected with a white fabric or preferably elastic strap at the shoulders. As seen in the images from screen used armor below, this ideally must be approximately 2 inches (48 mm) wide. Shoulder bridges For Level 2, no visible rivets are present. For Level 3, they shall free float in the back, be glued in the front and need to be held down in the back via a white elastic band to the white fabric/elastic chest/back connection. Ideally this strap should be 1/4 inch (5 mm) wide, and connect over the tab at the top of the back armor. The bridge should also lay flush against the back. NOTE: As seen in the photos below, there are no large tabs on the rear of the shoulder bridges. This is not specifically mentioned in the CRL, but removing them is highly recommended if possible.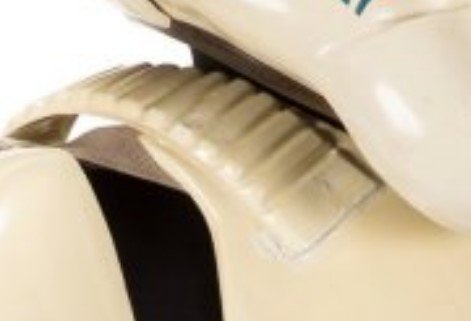
-
Returned To Active Service
gmrhodes13 replied to AW2066's topic in Newly Approved Members - Sound Off!
Hello and welcome back to the ranks trooper, we have a new trooping awards system you may want to take a look at. Trooper Missions and Deployment area awards are issued at certain milestones, more info below And request letters of commendation here -
File Name: More Star Wars Clip Together Droids - Convention Handouts Designer: 3D hacker Last Update: 2/09/2025 File/Link: 1 https://www.printables.com/model/1347912-r2d2-kit-card-r2q5-kit-card 2 https://www.printables.com/model/1369605-r2d2-kit-card-remake-r2q5-kit-card 3 https://www.printables.com/model/1397015-star-wars-kit-card-collection Description: The R2D2 kit Card has a multicolor and a single color print and is print in place! The R2Q5 is a Multicolor only and is also print in place you should use supports for both! Images: 1 2 3
-
- 1
-

-
File Name: Star Wars Themed Night Light/Lamp Designer: Big Dog Custom Creations Last Update: 1/09/2025 File/Link: https://www.printables.com/model/1400074-star-wars-themed-night-lightlamp Description: This is a simple night light/lamp with the Star Wars theme. If you have a printer capable of multicolor then you can use the paint function in your slicer to color the base and the insert, otherwise you the filament can be swapped out during the print to get the colors. The Main logo is designed separately to print flat and swap the colors. Then just insert the logo for that finished look. It also is compatible with the 2.8in. LED puck lights. Use the puck light instead of the LED strip to use with batteries. Also I have created a set of instructions to help with assembly. Have a specific theme you would like to see, then drop me a note and follow me. If I get enough requests I can put something together in that theme. Thanks for your interest. 3D printing settings Body Parts: Material: Any Infill: 10-15% Supports; Yes, recommended Bottom Panel: Print face down after adding color to the image for best results Globe: Material: Any Material Color: White, Cool White, Warm White Infill: 100% Layers: 0.16 or 0.2mm Supports; No Parts needed: Screws: 3 - M3x8mm Socket Set Screws 5 - M3x8 Button Head Screws LED style: LED Strip: https://www.amazon.com/dp/B098DVZZDQ?ref_=ppx_hzsearch_conn_dt_b_fed_asin_title_4&th=1 LED Puck Type Light: LED Puck Insert: https://www.amazon.com/gp/product/B01KWXCI3Q/ref=ppx_yo_dt_b_search_asin_title?ie=UTF8&psc=1 Rubber Feet: https://www.amazon.com/dp/B09XBMY5WJ?psc=1&ref=ppx_yo2ov_dt_b_pr Images:
-
- 1
-


