


gmrhodes13
-
Posts
31,198 -
Joined
-
Last visited
-
Days Won
1,067
Content Type
Profiles
Forums
Gallery
Articles
Everything posted by gmrhodes13
-
Firstly bubble lenses are only required for ANH Hero or ROTJ I don't recall anyone attaching lenses/glasses to help vision, not much room in there. Some information "I do seem to remember Troopermaster TM selling bubble lenses that were flatter at the point directly in front of the eye so there is less distortion."
-
I do find at times super glue although quick to dry does not handle knocks very well and can come loose again. I like to use a 2 pack epoxy glue, 5 minute, glue then tape in place, it's a little sturdier.
-
File Name: PS5 Controller Helmet Stands Designer: BricksByOskar Last Update: 19/078/2025 File/Link: Stormtrooper: https://makerworld.com/en/models/1713866-ps5-controllerstand-dualsense-stormtrooper#profileId-1818889 Vader: https://makerworld.com/en/models/1713825-ps5-controller-stand-dualsense-darth-vader#profileId-1818838 Mandalorian: https://makerworld.com/en/models/1713931-ps5-controller-stand-dualsense-mandalorian#profileId-1818967 Description:Recommended Print Settings Infill: 10–15% Layer Height: 0.2 mm Supports: Not required Key Features Star Wars-Inspired Design: A bold look that stands out in any setup Perfect Fit: Designed specifically for PS5 DualSense controllers Stable & Stylish Construction: Practical with an epic Star Wars aesthetic High-Quality STL File: Optimized for smooth and reliable 3D printing Compatible with FDM & Resin Printers: Prints easily on most setups Images:
-
- 1
-

-
File Name: Empire & Rebel Lamp Designer: Robert Last Update: 25/07/2025 File/Link: Empire https://makerworld.com/en/models/1631425-galactic-empire-lamp Rebel https://makerworld.com/en/models/1678847-star-wars-rebellion-lamp#profileId-1778344 Description: Beautiful table lamp with the Galactic Empire logo, there are two versions of the logo, one recessed and the other with un-recessed letters. The image shows the un-recessed version. You can find the LED lamp on aliexpress: https://a.aliexpress.com/_EwgnWUW Images:
-
- 3
-

-
-
 You need to add a link to your 501st membership profile, have a read through the first post in this thread
 -
3D Printed Rogue One TK Build Thread
gmrhodes13 replied to Platinum Lex's topic in Rogue One Build Threads
They are required for L2 and above, no idea why they aren't for basic as that is the connections holding them together. I doubt you would get basic approval without them. As I mentioned previously it's the "wings" of the chest and back plates which are angled outwards and won't allow the inner black strips to sit flush, you may be able to bend them to match up better. References -
I find nice thin coats is best, allows it to dry with little to no air bubbles, the thicker you apply the more the air bubbles which will show when sanding. Sanding and compounding is a slow process, I like to use water and wet and dry sandpaper, a drop of dish soap can help the paper to glide and not get clogged as much as dry sanding, once you get it just about flat go through with finer grit sandpaper, a compound polish at the end to get the shine back. Threads on ABS paste
-
Generally we leave E6000 24 hours to dry, BUT for any pieces under strain/stress leave for 48 to 72 hours. You may want to add some material and fill the gap in the lower ridge of your thigh It is a level 3 requirement, your GML may allow the gap but best check with him/her/them OPTIONAL Level three certification (if applicable): Lower thigh ridge joins (front and rear) shall butt-up flush against each other. Any gaps must be backed with ABS or filled as not to be noticeable. You can also take off the corners of your cover strips (as you can see in the reference above), this is done to stop the sharp corners catching on you or your undersuit.
-
File Name: Star Wars Stamps Designer: PJosh Last Update: 19/08/2025 File/Link: https://www.thingiverse.com/thing:7121667 Description: 7 Simple Star Wars Stamps 🪐Easy / Fast print (20 min per clips) 🪐6g of filament for per clip 🪐No support 🪐No Brim 🪐Easy to use Use a 0.4 mm nozzle with a 0.2 mm standard print profile. Nothing special. No support / brim needed. If you like and want to support my work, please download from Maker World and check out my YouTube Channel https://www.youtube.com/@PankratzBros https://youtube.com/shorts/UvYJXQZ-gSE?feature=share https://makerworld.com/en/models/1712213-star-wars-stamps Images:
-
- 1
-
-
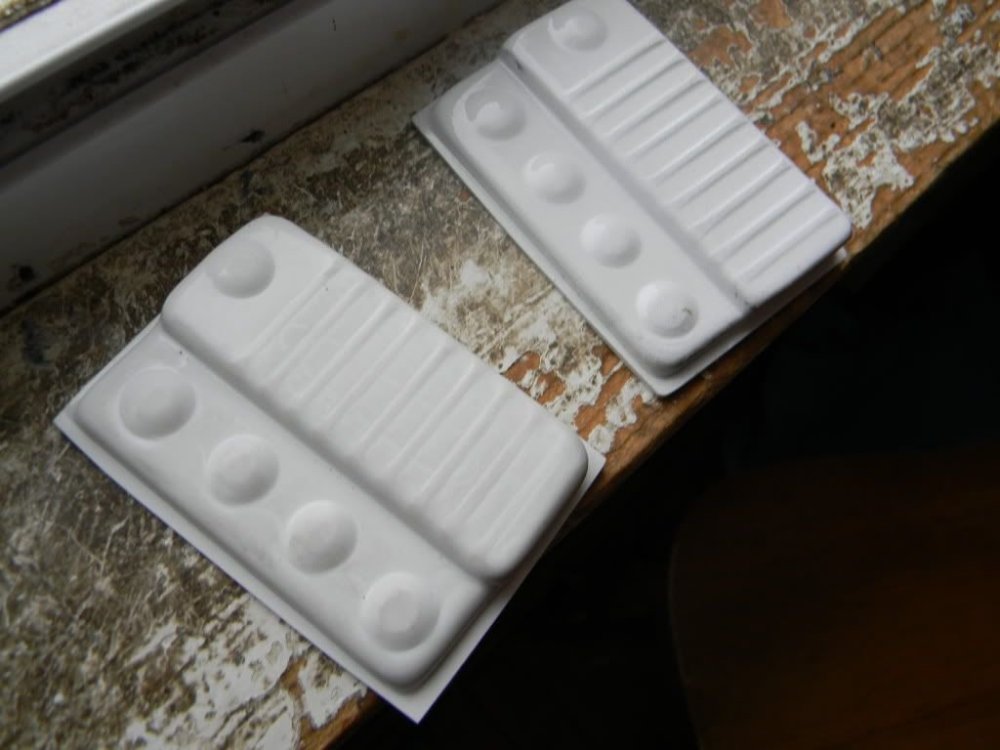
References Note: For Level 3 the paint does not extend to the bottom of the actual raised button. Below are two which have been glued to a piece of ABS plastic and the seam filled with ABS paste, the second with blade putty, I presume painted afterwards.
-
What browser are you guys using? I'm on edge on desktop and samsung browser on mobile, no issue to date.
-
Sha Sha's (Slow) KB FOTK Build for Short Troopers
gmrhodes13 replied to shashachu's topic in TFA Build Threads
Nice fit -
With elastic and snaps try to use a soldering iron or hot implement skewer or similar that you can heat to make the holes, this stops the snaps from coming out of the elastic. You can also add some E6000 around the hole prior to adding the snap. Doubling over the elastic can also help.
-
CRL Heavy Weapons Trooper
gmrhodes13 replied to TK-51103's topic in CRL's and check lists Quick access
May have been the only photos available when the CRL was first published All black -
TK 21020 ready for duty!
gmrhodes13 replied to SpudsMcKenzie's topic in Newly Approved Members - Sound Off!
Congratulations and welcome to the ranks trooper We have an awards program for troop attendances, you can request awards at certain milestones, info here Also here Also letter of commendations -
As the title says, lots of spam recently, all have been reported
-
- 3
-
-
ANH build: this is where the fun begins
gmrhodes13 replied to LoudDragon's topic in ANH Build Threads
I would lower the harness so it sits closer to your belt, can dig into your sides having it too high. You also don't need harness connectors to the armor as all the weight is held by the shoulder straps and side closures. Your forearm/bicep elastic should be higher, makes a difference to how they sit at rest Some use a hot water bath to twist the sniper plate, using lots of clamps and tape can also help twist the plate. Important is to get the sides to follow the ridge behind Looks like your strapping may have been loose I can see snaps, tighter strapping may be needed Boots need dark soles with no ridges Flat sole with a short heel. OPTIONAL Level two certification (if applicable): Boots have a black sole You will need to glue the front shoulder straps to the chest if applying for higher levels Shoulder Straps These shall be securely mounted in front and may free float in back. They may be affixed with rivets, Velcro, or adhesive. The rear tab of the shoulder strap is optional and may or may not be present. OPTIONAL Level three certification (if applicable): These shall free float in back. These shall be glued in front.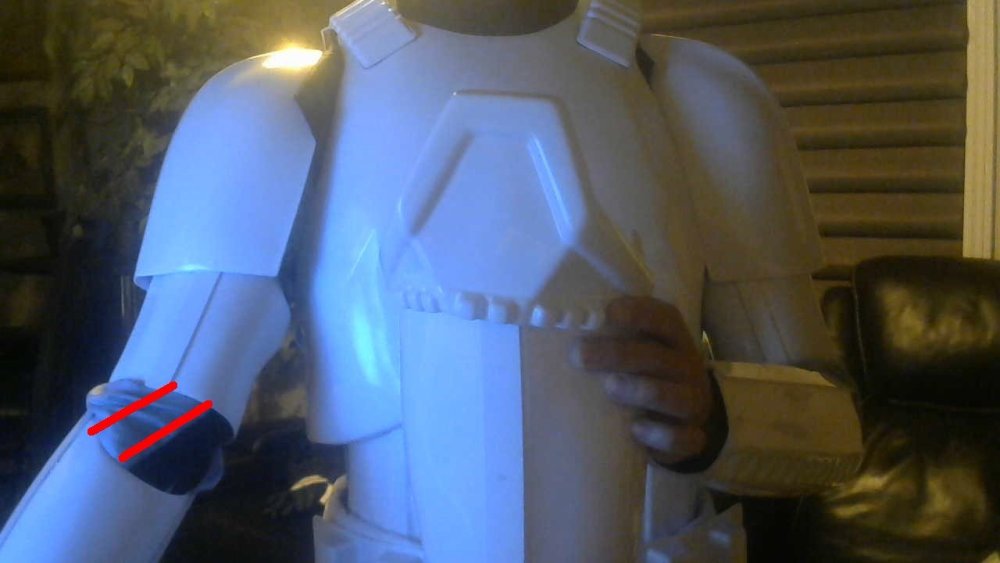
-
They look a little light, reference look more like a dark burgandy
-
A good place to start
-
I added a block of foam behind my abdomen, helps push it out so the sides meet up and don't overlap. Some add a tab system to the insides of the ab/kidney to stop it moving.
-
Reason we use elastic as it has some give when you move, bend, stretch. Doubling over the elastic with strengthen it's pull as well as using industrial elastic which is a little thicker than standard elastic.
-
Hello and welcome about trooper. You can keep a record of your troops in our Trooper Missions and Deployment area awards are issued at certain milestones, more info below And request letters of commendation here
-
Sha Sha's (Slow) KB FOTK Build for Short Troopers
gmrhodes13 replied to shashachu's topic in TFA Build Threads
My rubber gaskets are curved similar, they could have been a little wider at the base as they can pull out if I move my arms too far up, perhaps cut down in stages -
3D Printed Rogue One TK Build Thread
gmrhodes13 replied to Platinum Lex's topic in Rogue One Build Threads
Comparison with screen used armor Note how wide the angle of the lower wings -
Congratulations and welcome to the ranks trooper

