gazmosis
-
Posts
4,043 -
Joined
-
Last visited
-
Days Won
23
Content Type
Profiles
Forums
Gallery
Articles
Everything posted by gazmosis
-
Really nice work! I would consider a couple things. First, add some of your green magic goop to the screw that holds the arms of the folding stock to the hinge point. Shape it to look more like the round rivet head like the original. Next, I'd add some silver paint in the trigger group area. There was metal here that was never painted. You can do this when you apply Tino's weathering suggestion and lastly, grab a fine brush and paint black over the silver that ended up on the receiver body edge in the ejection port. This will give a cleaner look and make the charging bolt appear to be more 3D.
-

Microphone tips
gazmosis replied to Somatophylax's topic in Boots, Soft Parts, and other Accessories
From an appearance standpoint, there is nothing really "wrong" with any of the above mentioned mic tips. It is preferred that they be hollow all the way down (Trooperbay's are not), but if they are not, it's not breaking any rules. Mostly it's just a matter of preference and those bitten by the accuracy bug prefer the plastic/resin ones. -
Celebration 7 FISD Group Photos (or "how I need to learn to chill out")
gazmosis replied to Darth Aloha's topic in Off Topic
An honor to be there among such greatness! BTW.....who is the Lady with the beard? -
Ssssssssssssssnnnnnnniiiiiifffffffff! Ah the smell of plasti-weld. I am surprised you went that route using it as a filler. There are more flexible bondo options like micro lite. Most any bondo will crack if applied heavy on a flexing surface, but on this armor, the seams are so small and the bondo so minimal in the areas of flex that odds are low of issues occurring. We had no issues with any of the suits that were on Stage with JJ and the cast at Celebration. Can't wait to,see you suited up!!
-
A Less then Comfy First Helmet Build
gazmosis replied to Comfy Turtle's topic in Build Threads Requireing Maintenance
I would start by taking a bit more off of the round portion. You still have that flare out at the bottom that should be reduced more. Don't rush this. Like Mark said, look at both your gaps and the things preventing those gaps from closing. Always Mark what you are going to trim. Never just trim willy nilly. Important to remember that what you trim on the front side can/will affect what happens in the back. At the stage you are at, I would also decide the final location of your ear on your helmet and trace that. Stay in that trace line! Moving that ear, even a little outside that area, will affect how the ear fits. Good luck -
ANY local or big box hardware or paint supply store will have it.
-
Female Stormtrooper Armor
gazmosis replied to trooper96's topic in The Foundry - Armor and Prop Making
There is no need for apologies. What you did was in good intention and has it's place for an entertainment aspect. "You can't be told no unless you ask" We know more about you, you know more about what we do any why we do it. Best of luck to you! -
-
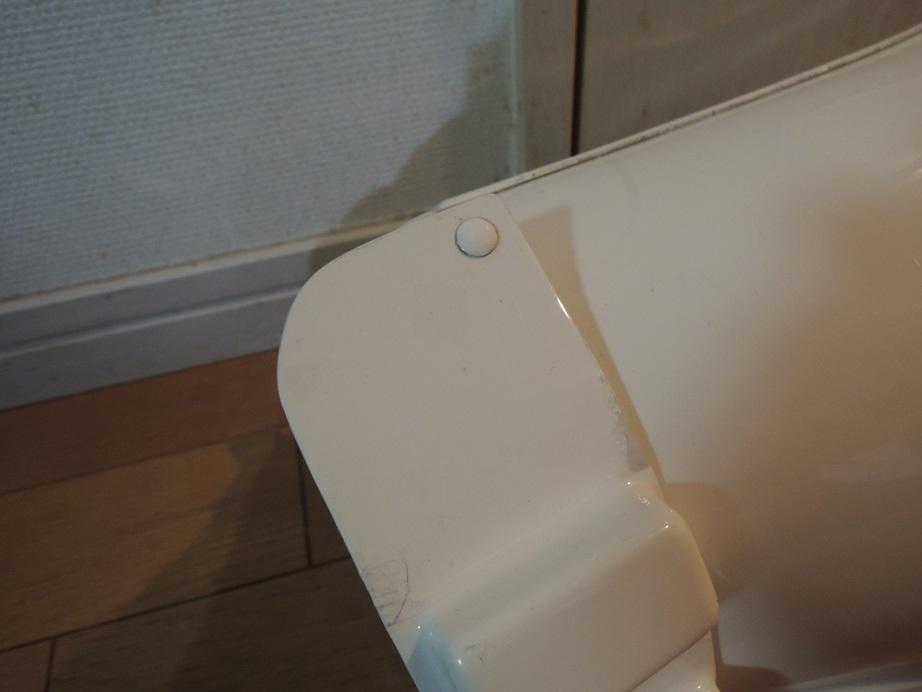
Thanks for getting on those pics and thank you for your application for Expert Infantry. Let's take a look at your armor!! CRL and EIB Application Requirements: All required photos have been posted. Although your armor contains all the necessary elements, with advanced armor accuracy badges, the weapon is just as important. Having a Hasbro converted blaster is OK, but the lowermost T-Track on the magazine side just above the folding stock needs to be removed and vent holes added. Here is an example: Get this taken care of and the badge is yours! Other-Armor Fit/Assembly: In this section, I will discuss suggestions made by your fellow troopers as well as observations I have made. These suggestions are for the purpose of improving the overall look of your armor. None of these will affect any application. If they would, it will be specified. Several people have mentioned your waist belt. See "Centurion" area for further discussion on this. I do want to mention your fantastic paintwork. This is always an accomplishment worth some kudos! I would think about tapering out the left side of the frown. Few if ever was this left as a blunt end. The positioning of the thermal detonator belt clips is good, however the screw placements could be moved. The top most screw should actually be very close to the top edge as seen here. In looking at the interior of your armor, I am very interested to learn what fasteners you used for the hardware on your left side seam. Centurion Suggestions: these suggestions are made based on what is seen in these pictures. More detailed photos in the Centurion application can show things not seen here. The armors ultimate accuracy is the responsibility of the individual. I said I was going into detail regarding your waist belt. Your cloth/canvas belt should measure 3 inches(77 mm) top to bottom. Matching this should be the vertical portion or ends of the plastic belt. They should then be trimmed on an angle to meet the horizontal run of the rest of the belt. This is a very small angle overall seeing as the belt itself rarely measures over 3 1/2- 3 5/8 (89 mm- 95mm). Your belt corners are trimmed at far too great of an angle. A new waist belt is strongly recommended here as well as a confirmation to make sure your canvas belt is not too wide. It looks like you left a little too much material off the back of the thigh pack on your right thigh bottom. The pack should be trimmed just behind the rivet point like this: Because of the amount you have now, you will probably need to re-round the bottom corner. You will need to obtain flexible/latex handplates And lastly, you will need a Sterling based blaster. Let me know if you should have any questions. Make that adjustment on your t-track of your blaster so I can get your EIB through!!! Nice work over all!

-
Darth Voorhees coming back home...
gazmosis replied to Darth Voorhees's topic in Hard Armor (General Discussion)
Way to go Lou!! Once you go White Armor.....you never go back!! -
TK-18421 Request ANH Stunt Centurion Status [ATA][162]
gazmosis replied to Barcode's topic in Request Centurion Status
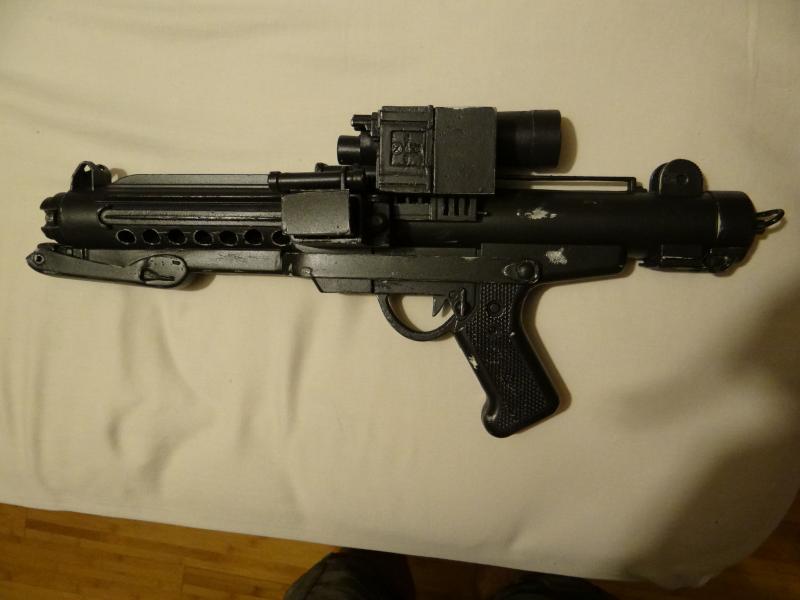
Hey there, Ben!! Thank you so much for your application for Centurion. Let's get right to it! CRL and Centurion Application Requirements: All required submission photos have been posted. The requirements to reach Centurion have been achieved and with that, I would like to congratulate you on your new Centurion badge!!!! *Note* any adjustments or corrections to armor prior to Centurion applications are preferably replaced by Centurion photos. The correction was noted on that particular picture so as to not create a contradiction with other photos. Other-Armor Fit/Assembly: Up to this point, the suggestions that were made in your EIB thread have been followed through. I hope you can see the vast improvement in the balanced look of your armor. Little adjustments can make a big difference and dropping your thighs and biceps just that little bit really evened the overall appearance. You are a taller, slender trooper.....not much can be done about that but you showed everyone what can be done with the armor. As long as you have that belt tightened, you will not have a side gap. Ironically, I just saw another blaster, recently, that had a similar issue with the folding stock positioning as Germain pointed out. I would at some point, take an afternoon to carefully re-position that. As the photo shows, the end of the folding stock is actually longer than the muzzle itself so this would do your blaster justice to move that slightly. It was an improvement to see that you separated the gloss of the grip with the flatter black of the rest of the trigger group. Much more authentic! Lastly, have you begun offering helmet painting classes? Congratulations again!! -
thank you good Sir!!!
-
Hey Ben: Can you please post a couple missing photos: Interior strapping, cod/butt connection, and button plate close up. Thank you
-
I'm telling you, you guys are the greatest. I can only pray the somewhere in my future that life allows me to remain here and meet you all again. Vern, dude, I cannot say enough about the well wishes and hopes for your well being. Everyone has tough times but no one deserves that. Good feelings coming your way,
-
Maybe the ones with the pauldrons are new sandies......there is a desert planet after all.
-
Chills Build - ANH Stunt (TM armor)
gazmosis replied to Chills's topic in Build Threads Requireing Maintenance
feedback! HA! Keep up the awesome work! -
AnjelRedemption's ANH stunt build (NE)
gazmosis replied to AnjelRedemption's topic in Build Threads Requireing Maintenance
You have a great start so far!! I do think, on your helmet, that you need to paint up to the top of the vocoder. Those ridges should be painted. On your torso, the kidney should be trimmed out to have to extra flashing. In the shot where you have the kidney aligned with the ab, the leg opening of the ab should be trimmed to run along side the ridge just above it. As you have it, the leg opening turns downward away from that ridge. See this pic here
-
Joe.Gravelle's TD build [AM] [T/MC]
gazmosis replied to TheDon's topic in Build Threads Requireing Maintenance
I would think about taking a bit more out of the eye openings and massaging down that right eye bump -
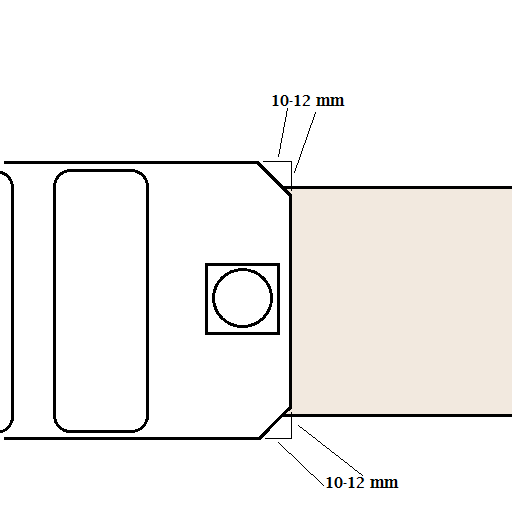
Hey Marc: Sorry again regarding the delay of getting to your application. Thank you, though for your EIB and you have been delayed long enough....(darn C7) CRL and EIB Application Requirements: All required submission photos have been posted. Your armor displays all necessary requirements for Expert infantry. With that, I would like to congratulate and welcome you to EIB!!! Other-Armor Fit/Assembly: In this section, suggestions by myself and your fellow troopers will be summed up. Many suggestions are made to improve the final look of your armor. If any of these would affect an application, they will be listed separately. As Germain pointed out this maker of armor doesn't come across the boards too often. It is clear to see the lineage, though. Nice work on the overall assembly and the armor fits you well!! Great work. In my absence, you have had some great suggestions from great people watching out here. Many of these, I see have already been suggested and addressed by you. I am sure you agree that the improvements on your blaster were one of the top things needed. It looks so much better now. The trimming of your side overlap made that right upper ab snap move right into position and looks like it will make for a better fit of your torso. Nice work on your helmet details!! Centurion Suggestions: I hope we will see a Centurion application from you here at some point. There are a couple things I would like you to follow up on before applying. The only part on your armor that I would like to see additional pics of is your waist belt. It almost looks like the outer most rivet covers sit in recesses. This was not the way the waist belts were done. They were just plain and flat in this area and the rivet cover sat on top...covering the rivet. Next is your thermal detonator. Your looks very long to me. The overall length of the thermal detonator should be in the neighborhood of 185mm. 20 mm end caps, 120mm center control panel and 12mm gaps between the end caps and center panel. You seem to have some extra space between your caps and center panel. I think your belt clips might be a little thinner as well so this could adding to the situation. Please confirm this. Lastly, If any of the adjustments you have made show clearly on any pics, please re-take these for your Centurion application. Especially full body pictures. Congrats again!!!
-
TK-73427 Requesting ANH Stunt EIB Status [ATA][457]
gazmosis replied to Coastertk's topic in Request Expert Infantry Status
Can't wait to see how things turn out -
As of right now, all indications show the armor to be correct. The final step in ANY armor being approved is up to the owner however. Just because the molds are approve able doesn't mean it will be built approve able.
-
It has been a long last three weeks here. The crowning Jewel of which should have been finally meeting my FISD family and putting faces to all the names , seeing all the armor up close, and hanging with the greatest troopers in the 501st at C7. However, I was forced to leave the party on Saturday night due to illness. After visiting my doctor the following Monday with a 102 fever, I found I had 1st stage pneumonia. I had made a post here just after Easter explaining that the week prior I was on a family vacation and off the grid. Right after I got back, I received the call of my dreams from Anovos themselves. I was invited to be part of the build of the TFA suits that appeared on stage behind JJ and the cast at C7. Because it was such short notice, I didn;t have the chance to explain here that I was leaving. Also, by agreeing to do so I was required to sign the "no disclosure agreement" and could not reveal what I was doing or where I was doing it. I called Eric on my way to said location from my car to let him know I was going to be away for yet another week, but could only give mild hints at best to explain why. We worked from 10 AM to 2 AM with short breaks for 5 days to complete the suits and had them packed up at 1:15 AM the Monday before Celebration. Needless to say, I never allowed the cold I already had prior to the project to heal itself and it sunk it's claws into me at C7. After the group shot and the parade, I went back to my hotel and slept for 4 hours. What a waste. I woke feeling worse than I did before. I have no plans on going anywhere soon. Reviews of Cent/EIB will be completed and all will be back on track. Again, to all those I met, please do no be offended. I was nowhere near myself. I pray dearly that I get another chance sometime in the future to redeem myself.
-
Sadly, just because something has the label "licensed replica" doesn't necessarily mean it's the right path. Master replica lids have long been claiming that it was created from a scanned film used helmet. However, the differences are many when placed side by side with an ACTUAL screen used one. If you are going the route of combining armor you are making (if I understand you correctly) with a different helmet, you are much better off getting something through an armor maker here and just combining it with yours. Now, is all the trouble you are going through to make your own armor JUST FOR YOU?? If you have ANY intent on distributing your armor here or anywhere, you will need to sculpt your own helmet. IF this is indeed for your use only, just make sure to give due kudos to whomever's helmet you use.
-
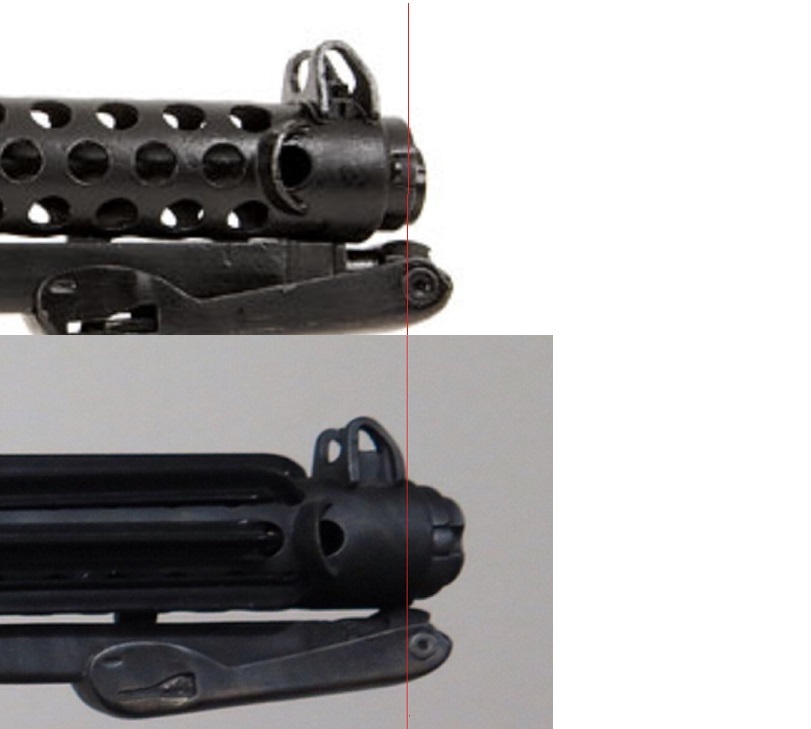
Hey there, Juan!! Terribly sorry for the delay on this!! so without further delay, lets get to this. CRL and Centurion Application Requirements: All required photos have been submitted. This fabulous armor contains all necessary elements and has earned this Centurion badge!! Well done! Other-Armor Fit/Assembly: To get to this point, there really isn;t all that much to comment on. Your fellow troopers and myself agree this armor is a masterpiece. You and this set were destined to be together and the blend of the HDPE colored RS lid with this armor really gives authenticity! I think it would clean up your side to get some better quality white paint on your side rivets. The only other thing I could bring up is something that has been perplexing me since your EIB. The finish and weathering on your blaster are the sign of a true artist. Well done. Something just seemed "off" to me and after looking it over I finally figured it out but still don't know how it happened. In this pic, I put a real Sterling on top and yours on the bottom. I drew a reference line in Red through the hinge point at the front of the folding stock. Looking at your blaster's main body, all the points seem correct. Did you shorten your stock length for some reason? I am just bringing this up should someone else notice this. I am not requesting a fix here. I'm not sure how one would be accomplished even if I did. Thank you again, Juan, for this great addition to the Centurion database!!
-
standing and applauding!!!