gazmosis
-
Posts
4,043 -
Joined
-
Last visited
-
Days Won
23
Content Type
Profiles
Forums
Gallery
Articles
Everything posted by gazmosis
-

Do u guys think this will pass inspection ?
gazmosis replied to TKedt's topic in Build Threads Requireing Maintenance
Imperial bar codes....very interesting! HA! -
The new TFA troopers will not get holsters. The only holstering mechanism is the hotter clip mounted on the right thigh. The blasters would have nubs that fit into slots. Kind of like how a picture slides onto a nail. I have seen this with a smaller pistol type weapon. Never with the full size. As of right now TFA owners will either need to make their own or use their E11. No one has officially signed on as a TFA blaster maker.
-
Trooping issues and Solutions for the TFA armor.
gazmosis replied to captsafe66's topic in TFA Stormtrooper
The biggest hurdle is determining what to and WHAT NOT TO trim. You can never assume even though some parts scream that it wants to be trimmed in one place when it's really another. Research and photos are critical. Once the parts are properly trimmed it goes together fairly well. Then comes the bondo. Like stated, you need to Be patient with this one -
NE TrooperGear ANH Stunt Build (First Build)
gazmosis replied to jhpeyto's topic in Build Threads Requireing Maintenance
Your forearms do have ridges but only on top. The underside should not. Align them at the elbow side. The wrists will be flush with no return edge. Just flat across the front. The biceps will align themselves regarding what halves go together. Just make sure the one with the "thumbprint " is on your left arm -
TK-73427 Requesting ANH Stunt EIB Status [ATA][457]
gazmosis replied to Coastertk's topic in Request Expert Infantry Status
Mr. Jay!! Thank you for your application to EIB! Let's waste no time and get to it! CRL and EIB Application Requirements: All required photos have been submitted. Your armor contains all necessary elements to qualify for EIB. With that, I would like to congratulate and welcome you to Expert Infantry!!! Other-Armor Fit/Assembly: In this section I will discuss observations by both your fellow troopers and myself that are suggestions to improve the overall final look of your armor. These suggestions will not affect any application. Those that do are listed in the above or below sections. First I want to commend you on some great custom armor work. This is an example of just how seamless shims can be added with a little time and patience. If you said nothing, most could not even tell they were not there originally. Well done, Sir!! A nice, solid overall build. I want to both commend and comment about your paintwork on both your helmet and ab buttons. The buttons I will discuss further below. Congrats on this accomplishment. Hand painting these details can be stressful if you are not used to it. Small details, however, can make a BIG difference. Although I am not requiring a change here, I truly believe a little alteration can go a long way towards improvement. The black that outlines the details on the tears and traps should be a minor pinstripe at best. This is harder than it looks to accomplish. Yours are good. Have I seen and prefer thinner? Yes. What I am suggesting is a slight alteration of the shape--specifically the tops of the traps. You have them very boxy and angled at the top corners. This should be more rounded. This is an easy alteration with a brush dampened with thinner. Round off the corners and touch up with black. Done. While you have the brush and thinner out, you can try to even out the outline of the left ear. The next thing are the tube stripes. Although your positioning and shape are right on, I have just never seen them left so short. I thumbed through a ton of pics from screen grabs to archive stuff and could not locate a helmet where the tube stripes didn't go almost to if not touching the ridge at the corner of the frown. This doesn't mean it doesn't exist. But in the striving for Imperial conformity, adding a few stripes will greatly improve your helmet's look. The only other thing is the charging handle on your blaster. Over weathered?? This is typically a tad darker. Centurion Suggestions: Although I attempt to spot and suggest things that make passing Centurion easier, the application requires a more detailed set of pics that can reveal things not seen here. The final product is ultimately the responsibility of the trooper. Ok, I said I was gonna mention some additional paint concerns. Although the ab buttons are molded a bit over sized, I would like you to touch up yours to be just a tad larger. They should be right around the 12 mm mark. You may not think that increasing them by a mm or 2 will make that big a difference, but it does. The next thing are the vent stripes on your rear traps. These were never painted all vertically and aligned parallel with each other. Although the center ones were, as they went outward, they began to gradually angle to follow the shape of the trap sides with the outer most stripes being the near the same angle as the trap edge itself. This next item is gives me gray hairs to discuss. It requires some work and knowing how hard troopers have worked to get this far makes me squeamish to discuss. I am referring to the cover strips on your thigh backs. We all know that these should measure around the 25mm or a bit less range. The only real way I can see that a strip as wide as you have would be necessary, is to bridge a gap made because the thigh just wasn't big enough. If this is the case, with your ABS paste skills you showed on your side shims, why not do that on the thigh backs? If there was enough material left to make the halves come together and the width of the strips were determined by the molded ridge, the strips need to be reduced in size. The molded ridge widths are to be determined by the cover strip width...not the other way around. I know some troopers are larger and need extra material to join parts. Cover strip widths should remain the same. Let me know if in fact you have a larger gap that needed to be covered. Congratulations again on a great build and well earned EIB!!! -
TK-69323 Requesting ANH Stunt EIB Status(ATA) [456]
gazmosis replied to sylverbard's topic in Request Expert Infantry Status
PM me when you have posted these, please. -
TK-69323 Requesting ANH Stunt EIB Status(ATA) [456]
gazmosis replied to sylverbard's topic in Request Expert Infantry Status
I cannot put you into the EIB database without an action shot. just so you know -
TK-69323 Requesting ANH Stunt EIB Status(ATA) [456]
gazmosis replied to sylverbard's topic in Request Expert Infantry Status
OH!! Even better!!!! go ahead and get those up as soon as you can. -
TK-69323 Requesting ANH Stunt EIB Status(ATA) [456]
gazmosis replied to sylverbard's topic in Request Expert Infantry Status
Hey Mark! Thanks for getting on these updates! Somehow in them, however, the full body shots disappeared. These need to be part of the original application. I saw that you had made some of the Centurion updates as well. Keep that going! I did add something on my original assessment in the "Centurion Suggestions" section. Look at the pic of the screen used helmet on the left compared to yours on the right and note the position of the tube stripes. These need to be relocated to sit about a pencil width away from the face on the cheek tube. I think with a ittle patience, you can make these a little more even as well. Keep up the great work so far and welcome to EIB!! -
Stormtrooper Social - Star Wars Celebration - 4/18/15
gazmosis replied to Pickles's topic in Announcements
Im in with the wife! -
Plasticine sculpt and plaster question
gazmosis replied to Sonnenschein's topic in The Foundry - Armor and Prop Making
whichever plaster you use will likely build a lot of heat and melt the sculpt material and make it really hard to get out of the mold undamaged. Can you use silicone as your mold making material? -
TK - 18421 Requesting ANH Stunt EIB Status(ATA)[455]
gazmosis replied to Barcode's topic in Request Expert Infantry Status
Hey there Ben!!! Thank you for your application to Expert Infantry. Yet another great example of a quality, ATA build. Let's take a look! CRL and EIB Application Requirements: All required pics have been posted. (thank you Tim for your guidance) Your armor display all necessary requirements for EIB. That said, I would like to congratulate and welcome you to Expert infantry! Other-Armor Fit/Assembly: In this section, I will discuss observations and suggestions made by your fellow troopers and myself. These are made as suggestions to improve the final look of your armor. These will not affect any application. This build is another example of how our hobby is not a one size fits all world. Not everyone is 5' 10". This said, taller troopers, as yourself, have a few options when it comes to "extra" space created by longer arms and legs. Clint had made the suggestion that perhaps Your thighs could be lowered just a but to balance out the knee gap. Man, this is a tough one because the way your thighs fit against your ab is just beautiful. If you were to lower them, I wouldn't go too nuts there and just drop them like 3/4 " (20 mm) at most. The other extended portion is below your biceps. It is not a requirement to have your strap go across your bicep. In fact, aside from the use of the bicep hook on Han's armor, few troopers had anything attached to the biceps and they just floated. I can't tell if you have bicep hooks. If not, let them drop a bit and as long as you can bend your arms comfortably, this gap will be lessened. Now to pick...MUHAHAHAHAHAHA! I am surprised that you went a little wider with the cover strips on the back of your arms than the front. These should both be the same (around 15mm) and don't get why you chose this way? The backs of the thighs and shins can be a tad wider so I don;t know if this was just a mis understanding. The other two issues are with your blaster. First, the pistol grip should be the only thing painted gloss black. The rest should match the color of the main blaster and CAN have a little silver to represent the non-painted areas of the trigger group. Next, the stop clip on the underside of the main body just in front of the butt cap is backwards. The arm on the inside should angle up towards the butt cap. This was used as a prevention measure so the butt cap didn't fall off unexpectedly. The lever was pressed on the one side allowing the "t" section to drop. This allowed the butt cap to be pushed in far enough that the locking tabs could follow the tracks and be twisted for removal. Without depressing this, the butt cap moved forward only slightly to engage the tabs on the folding stock to lock it into place. You can also see the silver portions around the trigger I mentioned earlier. Joe and you were both right. When the handpainted details are NAILED like you did on your helmet, this makes my socks go up and down!!! Just incredible work on those!!!!! Centurion Suggestions: Although nothing shows currently, Centurion applications require a more detailed set of pictures that could show something not seen here. Ultimate Centurion requirements are the trooper's responsibility. The only suggestions I have is to try the thigh and bicep adjustments. If they work out, take and submit those pics on your application. Congratulations again!!! -
TK-9369 Requesting ANH Stunt EIB Status(ATA)[515]
gazmosis replied to Draco's topic in Request Expert Infantry Status
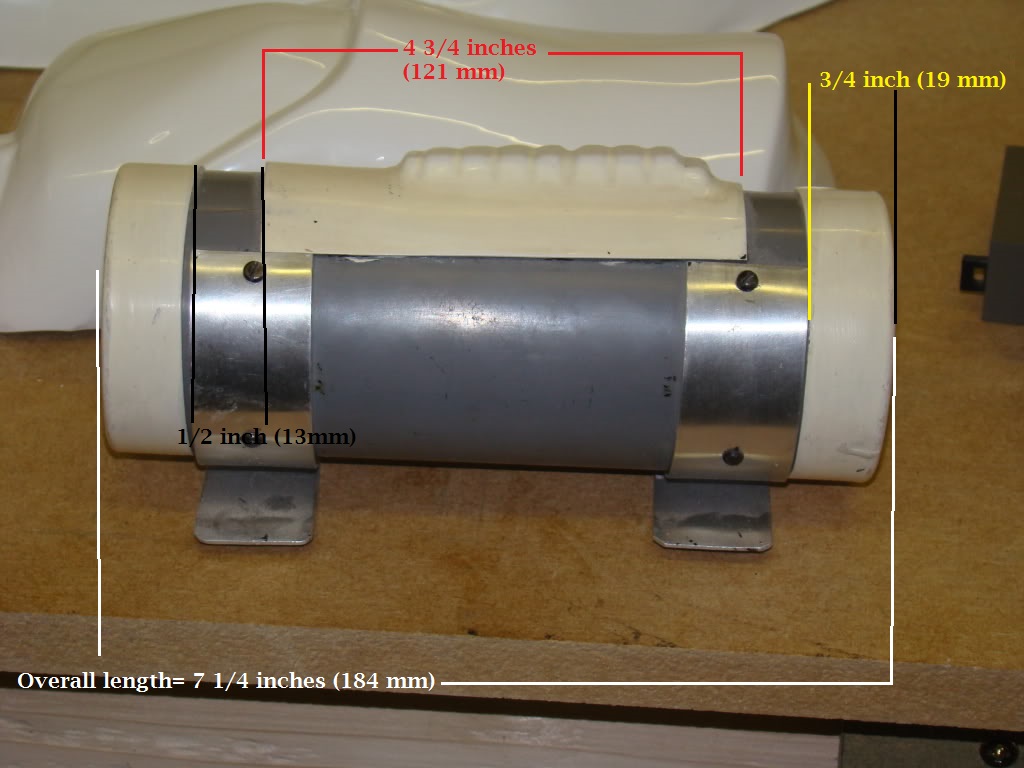
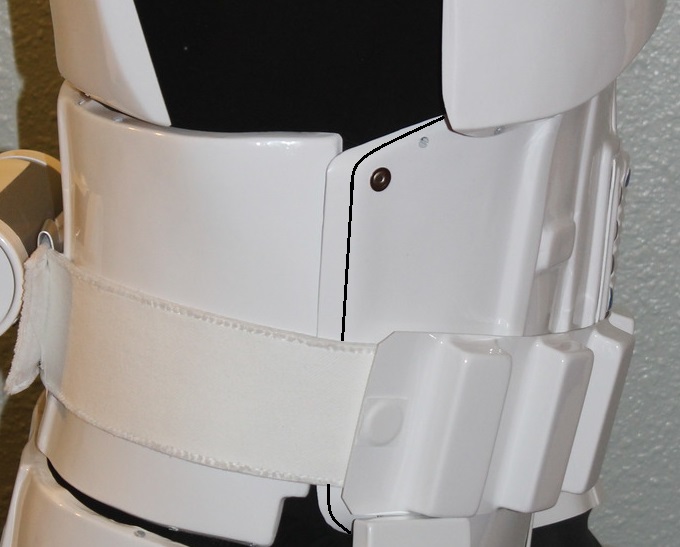
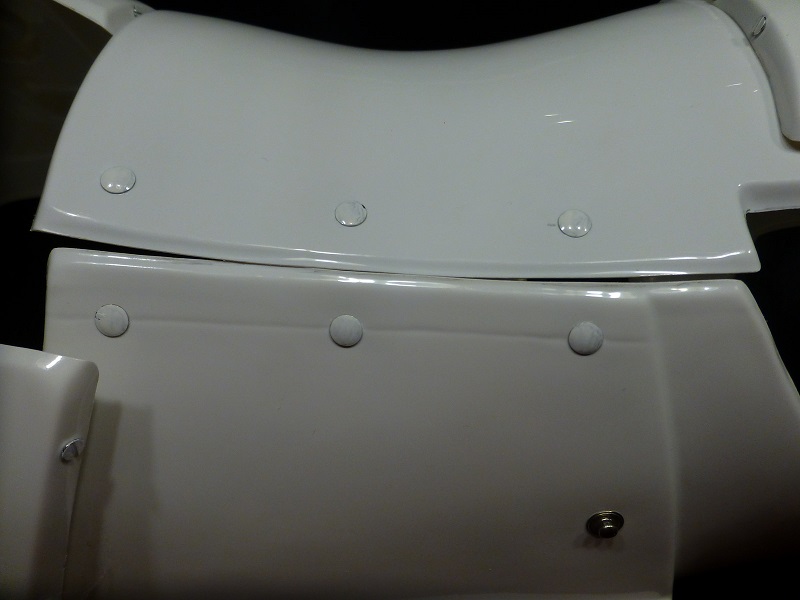
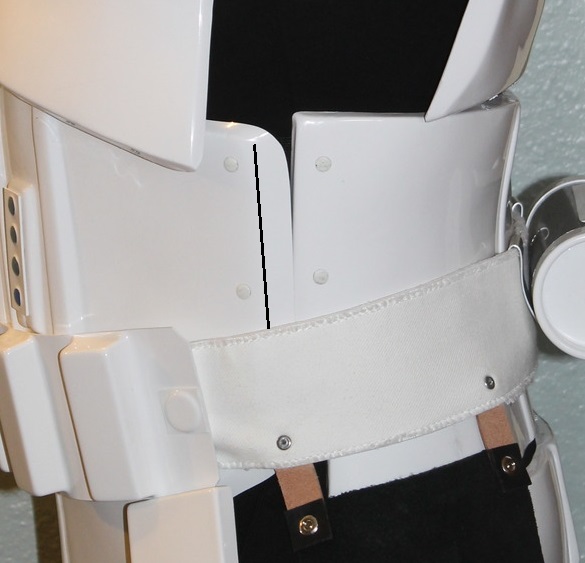
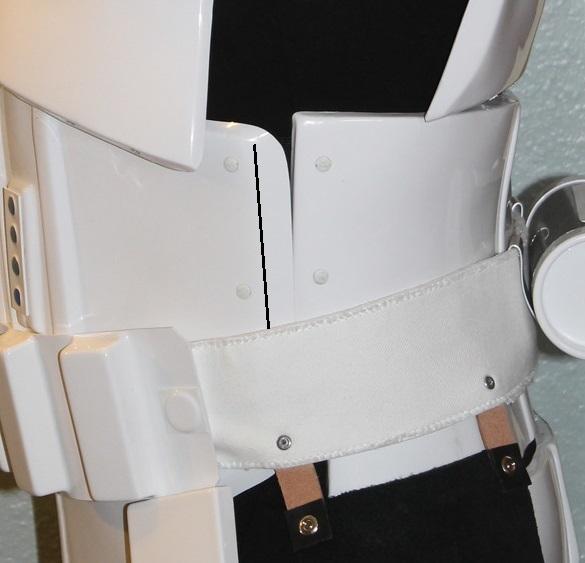
Hey there, José ! Thank you for your application to EIB. You have a nice base build. There are several things we need to go over so let's get to it. CRL and EIB Application Requirements: All required photos have been submitted. There are a few items that will need to be addressed before I can put your EIB badge through. First, your calves need to have the opening face the inside of the leg. not the outside as you have it. There should also be cover strips installed as part of the closure. This is a basic 501st approval point so I would fix this one right away. Next, The center button plate on your abdomen is designed to sit ON TOP of the raised stage molded into the ab plate. Although there are armors like RT Mad and even the old FX that have the plates molded directly into the ab, they still give the appearance of the plate on top of the stage. The good news here is that a new plate will cover the hole. You can clearly see in this pic the plate mounted on the raised stage. Next, The sniper plate mounted to the top of the left shin should be glued and not attached by rivets or any other external hardware. The last thing is your small belt pack or per pack mounted to the lower, right thigh. The attachment points should be in the upper corners not in the center. I marked where the rivet should be located. thanks, Tony for bringing this and the sniper up. Once you get this rivet re-located, make sure you paint it white. Lastly, your thermal detonator looks very long to me. Here is a general base to what the parts should come close to measuring to get to the approximate total length of 7 1/4"- 7 1/2" (190 mm). Can you show this next to a measuring tape so we can see if it is long or just my eyes playing tricks on me? I realize this might seem like a lot of work, but I am sure you can handle this. Please ask if you have any questions!! Other-Armor Fit/Assembly: In this section, I will go over suggestions made by both myself and your fellow troopers. These suggestions are geared towards making the overall look of your armor more awesome. These suggestions will not affect any application. Those are listed above and in Centurion Suggestions below. Like I said, you have a good base build. Good, clean lines and well adjusted to your body type. Nice job on your hand painted details. I think the black outline in your tears below the eyes is a tad thick but acceptable. Some may be looking at the amount of your tube stripes. I'm not sure where you got your decals from, but typically we see a bit of a tighter pattern resulting in a few more stripes per side. But 9 falls into the acceptable range. A mention was made regarding your shoes and the thickness of your soles. Have I seen thinner? Yes. But as long as this isn;t too thick and the heel not tall, these are fine. No seams in the front. Centurion Suggestions: Becasue a Centurion application requires a more detailed set of photographs, not everything can be seen here. I do my best to provide suggestions that will make your armor passable for Centurion, but since all details are not seen, the final product is the trooper's responsibility. Now, a few things will need to be addressed before applying for Centurion: We talked earlier about your center button plate and I need to mention the side one. This needs to be trimmed so that the buttons are a flat plate the sits on TOP of the molded platform not covering it....like this: -You will need to change out your plastic handplates for latex/flexible ones -though not seen often any longer, you have a strap that connects the back and chest at your side. This is acceptable, but needs to be mounted high so as not to be seen against the armor. This will mean changing it to black. IT will work just as well. I have this on mine . -A split rivet will need to be added to the cod portion of the ab plate. It does not need to be functional, just present. -There should be three (3) split rivets placed from top to bottom on the both the ab and kidney plates along your left side seam. (6 total) They should be located in this configuration. Note the the spacing and location.The "starburst" pattern on these rivets should be ignored in favor of the plain, 8 mm head split rivet. These were functional as they were used to attach the elastic that held the ab and kidney plates together as you can see in the picture. Only the top 4 were seen as the belt covered the bottom 2. This pic also shows two other things that are part of necessary changes to your armor. First is the square notch below the bottom rivet on the kidney. This will need to be on yours. The second is a male snap located on the lower portion of the ab. This snap was used to attach the waist belt to the ab plate. Something I do not see on your armor. Now, this snap is not required, but is is a full proof way of attaching your belt to your ab to prevent the droop of your belt. The top of your belt needs to rest against or slightly overlapping the bottom edge of the button plates. -the next 2 items are related: the HUGE amount of overlap you have on your sides and the three rivets I see connecting your kidney with the ab on your right side. As you saw in the pic above, the ab and kidney parts should meet at your sides with no overlap and should be butted against each other to form a single seam. I realize that the ATA armor is much bigger around than you are, but you can still make this work. The first thing you need to do is remove the rivets that are connecting the two pieces. Next, center the molded area on your back and butt to align. Now loosen the kidney so it is comfortable and you can get a finger between the kidney and your skin on your back. Now with a pencil, trace the ab edge onto the kidney and trim along this line. We have already discussed the proper rivet placement on your left side, but there are NO rivets on the right. Only a single, inward facing male snap should be installed at the top corner of your ab. The connecting strap with the female half of the snap is attached to the inside. You can see that in this pic:You can also see the other male snap used to connect the belt to. - The square plates with the round portion in the center mounted at the ends of your plastic waist belt are rivet covers. These were used to hide the rivet that attached the plastic belt to the canvas belt. IT seems that you haven't used any means to attach the end of the plastic belt to your canvas one and as a result, you have some pretty good outward flare on the ends. The belt should be tight to the body. There are no requirements on how to accomplish this other than the hardware NOT BEING SEEN on the outside of the belt. -You will need to install interior belt boxes that insert into the ones you have. - Lastly, There should be no overlap or at most minimal of the back over the kidney. A slight strap adjustment over your shoulders can raise your back up and solve that. You do have a little work ahead of you. We are here for support and to answer and questions you may have. This may seem like a lot, but we are truly on your side.

-
Drilling through triple canvas WITH plastic inside?
gazmosis replied to bigtrev503's topic in Assembly, Mods, and Painting
Use a large nail pounded through. Drilling you risk the canvas getting caught up on the bit. If you can get a leather hole punch, even better -
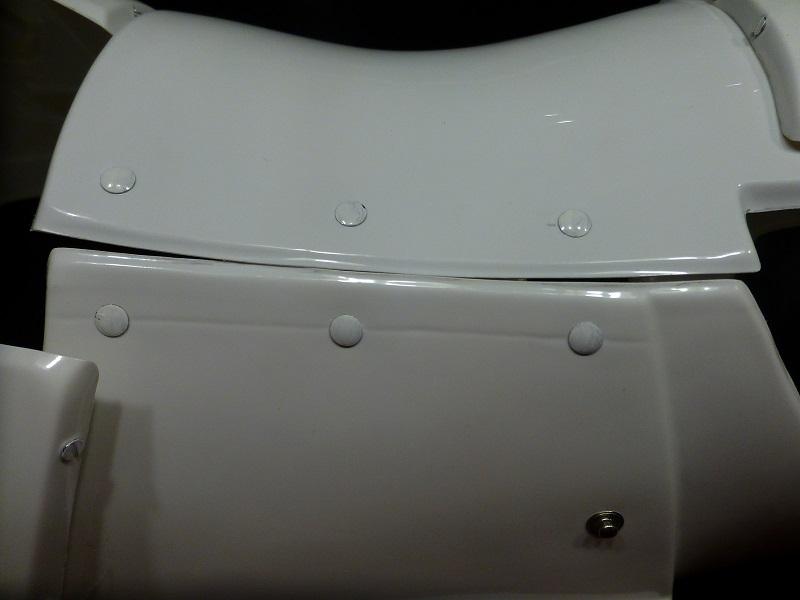
YOUR forearms have the same number of dents (11). Other armors like AP have the same as yours, others like TM have 11 on the left and 12 on the right. Yes, your right forearms is a different shape. The original forearm from the original suit your armor was made from (Loooooooooong story) was lost and resculpted. Having two thumbprints will not prevent you from getting Centurion. The original suits indeed only had the indent on the left. but this is not a recognized feature to prevent accuracy badges from being awarded
-
TK 10963 Requesting ANH Stunt EIB status(AM)[453]
gazmosis replied to justjoseph63's topic in Request Expert Infantry Status
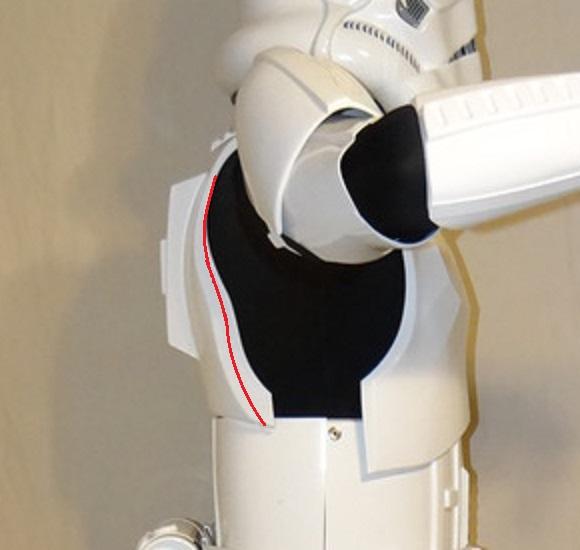
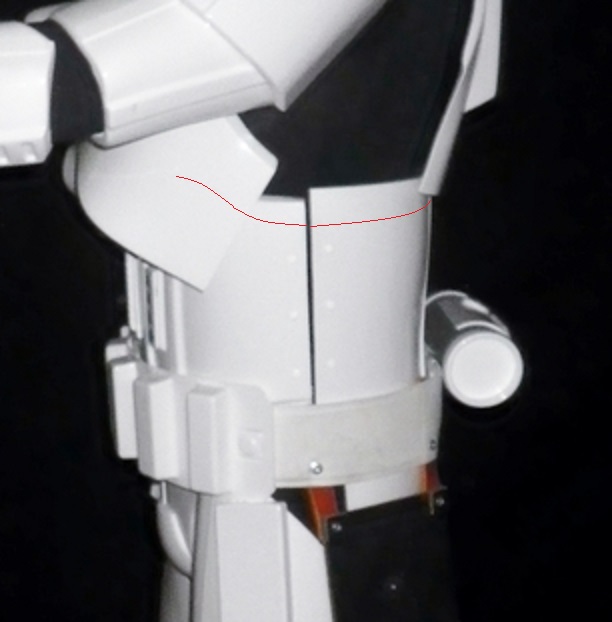
At last, Joseph!! Thank you for your application to Expert Infantry!! We have a few things to go over so lets look at your fine build!! CRL and EIB Application Requirements: All required photos have been submitted. Your armor displays all necessary elements to qualify for EIB. With pleasure, I both congratulate and welcome you to Expert Infantry!!! Other-Armor Fit/Assembly: In this section, suggestions by myself and your fellow troopers are made to improve the overall final look of your armor. Unless specifically stated, these suggestions will NOT affect the outcome of any application. Items that CAN, will be listed below in "Centurion Suggestions". Very nice work on your overall build. Your armor seems to fit well and looks comfortable. Very nice paint work on the helmet details. This is never easy. At times, wearing your armor correctly is almost as important as building it correctly. There was a concern regarding the placement of your arm parts and I agree that they are a bit out of alignment. With your arms hanging at your sides, the molded ridge on your shoulders should align with the MOLDED ridge of your bicep, and the molded, square indent ridge should fall into close alignment with the molded ridge of your bicep. I question the position of your shoulder bridges. Almost never is there the amount of chest material you have showing on the shoulder side of the bridges. They seem to be mounted too far toward the neck side. This is something regardless of application, I would strongly suggest moving to be more centered. Your chest should not be flying so outward when raising your arms or anytime for that matter. I would install some chest to ab or back to ab straps to keep this "reigned in" as Tony suggested. If you do a back to ab strap, make sure you install it high enough above your sides so it is not seen. In the future, it would save you gluing hassles by leaving the extended material around the center ab button plate. If you upgrade this, just make sure the edges do not exceed the curved edge of the base "stage". Centurion Suggestions: Joseph and I spoke at great length regarding the "updated" AM chest featured on his armor here. The updated chest includes a much softened set of molded details on the chest compared to hard lined edges on the previous version. Although this is more correct, these softened details are still on the original AM chest shape mold which is the main reason for its ineligibility for Centurion. The back plate Joseph has here is great, though! Updating this chest would still be necessary but this would also solve your shoulder bridge issue. I would still consider this. You belt has a bit of a low position in front. It needs to be positioned touching or slightly overlapping the bottom edge of your button plates. Your left side rivets are a little bunched. However, your kidney and ab plates are a little taller than other armors. The top edge of the AM ab plate does not have the slope from center to edge compared to other armors like the RS ab pictures here This can be remedied with a little work. I marked in red a possible trim line. Although you would need to replace the male snap on the opposite side, this would bring your left side rivets into a better position. It would also solve the next issue and that is the overlap of the back plate onto your kidney. Trimming these parts would probably require some work with a hobby iron to replace the return edges, but in the end I believe it will be worth it. You will need to replace the large snap on the cod with the same split rivet you used on your ab and kidney seam. Lastly, your thermal detonator seems large to me. I am aware that the AM center control panel is cut a little close on the right side, but there should still only be a 1/2 -5/8 " max gap between the end caps and center control panel giving an overall length to your detonator of 7 1/4- 7 1/2". Please show a measurement of yours or if it is indeed long, you'll need to do some trimming. I know you have a bit of a road in front of you but I am confident you will nail this. Congrats on your EIB again!!!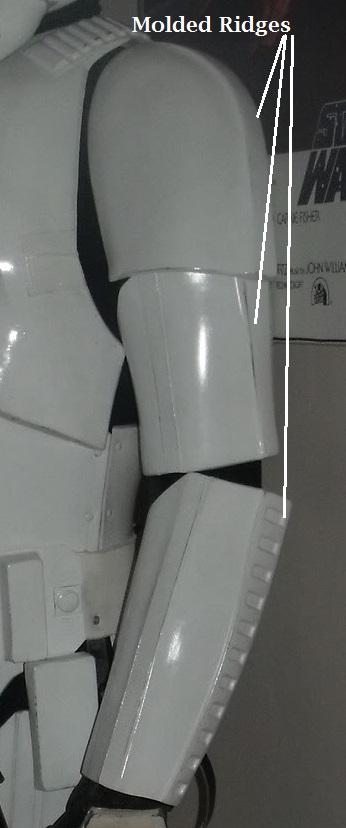
-
Hey there, Layne!! I totally agree...MTK has a fine set of armor and with his continuing improvements in accuracy, I feel we will be seeing more of this very soon! Builds like yours will help this along! Let's take a look!! CRL and EIB Application Requirements: All required photos have been submitted. Your armor displays all required elements for EIB so with that I would like to congratulate and welcome you to Expert Infantry!!! Other-Armor Fit/Assembly: In this section, I will go over suggestions from your fellow troopers as well as provide my own that go towards general improvements in the overall appearance of your armor. These suggestions will NOT affect any application unless specifically stated. It is great too see another application where there isn't a whole bunch to comment about. This is a great, well detailed build that will serve you and your Garrison well. Your paintwork on your helmet came out great. I like to make this observation for I know first hand how difficult handpainting these details correctly can be. If I was to make a suggestion for improvement that doesn't affect any application it would actually be to your blaster. The power cylinder wires you have we've seen before on RS props blasters. However, these type of heavily coiled wires are a bit enthusiastic. If someone was to have these wires, the coils should appear a bit more modest. Centurion Suggestions: Because Centurion applications require a much more detailed set of photos, issues may come up that go unseen in EIB applications. Before you apply, Layne, I'd like to see a couple of adjustments made. First, re-take the pics showing your sides and make sure your belt is tight to eliminate that side gap on your left. Second, The cover strips on your thigh backs will need to be trimmed back if you intend on keeping the lower portion the way it is. (many trim this portion back for better mobility) The cover strip cannot exceed the lower ridge. The last thing is the elastic band over your shoulder bridge looks more like a hair tie than the flat elastic that really should be there. This is more what I would like to see: Nice all around work, Sir!! Congratulations again!!
-
TK-65535 Requesting ANH Stunt EIB Status (AP)[451]
gazmosis replied to bearings's topic in Request Expert Infantry Status
Hey there, Ben! Thank you for your application for EIB. Yet another fine example of the possibilities that can be reached with AP. Let's look at this!! CRL and EIB Application Requirements: All required photos have been posted. Your armor represents all required elements for EIB. With that, I would like to congratulate and welcome you to Expert Infantry!!! Other-Armor Fit/Assembly: In this section, i will summarize observations and suggestions from both myself and your fellow troopers. These suggestions are made to improve the overall appearance of your armor but DO NOT affect any application unless specifically noted. This is just a great, clean build. Nice fit, nice lines. Well done. Updating the small, AP thermal detonator with the correct TM detonator was a nice move. Your clips and the small gap between them and the end caps were brought up. Would I prefer that there were no gap? Yes. However, the gap that is there falls under the "minimal" gap description in my opinion so t is fine. Your incorporation of the original strapping brackets were a nice touch as well. I wish I had more to comment on, but in this case no news is good news!!! Centurion Suggestions: It needs to be made clear that your EIB application is EIB and your Centurion application is Centurion. There are a different and more detailed set of photos required so other details may surface that weren't seen here. I would advise you to take pictures that feature your armor larger in the shot. I have no improvement suggestions that I can see off the top. Just make sure all the necessary pics are present. Well done again and congratulations!!!! -
Cover Strips/Finishing Strips
gazmosis replied to SkyyDragon's topic in Assembly, Mods, and Painting
Are you referring to the actual thickness of the plastic or the measurements of the finish strips themselves? -
Can I ask a really stupid question? Aren't you holding it??
-
MP 40 Ammo pouch DIY
gazmosis replied to TK-Sonic's topic in Boots, Soft Parts, and other Accessories
Foam is not an accepted option for approval. I'd hate to see you do all this work and not be able to be approved. -
I would check in if I could. The forest of southern Illinois has almost no service where I am going.
-
TK-69770 Requesting ANH Stunt Centurion Status [ATA][160]
gazmosis replied to DarkOrder66's topic in Request Centurion Status
THAT'S the way those parts should look!!! That belt is fantastic and thank you for making these upgrades so quickly, Chris. Troop proud in your newly upgraded CENTURION armor! -
TK-44228 Requesting ANH Stunt EIB Status (RS)[450]
gazmosis replied to Lidocaine's topic in Request Expert Infantry Status
LUKE!!! LUKE!!!!! I'm shutting the power down!! I'm sure you've never heard that one before!! Anyway, thank you for you EIB application and another great set of RS! CRL and EIB Application Requirements: Awesome application. Thank you! All pics present and in order. YOur armor contains all required elements to qualify for Expert Infantry. With that, I would like to congratulate and welcome you to EIB!! Other-Armor Fit/Assembly: Normally, this section is to make suggestions towards an overall improvement in the final look of your armor. The only think I can suggest here is to tone down the gold paint on your scope. Acrylic paint works really good for this. Centurion Suggestions: I am not sure if you or RS constructed this suit. Either way, I understand the luxury of being able to "grow" a little in your armor which is typically why the extra material is left on the sides. However, the hardware in these locations should still represent their proper positions. I am not sure if you truly need this extra material. I see overlap on your one side. If you are able to tighten the belt and have your kidney sides meet the suggested trim lines I painted on your pics, I would strongly consider making this adjustment.. This is an example of the positioning I am looking for: Congratulations, Luke!! Great to see another one of these sets making the Legion look great!!!
-
TK-24218 Requesting ANH-Stunt Centurion Status[AM][159]
gazmosis replied to fuumantroop's topic in Request Centurion Status
ANDREW!!!! Thank you for your Centurion application! Having shared most of your upgrades with me, I knew this day was coming soon. Let's look at your final product! CRL and Centurion Application Requirements: All required photos have been posted. The original AM back and chest were replaced by upgraded accurate parts received through AM. With this upgrade, your blaster upgrade and your rubber glove/flexible handplate upgrade, your armor now contains all necessary requirements to meet Centurion. Congratulations on the well earned badge!! Other Armor Fit/Assembly: Your build is outstanding. Tight seams, clean lines make the difference. I like that you went with the upgraded shoulders, too! The black on the thermal detonator clip screws are a great detail. I know there was mention of your drop box straps and the minimal gap you have is just about the limit to what I would allow. I would consider knocking back the overlap on your canvas belt. You have what looks to be 14 inches of overlap which is WAY overkill. The max you need is the width of the square molded section on your kidney and butt. There is more than enough to be secure and the overlap is hidden by the thermal detonator. I would put it in your schedule to knock back the return edge on the sides of your new back plate. Although perhaps it's a bit enthusiastic in this pic: and doesn;t need to be brought down THAT far, yours could stand a little trim. . Carry on, Trooper! You are now a brighter star in your Star Garrison!!