gazmosis
-
Posts
4,043 -
Joined
-
Last visited
-
Days Won
23
Content Type
Profiles
Forums
Gallery
Articles
Everything posted by gazmosis
-
Double check your shoulder bells, though. Don;t let those wander too far from the ribbed bridges.
-
Nice work so far, Todd!!!
-
try [email protected] They make TX armor and might be willing to sell you just the Therm Det
-
I am truly blessed. Thank you, Eric for the consideration to keep me on board. It's an honor to have the chance to look at the artistry of the greatest troopers in the Legion.
-

ATA Armor Build_My First TK
gazmosis replied to russellr2d2's topic in Build Threads Requireing Maintenance
Those thighs are works of art, young man!! You had asked earlier if the issue with the bottom of the thigh back was normal. With all lineages of TE armor it is. Remember that your armor was derived from a ROTJ suit which was molded to be overlap construction. That is the reason for the difference. Most people end up cutting all that off anyway so you dont get pinched in the back of your knee -
Hard plastic lens attatchment help needed...
gazmosis replied to justjoseph63's topic in Assembly, Mods, and Painting
First, this is not the screen used method. That was acetate sheets with an adhesive strip on both sides. Second, the interior of the helmets can be done using any method a trooper wants. As long as the achieved look from the outside is accomplished, the interior has no restrictions. -
Hard plastic lens attatchment help needed...
gazmosis replied to justjoseph63's topic in Assembly, Mods, and Painting
That's a good one, John. People have used those or glued together a small stack of scrap ABS pieces. Either one will work, but you want to drill those screw holes BEFORE you glue them into the helmet. One little slip and the drill bit will come through the faceplate.....NOT GOOD -
TK-11721 Requesting ANH Stunt Centurion Status [MC]
gazmosis replied to Robo Tarot's topic in Request Centurion Status
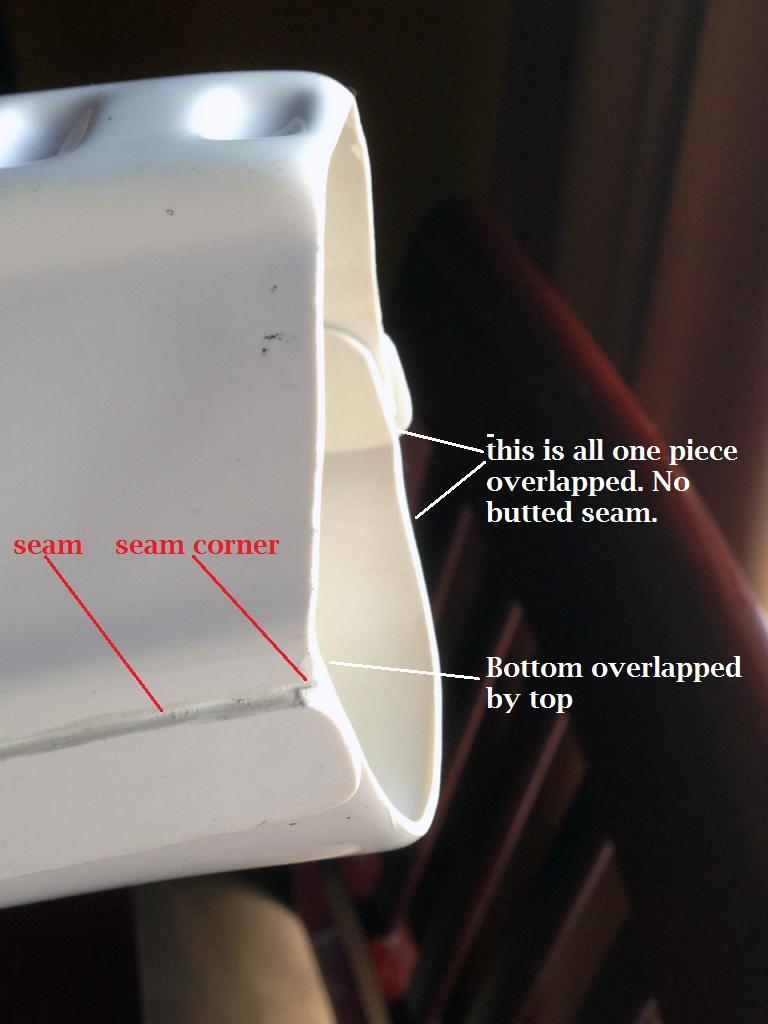
The CRL change regarding overlap construction was made well over a year ago. A certain grace period is allowed for a short time after a CRL change, but because of the time that has already passed, any armor, regardless of when it was bought/built will need to recognize this build method. This doesn't mean in any way, Pete, that you should not be proud of your armor. It is EIB certified, you look fantastic and anyone in your Garrison should be proud to troop beside you. I would not look at this as a setback or a disappointment. -
Fantastic alignment. You still have some to trim off the side of the cod, butt and crotch tabs, but armor on, young man!!
-
RT-MOD ANH HERO Build
gazmosis replied to gunslinger7788's topic in Build Threads Requireing Maintenance
Just make sure you build this with butt jointed construction. -
TK-11721 Requesting ANH Stunt Centurion Status [MC]
gazmosis replied to Robo Tarot's topic in Request Centurion Status
I will work on finding out additional information regarding this. Did you make a build thread? -
Nice work!
-
The notch was part of the original suit. It really served no purpose as in improving function or movement. Perhaps it was a mistake? Who knows. This detail was often hidden behind the drop box. Some suits had it more prominent and some less, but it was always there
-
TK-11721 Requesting ANH Stunt Centurion Status [MC]
gazmosis replied to Robo Tarot's topic in Request Centurion Status
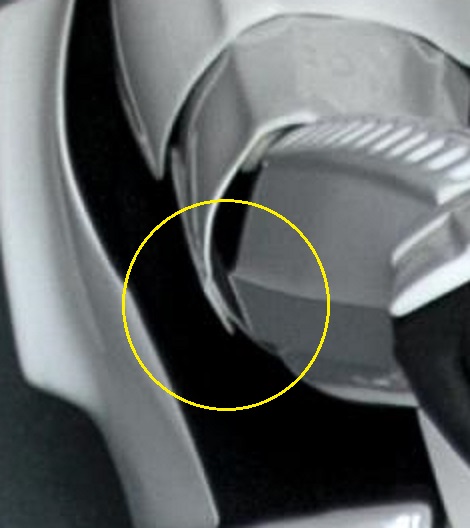
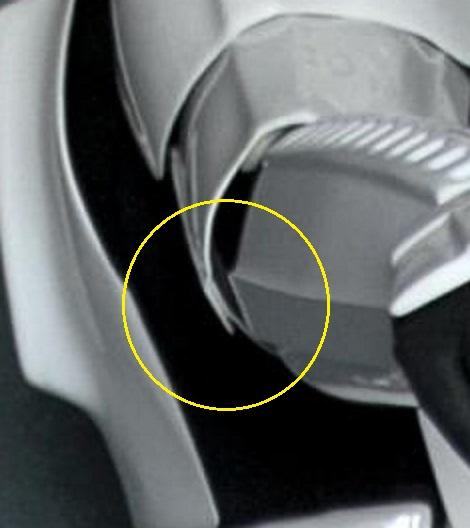
Hey there Pete!! Thank you for your application for Centurion. I know you have done some changes and upgrades to get to this point and I thank you for that. So let's take get to it. CRL and Centurion Application Requirements: All required photos have been posted. In regards to the aspects of the Centurion badge, we have a few things to discuss: First I wanted to touch on the wrist opening of your forearms. They are not supposed to have any return edge. This includes into the square indent ridge as seen here: I am concerned about this detail on YOUR forearms with the first square indent being so close to the opening. Typically, this is not the case. I would like to see no return edge at all here, but if it means cutting into that first indent, then you can just leave it. Second. Prior to every write up, I jot down a ton of notes so I won't forget to type anything up. Well.........I wrote this point in my notes by never added it to the "Centurion Suggestions" section of your EIB application. This has to do with the trap and tear decals on your helmet. These must be hand painted or use the "hand painted" look decals. Note: the Centurion Suggestion section of EIB applications is provided as a guide for certain details. The trooper is ultimately responsible for the details on his/her armor. We will need to talk in depth regarding this next topic. Centurion badges require the application of many additional specific details to be present on a trooper's armor. As a result, there are many more required photos to show things that might not appear clearly on EIB applications. In reviewing the pics of the wrist side of your forearm for the return edge topic, I am seeing evidence of overlap construction. When I went back to review your EIB application regarding the helmet decals, I spotted evidence in your bicep as well. It is unfortunate, but all two piece armor parts (Biceps, greaves, thighs and forearms)must be constructed by the butt joint coverstrip method on ANH and ESB armors. Overlap construction is not allowed. I hope I am just seeing things. Please provide some additional photographs of the interior of these parts so I can clearly see which type of construction you used. IF it is overlap, Just let me know.
-
Overlap on kidney from back plate
gazmosis replied to Tcsjc's topic in Hard Armor (General Discussion)
That's not that much. You should be able to re position your back plate up and eliminate the overlap -
TK-11721 Requesting ANH Stunt Centurion Status [MC]
gazmosis replied to Robo Tarot's topic in Request Centurion Status
Armor currently under review -
Looking for assistance in choosing armor
gazmosis replied to Drage13's topic in Hard Armor (General Discussion)
The measurement to consider is around your midsection at your belly button. -
TK-11721 Requesting ANH Stunt Centurion Status [MC]
gazmosis replied to Robo Tarot's topic in Request Centurion Status
Andrew is right, Pet. Can you post that thigh attachment pic, please. -
jengel's ANH Stunt build AP kit
gazmosis replied to jengel's topic in Build Threads Requireing Maintenance
Wait till you have the ears in place so you can trim the neck opening to match the bottom of the ears for a smooth look once the neck trim is installed. Remember also, you will need to get "S" trim for the opening yo replace the "U" trim that comes with the helmet. I definitely agree regarding taking more out of the teeth and eyes -
This addition to the Centurion CRL was was added recently so only applications older than a few months ago were passed without it. If you are careful, it will look great. If you wanted to take it up a notch, get a hobby iron and make return edges to really give it that pre molded look. Or Terrell can just ad it to the mold
-
TK-17980 Requesting ANH Stunt Centurion Status [RS][152]
gazmosis replied to cl6rkee's topic in Request Centurion Status
Hey Clark! Thank you for your application for Centurion and the chance to view the always appealing RS suit. So let's get to it. CRL and Centurion Application Requirements: All required submission photos to review have been posted. The main points of the CRL have been demonstrated on your build. However, on rare occasion, there is a situation where there is a detail that is present on the applicant's armor that was historically never present on the original suits and as a result, a correction was asked to be made. There are two on your armor. The first and easiest one is the white paint on your crotch hardware. This needs to be removed. The second are the left side ab/kidney rivets. This is one of the most referenced photos from our own gallery of the rivet placements: If the side rivets are not perfectly placed from top to bottom, but evenly placed across from each other to maintain a balanced and consistent look to the armor, it would be acceptable. I believe that on your AB, you nailed the locations. Unless it has changed, RS has dimples on the ab side of the seam to mark the rivet locations so it is pretty hard to make a mistake there. The kidney rivets are then just placed directly across from them. This is your side as it appeared in the application. I marked with a red circle the approximate location of the top rivet and the middle rivet is not even present. I re-did the picture with the kidney rivets as they should be across from the ab ones. Your armor is incredible on so many levels. These adjustments will make the package complete and the Centurion badge yours.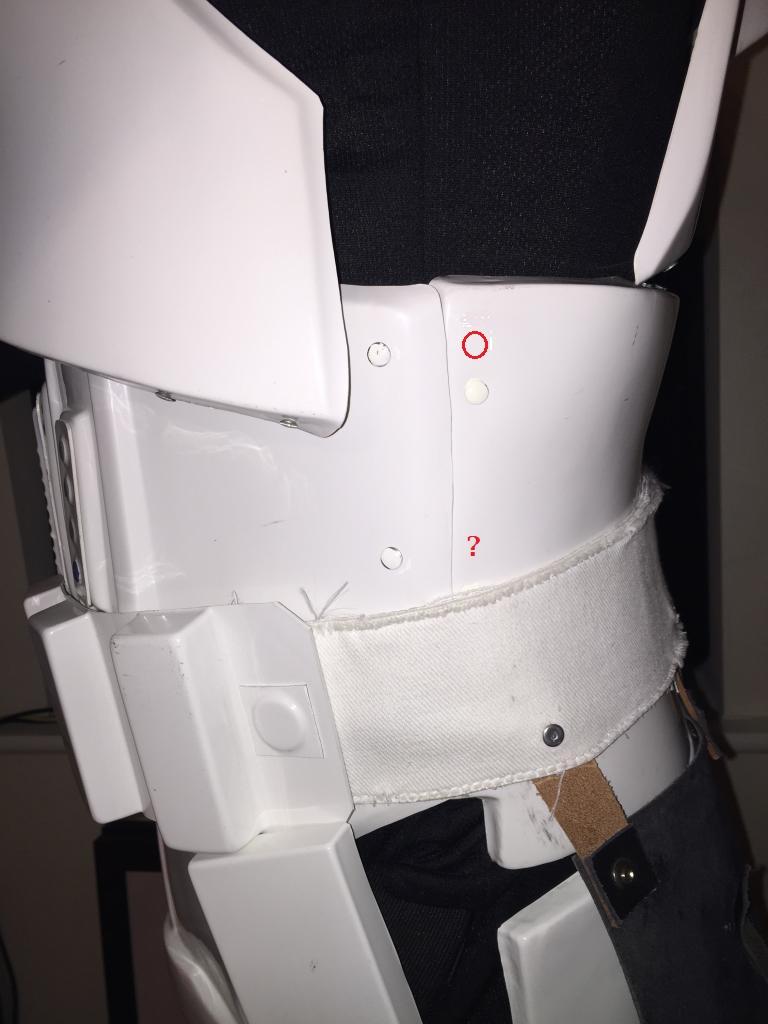

-
I can't really see the bottoms, but you could still take a bit out of the middle two to make them a bit taller. Just my opinion, though.
-
Long live the beefy trooper! It's our muscle!!!
-
They said he walked away from it. Albeit with a bloody face......but he did walk away from it.
-
Hey Charles! Awesome work with two costumes in one week for EIB! Obviously you had this planned! CRL and EIB Application Requirements: All required photos have been posted. For the record, a "bucket off" pic is not required for EIB applicants. Only for basic approval at the Garrison level. ​All components of your HWT are present to qualify for EIB. With pleasure I can say congratulations on your EIB approved HWT!!! Other-Armor Fit/Assembly: I very nice overall base armor build to upgrade the FX to EIB level is the foundation of this costume. A very well detailed backpack as well! You hit the nail on the head in regards to the definition of light weathering. Just perfect. Centurion Suggestions: Sadly, the FX armor does qualify for Centurion status. This doesn't mean that you shouldn't be proud to troop in this awesome costume! Maybe an armor upgrade is in your future, maybe not. Either way, you look great and your Garrison should be proud!