Leaderboard


Popular Content
Showing content with the highest reputation on 02/06/2023 in Posts
-
The template can be found here, if you want to use this for your own memes. Credit to @T-Jay for taking the pictures -- thank you!5 points
-
Well after hundreds of questions, I finally made a video to help explain how I built this first order armor. It’s an hour and twenty five minites long. Some of the information is for new potential builder. So everyone can fast forward to whatever pertains to them. So this is the build for The Last Jedi and The Rise of Skywalker variation. However it will touch a bit on The Force Awakens variation as well. This is the new Denuo Novo First Order Stormtrooper armor and helmets. there are a lot of exceptional builders here and build threads. This is not to override any of them, but rather a video aid to them.3 points
-
3 points
-
Hi Scott, Adding to what @Chemi explained , we the DO team are not here to discourage anyone but to serve and help . I support completely Chemi's feeling . The FISD has tons of building resources not only a large Gallery Section for reference images, many build threads and approved EIB an Centurion apps, All of them in order to help those who want to build his Armor just for basic approval or to go above and beyond to the OPTIONAL higher levels of accuracy EIB and Centurion. Also there's a clear statement into each CRL , (NOT ONLY TO FISD), that advice the builders to reach the respective Costume Detachment for more detailed info. This Visual Guide has been reviewed by the detachment staff and the LMO team and is certified for use as a minimum approval guideline for GMLs. GMLs are free to approve this costume type. This document is not intended to be a detailed how-to on costume construction; rather a visual guide to be used for 501st costume approval. Details on construction may be found on the respective costume detachment web forum. So, the info is there, the help is there and all of us into the FISD are willing to help and make this a better place as you rightly stated. All your positive comments will be taken in account for future CRL changes and revisions that takes time and proper process.3 points
-
Most of the soft parts collected2 points
-
Taking it to the next level!2 points
-
Hello Thanks so much, I've been talking ti a few suppliers and have also found a spectra chrome supplier in Norway. So making some headway there, might also be heading to the US in July and wondering if it isn't worth taking her with and getting it done there. If you don't mind me asking, what did you go with and how has the maintenance been on it? Small update while I'm at it, been snowing so slow progress. Almost done with internal covering with plastidip and about 1/5 of the way with coating the outside with primer for 1st round of prep.2 points
-
Leaps and bounds, coming along nicely. I find using elastic on areas that you will be moving is best, you can be quite restricted with nylon especially on the arms and legs. That said for other areas which you don't need to move very much like ab harness I used nylon. At the end of the day it's what ever feels more comfortable for you, a little trial an error doesn't hurt to get if feeling right2 points
-
Added some ABS to the tops of the shoulder tabs: Painted the ab boxes and some other bits: Also been trying to figure out what strapping system I want to use, and which areas should be elastic vs. nylon. I’m gonna start with the shoulder bells and biceps.2 points
-
Chemi, I am sorry if my post appeared to be a slap at you personally, that is not how it was intended. There have been other DOs that have mandated the weathered Hovi Mic as well. I was simply using that as an example. I appreciate the time you took for my review more than you know. I know you are all volunteers and are donating your time. Being someone who works 60-70 hours a week, I know how valuable free time is and you are donating the one commodity that you cannot get more of, your time. I do thank you. My issues are more with the CRLs, how they are written and how they are applied to the grading process. While I understand that you use reference pictures to give context to the written CRLs, there are many many many pictures available to use as we build our kits, but the only pictures we have reference to in the CRL are for the Hovi Mics. The first issue is the words used in the CRL. Two of my biggest issues are the positioning of the tube stripes and ears. However, the word used for this is “Ideally”. The CRL states, “Ideally, the tube stripes are positioned approximately a pencil width from the side of the cheek,” and “Ideally, the placement of ears (and screws) should closely follow the rear angle of the trap above them.” Ideally is aspirational language, not mandatory language, but it is being used interchangeably like the word shall. If these two requirements are mandatory, the CRL should be changed to read, “The tube stripes shall be positioned approximately a pencil width from the side of the cheek,” and “the placement of ears (and screws) shall follow the rear angle of the trap above them,” if that is what is meant. If it truly is aspirational it should be treated as such. Regarding the “Han snap” the CRL only states, “A single male snap on the top right corner of the ab plate is present.” But there is no requirement listed for how far it should be from the edge, etc. The same goes for the rivet for the thigh ammo, there is no spacing requirement at all. If the spacing is a requirement why is it not listed like it is for the rivets on the abdominal armor? For the abdominal armor it states, “Rivets are equally spaced along the depth of the armor and about 10mm from the edge.” For the abdominal armor, I get it, it is listed and therefore should be enforced, but for the thigh armor….? The list can go on. We, as builders, are referencing the various pictures we can find online which are clearly different pictures than we are being graded on. If we are being graded on specific pictures, why are those pictures not listed and posted in the CRL? The same thing goes for measurements, if we are being graded on the placement of snaps and rivets, those placements should be listed in the CRL, or pictures placed in the CRL. The placement is clearly listed for some items, but not others. For us to build to the CRL but then told there are other, different requirements that we never knew of or have seen before, can only appear as arbitrary to those of us on the outside. I can clearly see that my post has inflamed the situation and been taken personally, which was not intended. The intent was to help those members that come after people like me. To give those members a clear standard they can build to. If there is a measurement, give it to them. If there is a picture they are going to be graded on, give it to them. If something is mandatory, use words that convey that and not permissive or aspirational language. The spirit of my post was to try to make this a better place, not throw stones or piss anyone off; for that I apologize.2 points
-
Hola Manvi. Te faltaba el link a tu perfil. Te lo añado!!! Hi Manvi. You forgot to add the link to your profile. Added! https://www.501st.com/members/displaymember.php?userID=35695&costumeID=1242 points
-
The work continues on weekends: I attached the kidney plates to the abdomen and painted the black, depressed angle line. I also used industrial white velcro for the rectangular plate. I liked the thought of a zippered closure like the one pictured in the R1 TK Reference Gallery so thought I'd give it a try. Used a six inch zipper and sewed it to 3" wide strapping (a guitar strap). I used 3" so I could add additional snaps in case I had to increase or decrease the size and how tightly it fit. I shortened and re-stiched the suspenders. I also reversed and replaced the snaps so they would snap to the armor on the inside and were stronger than the ones they came with. After fitting the armor though, I don't know if I'll need the suspenders; the armor fits pretty snug. Decision later. Did a test fit and it's pretty good. Eventually I'll use a heat gun to reshape some of the armor so it fits a little better but for now I'm happy with it.2 points
-
Greetings fellow members, Our Detachment election cycle has come to a close, with no other nominations accepting to run for the position of Detachment Leader. This means I will continue on as your faithful servant for the next year, and I am pleased to be at your service. This new term will see some staff changes, new initiatives, and more fun and support for all of our members. First and foremost allow me to update you on your staff for this term A massive thank you for the support and service of the following members who are leaving staff position. Justin Reed (TheRascalKing) TK-61490, thank you for your service and enjoy your new project Frank Peranteau (Frank75139) TK-75139, thank you for your service and enjoy more time back with your family Aaron (Bronx) Gibson (Pyrates) TK-99725, thank you for your service and enjoy you new and exciting job Thank you for your unquestioned loyalty. Your staff team for 2023 Detachment Leader (DL): Andrew Franke (Sly11) TK-11469 Detachment Executive Officer (DXO): Joseph Pedigo justjoseph63 TK-10963 Chief Deployment Officer (DCA): Mario Reyes (TKSpartan) TK-48117 Deployment Officer (DCA): Jose M Sanchez (Chemi) TK-30173 Deployment Officer (DCA): Tony Jobe (ukswrath) TK-10116 Provost Marshall (DCoG): Steven Sheades (starsaber25) TK-10466 Provost Marshall (DCoG): Tim Waychoff (DarkCMF) TK-51878 Provost Marshall (DCoG): Chris Pearson (themaninthesuitcase) TK-10911 Provost Marshall (DCoG): Dan Branton (Cableguy) TK-42911 Special Unit Director-Valkyries (DCoG): Teresa Nuthall (Soulart) TK-41307 Provost Marshal SM Platforms (DCoG): Christoph (Danny) Lauber (Ripper_L) TK-55550 Fire Team Relations(DCoG): Mark Ryner (captsafe66) TK-4584 Merchandise and Brand Officer (DMBO): James Silvius (jsilvius) TK-12953 Trading Card Specialist (DMBO): Eric Ho (Hoda) TK-42911 Personnel Officer (DPER): AC (NoVATie) TK-5597 Content Editor Support (DPRO): Adam Wolf (Revlimiter) TK-89400 Content Editor Support (DPRO): Jeff Salt (Wingnut65) TK-50297 NEW TO STAFF Content Editor Support (DPRO): Jonatan Ostling (Nairy) TK-23592 NEW TO STAFF Content Editor Support (DPRO): Vicky Mandlmaier (Vicky_Velocipanda) TK-50893 NEW TO STAFF Social Media Relations (DPRO): Luca Hahn (Morgi) TK-66744 NEW TO STAFF Newsletter Publisher (DPRO): Glen Rhodes (gmrhodes13) TK-85421 Attache Ambassador (DPRO): Caleb Mask (MaskedVengeance) TK-73692 NEW TO STAFF Systems Administrator (DWM): Eric Brager (Darth Aloha) TK-9674 Systems Administrator (DWM): Mathias (Locitus) TK-2959 Detachment Founder (DF): Paul Hoeffer (Daetrin) TK-8020 For our new staff, thank you for stepping up, and assisting in making this detachment as good as it can be for all our members A brief on the Detachment plan for 2023 We always like to start the new term with a bang, so be prepared to see a new section of the forums coming in the very near future. We aim to please but also to make sure we involve all our members. Discussion of a new ladies section is no secret and we are making good on bringing this full circle with its own section of the FISD forums. Come and help Teresa make this a new friendly and safe home for all our female TK's and make it your own. This new section is opening soon. More competitions, first off will be a design competition (members only), and a chance to leave a mark on the face of the FISD forums, keep your eyes open for that. There is some revamping going to take place and expansion on areas where technology is improving and times changing. We look forward to adding a section for 3D resin printers, these are becoming very popular with brilliant results and we want those with experience to share their knowledge, files and services right here on FISD. The replica section is also undertaking a minor tweak to include First Order TK's. If you are OCD and love those fine details and magic finds, you will have a place to post your intimate armour details inside and out. It amazes me we still find hidden gems on OT bits and pieces so I look forward to more with the newer generation stuff. Who wants merch!!, we are already working up ideas for this years items, so keep an eye on the forums for interest threads, competitions and more. More CRL work to come, not only are we looking to add more goodies to current CRL's but the entire legion is preparing to move to an updated CRL Platform. This will be a monumental task for every detachment and needs to be totally complete by October when the old platform will no longer be supported by the vendor. The hopes are for new look CRL's with added features to possibly make it easier to create and use all CRL's. New functionality is also on the agenda. The mystery stuff: Are you preparing for the 1500! more to come on that in the future. More staff to continue to expand in every direction we can. I will be looking to add additional staff with skill sets for particular areas we wish to grow, watch this space for updates and plan initiatives where you could make a difference and support your fellow members. More to come but hopefully this whets your appetite for the moment. We are in for a great year on all our platforms! With unquestioned loyalty Andrew Franke TK-11469 (Sly11)2 points
-
I’ve been a big Stormtrooper fan ever since I’d seen Star Wars as a young boy. Even back then I can remember obsessing over the armor, blasters, and other accessories the Stormtroopers carried. I remember really wanting that grappling hook Luke used during his escape from the Death Star, and dreaming of the day I could collect all the parts to build a E-11 Blaster replica. Of course one of the more mysterious items I wanted to know more about was the Sandtrooper Pack! I actually recognized some parts on it myself such as the Tupperware Lid, and the Canteen, but the rest of the pack was a complete mystery to me growing up. Then one youthful day while surfing the early internet(on dial-up 56k modem connection I might add) I came across the old ‘Parts of Star Wars’ website, which is still active to this day! This was a wealth of valuable information to me back then, it actually identified all the parts I needed to build the E-11 Blaster I’d been dreaming of. This also began my search of trying to find out what parts were used on the Sandtrooper Pack. I came across the 501st Sandtrooper Detachment Forums at MEPD.net and found that many of the parts had been identified, but not all of them. In particular one of the mystery parts appeared to be an obscure AM/FM Radio of some kind. I scoured the internet for information endlessly for years until someone eventually discovered and identified the radio used on screen. This was huge news!; It was a “Sonix Victory 75” radio, unfortunately the Sonix company turned out to be an obscure one indeed! Very little information is known about the company to this day. Then in 2011 a Canadian version of this radio was found in Nova Scotia under the brand name “North Star”. This got me very excited being a Canadian and my mind wandered with dreams of finding one of these vintage radios in the back of some pawn shop, or under a pile of old audio equipment in some thrift store. Well it’s been another eleven years since then, several more radios have been found both under the Sonix and the North Star brand names. But unfortunately, none of those radios were found by me. Alas, I never gave up my search and eventually I did end up finding one of these radios for myself. Not only that, but I also discovered a third previously unknown brand variant! This was only made possible due to the discovery of the Canadian variant 11 years prior. When that North Star radio was found, another was found not too long after that. One of these Canadian radios had a sticker with a model number on the back which read “Model: MT-1809”, this is what ultimately led to my discovery of the Solar brand variant. One day while searching eBay for the query “Vintage Radio MT-1809” this Solar radio just popped up for sale. $45.99 plus shipping, and the best part; it still works! I don’t think I’ve ever clicked Buy Now so fast in my life. My hands were literally shaking as I was checking out, as I’ve had hot ticket items like this sell out from under my nose before I had a chance to finish checking out. Thankfully this purchase went smoothly and it showed up at my door fairly quick. It was found on October 20th, 2022 in Bath Township, Michigan which is about a two and a half hour drive from where I live in Sarnia, Ontario Canada. The seller informed me it was from an estate sale. The reason I want to share my find is that these kinds of discoveries tend to have a cascade effect, and I’m hoping more of these radios will be found yet in the future. I can tell you this version is from an American company that produced radios in the 60’s and 70’s (more of that later) which was a great time for the electronics industry so I’m hoping there was a higher number of units imported for this American version of the radio, though all the companies that offered this model seem to be obscure. And so without further adieu I give you the Solar model: MT-18091 point
-
Hello there. (heh) I first heard about the 501st about 2 years ago (I think) and immediately loved the idea of joining everyone in doing Star Wars charity stuff, anyways after a long 2 years (in which I probably should've done planning and stuff but uh.. nope) I'm finally ready to get started on stuff here, which is quite exciting! Literally any information will help me as I don't remember much from my "research" from back then. I'm also 6'5 so durable armour suggestions for tall troopers would be super helpful. Anyways, have a nice day. (also I might've made a post from back then?? but now seems like a more fitting time to do this.)1 point
-
Thanks Glen. That’s really good to know. Didn’t realise that. The plan is to ultimately switch out this temporary hack for BlastFX once I get it repaired. The only switches in that will be the trigger, the Hengstler counter button, the selector switch and one more fitted under the mag release. Nothing you wouldn’t normally see on a screen-used E-11.1 point
-
Should be very helpful for our new builders1 point
-
I've done on a few occasions I have also used the electronics out of cheap toy blasters, they may not be as accurate but allows you to have some basic sound and lights at a low cost. Just note if you are applying for higher levels you have to make sure additions can't be seen, like switches, I had to remove one, fill the hole, sand and paint for my L3 application1 point
-
https://www.whitearmor.net/forum/forum/113-advanced-tactics/ EIB and Centurion stuff is in here. You obsess over the CRL and photos required, then get someone to take said photos whilst you repeatedly refer to the photo sheets and yell at them for not noticing your shoulder bells weren't quite aligned. But seriously, to me, it's really satisfying having armor that's as accurate as it can possibly be. Not at all a requirement, just a fun thing for those of us wired that way.1 point
-
Ouch yeah my progressive lens aren't to great!1 point
-
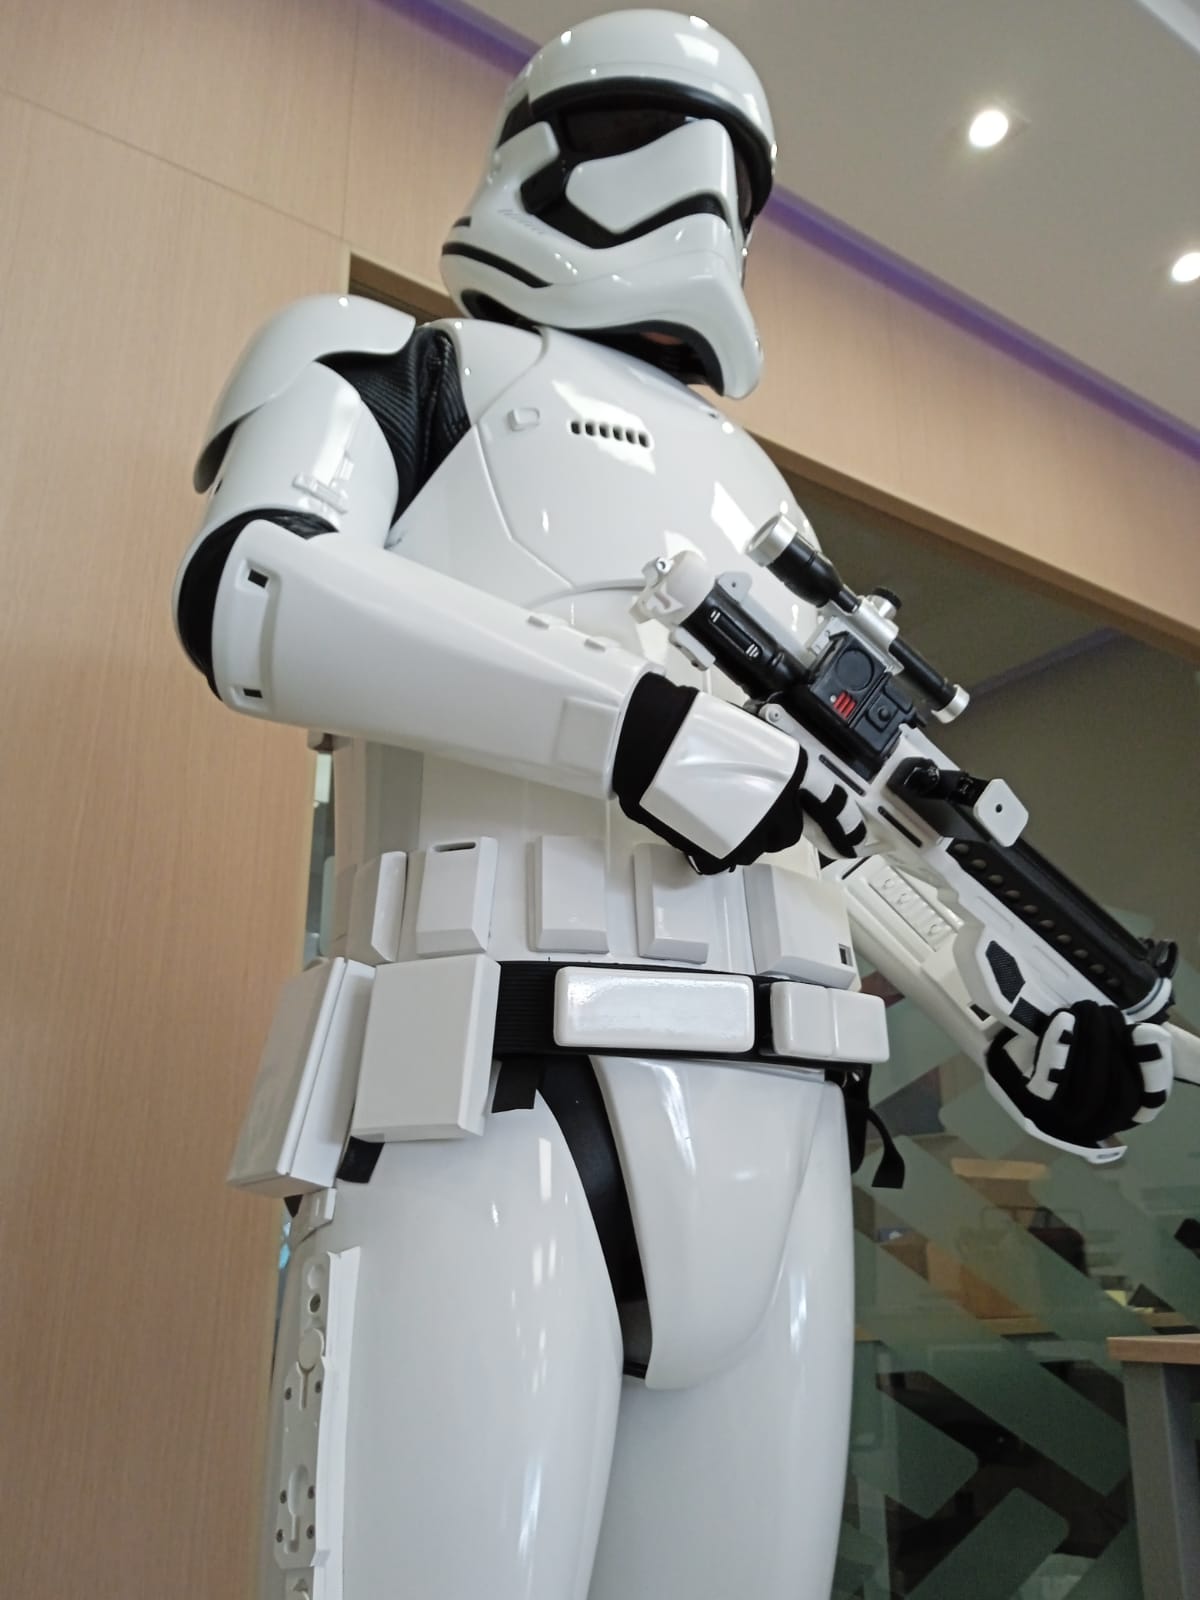
Blaster!1 point
-
Let me know if you can’t find anything, I can send you some if I have some left, or could pick it up for you as I am in there a fair bit since I am working on 2 costumes now.1 point
-
Thanks for the link, and the luck!1 point
-
Alrighty then, I'll probably have to go check my local stores and stuff to see if they have anything similar. On a side note my grandfolks used to live there, so that's neat, probably went into the same store too. They live closer to waterloo now and encountered a 501st member patrolling the streets as well, what a coincidence!1 point
-
Thanks! My neck is also 17 inches so hopefully I won't have to remeasure too many things. I do have one question though, any tips on where to get the shiny-ish material for the outside of the neck?1 point
-
1 point
-
Great search !! Yes, making your own is a plus to your knowledge. Good luck!1 point
-
I also found this thread recently, and might have a go at creating one myself just to gain some knowledge/knowhow, if that fails I can just get the trooperbay one.1 point
-
Hahaha thanks guys. I really hope it helps some people out1 point
-
Thanks again fellas. I meant to say that I will look at lowering the forearms to create a bigger gap at the elbow (reluctantly) to close up the gap above the gloves. Especially the left forearm. I’m happy with the bicep position. It’s already as low as it can go. (And is already on a hook.) Sorry if I wasn’t clear.1 point
-
Awww yeah! You've got a new subscriber! I've been longing for some 501st and FISD member content as I have a drought on the "Babe, what should we watch tonight?"-front! Thank you!1 point
-
Excellent, glad to see this here Ardeshir, nice work.1 point
-
Awesome stuff!1 point
-
1 point
-
Hello and welcome aboard, this thread should help you on you way, good luck with the research For local help you could reach out to your local garrison, you can do a search here https://501st.com/maps/imagemap-northamerica.php1 point
-
Looking awesome Pedro!1 point
-
Thank you for posting this.1 point
-
Excellent work to supplement your build, Ardeshir! No doubt many troopers will find it helpful.1 point
-
Thanks I will, anyway I still have to make some tweaks, but, thank you very much for your help1 point
-
Nice work trooper, if I may you could cut off the excess material from your thigh straps Looking forward to seeing you out and trooping
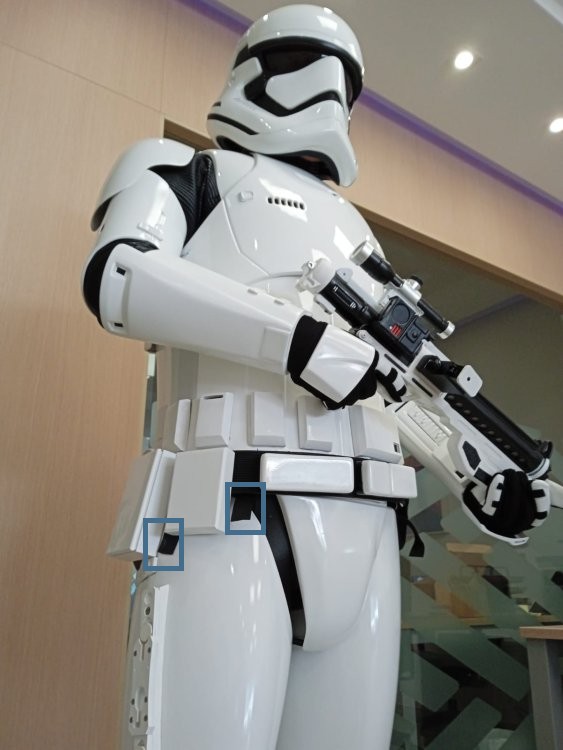 1 point
 -
Looking good, I agree with your own review, apart from the biceps, I don't think you will want to lower them any further, if you do they will easily pull out from under the shoulder bells and catch. Many use bicep hooks to keep the biceps at the right level that way you can keep them low but not allowing them to slip out, not sure if you have them, some info here1 point
-
I've finished it, on Saturday I put it all in for the first time. I have to make a couple of adjustments, but, nothing important

 1 point
 -
Looking good, keep up the great work.1 point
-
One habit I've started, which I'm sure each and every one of you does this as well. All of the new Starwars content coming out has got me looking at TK's with a lot more scrutiny! I'm now looking for shoulder bell elastic, cover strips, drop boxes, spacing, and God knows what else!1 point
-
Next was the slots in the shoulder for the shoulder bell support brackets and strapping. I put the chest/back on and marked the top of the shoulder with tape. Then I marked with pencil where the slots would be located. Then I drilled holes to mark the ends of each slot: Next I used the cutting wheel on my dremel to cut the slots. It was pretty nerve wracking since these areas are really narrow, but it turned out ok: Then I sanded them a bit, then did a rough fit with the shoulder bracket and strapping. Looking pretty good: And with me just holding the bell in place: Then I glued the shoulder brackets in place with E6000: Next I decided to cut some slots in the ab for the 2” strapping that I’m going to use as a suspension. I got the idea from Captain’s Drydock on YouTube. I used the same technique as I did on the shoulders, drilled holes to mark the ends of the slots: Then used my dremel to cut the slots on the front and back: Rough fit with the strapping: I’ll also be using some parachute clips to make it adjustable and easy to get in and out of.1 point
-
CONGRATS!!!1 point
-
Congratulations @Sly111 point
-
Continued working on the holster. After a few filler and sanding cycle, it was ready for paint. After one coat: Looking good: In order to install the hardware, I had to buy the Torx bits. Then I added the center hardware, and found they stick out the back too far: So I dremeled them off drilled the holes in the base and thigh, and then did the final install: I’m happy with how my “Frankenstein” R2Dan metal + DN base turned out.1 point
-
A very slow process indeed, ABS sanding and polishing is not the easiest, I actually used automotive cutting compound, it's a lot coarser than regular polish which helps to bring the shine back quicker, then go over with a regular polish. You have done an excellent job, well done.1 point
-
Thank you to all who contributed to this wonderful newsletter and forum I'd like to take this opportunity to give everyone involved a huge shout-out! For me the extra activity comes from a lack of troops right now, but for whatever reason you all joined in, I appreciate every meme and member that joins the thread1 point