Leaderboard


Popular Content
Showing content with the highest reputation on 12/01/2021 in all areas
-
Hi everyone, I though I would post the process I used to make my neck seal for others to use if they want to try and make their own. Materials: Stretch fabric - I used a tshirt type elastic material for the bib and the inside of the neck piece and a elastic stretch fabric with a shiny rubber like surface for the outside of the neck piece. Batting Paper for making a pattern. Right angle ruler. Sewing supplies. My neck size is 17”, so you may need to adjust some of the sizes accordingly. Based on your neck size. Step 1 - Make the pattern: Using a corner angle ruler, make a rectangle that is 26 inches wide by 14 1/2 inches tall. Mark the middle of the pattern along the long side of the rectangle with a dotted line. mark one side front and back Make a mark 10 1/2” from the edge of the front side. Make a second mark on the midline 12 inches from the edge back edge. Make a mark 13 3/4 inches from the back edge and 3 1/2 inches in from the side on each side of the pattern. Now using a pencil, make an oval on one half of the pattern from the 12 inch mark to the side marks at 13 3/4 inches and around to the 10 inch mark. Fold the pattern in hale and cut out the oval. Now we make the neck piece pattern: First make a fitted template for the neck part. This is essentially a rectagle measuring 4 inches tall and 17 inches wide (width is the same as your neck size). Mark the midline of the long side of the rectangle and make a mark 3 1/4 inches from the bottom of the neck piece. Freehand draw the curve from the marked spot up to the top of the neck piece as shown. Fold the paper on the midline and cut out the curve. Next, use the sized neck piece to create a pattern by adding an inch or two on either side and a half inch on the top and bottom to allow for seams. Seep 2: cutting the fabric: Pin the pattern to the favric and cut the fabric following the pattern, including the hole in the bib. For the neck piece, cut one piece of the outer fabric using the pattern and cut the inner fabric using the same pattern but leave extra length on the bottom to allow for the seam on the neck. use the fitted pattern to cut the batting. I used 3 layers of batting. Next, pin and hem the edge of the bib. Step 3: making the neck piece. On the non showing side of the outer piece of fabric, use the fitted template to mark the fabric along the seam line using a white fabric pencil or chalk. Pin the outer and inner pieces together along the top border of the neck with the inside and outside surfaces facing each other. Next , lift up the upper piece and fold the lower piece up to sit in between the two pieces. When the upper piece is dropped back down, then pin the upper and lower pieces along the bottom side of the neck piece. Now sew along the top and bottom sides of the neck piece. Do not sew the sides. Once sewn, this will create a tube. Turn the piece inside out so that the proper sides are now on the outside. Slide the batting into place by putting your hand in the tube and gently pulling it through. Take some time to position the batting inside the neck piece properly. Starting at the bottom of the neck piece, use a sewing machine with a walking foot to sew straight lines along the length of the neck piece. Use the previous line as a guide for the next one. Continue up the neck piece to the top. Step 4: attach the neck piece to the bib. Mark the centre of the front and back of the neck opening as well as the outermost points of neck opening at the shoulders. Next, mark the mid point , the back points ( I sewed lines from the top to the bottom where the neck piece will meet at the back), and the side points at the shoulders. Now, using the marked point to line up the pieces, pin the neck piece to the bib start at the middle front and then do the shoulders, pin the areas in between next and work your way all the way around the seam. This takes some time and several readjustments to get it right. Trimming off the excess length at the back of the neck piece helps a bit. You will have a gap of about an inch or so in the back but this is ok, the zipper will close it up. Make sure that the correct sides (inside and outside) of the neck and bib are in correct position. Now sew around the neck from the edge of one back point to the other back point. You likely will have a fair sized gap between the 2 back points, simply cut down the back of the bib in the middle of the space and sew a zipper in place that runs up the back and onto the neck section. you now have a completed neck seal. Happy trooping.3 points
-
Congratulations and welcome to the EIB ranks trooper Also if you apply for Centurion please use a blank background, very hard to edit out a Death Star full of Lego2 points
-
2 points
-
Welcome to the ranks Kris !!2 points
-
Hi Matt, and thank you for your application for ANH Stunt Expert Infantry! CRL and EIB Application Requirements All required photos are now in and, after review, we are pleased to welcome you to EI! On behalf of the entire DO staff, congratulations!! Other-Armor Fit/Assembly In this area we review observations made by your fellow troopers and the DO team. Some observations may lead to suggestions to improve the overall look of your armor. Note that we consider both text (CRL) and pictures (screen caps/reference images) when reviewing submissions. First of all, as a taller Trooper you did a SUPER nice job on making this armor fit great! Excellent work, sir. Secondly, please don't be alarmed at all the photos below. You nailed a lot of great details, but we have a few suggestions for ya' to help give you a better overall look. That being said, let's jump right in! Unless it is permanently glued down, we suggest that you lower the center of the brow trim a bit, as it seems to have an arch. As seen in the reference image, most had a more horizontal look. Reference image In a perfect world, the biceps should sit underneath the shoulder bell. We realize that because of your height this may be difficult, but you should be able to raise them an inch or so by shortening the strapping. It may also help to remove all of the return edge from the bottoms of the bells (pic 3) so that they don't butt up against the bicep. This will also allow them to sit closer to the bicep, and as seen in the second reference image many of the originals had little to no return edge. 1. 2. 3. Reference images Technically your ABS belt is correct- the bottom sits ".. at or just above the bottom of the ab button panels" but it could come up half an inch for a better look. We also noticed that when you raise your arms it slips down (second photo). Some Velcro on the rear would take care of that perfectly! Reference images Just a small detail here, but if you have the time and inclination your small ab-button plate could do with a trim. Reference images Centurion Requirements In this section we prepare you for Centurion. More photos may be requested in the future that allow us to make better decisions on possible adjustments. If there are any areas of concern they will be discussed here. Because Centurion photos show much more detail than EIB, items to pertaining to Centurion might be seen there and not here. We try to point out all that we can from what is seen, but the final accuracy is the responsibility of the trooper. Since Centurion is the highest level of approval we have, this is the area where we go into a lot more details. Some of these will be relatively easy fixes, and a few will be more challenging. BUT, after looking at your build skills we feel completely confident that you can do it... and we can help! Keep in mind that in addition to the actual CRLs, we consider screen caps/reference images when approving at higher levels. As per the CRL, for Level 2 the tube stripes are "Ideally" located approximately a pencil width from the cheek. The right side is VERY close, but for L3 the left side needs to come in more. Reference images An easy fix here.. Just grab some black paint and extend the first 2 ribs of the vocoder up a bit. Reference images Although they could very well be there and we just can't see them in the photos, a thin (like ¼ inch) white elastic band is required to hold the shoulder bridges down. Reference images A quick strapping issue here: Again, we realize that you are a taller Trooper and we certainly do make exceptions in some cases, but if possible we would like to see the shoulder bells raised to where the tops are closer to the shoulder bridge. This would help minimize the gap(s) between them and the chest / back plates, (and another reason to raise the biceps). reference images Now for the most difficult issue: As you are probably aware, when using shims, the outside seam must be flush for Level 2. Looks like you got that part covered! For Level 3, however, the seam will need to be filled. It doesn't have to disappear 100%, but it should not be overly apparent. Some ABS paste and an hour or 2 of your time would make this look spot-on, and there are a few tutorials here on that exact issue. The CRL for Level 3 states that "Ideally there is no gap between the abdomen and kidney armor". The key word there is "Ideally". As I mentioned, we make allowances, but we would like to see them a bit closer if possible. Maybe just a matter of tightening up the canvas belt. The screws on your TD are the correct type and in the right positions, but unfortunately they are way too large and will need to be replaced. I can send you set of the correct ones (no charge and I'll even pay postage, just PM me). Note that because of the shank diameter being smaller you may have to glue the clips to the TD and glue the new screws in. Easy peasy. Reference image As per the CRL, "The corners of the plastic ammo belt shall be trimmed at a 45° angle that meets the outer edge of the cloth belt". You have a distinct advantage here because of where your square belt buttons are placed. All that is needed in your case is to trim the ends as shown below. 4 minutes with a razor knife and you are golden! Reference images After you trim the ABS belt ends, we need you to bring the drop boxes out to where the outside edge is in line with the outside edge of the ABS belt. Just move the strap(s) over and add a dab of E-6000 behind the elastic to hold them in place. Raising them up a tad to where the tops of the boxes meet the bottom of the ABS belt would help as well. As seen in the reference pic, there are no gaps on the lower ridge(s) of the thighs. I suggest gluing a small piece of ABS behind that gap. Filling the gap with ABS paste is optional, but preferred. Just a dressing issue, but the ridges at the top of the left calf should be completely closed, just like your right one. Reference image Last up! Like I mentioned in your thread- that is an AWESOME looking blaster. Many times we see lots of print lines, but we can tell that you took a lot of pride in that build. The only small issue is the silver weathering on the T-tracks. The originals were plastic, so I suggest grabbing some of your black spray paint and giving them a quick coat. And that's it, brother. You have some work ahead of you, but we would honestly like to see you tackle these issues. You have the skills and we are here to help, so I really hope to see your Centurion submission as soon as you are ready. Time to get out there and "shine" as the newest EI in the Diamond Garrison!!2 points
-
Hi again, Jessie, and thanks for the updated pics!! Everything looks great, but we need one last fix before we can get that badge under your name. Although not specifically listed in the CRL (yet), the gaps on the rear of your thigh bottoms will need to be filled. They are pretty small, so we suggest just gluing some scrap ABS tabs behind them so that they aren't quite as obvious. Nice job on those mobility cuts btw! Reference images2 points
-
A couple of great threads is you do decide to got the Black Series route1 point
-
Maybe you're right... I can try to do some modifications that's easy that might make me a bit happier - might widen up the nose (noticed the opacity overlay between current and future) @TheRascalKing has graciously allowed me to borrow his TLJ black series helmet for side by side comparisons. I think I'll try to pick up a black series helmet in case I botch the KB lol Then maybe sand down the nose bridge so it's a bit narrower and sleeker than current. Hopefully there's enough material to work with to get the shape, otherwise it's patch and putty time lol1 point
-
Yeah, I was looking at that. I think I pulled an old reference with a 7.5+ length. I'll trim a bit off. Good catch. Sent from my Pixel 5 using Tapatalk1 point
-
A bump for those that miss this thread1 point
-
Looks like the gap between your endcap and control panel is a little too wide It's not a build if you haven't bled on it
 1 point
 -
WAY TO GO, Kris! After seeing that armor I had no doubts... Another Centurion for Garrison Titan!1 point
-
I would leave it alone unless you really and I mean really really want to go full-accuracy, given if the discrepencies you pointed out are correct. I would send my GML pics of the helmet just to be sure and ask but I doubt it will be denied approval or even L2/L3 (Ask the DO:s about that) Good luck with the build1 point
-
Very nice tutorial Gerald! I definitely learned something here; actually quite incentivized to make one myself. Thanks!1 point
-
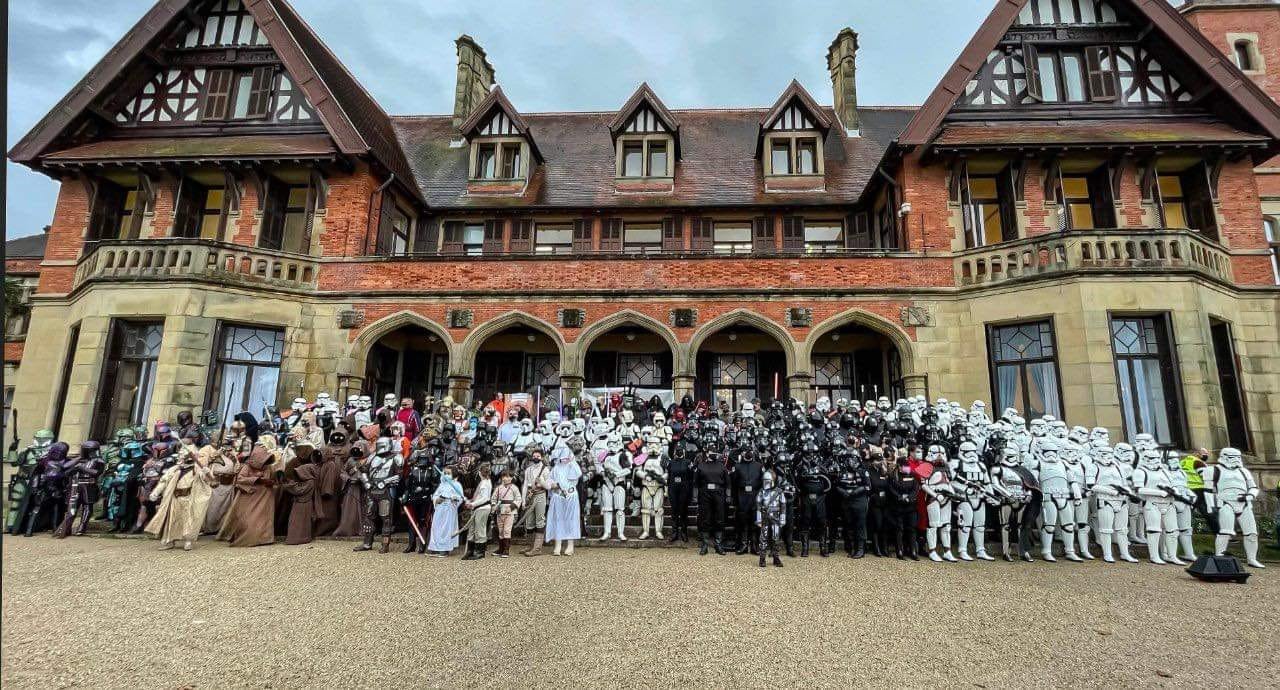
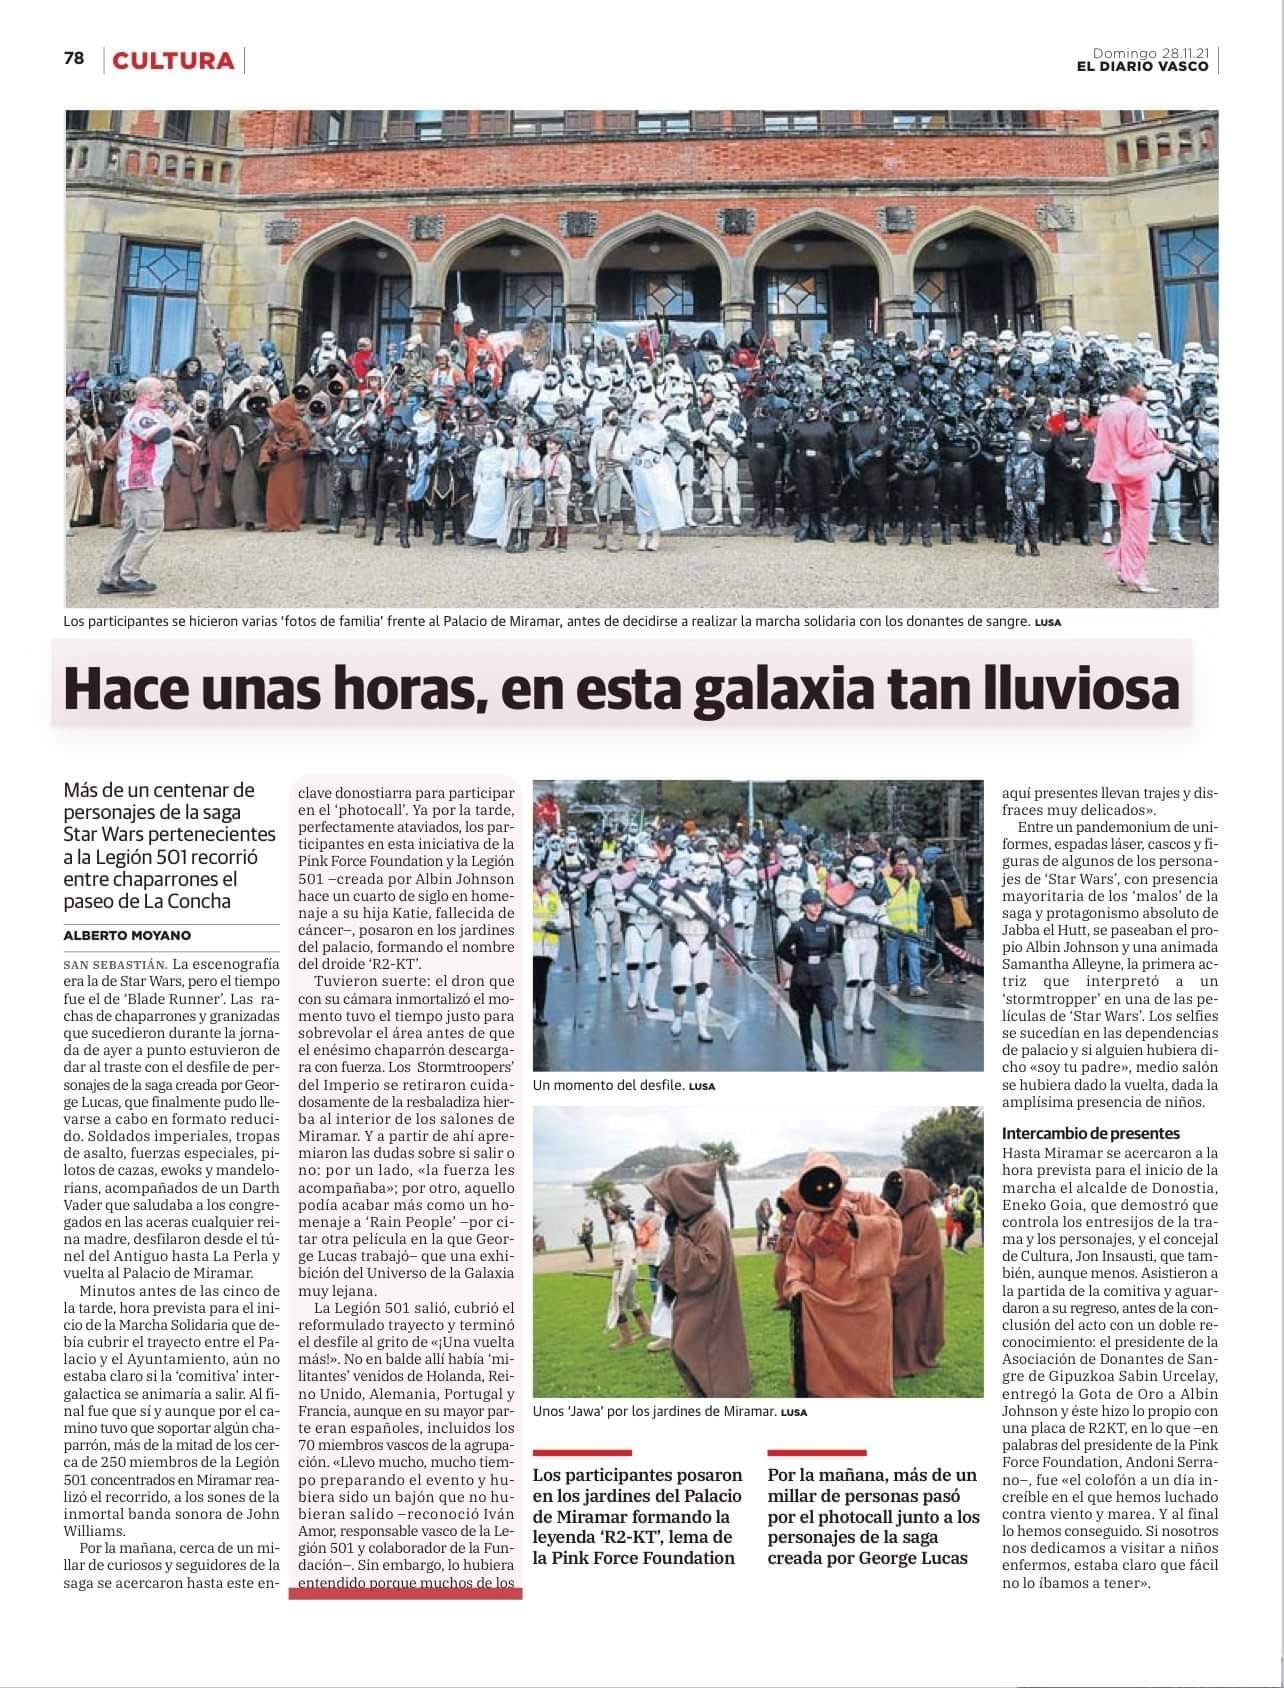
A few other photos Story here More images here If you use Google there is an option to translate to English in the title bar, left hand side


 1 point
 -
Hi Matthew - Justin (TheRascalKing) and I have been working with Hellhounds and we have your order information in our database. While you are, of course, welcome to reach out, it won’t be necessary to proceed with your order at this time. Everybody should be receiving an email in the coming days. Sent from my iPhone using Tapatalk1 point
-
Hello you need to have an approved 501st legion account and TKID, membership application info here https://databank.501st.com/databank/Join_Us. You then apply through your local garrison for membership. Once you are legion approved you can request Stormtrooper access in this forum. You need minimum 5 forum posts to access sales threads.1 point
-
Hi Kris, and thank you for your Centurion application! CRL and CENTURION Application Requirements: All required photos have been submitted, and on behalf of the entire D.O. staff we are pleased to welcome you to the rank of Centurion. Congratulations! Other-Armor Fit/Assembly; In this area we review observations made by your fellow troopers and the DO team. Some observations may lead to suggestions to improve the overall look of your armour. Note that we consider both text (CRL) and pictures (screen caps/reference images) when reviewing submissions. Nothing to add here... We are proud of all the work you have done...It is gratifying to see how you have improved your armor and brought it to the highest level. Congratulations Centurion...1 point
-
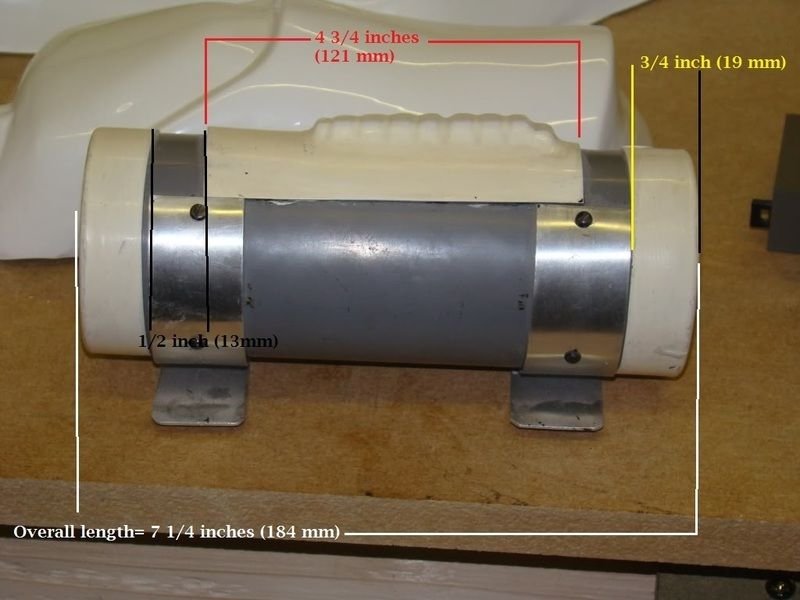
Back to the bucket. This is a pillow speaker set. I had no idea this sort of thing existed till the other day. I guess they're meant for listening to books or white noise or whatever through your pillow. They're thin and soft and seemed like they'd be perfect for a bucket. Since I replaced the top two helmet pads with my amp and iComm, I had two spare helmet pads left over. They got immediately grabbed up and sliced open for headphone duty. I was surprised by all that was inside. Some soft couch foam, harder closed cell foam, and a sheet of stiff vinyl as backing. No wonder it's $20 for like 8 of these. Hole cut for pillow speaker! Taped in and ready for action. And I wish I could report that these were awesome. They DID fit. My head can slide in and out of the helmet with those pads at my ears. And the speakers do work... barely. They are extremely quiet. They seem to be designed to be pressed hard against your head for sound to transmit to your ear, like if you were lying on a pillow. That's great and all, but I can't have that with the bucket. That's what I had before with the big headphones and I couldn't take the bucket on and off... And then inspiration struck. I hacked apart my big headphones and shoved them in the helmet pads. I managed to only take this one photo. Basically, the headphones are held together with 2 screws each. Unscrew them and you get access to the little driver as seen above. The ear pad and driver are left mounted to a thin plastic wafer. It's about 3x as thick as the pillow speaker, but it's less than half the original thickness of these headphones. I covered each driver with gaffer tape very carefully. The tiny thin delicate wires are tiny, thin, and delicate. With any luck they'll last a while and not get torn away. But the tape is quite secure and should hold things safely. Then I cut larger recesses in the helmet pads. I cut the soft padding away completely, just leaving a donut around the outside of the headphone. Annnd... IT WORKS!!!!!!!! The big headphones are much louder than the pillow speakers and work beautifully. I can get in and out of the helmet without harming headphones or shifting the padding around. It's comfortable and I can hear clearly. I don't even have the SHA volume all the way up. I feel like my bucket is now "complete." I'll tidy up the wires and get everything situated to my liking after my next troop, but I'm just over the moon about this. - the SHA works beautifully, doesn't pick up fan noise, and I can hear things. - the amp is wonderfully loud and the iComm makes a lovely crackle noise just as I wanted. - the fans keep me cool. One usually does the trick. - the bucket is comfortable and I can see clearly thanks to careful padding adjustment to get my eyes in just the right spot. I'm a happy trooper.1 point
-
Hi Ben, Welcome from one of your UKG brothers. I have enjoyed following your journey in getting clearance for your costume. You look great. Glad to hear your going for EIB and Centurion. Plenty of help here and in safe hands for this. Look forward to meeting you and trooping along side. Good luck. Sent from my iPhone using Tapatalk1 point
-
Hi Joseph, Would you mind adding some info to your post above. Geeky Pinks have told me that they are able to produce all of their items in non-leather alternatives, for those plant based troopers amongst us. In their words, this includes: "...neck seals... pauldrons, gunner bibs, vader suit, imperial knight, jedi or sith items, jawa bandoliers... Basically any item the SW universe could need in leather, I'll make in a vinyl/faux leather"1 point


.thumb.webp.27f7939d37871f319ff836257d4a3668.webp)