Leaderboard


Popular Content
Showing content with the highest reputation on 06/01/2021 in all areas
-
I used JB weld for the yoke, you do get quite a lot of strain while putting on and off so any filler may crack between the join. At the end of the day what ever you are comfortable using.2 points
-
The only issue I see using E6000 here or any other areas near seams is it will flex and when it flexes it may crack the seam filler and paint. This advice may be a little late however I suggest using plastic welder/epoxy so the area connections and seams are permanent and have minimal flex.2 points
-
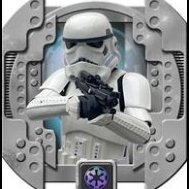
Hey. so it finally worked, and i didnt have to buy a heatgun. 1. I got rid of the return edge 2. Applied some boiling water to the areas, to heat it up a bit. 3. Kept in the desired shape with some wood and fasteners. 4. Then i poured about 1 Liter of boiling water slowely on each side. 5. Let it cool down for roughly 2 hours. the back plate has the perfect shape now. I might have to add a little gab between the kidney plate and the back plate, but thats about it. thanx for your help guys, you’re amazing!!
 2 points
 -
When magnets just aren't strong enough... you utilize the coat closet to hang your thighs2 points
-
BACK/CHEST SECTION ASSEMBLY NOTE: I used E6000 Glue but it was recommended by fellow troopers to use an Epoxi Glue. I'll use it to the AB section Assembly . Next Step : Applying ABS paste and Sand day and night Finished Return to Index2 points
-
Second update of the night! In addition, I started working out the thigh supports. I cut some elastic and glued it to the front of the thighs. With a black thrift store belt, I measured out the length for them to hang from it by. Looped it, and then sewed them together. All together now.2 points
-
BICEPS ASSEMBLY 24-48 Hours Later Next will be to apply ABS paste to fill the seam , Sanding and Polish. Finished Return to Index2 points
-
I am aiming for ANH stunt in Japan. I am currently making armor. I joined to get a lot of tips. I made it while consulting with my friend's 501st member. I can only speak a little English. So I use Google Translate. sorry.1 point
-
So am I... Sent from my iPhone using Tapatalk1 point
-
Indeed Agreed, some type of plastic epoxy1 point
-
If you use the correct tape you shouldn't have too much bleeding. Worst case scenario you may need to clean up some edge points with a tooth pick.1 point
-
Thank you Tony, One positive thing of E6000 is that , if necessary you can remove it carefully , and relocate, adjust or replace the piece and glue type. . Let see how it works.1 point
-
1 point
-
Got Clamps!? Whatever works1 point
-
Nice work, clean. A little paint to that middle screw and you're set. Keep up the great work.1 point
-
It does look really tight against your neck, and you may end up having to trim it. Again, it may be the photo, but it looks like the return edge may be the culprit. If you do end up having to trim it, here are a few tips: 1. Trim in increments... just until it's comfortable. Once it's gone, it's gone. 2. If you have to remove all the return edge, be sure to glue in a one piece shim right behind it (gray area in the second pic). Otherwise you may develop cracks. I doesn't have to be thick, and you can use ABS scraps or even a white plastic "For Sale" type sign. It doesn't have to be pretty, as so one sees the inside. There is an example here that shows another method for someone who had a cracking issue. Remember that "ideally" the front bottom of the helmet will cover the neck opening (as seen below) and the neck seal will provide some amount of padding, but in the end it's important to be comfortable! I have a tutorial here on return edges that may come in handy.1 point
-
before (left) and after (right)...1 point
-
Not true at all. I know quite a few ESB AM armor builds. The armor is spectacular and extremely well built and detailed and exactly the same as the New Hope armor. I built mine to be exact to my Anovos Build. The ESB requires a different set of stickers on the helmet, the frown is black, the belt does not have rivet holes and the holster is a sling loop on the other side and the hand plates are different, of which AM carries all the necessary parts. The stickers, if they do not have them for the helmet, you can get from Trooperbay. I am not sure what they are referring to regarding chest and back plate, and, I can guarantee you they are wrong. Contact Dave at AM and he will guide you through it. Very nice guy and excellent product. Finally let me just say this, I would not say it if I wasn't willing to back it up as well. I know two other ESB builds at Centurion Level that are AM builds. If you have any questions, feel free to ask.1 point
-
I acquired some sewing skills (courtesy of my mom lol) and started to make some straps this weekend. Starting with the right side kidney to ab. I'm not sure which direction to head with other strapping connections. I've seen where a lot of troopers use glued in snaps on the armor, and then separate nylon snaps to bridge them. Assumedly this makes it easier to break apart and transport. This guide by chiefbonan looks like it will be very helpful. For the snaps on the armor, it seems like most people use ABS base plate for the male snap. The above guide mentions using nylon for some. I don't know what the advantage for each is, so I'm testing each first on the kidney to butt connection. Immediately I noticed that the snaps set in plastic (from left-over cover strip) is not very bendable to the contours of the armor. So I might go with nylon if a stress test goes well.1 point
-
I was able to trim back the excess on the existing right ear leaving a bit more of a gap around the tube, but comparing it to an original made me feel a little bit better about it...1 point
-
I think I see what may be happening here. The reason you probably are having difficulty bending the shoulder bridges is because of the return edges that are still present. Bending of any sort is next to impossible when you still have the return edges intact. It may be the photo angle, but it looks like you still have quite a bit on the tops, which looks to have an angle for some reason. As seen in the reference image, return edges were pretty much non existent in those areas, and removing them would not only allow you to effectively bend them, but would actually be more screen accurate. Reference image Note the difference in the angle1 point
-
SHOULDER BELLS ASSEMBLY Return to Index1 point
-
A heat gun does take some practice, plastic can go to movable to molten mess in the wink of an eye, less is more. When using the hot water bath method, when you move a piece to were you want it go a little further and hold in that position until it has cooled, it will relax a little once cool, it's already been molded to a specific was so will try to return to that until completely cooled. The brackets on RS don't allow for much movement, you may want to try some snap plates and elastic to give you a little more room. A lot of the armors are really suited for those 6' and under so you are just over the limit so may need some gap on the back.1 point
-
I use a hole punch and masking tape, same type of method as Tony1 point
-
Getting better. When in doubt purchase a circle radius stencil, lay it over painter's/making tape, select your hole size, cut the hole using an exacto knife, lay painter tape over button and paint. Note: hole circumference should be the same size as the button crown (slightly smaller than what's shown below).1 point
-
The hot water method is a bit slow pace, you need to repeat the process again and again. Personally I prefer the "Ninja Style" using a Heat Gun but It needs to be done carefully because the piece can be damage. You could make a test with a scrap piece too. AGAIN: BE CAREFULL1 point
-
Hi, I have updated my first post adding the photo requested.1 point
-
I used the search feature and the most recent topic is five years old. I don’t know if anyone has a current source to get their springs for inside the E- 11. I know I can make my own with a wire hanger and a broom handle but I was looking for something better. TIA Sent from my iPhone using Tapatalk1 point
-
belt’s almost finished; just have to glue on the rivet covers and I’ll probably hit the belt box straps with a little glue or even tape too, to keep them in place and avoid any sliding...1 point
-
Sand sand, primer primer. These will need light touch filler putty, and another couple passes with the primer Sent from my iPad using Tapatalk1 point
-
Well if you were given a new set of MTK armor then the armor itself is just fine. Now it will come down to how you build it and how the final product looks. The best thing I can tell you is to look through some of the build threads. Study some of them. Then you should start your own. Also, there are some build Videos on trooperbay.com you can look at. Also some videos on YouTube with our friend CableGuy.1 point
-
Sent from my iPhone using Tapatalk1 point
-
Sent from my iPhone using Tapatalk1 point
-
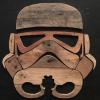
Just looking through a few of your images and there are a few areas which will need some more sanding, perhaps filling too. With Phasma the base needs to be as flat as you can get it as every blemish will show in the final stage. When sanding filler you can wrap sandpaper around a small block of wood, helps to sand flat raised areas or you can purchase a rubbing block from an automotive store Once your armor is finished and you have sprayed a few coats of spray putty or primer/filler you can then give a light mist spray with black, this helps when wet sanding (or dry sanding) to show high and low areas, any areas with black remaining will need more filling. https://www.renownauto.com/blog/entry/what-is-a-guide-coat A couple of videos on guide coat and block sanding
 1 point