Leaderboard


Popular Content
Showing content with the highest reputation on 01/26/2021 in Posts
-
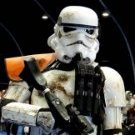
Name: KC Grim Username: KC Grim TK-57899 Southern California Garrison Los Angeles Squad Armor maker: Anovos - Fully Custom built by Ardashir Radpour and me Helmet Maker: Anovos - Fully Custom built by Ardashir Radpour and me Blaster Type" E-11 made by Pretorian - Fully customized Hight: 5'10" Weight: 160lbs Boot Maker: Imperial Boots Canvas Belt: Custom Made Hand Plates: Trooper Bay Rubber Latex Plates Electronics: Xiaokoa Wireless Mic, Wireless connect to Aker Amp, Aker Speaker, Self made custom fans and battery system Neck Seal: Stormtrooper Undersuit. molded piping Holster: Anovos Undersuit: Lycra Motorcycle race undersuit. EIB Approval:1 point
-
You are most welcome we are here to help you, "troopers helping troopers" We do have a pre approval area if you want to post final pictures for review before you contact your GML again, good way of gauging if you need to make any other modifications https://www.whitearmor.net/forum/forum/193-request-tk-pre-approval/1 point
-
Wow! This is so great. Thanks a ton for this post. I had always wondered. I know for the side gaps I have seen larger troopers (like myself) in the past with a white cloth instead of plastic. Is that approvable or is that a no go? I wouldn't think so but just wanted to check before I wrote it off completely lol. I didn't point this out earlier, but I have made some modifications to the original armor in adding a cloth belt, adding the white elastic shoulder straps, and changing the ab buttons. Just want to make sure these were good or not before I replace some of the aforementioned parts. Thanks again, this is such a relief!1 point
-
Cool, thanks guys1 point
-
Congratulations and welcome to the ranks! Really beautiful work. Color me impressed!1 point
-
Now to finish my shins. The left shin is already assembled, I've just finished the right with the coverstrips. The shins line up much better at the back after several hot water bathes. This makes the velcro connection better in appearance and performance. I've also placed the velco on the inside for the boot attachment.1 point
-
HOWTO: Make your FX armor Expert Infantry I get this question asked a lot so figured now was a prime time to write it up. Obviously the helmet has to go in toto, but since that's an all-out replacement and usually taken care of in one fell swoop, and the fact that most already have swapped out their helmet, Id like to focus solely on the armor. Despite what people may say, making your FX armor EIB acceptable actually takes little effort, money, and time. You can pretty much buy everything you need for $60 and an hours worth of work, or if you have time can do it for about $20 and an afternoon. Lets break it down! 1. Replace the ab plate buttons The ab plate buttons that came with the FX kits are the wrong size and color and need to be replaced. Fortunately this is pretty easy on the FX kit and you have several routes you can choose from: 1. Easiest way buy them completed. You could contact other armor makers and buy pieces seperately 2. Next Easiest - buy plain buttons and use decals You can buy plain buttons from Tandy. They need to be 7/16" in diameter. You can then buy decals from TK-4510 instead of painting them for $3 Button Decals : https://trooperbay.com/trooper-abdominal-plate-decals 3. Least Easiest - buy plain buttons and paint yourself As above, you can buy a set of 9 buttons from Tandy and paint them yourself. Painting guide: http://whitearmor.net/forum/index.php?showtopic=8117 Where to buy paints: trooperbay https://trooperbay.com/costuming-supplies/painting/humbrol Maximum cost : $20 Effort : 10 minutes to 30, depending if you buy or build 2. Replace the plastic belt Like the ab plate buttons, this is a pretty straightforward fix if you buy a belt or you can save some money and make your own. Making a Belt HOWTO: A guide to making a canvas belt : http://whitearmor.net/forum/index.php?showtopic=665 Maximum cost : $40 Effort : 20 minutes or more, depending if you buy or build 3. Correctly mounting your holster While most holsters have full straps, in A New Hope (which most troopers do) the belts are actually fastened from behind using rivets. This is a very cheap mod and you there are many ways to achieve this look. If you are doing an ESB trooper, simply wear it on the right instead of the left ($0 cost and time). If you are doing an A New Hope trooper this look can be achieved by simply cutting off the outside strap (free, 5 minutes) and then fastening the holster to the belt like shown in the picture below as a guide: You can use rivets, Chicago screws, or even snaps. The rivets need only be seen on the outside, and you can even use velcro if you wish on the inside to make it more secure. Maximum cost : < $5 in materials Effort : 10 minutes or less Pretty easy so far So far it's been pretty easy and the above steps will instantly make any FX based stormtrooper look more accurate and impressive. Some choose to stop there, but there are two more mods that will need to be done to make that FX kit Expert Infantry. 4. Cutting the butt plate While the cheapest mod to do, this is really the only one people hesitate on and it often takes two people to get it to hang correctly. While there is a seam line on the back of the FX back plate, it's too high and the cut should actually be lower down, about 1/4 to 1/2" below the belt. You can see this in several shots. While the pictures above only show the strapping for the kidney to the butt plate, some people (including myself) also use a strap that goes around the front of the waist to keep the sides from flaring out. Ideally one could use a heat gun to properly shape it, but a strap works well too. Also depending on your body type you may have to put a little bit if padding in the butt plate to get it to sit correctly (OK, maybe just me and my small butt :-)). Regardless of whichever route you go, this is an inexpensive mod in that the cost is just those pieces of velcro or strapping that you use to secure it. The time is the biggest factor, as while cutting it only takes 5 minutes it can take up to 30 to get it to sit correctly. 5. Shimming the side gaps Of all the armor makes, the FX has the largest gap between the ab plate and the back plate. Fortunately this is pretty easy to solve with some extra plastic sheets. While clones advocate a seamless join, FISD is not so picky and simply using a plastic shim is acceptable. There are several routes that people use: 1. Buy spare ABS/HIPS from whomever made their kit (guaranteed to match the armor) 2. Buy spare ABS/HIPS from a plastics store (perhaps cheaper) 3. Use spare ABS/HIPS that they have laying around. The plastic belt that gets replaced by using a fabric belt is often an ideal candidate for this. 4. Buy a cheap plastic sign from a home improvement store and paint it to match Here is a simple fix that a person used as a starting point. Remember it just needs to look good from the outside though it's always a good idea to make these changes more robust as time and budget allow. Conclusion And that's it! It may seem a lot at first, but after going through it you'll wonder what all the fuss was about. Whether you decide to buy everything you need or create all the pieces from scratch, these changes will really make your FX armor kit pop and breath new life in to it, allowing for many more years of enjoyable trooping to come. Where to go next I'd like to encourage those that haven't taken the plunge to make these changes to do so. Making your FX Expert Infantryman qualified actually is relatively inexpensive and not that hard. Not enough you say? Yes, there is even *more* you can do to pimp out that FX kit, from adding side snaps on the ab/kidney to adding return edges to the chest and other parts, but these aren't required for EIB. What do you think? Everyone - we on FISD staff would love to hear what you think of the above. Was it easy to follow? Did you like the changes once done? Let us know! Paul "Daetrin" FISD Founder | retired DL (FISD), GXO, GML, XO (MEPD, IOC), DWM (IOC, SpecOps, Sith Lords) | 2007 Rose Parade Marcher (B Co.)1 point
-
Not much of an update on the blasters but just thought to share my progress working out how to make my own power cylinders. Lots of material testing and sorting out dimensions I am happy with. Got my 10BA bolts and nuts. Sourced some local resistors here in Japan and still on the hunt for better braided wire. The red stuff I got cheap from ebay is just nylon sheathing. Good for making things cheaply but the detail is lacking. Made my crude templates for the base plate in MS Publisher. Trying to learn some CAD draw so I can make files to send to a laser cutting company.1 point
-
Some threads on making FX armor approvable1 point
-
Congratulations Dan1 point
-
Congratulations and well done Dan1 point
-
Congrats Ruck!!!! Welcome to the Centurion Club!!1 point
-
Congratulations!1 point
-
Congratulations Scott, great to see we have a TKC joining the Centurion ranks1 point
-
Congrats Scott! Well done and worth the wait.1 point
-
Attention Troopers!! please welcome to the ranks Centurion # 492- Scott (Ruck) TKC 69901 of the Northern Darkness Garrison. Well done, sir! Just 8 to go !!1 point
-
Hi Scott, and thank you for your Centurion application! CRL and Centurion Application Requirements: All required photos have been submitted, and on behalf of the entire D.O. staff we are pleased to welcome you to the rank of CENTURION. Congratulations! Other-Armor Fit/Assembly; In this area we review observations made by your fellow troopers and the DO team. Some observations may lead to suggestions to improve the overall look of your armour. Note that we consider both text (CRL) and pictures (screen caps/reference images) when reviewing submissions. Congratulations Scott welcome to Centurion 500 !! You have made an awesome work to give your armor the best TKC look . Well done Trooper!!1 point
-
SURPRISE! Here's the release of my Phase 3 Helmet! Can't wait to see some of these floating around Just as a reminder, I don't mind if people sell prints/casts, but don't try and resell the file, or claim it as your own Please credit me and Nico Henderson (Titanantinium on these forums and the one who modeled the helmet). Have fun guys! https://drive.google.com/file/d/1e3BNRxJONNfYAZ9noHg29s-YyKDZiIF9/view?usp=sharing1 point