Leaderboard


Popular Content
Showing content with the highest reputation on 11/19/2020 in Posts
-
I wanted to have a go at painting the boots, so after reading several tutorials about boot painting, I got to work. I gave them a good wipe over with acetone to remove the shine and placed the velco to keep the shins in place. 1 coat of white leather paint 3 coats later 6 coats later I still need to go around the sole with a toothpick to remove some paint bleed, but man they were fun to paint and see the transformation.4 points
-
23 Congratulations Jonas "LEGOeatPokemon" TK22423 Centurion 477 22 to go Charles "Templar726" TK72627 Centurion 478 (number was missed when first approved 2016)3 points
-
OP (MV) Post #38: Rough Helmet Trimming & One Year Anniversary on FISD This is a relatively (by my standards) short update to show the very basic rough trimming I started on my helmet cap and face. My rough cut lines were drawn out in this post, and in continuing with pandatrooper's guide, I cut in eight areas including the neck opening on both pieces, the ear profiles on both sides of the cap, the top on the faceplate, the brow line, and of course the eyes. I essentially just cut close to my pre-drawn guide lines to give myself room for error, except for the brow line and two spots at the neck opening which I cut right to the lines. On the brow I used the plastic straight-edge again to form a straight line from the backs of the traps across the front to the other side. I left a lot of excess plastic at the neck opening where the cap and face will overlap, as well as at the bottom of where the ears will eventually be positioned. All of this will be further trimmed when I eventually attach the cap and face. Keep in mind, too, this is all pre-sanding since I want to do rough fitment of the pieces prior to proceeding with closer trimming and then sanding. The tools I used were lexan scissors for the large cuts, a dremel cutting wheel (my first ever use of the wheel, and second time for the tool, which was admittedly a bit risky) to start the eyes, and then an xacto knife to further expand the eyes closer to the trim lines. More on the eyes after these first images. Eyes First, know that I am not finished with them, and I would like some feedback. Looking at screen references (Gallery) of ANH Stunt eyes, some of which are shown below, it's clear that the cut lines were all over the place, with varying amounts of return/flashing left visible. However, my plan has been to go for an idealized look, as opposed to the awesome replica style by Dan (CableGuy), so I'll be seeking smooth and even curves and ridges. As of right now I believe I can likely trim some more at the inner points of the ears near the nose, and perhaps also some at the outer corners. Interestingly, I didn't even cut all the way to the suggested trim lines (still seen in photos below) along the tops and bottoms of the eyes, but from the front those areas seem to look ok to me. But perhaps the eyes are still too deep and could use some more trimming in those areas to better match the screen-used thickness of the eye sockets. What do you veterans think? These next images show the remaining pencil lines on ATA's suggested trim line seam. Does it really seem like I need to further trim the long tops, bottoms, and sides of the eyes? As mentioned above, I think there's room to further extend the inner points near the nose, but I'm not sure about the rest. If the consensus is for me to keep trimming all the way around, I think I will experiment with leaving a bit of extra on the right eye to somewhat emulate the screen-accurate bump. Additionally, today marks a special date for me since it is my one year anniversary on FISD (with an account), and tomorrow will have been a year since my introductory post. It's hard to believe a whole year has passed, and it's amazing how much more attuned I am to variances and irregularities in TK armor. Gone are the days of watching ANH and ESB and seeing idealized TK uniformity. Now I can't UN-see gaff tape, dropped or twisted biceps, open calves, and much more. I can only hope to someday be able to discern armor vendors by simply looking at a bucket or ab piece. Then we can talk about a resume-worthy achievement! Haha. Many thanks to each and every one of you who have poured your time and wisdom into my journey. Now on to my next 500 posts and beyond! One final note not really related to my thread, which is somewhat customary. Just this past weekend a family member shared their Disney+ account with me, so let's just say... this is the way... Quote Response: Glen - Thanks for your TD tip! I hadn't thought about clear-coating, but that does make sense considering that the primer will be flat and the screen-used TDs had some shine to them. That was something I was missing on my initial attempt. Printable/downloadable PDF of my entire build thread to this point contained in [THIS SHARED FOLDER]. The PDF will be updated within a few hours of my own new posts and will note sequential version numbers and revision dates.3 points
-
I'm actually OK with the spacing.2 points
-
Incinerator.mp41 point
-
Hello everyone, I am Chris from Cleveland, Ohio. I’ve been a Star Wars fan since I was a young kid when the first movie was released. Ever since then, I’ve always wanted to have a Stormtrooper outfit (I’ve looked for kits over the years). During these Covid times, I have a little more time on my hands to actually make it happen. Over the summer I 3D printed an ANH helmet and was pretty happy with the end result. That wasn’t enough. But it was enough to make me pull the trigger on an ATA TK kit which has been sitting for about a month in my basement. I’ve been reading a lot on this amazing forum, and honestly it’s a lot to take in. Every time I think about starting it, I feel like I haven’t researched enough. With that said, my goal is for Centurion level, else there will always be regret. I do hope to get started on it this week!1 point
-
Resin
.jpg.ccfa384cefdc4da65b97c4d031610e3f.jpg)
.jpg.a72974a4981c479a3a6486b301a185c0.jpg)
.jpg.143daffdbdcca96cdff3378da08faeec.jpg)
.jpg.836dcda51214be3d844830818f993aca.jpg)
.jpg.6c3a37d3245cb76ff41b9b35601f8250.jpg)
.jpg.0252d7f9ffc8924fb9df97685fcddf08.jpg)
.jpg.b398fb442ad179c2c460944d770baf2d.jpg)
.jpg.8f2272a15a5e66df90b4ac23ac32608c.jpg)
.jpg.20ff01629480e661984c5a2d5f2d4e0d.jpg)
.jpg.e8f41e8b03599ad8b8433050ec8b8141.jpg)
.jpg.21ecd6655267ff40840393f732982398.jpg)
.jpg.606e9fc59cae1c67682f87632c9bcbdb.jpg)
.jpg.861802be116a9e08f92afad687821fcc.jpg)
.jpg.c82ef3fb5617c463fc2701be6c060ae9.jpg)
.jpg.e90b49004ddf82cc71c06bb9be17ea94.jpg)

 1 point
 -
At long last, what a ride, congratulations trooper and welcome to the ranks1 point
-
1 point
-
Congratulations Jonas!! Welcome to the ranks1 point
-
Thank you! You had a lot of great pointers!1 point
-
Congratulations and welcome to centurion trooper1 point
-
Woooooo! Thank you @justjoseph63 and everyone else for helping me come this far, I feel really proud of this!1 point
-
Hi Jonas, and thank you for your application for Centurion! CRL and Centurion Application Requirements All required photos are now in and, after review, we are pleased to welcome you to Centurion! On behalf of the DO team and myself, many congratulations! Other-Armor Fit/Assembly In this area we discuss areas that could benefit from additional improvement. Note that we consider both text (CRL) and pictures (screen caps/reference images) when reviewing submissions OK brother, after all your hard work your goal has been reached! But.. there are a couple of issues we would like to address. Nothing too crazy, but things we know you can handle. 1. Although they are lined up perfectly in the front and the gaps are spot-on, the rear photo shows your thighs as being uneven and they have way different sized gaps. Either they shifted during your photo shoot or you could really use some trimming on the top front of the right side. This is also apparent on the sides in your "arms raised" pics. To even them out and give you a MUCH sharper look, I would suggest trimming off the top of the front right thigh and then raising it to where it matches the left. A simple dressing issue here and a common problem... your sniper knee plate is twisted off to the left. This can be easily fixed by adding some foam padding inside to keep in snug you your calf and will also help your cover strip alignment. And that's it! Over the course of your build you and I have been in constant contact via PM, and you have really stepped up to the plate with all the suggestions that have been offered. I honestly hope you will once again do your magic and take the final steps in making this one truly awesome set of armor!1 point
-
The frown was corrected in the EIB submission - that detail wasn't missed by you! Apologies, but when I started this thread, some of those images remained. Here are the pictures showing the corrected frown from the EIB submission:1 point
-
As for the decals. it's up to you. Hand-painting is great, and if you have the skills and a steady hand I highly suggest going that route. Speaking of painting, as Glen mentioned the paint on many of the teeth needs to be taken back a bit before one of us starts your EI review. Although many GMLs miss this item, it is actually a requirement for Basic approval: "Frown is painted gray and does not leave the teeth area" 10 careful minutes with some Q-tips, toothpicks and a NON ACETONE paint remover and you are good to go. I suggest Goof-Off, which is a citrus based paint remover and is available in tiny bottles, often at the Dollar Store.1 point
-
Looking great Mark, blaster looks top notch Sent from my SM-A520F using Tapatalk1 point
-
I ended up ordering the stickers and the paint set from TrooperBay. I figured I could try the stickers and see how they work out. If I don't like them, now or down the road, I can peel them off and paint them. I have had great success with soapy water and stickers.1 point
-
They can be a little difficult to stick in some areas, it's easy enough to pull back a problem area and re-apply, if you use a little force too it can help on problem areas. Using a pin can help for any air bubbles. You can use the old model making trick and apply with soapy water but it does take ages to get all the water out so you have to keep at them until you do. Lots of websites with info for wet applying decals https://www.carstickers.com/blog/post/apply-your-sticker-like-a-pro/#:~:text=You can apply most smaller,the area is still wet.1 point
-
Hi Mitch, you may want to take a look to this video, it was so useful to me when sizing my thigs.1 point
-
For the thigh, you could take off more return edge on the bottom. It won't be visible, and will give your leg more flexibility. As for lining up the back, I would measure the top and bottom of your thigh, and a few inches, and then measure evenly on both the inner and outer part at the top and bottom. For example, a 25" diameter upper thigh, starting big, like 28 or 30 inches. Then measure from the front seam, around the inside along the bottom of the curve, and marking at around 14-15 inches, then measuring at the same height on the outside. Then for the bottom of the thigh, measure and add. Then, measure along the ridge, from the last corner to the edge of the piece, so that it will appear symmetrical. Connect the top mark with the bottom mark with a line on both pieces, and tape them together and test fit. From here, you can make it smaller or larger so it fits, and continue to test fit before cutting. This might have been a confusing explanation, so hopefully someone else can answer or explain better.1 point
-
i looked at it as easy to take apart and store.i can un screw the chicago screws for the holster and pop belt plate off and roll up the belt.1 point
-
I may get some of this as well for my bucket seeing how well it worked for you. Also seriously considering doing the snap thing for my belt now too so I can go between ESB and ANH stunt belts. You're giving me some good ideas, thanks!!1 point
-
Great news, Mark! Actually looks great to me too! Sent via Imperial Tapatalk Comms1 point
-
The awesome DOs definitely have the final say in this, but based on what I’ve seen on submissions in the past, they may want to see closer proportions. While they wont be getting a ruler out to check the 20mm and 10mm spaces, I think they’ll likely ask for something appearing to be a relative 2:1 ratio, rather than the 1:1 (13mm:13mm) that you currently have. Sent via Imperial Tapatalk Comms1 point
-
You could also go over the lines with a black permanent marker which could make them look hand painted1 point
-
WOW.. super nice job on those fixes, sir! I am hopefully assuming you will be aiming for Centurion, and there is something I noticed about your bucket decals... the ones you currently have do not look like the ones AM normally includes with their kits As per the CRL for Level 3, "Tears/traps shall be hand painted or use decals that emulate hand painted..", and yours look a little too "perfect" in comparison with those seen onscreen. BUT, if you are willing to change them out, I have a complete spare set of current AM decals that I will send to you (no charge),. Just shoot me your shipping info. via PM if interested. Yours Reference images AM** Yours Reference images AM** **P.S. The photos of the AM decals appear lighter because of the camera flash, but they are actually the correct color.1 point
-
If you want authenticity then you should use a liquid solvent cement. It’s a water like substance. You clamp the two parts together then apply the liquid in an needle applicator bottle to the join. It will seep in a capillary action and weld the two parts together. you just have to be careful not to drip it across the plastic or you’ll be sanding and polishing.1 point
-
50/50, with a new build you can fit to your now shape, also update anything you had issues with on your original armor. Or modify your old armor, you know how it fitted and what would would be needed to reduce the size. Personally I think I'd go for a new build, "if I only knew back then what I do know"1 point
-
Yea I realized that it was a little thick but that’s all the hardware store had. It was exactly the width I needed all I had to do is cut it to length shape it and drill the holes. If it’s a real issue I can always fill the holes in the old clips with JB weld and drill new ones, but these really came out nice I’m really happy with the way they look.1 point
-
Now for the dreaded sniper knee. Like many builds have mentioned, vertical sides looks more screen accurate and rounded corners to prevent stress splits/cracks. I think I might have the sniper knee secured in the correct position. It was a tough battle getting this awkward knee to fit, not to mention a long time. But as it was strongly advised, glue the base (wait 48 hours), glue one side (wait another 48 hours) then glue the other side (wait 48 hours). As you can see there were quite a few clamps needed. After I removed the clamps, I gave it a once over to check the positioning. It looks straight and aligned to me, but I'll leave it up to you guys. It was soon after checking the position of the sniper knee, I then realised that one of my clamps had left an imprint on the side. So I did what any rational person would have done. I had a 5 minute panic attack, then went through my options and possible outcomes. It seems that there are only 2 options for me:- A. I leave it as is and say "oh well, these things happen". or B. I carefully remove one side, trim off as much of the imprint as I can and reglue. Then carefully remove the other side, trim off a little to even it out and reglue. Here's a picture to show what I mean. What should I do?1 point
-
Its been very slow for me in the way of progress. I've been trying to find the time to work on my kit, along with the difficult areas to glue that require 48-72 hours cure time instead of just 24 hours. I managed to get my left leg completed (except for trimming the top of the coverstrip) and I want to get confirmation from you experts that if everything looks good, I can incorporate those measurements for my right leg. So here's what I managed to do. The last time I spoke about the thighs, I was struggling to get the gap where the ridge was at the back to close. After some very helpful feedback and ideas, I went back into the thighs. I installed the inner strips, then the front coverstrip. I borrowed an idea from Markgambino for closing the back ridge gap (thanks Markgambino) I cut 2 thick pieces of ABS, glued them together so they would be extra strong... ...and used the force (clamping force) to close and even the ridge gap for 48 hours cure time. This worked batter than I expected. I thought that there would still be some gap to fill with ABS paste, but there's hardly any at all. After that I glued the back coverstrip... ...and here is the result. I'll trim the tops of the strips only when I know that the thighs are good and don't need resizing.1 point
-
An RS full commission build will include a blaster , basically it's a full stormtrooper costume in one box , built to measurements supplied by yourself . It's a great one stop entry into the world of Star Wars .1 point
-
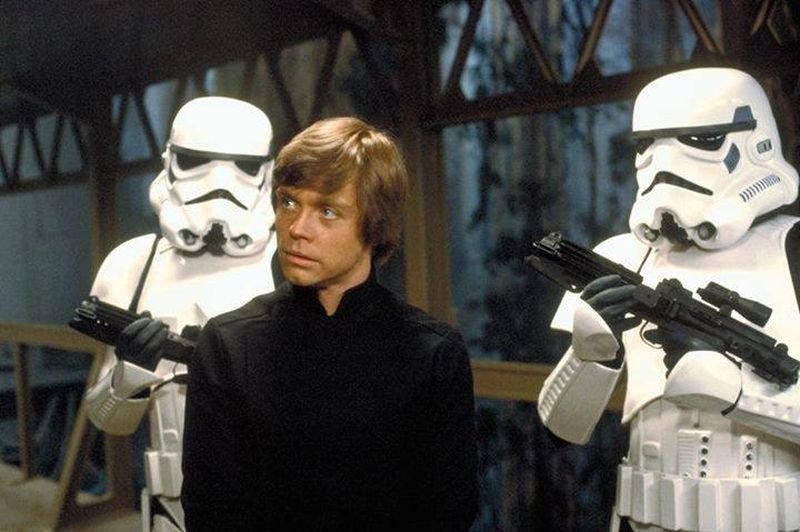
I think I'm gonna go with RS Propmasters strictly on reputation, but I have questions for those that have gone before me. 1. What's the practical difference between ABS and PVC in this application? Which is preferable? There is a thread here with info https://www.whitearmor.net/forum/topic/23424-abs-or-pvc/#:~:text=The 1.5mm ABS is,time and is ULTRA white. 2. When ordering, 'strapping pack' is optional. What is that, straps to hold the suit together? Correct 3. Full commission or self build... since it arrives in parts and pieces, how much work is really involved in finishing a self-build kit to the commisson level? I would advise to have a look at some of the RS build threads (or in fact any armor builds). If you can build a plastic model kit you can build armor https://www.whitearmor.net/forum/forum/80-anh-build-threads/ 4. Self-build doesn't include blaster or boots. What else is missing that I'll need? From their website "This kit contains all the plastic formed components, plus matching plastic cover/joining strips. Also included are all the components to complete the thermal detonator including the tube and metal mounting clips." Strapping, gloves, glue, material belt, paint, holster, boots, blaster, padding for helmet, neck seal, a great list of soft parts here https://www.whitearmor.net/forum/topic/47307-list-of-soft-parts-for-your-ot-tk-build/ 5. I'm looking at the ANH blaster. RS is out of stock on all three blaster styles. Is that something I can source more locally? (I'm in Nevada) Thanks for your help and advice! I don't know what may be available in Nevada, you may want to check in with your local garrison, you can find a list of them here https://www.501st.com/members/displayUnits.php1 point
-
I agree, I had a heck of a time with my first helmet, ears where the worst1 point
-
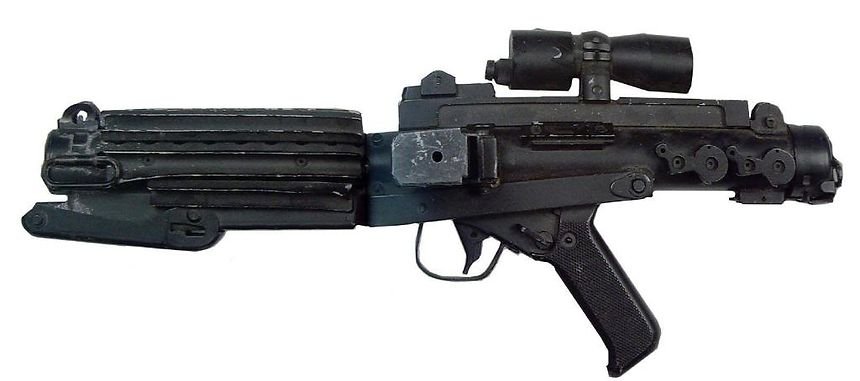
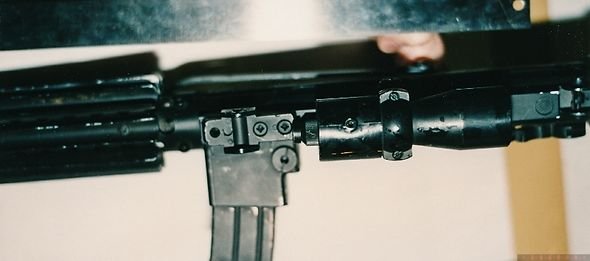
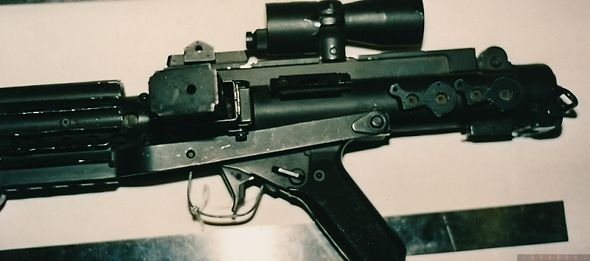
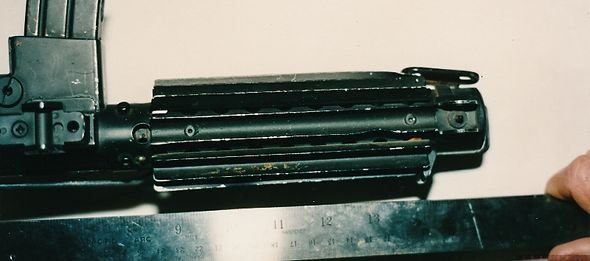
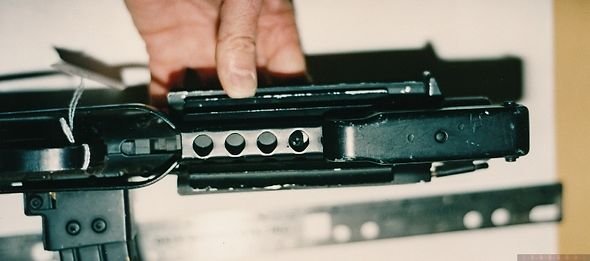
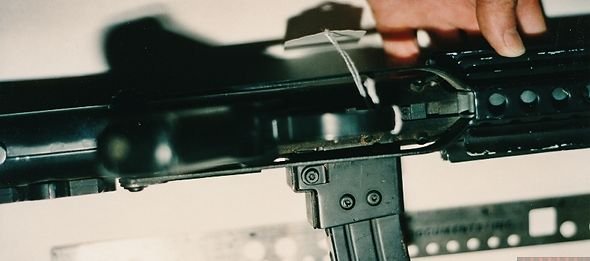
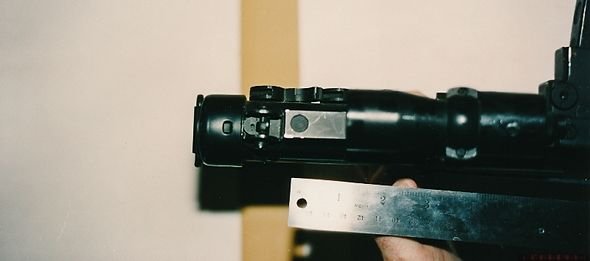
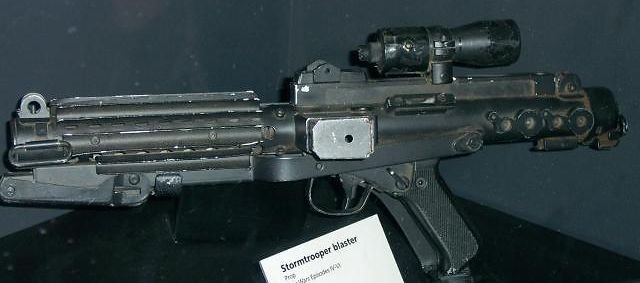
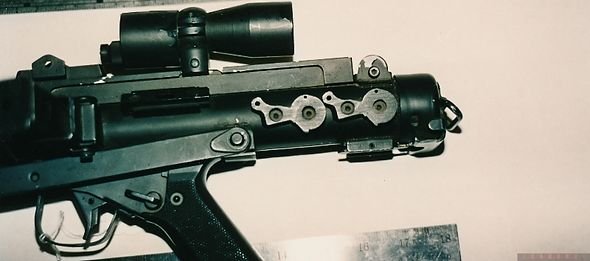
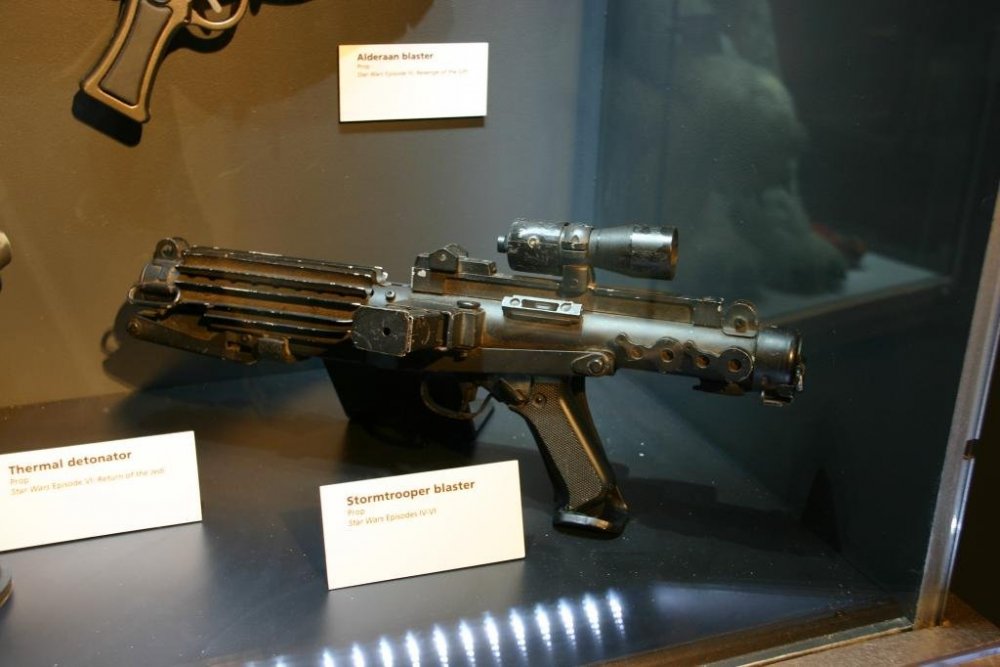
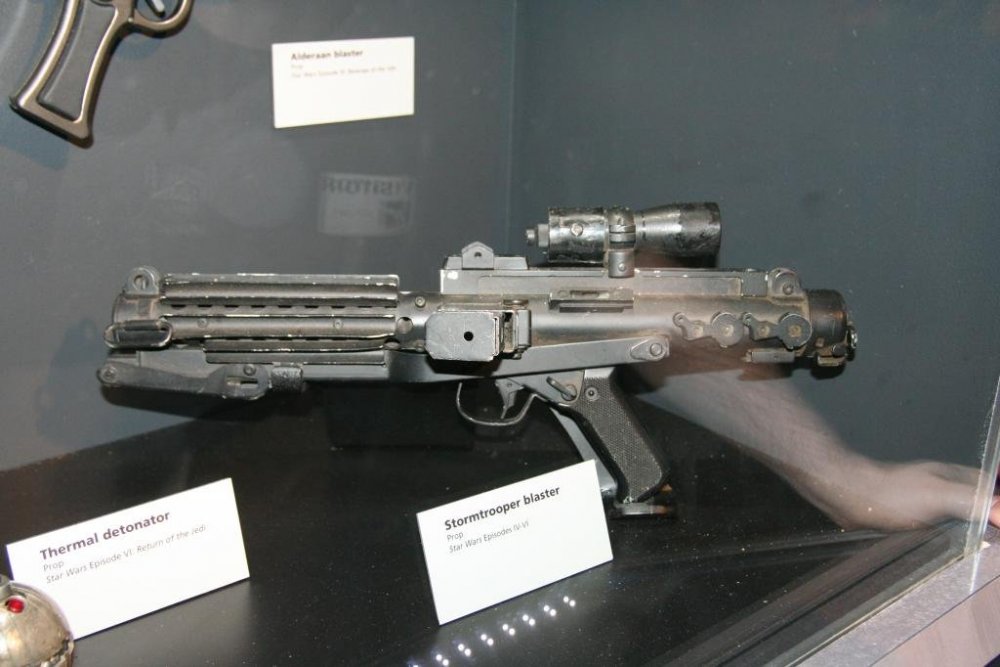
My Phoenix Props kits a few years ago all had a one-piece folding stock, which (as far as I know) was cast from the cleaned Sterling parts set that you have now. I always wanted to see (and have) a detailed resin folding stock. Yeah, it might break - but I would take that risk.1 point
-
1 point
-
Nice positioning1 point
-
Hey Scott, Thanks for the ear screw fix, and apologies for the initial miscommunication. Could you please post close-ups of the wrist side of your forearm armor? The L3 CRL states No return edge on the inside of the front of the forearm is allowed. I can sort of see them in your arms raised photo, but a closeup would be helpful to confirm that there's noreturn edge. Next, this was listed as a suggestion in your EIB application but per the CRL should have been a Centurion requirement. The L3 CRL states: The top of the ABS ammo belt should sit at or just above the bottom of the central and vertical abdomen button panels. Yours is sitting a bit low: Reference Images: I had this same issue with my Centurion app and have added a couple small strips of velcro to the front of my ab armor to keep my belt from sagging. I really appreciate your patience in this review; I have been swamped at work and have been peeking at applications on short breaks so I'm definitely not operating at full capacity. You have a great build and you're almost there - we'll get you over the finish line soon. Thanks, Sha Sha1 point
-
24 to go, congratulations Shawn "Firedog" TK12399 Centurion 4761 point
-
Started last weekend. Hyperdrive activated!!!1 point