Leaderboard


.thumb.jpg.a22c59871126b71e159a4adfd3e00414.jpg)
Popular Content
Showing content with the highest reputation on 11/18/2020 in Posts
-
Good morning. Getting around to working on my faceplate. I’ve trimmed the teeth and any filing them down. How are they looking so far? Sent from my iPhone using Tapatalk2 points
-
Hello I’m TK11605... CharlieMcNeil Can’t wait for the weather to be nice again so I can troop on the Harley.
 2 points
 -
Hola Lluis , las nuevas fotos se ven muy bien, pero revisando mas detalladamente con el D.O. Team, hay varios puntos que corregir para que estés listo. Hi Lluis, the updated photos looks great, but looking in detail with the D.O. team, there are some points to fix and you're golden : 1- Entre los requisitos para Centurion indicados en tu aplicación de EIB se solicitaron ajustes de pintura en varias zonas del casco: In your EIB app some paint fixes to your helmet were pointed as Centurion requirements Las líneas re rango deben ser más gruesas y definidas The rank lines should be thicker and well defined References Los lagrimales fueron corregidos y el grosor esta bien pero las líneas se ven muy irregulares por lo que es necesario definirla más The tear lines were corrected but the lines look very irregular so it is necessary to define it a bit References El vocoder se ve mucho mejor pero al igual que los puntos anteriores es necesario refinar algunas zonas , indicadas con las flechas. The vocoder looks much better but like the previous points it is necessary to refine some areas, indicated by the arrows. Acerca de tus campanas de hombro , es necesario hacer un pequeño recorte en las esquinas para que no se metan demasiado en la armadura pectoral. Your shoulder bells are behind your chest plate quite a lot, you may want to trim a little of extra material Reference Otro ajuste rápido es que quites los elásticos de la parte del frente de los puentes de hombro , solamente se requieren los posteriores. Another quick fix is to remove the two additional elastic on the front of your shoulder bridges, just the rear are required. Reference Es requerido que alargues los elásticos que unen los biceps y los antebrazos de manera que estos bajen un poco mas cerca de las muñecas. It's required to lengthen the elastics that join the biceps and forearms so that they drop a little closer to the wrists. Reference Finalmente, aun hay un espacio entre tu placa abdominal y la lumbar y deben alinearse . Finally, there's still a gap between your Ab/Kidney connection that needs to be addressed Reference Son varios detalles pero estamos seguros de que puedes con ellos , déjanos saber si podemos ayudarte en algo. Certainly, it seems to be a lot of work ahead, but we are confident that you can deal with it , let's us know if we can help you. Estás a solo unos pasos Lluis!!!2 points
-
I've got the front and back together, now time for the ears. Here I'm lining up the screw holes with the edge of the trap. Sent from my SM-G930T1 using Tapatalk2 points
-
No time to stop. Here the link to my Centurion application. Just a couple of photo reshoots were needed and a screw tightened so far. I can't seem to get my belt to ride high enough after fixing my Ab buttons so I'm going to remove and fill in the holes for the snaps and install another reinforcement of ABS to strengthen the area. I already noticed some marks indicative of stress around one of the snaps so I'm looking to address that.2 points
-
Looking good Mark, should be an easy pass.2 points
-
When building an RS helmet, always always start with the left side . Line the eye up with the forehead trap, and make the first hole . Use an ear nut n bolt to secure it , then work round to the right side . Don't fit the rivets until you are happy with the fit .2 points
-
ANH TK Stunt Name: Mark C Height: 182cm Weight: 105kg Future Garrison: Knightfall Garrison Armour Maker: AP Helmet Maker: AP Cloth Belt Maker: AP Neck Seal Maker: Darman's Props Boot Maker: Imperial Boots Holster: AP Hand plates: AP (until Joseph's arrive) Thanks in advance for any feedback! Special Thanks to: justjoseph63, gmrhodes13, TheSwede; ukswrath; sly11; Tarok; TkSpartan; husky68, + many others http://i.imgur.com/XDIeFPX.jpg http://i.imgur.com/8nLMgPq.jpg http://i.imgur.com/JQWdQws.jpg http://i.imgur.com/AtYgac0.jpg http://i.imgur.com/fKgSEre.jpg http://i.imgur.com/rHLEsCd.jpg http://i.imgur.com/xDukABy.jpg http://i.imgur.com/6EFp69i.jpg http://i.imgur.com/mh5QcTO.jpg http://i.imgur.com/ShKjlOs.jpg1 point
-
Hey there everyone! So glad to finally be a member of this fantastic group. Looking at my armor on its stand still makes me giddy. I started this journey about three years ago, but the past two months is when things really kicked off. I binged the Clone Wars while waiting for my armor to arrive, which only fueled my excitement to be involved in the 501st. Like everyone else, I’ve had to make a few quality of life changes to the armor; shortening/lengthening strapping, wrangling those pesky shoulder bells, making the helmet into less of a plastic coffin and more of a trooper’s friend with some fans and speakers. If I had any advice for any aspiring members, it’s to come to terms with the fact that TK armor is not the most comfortable thing in the world, but you can definitely work to make it bearable! I still have a ways to go but I’m confident in my fellow troopers and their wisdom to guide me. Again, thank you for all your help and support and I hope to see you on the field! -Ian
 1 point
 -
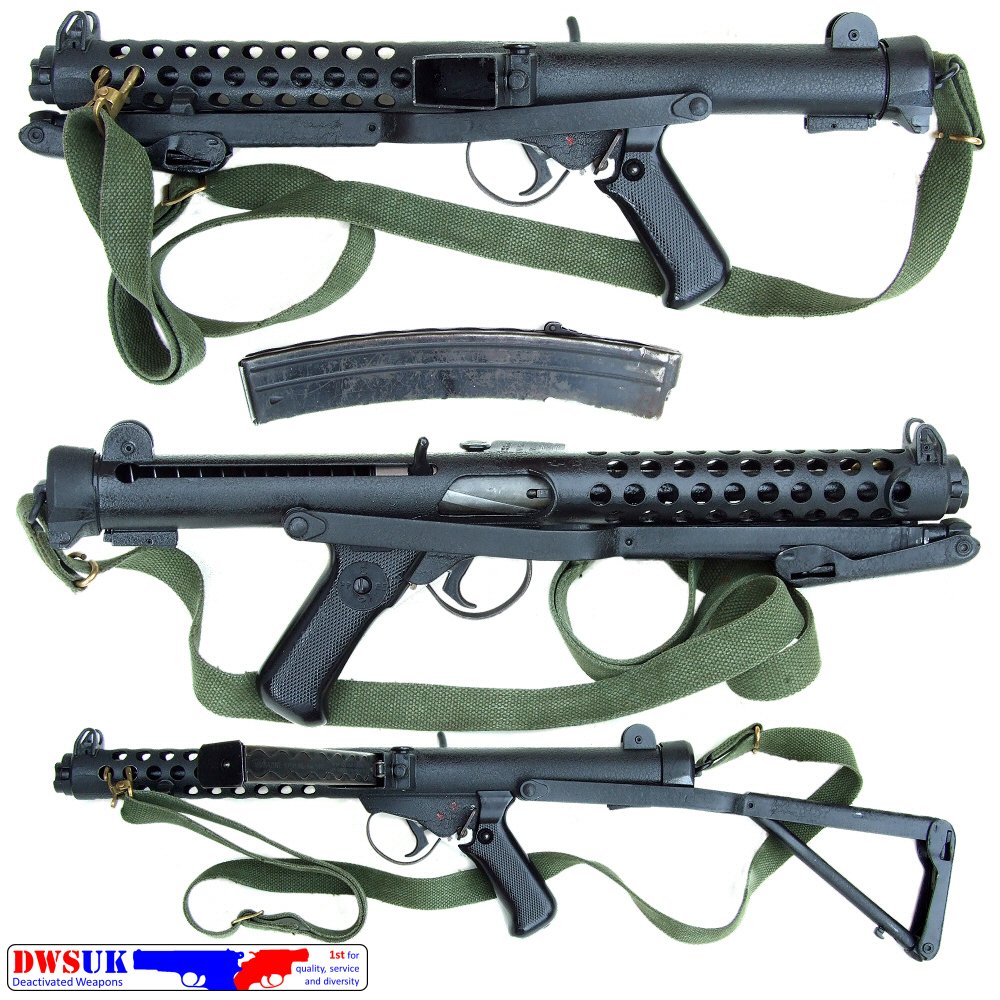
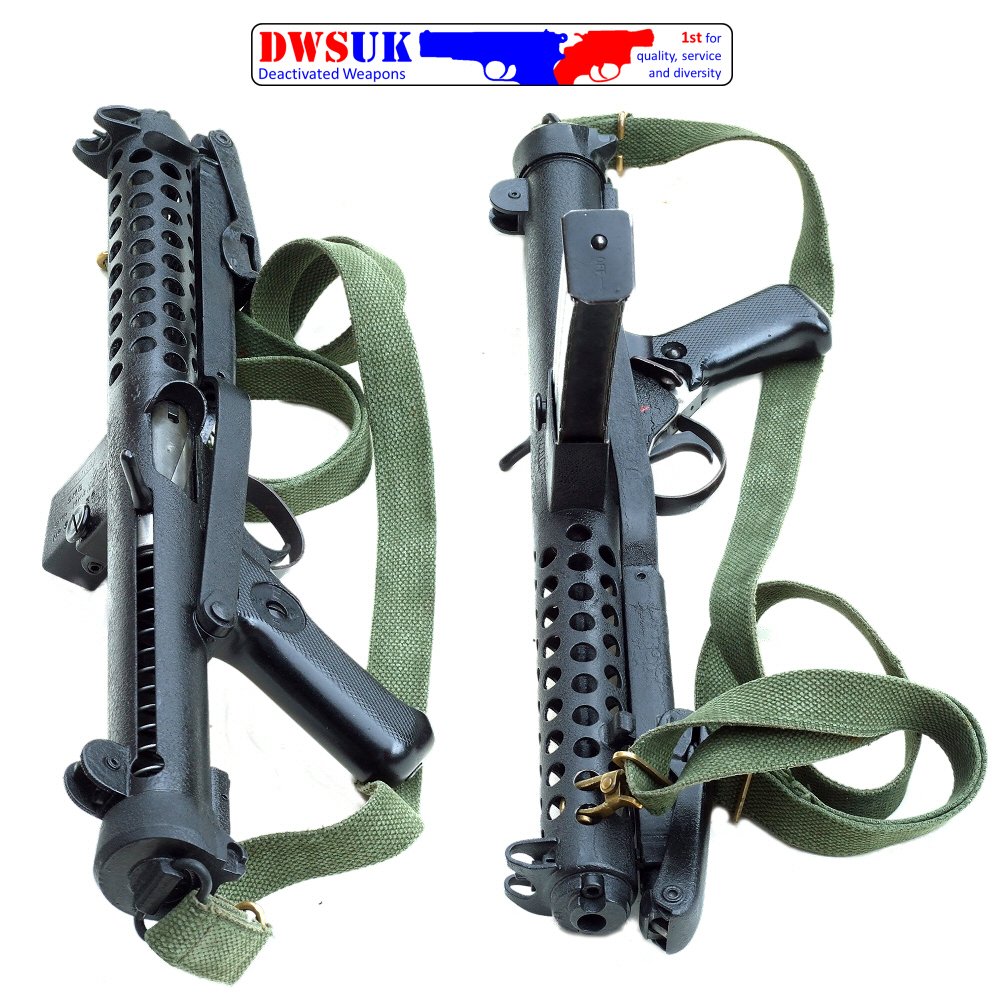
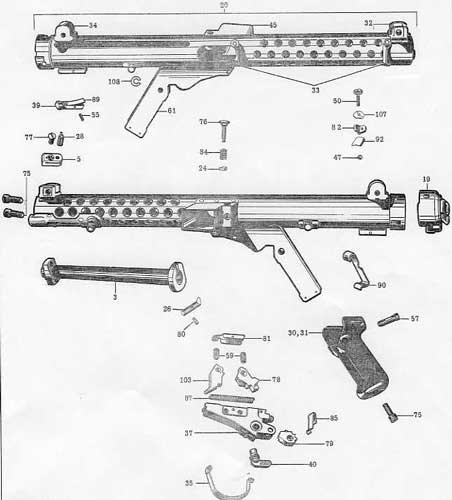
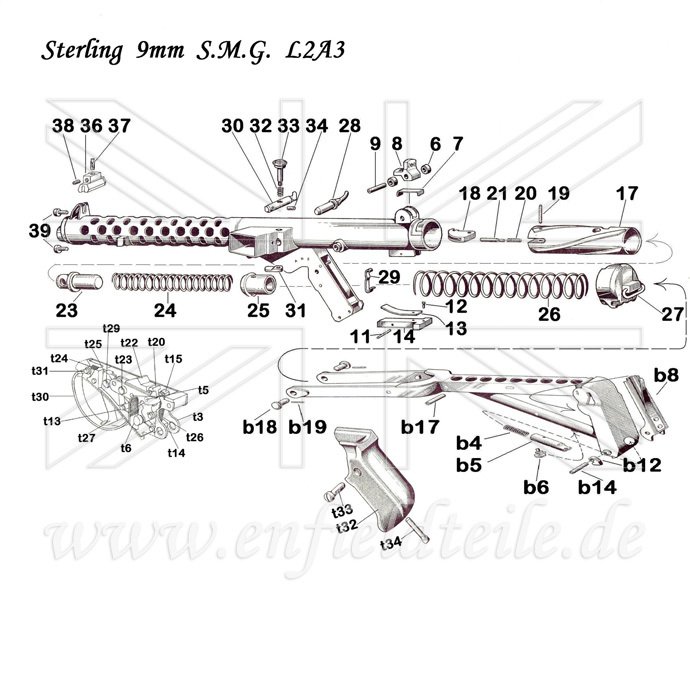
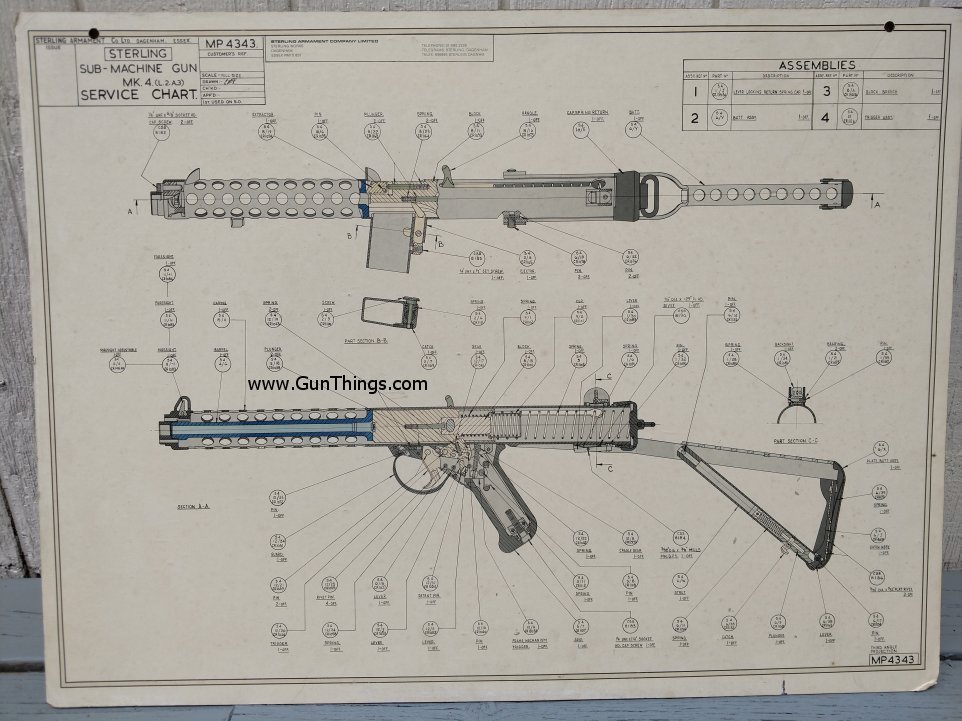
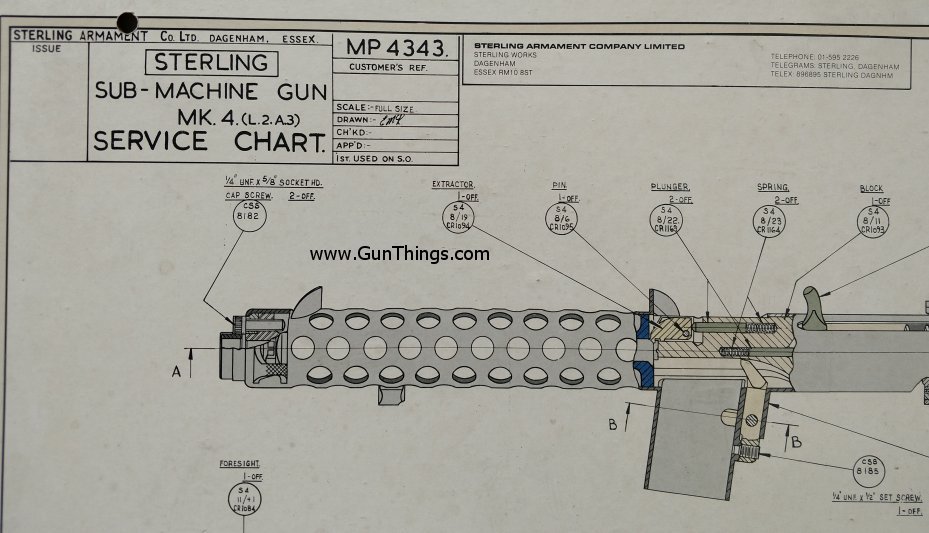
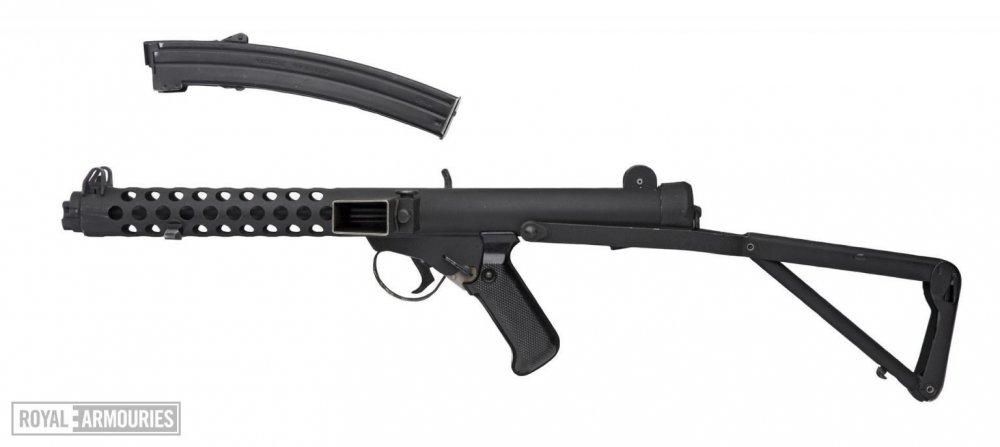
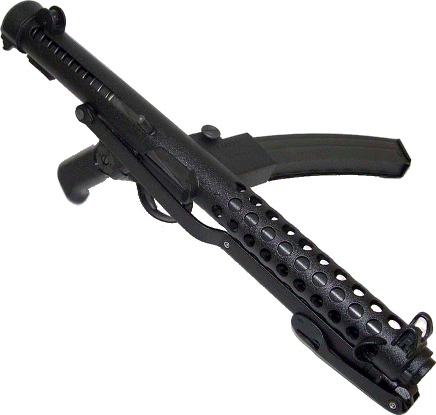
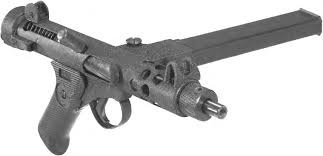
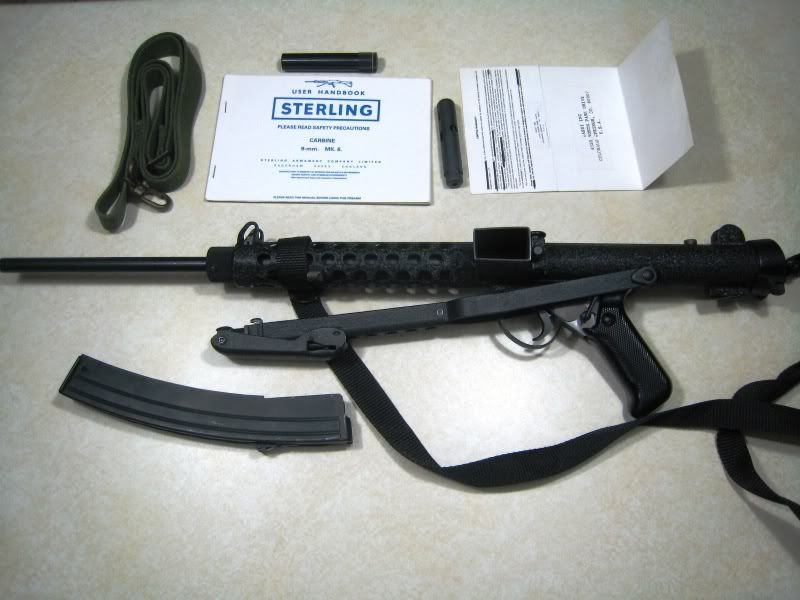
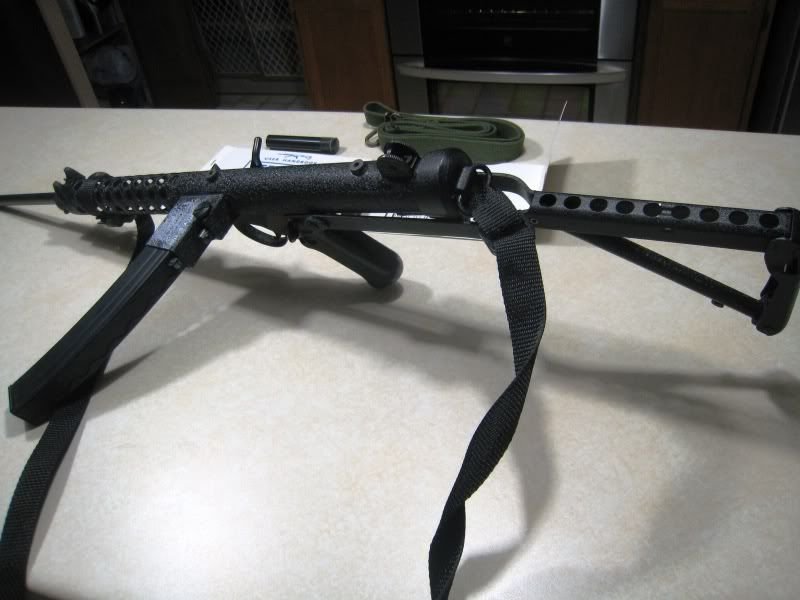
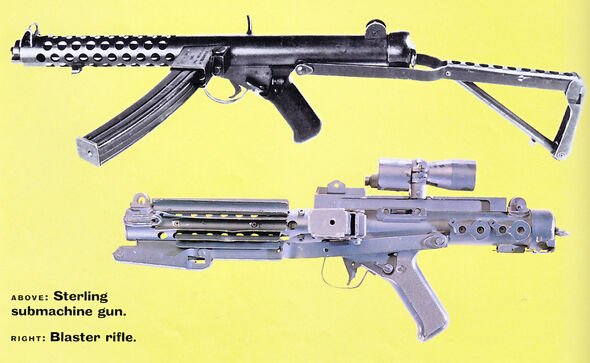
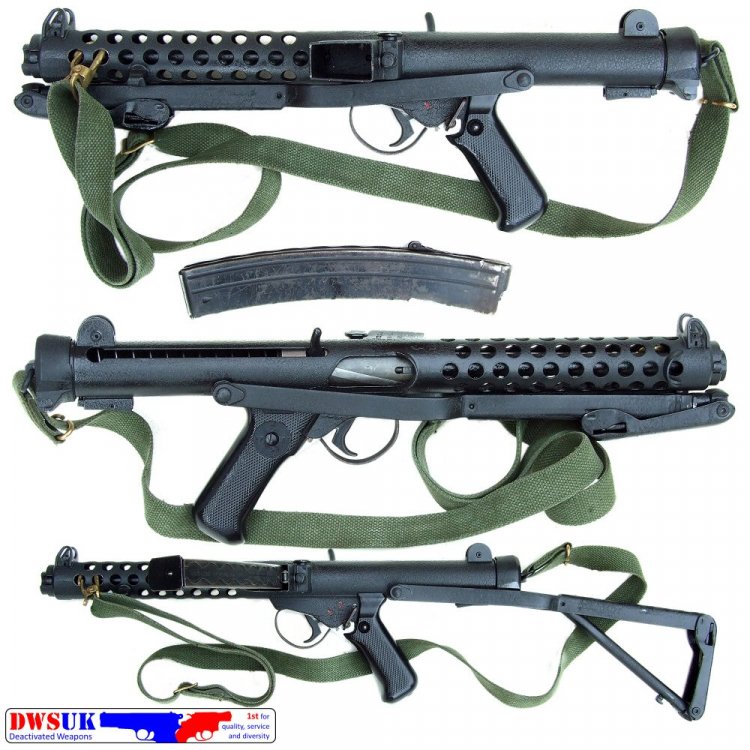
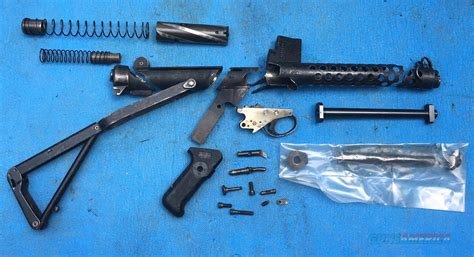
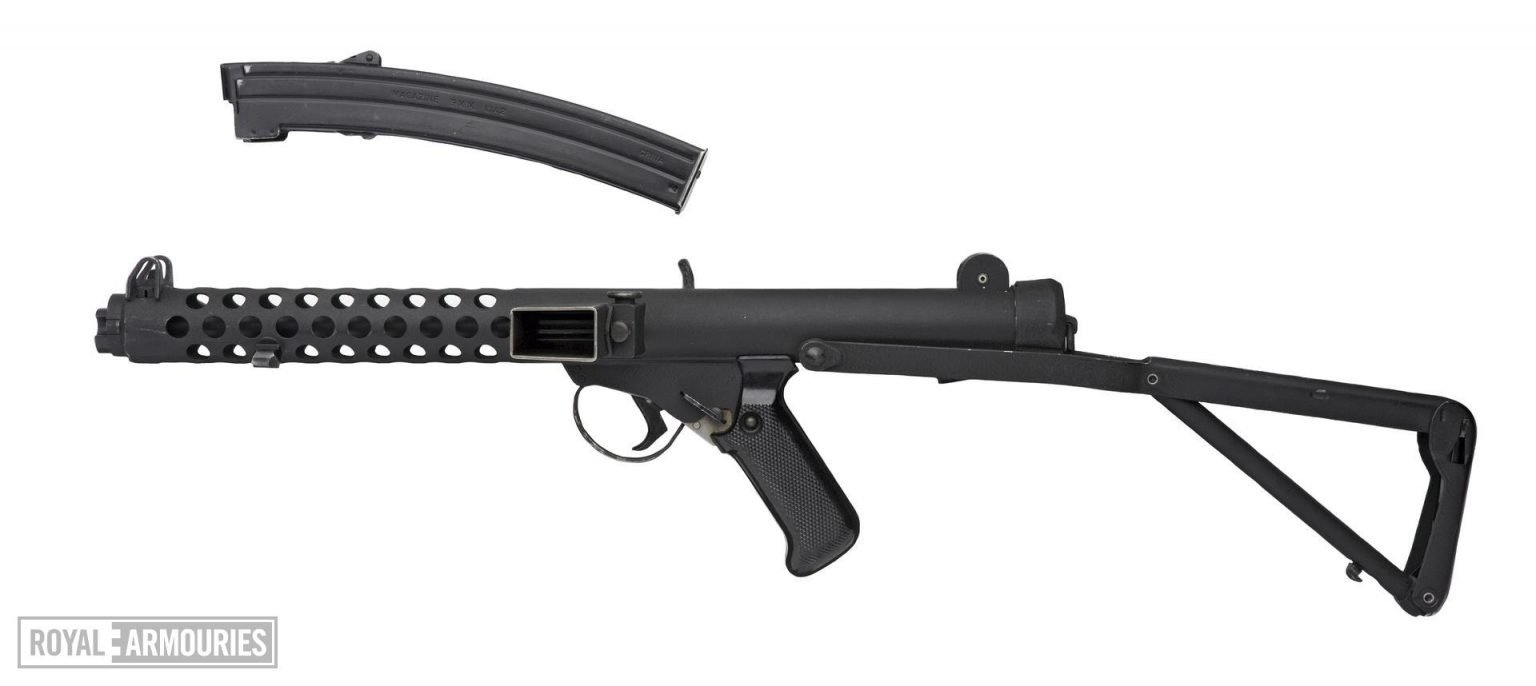
Handbook PDF http://pdf.textfiles.com/manuals/FIREARMS/sterling_mk4_smg.pdf L2A3 Sub Machine Gun PDF http://sterlingl2a3.com/wp-content/uploads/2012/10/KokalisL2A3.pdf STERLING TYPE I, TYPE II & TYPE III SEMI-AUTO RIFLES & COLEFIRE MAGNUM SEMI-AUTO PISTOL Owners Manual PDF https://www.centuryarms.com/media/Rhet/Resources/Post/Attachment/2802744720062.pdf
.jpg.081fe7fe78eff74dc493d36ccfb624b8.jpg)
.thumb.png.fbeefbaf1c9c685a66a202c4ea13a4ed.png)

.thumb.jpg.c0d888b159b4148c4b4c2d0365f900d5.jpg)
.jpg.4a94de38fee519c39f936618e51d66ff.jpg)
.jpg.d82f2310ee196fec8daa3b3d5c9b4a03.jpg)
.thumb.jpg.dd651031008eb2592795e29081368ceb.jpg)
.jpg.1b4a75d4119c595b0f44665985570bb6.jpg)
.thumb.jpg.911c60f37fd6de8c49ce75d8a5ace5dd.jpg)
.thumb.jpg.53532265537be327210b6c72e8d8b13f.jpg)
.jpg.3d427cd125add60e6dd4bd8b55c9060b.jpg)
.jpg.d305c873072ab0c8ea4847e5947ec094.jpg)
.jpg.aa23b55e7846793d8648c12c2b0a8118.jpg)

.jpg.f3b05be3c68dc569b0e2c65a54324ead.jpg)
 1 point
 -
Its been very slow for me in the way of progress. I've been trying to find the time to work on my kit, along with the difficult areas to glue that require 48-72 hours cure time instead of just 24 hours. I managed to get my left leg completed (except for trimming the top of the coverstrip) and I want to get confirmation from you experts that if everything looks good, I can incorporate those measurements for my right leg. So here's what I managed to do. The last time I spoke about the thighs, I was struggling to get the gap where the ridge was at the back to close. After some very helpful feedback and ideas, I went back into the thighs. I installed the inner strips, then the front coverstrip. I borrowed an idea from Markgambino for closing the back ridge gap (thanks Markgambino) I cut 2 thick pieces of ABS, glued them together so they would be extra strong... ...and used the force (clamping force) to close and even the ridge gap for 48 hours cure time. This worked batter than I expected. I thought that there would still be some gap to fill with ABS paste, but there's hardly any at all. After that I glued the back coverstrip... ...and here is the result. I'll trim the tops of the strips only when I know that the thighs are good and don't need resizing.1 point
-
An RS full commission build will include a blaster , basically it's a full stormtrooper costume in one box , built to measurements supplied by yourself . It's a great one stop entry into the world of Star Wars .1 point
-
Started painting the frown. I’m a little anxious to paint the ends on the left and right sides. Sent from my iPhone using Tapatalk1 point
-
Wow Colin, very well done!!! Glad to see, there is nothing left to tell from that earlier flaw.1 point
-
cleaned up these teeth.finished the right shin still rough finish.im going to clean everything up once its all done.i used these bigger thicker picks to clean frown.the smaller ones break easy and you get hand cramps.also my belt just came in.really cant do nothing to it till the snaps arrive.1 point
-
Modification continued: I used the Bondo "Glazing and spot putty" to patch the spot from removing the mounts, and to fill the holes on the counter. I also used it on the "keyhole" repair, which will be shown below. At the hardware store, I purchased a few different varieties of 6/32" bolts and threaded inserts. On the scope, I drilled out the holes larger, put in some CA glue, and then used an allen wrench to screw in the threaded inserts. For the rear sight, because the pieces were tighter fitting, I used a different type that just gets glued in (CA glue again). These inserts (if they hold well) should keep the new rail strongly mounted, as well as allowing it all to be removable: Finally, the "keyhole" slot that was incorrectly placed on the side of the muzzle. It should be just a standard hole, and I figured now was the time to fix that too. Because it is just a small rectangle of plastic with a curved edge, I first drilled a large hole in the plastic, and then cut the rectangle off of the edge of that hole. It is difficult to lower a piece that small into place with glue, so I took a scrap of white ABS and bent it into a small hook, and glued the piece on to it with a small dot of CA glue, and dried it with accelerator spray. Then applied glue to the black piece, and held it in place with the hook, while I sprayed with accelerator. Then (after holding my breath), broke the white piece off of its weaker glue spot, leaving the square in place. Two coats of Bondo glazing and spot putty, and it now is looking as it should: So now I will just need to drill some holes in the rail, hopefully in the precise locations, and then create the Hengstler mount bracket to get it all completed. I have the reference thread, and with it I plan to just eye the location for the scope and counter, but if anyone has a precise left side view of the blaster with measurements, I would welcome the reference.1 point
-
Thanks, this is by far the most unnerving part of the bucket. Sent from my SM-G930T1 using Tapatalk1 point
-
Welcome to the ranks, Ian. Now that you mention it, these could sit a bit closer to the shoulder bridge. Maybe you can reach this by shortening the strap. To keep your lower legs from rotating, you can use velcro between boots and shins.1 point
-
Looks awesome, mate! Well done! Sent from my Imperial Communicator1 point
-
Just going through some files and noticed I had this video of the Sithtrooper armor flexibility, fpr anyone interested in materials used these days 72215482_961535254182683_849740901348540416_n.mp41 point
-
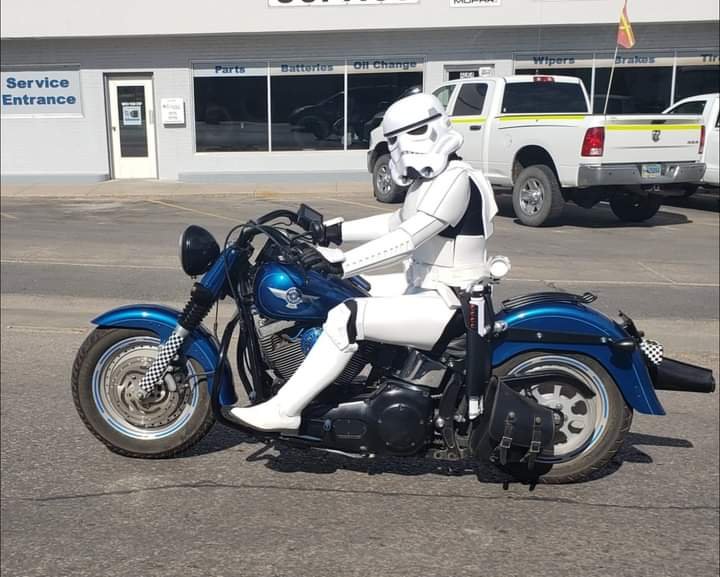
Safest way to ride. You won’t be able to hit anything! Sent from my iPhone using Tapatalk1 point
-
Oh man!!! Yea I understand, I am self isolating before my surgery so I have a lot of time on my hands. I decided to go for my upgrades, I’ve been wanting to do it but just never made the time now time is all I have so I might as well make good use of it. Thank you for your build thread that is awesome! I love what you did with you 5 button panel, I never thought of doing it that way. I cut out plastic and just made a box under the panel it looks good but it catches my chest plate causing it to not come down where it normally will sit. Is that what you were referring to? I didn’t h see stand what you mean about my ab.1 point
-
Colin Adams TK 25622 Letter size Justjoseph63 Thanks! My pleasure, and congrats! http://www.whitearmor.net/eib/certificates/25622-eib.png1 point
-
Scope rail modification: Okay, in the interest of moving forward toward Centurion, I decided to go past the point of no return, and modify the blaster. My reservations before were about weakening the blaster, breaking glue, and re-threading bolts a third time into 3D printed plastic holes. To do this, based on @gmrhodes13 guidance, replacing the printed rail (which I now see was too narrow) with a 2 cm wide aluminum one will allow me to disassemble my scope and counter mounts by destroying the original rail. Because it was glued in place, this is the only way to get to those bolts, but it will end up making a stronger and more accurate blaster in the end. In addition, I will be gluing threaded inserts into the mounts on the counter and the scope, so it will be removable and strong. Here is where the rail needed to be cut, in four places, to remove everything. For my resin clone helmet, I made a simple tool using a coping saw blade mounted in a handle, and this proved handy to cut some of the very tight spots on the rail: The next step was to saw off and file down the [inaccurate] Hengstler counter mounts that fixed that location: And finally, I couldn't find the correct 2cm wide aluminum rail at any hardware store near me, but I had a scrap of angle channeling that was the right width and thickness, so I cut off one side, ground it smooth, and cut the front shape that fits into the barrel. This looks like it should work perfectly: I am also planning on filling the keyhole notch that is on one side of the barrel, which should be the last inaccurate thing to fix on this. Update on that once I start filling.1 point
-
Thanks everyone! I'm really getting excited. Look for my build thread soon!1 point
-
Definitely works well with mineral turpentine and a toothpick. Simply dip the end of the toothpick in the turps and slowly scratch away the paint you dont want.1 point
-
Here is a quick look at the 3 types of folding stocks I will be using for my blasters. The top stock is the original one from the DVH kit; one full casted piece, non-moving parts The middle stock is from Phoenix Props kit. I am not sure if this was modified to cast into 2 parts from the DVH kit stock. It still has the old sterling paint in some areas so I think that is what this is from. Then Dday went with newer parts to cast from. I might be wrong about this so please feel free correct me. The bottom stock is casted from the paint stripped parts I acquired from Dday. Side View Top View Parts For Part For the DVH and Phoenix Prop stocks I am working on removing the inner resin to fit in the folding arm tubing. The DVH stock is really interesting as it has all the paint texture and battle worn look & feel to it. Lots to clean up and patch but still fun to work on. Nice point about this stock is the hinge mount part is casted with the stock wishbone arms so its easy to glue onto the receiver tube & the outer hinge caps are casted into the piece. The Phoenix Prop stock was a huge improvement from the DVH and Doopy stocks as it added more depth and detail by molding the handle part separately. No Need to carve out areas to make it appear like 2 parts. The stock I casted will have all the parts included. I have only molded the large parts so far but hope to start on the smaller parts at some point. The stock will be fully movable, lightweight but with the parts being plastic and very thin, I don't think it will be very strong and will eventually break. Just fun to go from a static one piece stock assembly to a 1:1 part for part replica.1 point
-
Standard blasters don't have that permanent mount This is what is normally used for the counter and scope Here's an all in one version With some 3D print stripped holes I've used some wood (dowel) from paint brushes and glued into the print then re-drilled and retap the thread, may be an option.1 point
-
Correct on the ‘tweaking’ , there is a bit more work to be done and Dave is taking care of me. Understand the difficulties with commission builds , can’t be easy at all going off pictures and measurements, so my hat is off to him . Wish I had the time to do this myself but since COVID hit I have had zero time to take on a project like this . We’ll get this [emoji106] Sent from my iPhone using Tapatalk1 point
-
Ended up getting my forearms trimmed and sanded. Just have to fit them to me, cut them, and glue em together. Sent from my iPhone using Tapatalk1 point
-
It has begun!!! Made the first official cut on my AM Armor. Listening to some Amon Amarth (A Melodic Viking Death Metal group. GREAT stuff!) while I get to work. Sent from my iPhone using Tapatalk1 point


.png.3bbb12b25d70c0f1f239c8d4e569cb23.png)
.jpg.3a83d2f7ffcb0e23e4271199601e0c03.jpg)
.jpg.bd88d45e8e838859c82d073a7353f1a9.jpg)
.jpg.0657e864c7e7db3040351331d62e805c.jpg)
.jpg.bfed3c6436539dbf265fc7d409f73bbf.jpg)