Leaderboard


Popular Content
Showing content with the highest reputation on 10/26/2020 in Posts
-
Hello! Total newbie here to costuming and handiwork, and I'm diving headfirst into this. I'm looking for as much guidance possible while I build my kit, and I had a good feeling this place would help. I've poured over many other build threads and feel ready to start mine. Truthfully, I had my BBB day a while ago, but have been putting off the actual build until now. As mentioned in the title, I sourced my kit from Walt's Trooper Factory. I've heard a lot of good things about this suit! My goal is to have a Centurion level TK by the end of this. Obligatory big brown box photos!2 points
-
In doing some research, I found a great build that might be an excellent resource to fellow Imperials.2 points
-
Hello all, Biker Scout who recently got his TK armor approved and am ready to mix it up with the F.I.S.D...... Looking forward to not sitting at troops. TK-578991 point
-
thank you - I try my best1 point
-
Hi Ryan, as Glen pointed for higher levels (even basic) , it's too important to check the gallery . The crls states : Text descriptions are only one part of the guideline. GML's and costumers must consider both text and pictures (CRL and Reference) when reviewing the costume. When giving advices , tips and reviewing EIB and Centurion level apps, we consider both CRL and Reference Images. About your ammo pack rivets , your measures looks ok, you can mark 5mm down and 10mm across and see haow the mark looks acording to the references. Keep on doing a great work !!1 point
-
Looks like all my comments have been mentioned. You are on the right track. Good luck on that final push!1 point
-
Makes sense to me and I am trying for the highest level possible. Thanks for the feedback. I will make the appropriate adjustments to the TD. It looks like I may need to bring my rivet hole marks further in from the edge of the ammo pack.1 point
-
Always best to check the gallery sections, CRL is approximate measurements, just because a maker has mold lines does not make it correct Measurements given in this document are intended to be approximate and generalized; not criteria for approval. CRL image is a guide, we try to give screen references when giving feedback on builds as you may be aiming for L31 point
-
Sly11, I keep hearing people refer to the FO Stormtrooper armor whenever we learn something new about the Rogue One armor. Id be willing to go out on a limb here and say that there is more in common than different from the ROTK and the FO Armor kits.1 point
-
Ok, lets get this puppy approved...1 point
-
I see, thank you!1 point
-
We are talking about white plastic not painted, most makers including me use white gloss ABS plastic to make armors its not painted, not sure what acetone vapor polish process is but I know as a fact that Acetone on ABS plastic will ruin finish. Mark (AP)1 point
-
Congrats on pulling the trigger on an AM build and kudos on getting healthier. I ordered a commission build from Dave back in February , and then Covid hit. Needless to say good things come to those who wait ( correct, its been 8 months of waiting ) and BBB day should be this week or early next week. I'll follow up with you as soon as the armor arrives and let you know how things look. Several good builds with the AM line.1 point
-
Thanks Glen. I have started to build the CRL using your work Glen. Once complete it will go under LMO review Thanks for the effort you put in and those that started the original work last year. Sent from my iPhone using Tapatalk1 point
-
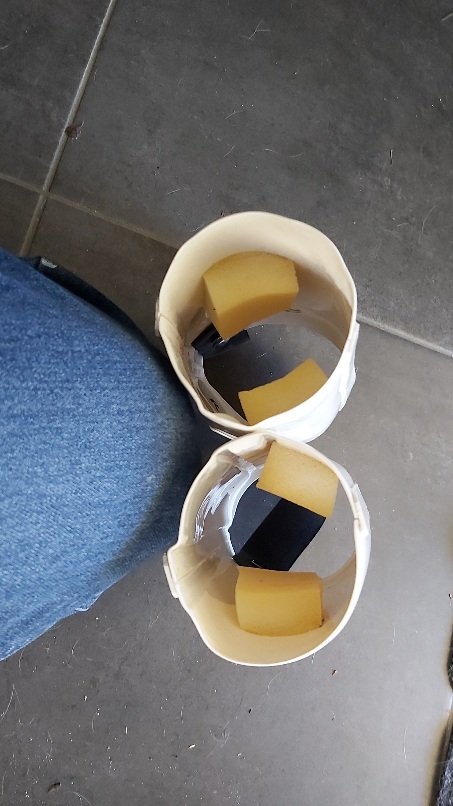
I have skinny arms also, add two pieces of foam which holds them tight and stops rotation
 1 point
 -
The final piece: the E-11 blaster. [I will duplicate this part as a new posting in the ANH E-11 build section] I submitted for basic approval already, without the blaster, as I wanted to get the ball rolling, and the blaster isn't required. But of course, I can't wait to have it for trooping. For my clone, I used a really nice 3D printed kit from Imperial Arms 3D. I know many scoff at 3D parts, but I have experience finishing them, and as his kit looked really nice (his new Version 3 of the E-11) I was curious to see how it would work. His prints are very finely textured. It has a metal spring, sliding bolt, folding stock, and magazine that comes out with magnets. In the past too, he was responsive over Instagram and has adapted the clone blaster based on my feedback. I already have found two minor accuracy improvements, so I will see if he can add those to future kits. He does offer "finished kits" but I don't know for certain if they would be as finished as 501st people like. I prefer to complete it myself, and swap out printed screws for the real ones, and other modifications. Here is what the full kit looks like (so many pieces!): Instead of my usual dance with coat after coat of Bondo glazing putty and filler primer, I am trying a new product, XTC 3D. It is a sort of two part epoxy like mix that you brush on, and it "self-levels" on the prints. It is sandable, but doesn't need as much as other processes do. Once I figured out the best application process, it actually is going to be my new go-to method of finishing a 3D print. The key is to mix very little, 5 ml of the one, and 2.5 ml of the other part. You have about five minutes of good glazing time where it really spreads out nicely. After that, it begins to thicken, and while it is good for filling the backs of parts, or less-detailed areas, it no longer will nicely level out. I found it also works best when the side up is all you do, so to do a "box" shape like the magazine takes about four passes. In about two hours, it is cured, and you can do another side. Here is what it looks like when it is working perfectly: All told, I have probably mixed about ten "batches" and done light coats on parts, second coats on some, and third coats on trickier surfaces like the t-tracks that need to be really smooth. It sounds like a lot, but I just do one or two passes a day, and it is ready to go in a few days. Adjustments to his model: I found so far two inaccurate little pieces, for some reason he has a second muzzle flash guard on the other side. I used epoxy putty to fill that slot, and will sand it smooth. The other is the kit is missing the bayonet lug. I thought maybe I had lost it, but looking at his site and the pictures of finished blasters, they are all missing it. So I decided it was simple enough a piece, I would just find a dowel that fit in the hole, and cut my own. Once coated with filler primer, it looks like a metal part: Finally, I plan to hit my old drawer of antique flat head screws and bolts to replace any printed ones, including those five on the front of the scope. Also, while the kit comes with a flat disk of clear plexiglass for the scope lens, I wanted a more domed one. One benefit of having a 6-year old boy is that a lot of toys have lenses or little magnifiers, so I save all of them for things like this. Two worked, and I had to grind them down a little, but the fit nicely now. Also, by coincidence, there was this shard of plastic that found my foot a few days ago, and it is slightly curved, perfect for the Hengstler window. Cut down and set it, it should work well. His print has raised numbers, so I will paint those white, and then glue the window on top:1 point
-
Well after building up anxiety for hot water baths I finally took the plunge. Super easy and I’m embarrassed it took me this long to try it. I tried to get everything in one go. Got the forearm tension eased. They might need a little more work before strapping is added but infinitely better. Thigh ammo pack is done. It isn’t perfect but since it will be held by rivets and e-6000 it will work. I did a preliminary bend for the shoulder bridges and kept the large tab. I want to make sure I have enough length when assembling the torso pieces. Last and most difficult are the calves. Not perfect but they line up better and the magnets should have no problem keeping them closed. A little area in the middle I couldn’t get quite right can probably be hit with a little heat gun depending on how it turns out. Also got ambitious and glued the inner magnet strip. Making progress!1 point
-
Thank you - he promised me - I will get it before halloween today I also ordered a E11 from TRamp - at this point, I realize that is a very expensive thing till you have everything1 point
-
No matter if you made it or not Garrett. It looks good. Also you know where to find me if you have questions.1 point
-
Awesome, thanks for the advice, Mark. [emoji16] Sent from my Imperial Communicator1 point
-
WHAT! not sure were you got that from NEVER use acetone base products on plastic will ruin finish, just simple car polish. Mark (AP)1 point
-
Nice work, a few things before the DO's get here: A few of your images are a bit blurry so you may need to replace those as it's hard to see some details. Looks like you have some pretty big biceps which makes them sit to the sides while wearing, your left is really noticeable, if you can't reduce the size of them you may want to try some foam in the inside to help them sit central, they won't be as noticeable if they sit central. Also try to make sure your legs match alignment, coverstrip to coverstrip. Thigh heights are not quite matching as well. You should remove the excess glue, rub with thumb or use a scrap of plastic to push off Mobility cuts on the rear are not that angular on screen references. Thigh heights on rear are different, also left appears to be hitting the butt plate You have a lot of extra fabric belt material which could be trimmed off, normally belt is covered by the TD You could tighten the lines on your vocoder paint, mainly the rounded areas. Can't quite tell if you have replaced the hovi mesh, Anovos is too fine. Good luck with approval
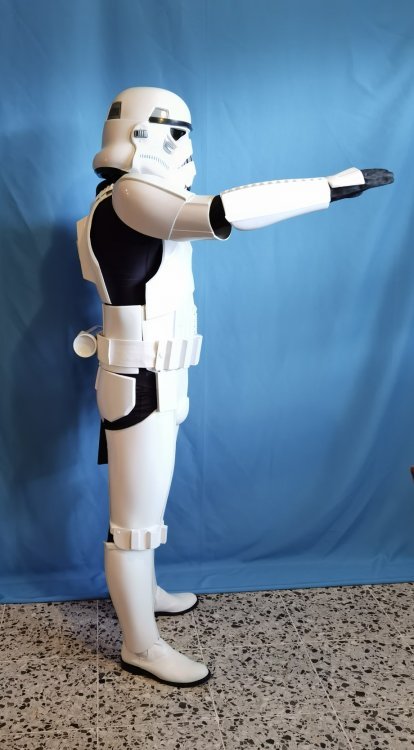 1 point
 -
Some form of comfort is pretty darn important. Nothing worse than spending good money on your dream costume and not being able to wear it because it hurts too much. The small steps you are taking will have a big payoff in the long run. Great work so far. Sent from my iPhone using Tapatalk1 point
-
The back plate piece is a very similar design to the TFA FOTK where it hooks over the top and the TD attaches to the bottom, minus the grooves that run down its length of course. Sent from my iPhone using Tapatalk1 point
-
I got up once again at 5:30am, and suited up, set up some lights in the driveway, and took some turnaround pics. Submitted to my GML for basic approval today, wish me luck!1 point
-
Jeff, That first picture from Rogue One is exactly what I was looking for. Also, the closeup pic of the tabs and belt is perfect. Thanks! Regarding the CRL, I wasn't sure. I keep referring to this plate as the Kidney Armor, because that's what I've seen elsewhere; that's why I asked. However, after looking at the 850 Armor Works site, they refer to it as the "Trauma Plate." Maybe I'll just go with that. The PC-7 machining video is incredible, I've never seen anything like this before. So far it's holding up pretty good and it sands great as well. I actually just used some for my thigh strapping last night and when I checked this morning, it looked like it did exactly what I needed. Also, I saw the 1" ball video earlier as well as the company videos where they use denatured alcohol for shaping. I started doing that and again was pretty impressed. Also, I've been using a scrap piece of HIPS as my mixing pallet and the alcohol cleans it up perfectly. I actually used that scrap piece for the tabs and there's no epoxy on it at all. I've got my eyes on a Death Trooper kit, so if I go that route, the PC-7 will definitely be something I pick up when gathering my materials.1 point
-
Fantastic job on this build Dan. Looks awesome!1 point
-
Love the suiting up video Yes that should work as an action shot, please don't break into a YMCA dance though Great to see you at pre approval, feedback left, good luck with approval, hope to see you will a TKID very soon.1 point
-
Dan just a quick question as I haven't been through every phase of your build in detail, but if you are running off the old version of the CRL, don't forget to inform your GML that we do have a grace period for those who started there build before we updated the CRL to it's current from. If you indeed went for it and built to the new CRL then you don't obviously need to mention it to them. If you need a copy of the old CRL to supply your GLM here is the link to the thread you can direct them to complete with PDF of the old CRL version. Good luck sir, but looking at your build, you wont need it1 point
-
Thanks Andrew, well I did say I had cabin fever
 1 point
 -
GREAT job on the trimming so far, Rob! You mentioned you were looking for bubble lenses and 3 bump ear bars, but if you are aiming for a Hero build the frown can only have 6 openings (3 on each side). The helmet you have has 8 (Stunt style). Note the extra opening on the ends on yours Hero Can this be fixed? Yep. I changed an Anovos Stunt Helmet to a Hero using ABS paste to fill those holes (not an easy task, though). I would steer well clear of CA (super) glue. Seriously. Although E-6000 takes 24 hours to dry, it is much more forgiving and can be removed easily if it drips on your armor. If you make a mistake, the bond can be broken with no damage, but with CA glue, once it's set it's set. Drips must be sanded off and the finish polished. Not easy. Trust me. Thread moved, title updated!1 point