Leaderboard


Popular Content
Showing content with the highest reputation on 09/29/2020 in all areas
-
Just wanted to say hello to all my fellow bad guys doing good. I am up here at the Central Garrison in North Dakota because Uncle Sam sent me (Air Force), but I am hoping to move back to So-Cal here next summer and hopefully do some trooping in some warm weather. ND is a great place to be a snowy, but not so much a TK. Can't wait to start trooping soon!3 points
-
I said it would be converted in a few months. Well, other projects got in the way, and life, too... so it actually took a little over 2 years to complete, but this kit is now officially a Sandtrooper! Time to go find some droids!3 points
-
Hi folks, Checking in today and I’ve just noticed I’ve reached 3000+ posts on this wonderful forum!! Wowza... For me, this all started back in 2017. I wanted to renovate my yellowing SDS helmet and stumbled across “whitearmor” on google. I followed some excellent videos by Mike of Trooperbay and resprayed that helmet. Following that, I read more and more on white armor and, not too far down the line, I bought my first helmet kit from Ross at RWA. I documented that here on FISD and received excellent support and advice. That was a big part of the build, helping and supporting the build. After finishing the build, along with the armor kit, and clearing it up to Centurion, I was asked if I’d like to join the Imperial Attaché team - “HELL YES”, I said. :-) I later joined the DO team, helping troopers reach THEIR goals of EIB and CENTURION. If it weren’t for the changing of the guard that year, I’d have likely carried on in the role, along with the legends that are Joseph and Tony. Alas, things changed, however, this year the FISD is back on track under the exquisite leadership of Andrew. Anyway, enough waffling from me. I just wanted to say a huge THANK YOU to the FISD community. I won’t get into shout outs as I don’t want to exclude anyone, however, I’m pretty sure many of you know who you are - people that have made this forum, this community, so welcoming, supportive, and knowledgeable. Keep up the great work, everyone.---------- Best wishes Dan / CableGuy2 points
-
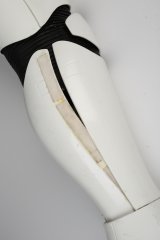
Been a fairly productive few days - Thighs finished, ammo pack riveted in place, rivets painted - Calves finished - Garter belt for thigh all set up and attached to thighs - Cod strap riveted in place and 2 fasteners attached on posterior - Shoulder bridge straps modified and shoulder bell straps shortened to attach closer to bridge strap I'll attach some photos if they ever download to this computer as I have exausted my months photo uploads on taptalk.2 points
-
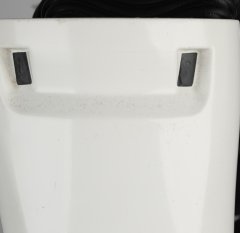
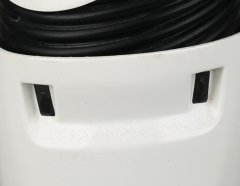
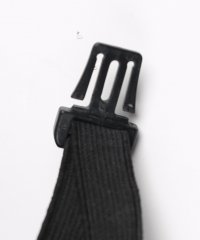
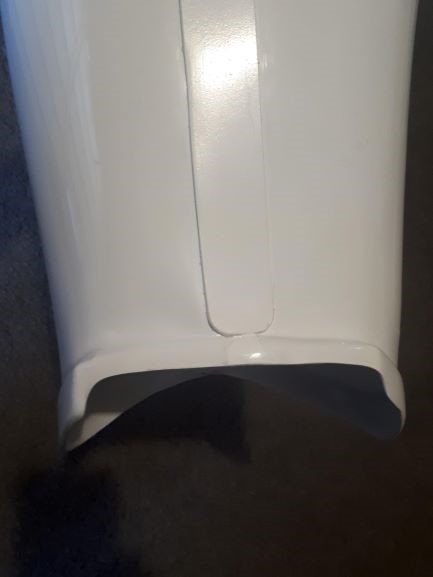
The CRL does not mention a specific number of rib requirements, so I'm not too worried about that. Onto the TD First, I made a start with painting the tube. Since I did not have a spray can with the matching colour, only the small Humbrol pot and some brushes, I had to paint the tube by hand. While I left that to dry, I worked on the measurments for the control panel and end caps. I used the Canon reference measurments from Ukswrath build thread and adjusted it accordingly. The control panel has been trimmed to 121mm in length and the end caps 19mm. The paint has dried, but the end caps wouldn't fit on because the tube circumference is slightly bigger. Some troopers use the hot water bath technique to slip the caps on, but I'm not going to do that. Since the cap circumference is smaller than the tube, forcing it onto the tube could cause a noticable bulge on the caps or make them split from the pressure. So what I did instead was measure the tube ends 5mm, tapped around and sanded it down. This allowed the caps to slip on much more easily. It wasn't till after installing the end caps that I measured the tube and found it to be too long. No problem, it's an easy fix. I measured again how much it was over by (current length 198mm - needs to be 184mm). So I measured and removed 14mm from the end, sanded down 5mm around the paint end for the caps to slip on. After that, the rest was easy. Just placed the control panel inbetween the end caps and measured the correct spacing, then glued into place and waited 24 hours. I looked at the supplied painted screws and could see a little paint chipping off. So I touched them up with some gloss black. Since I already asked about these being L3 acceptable and Justjoseph63 said that they would be. While the glue was drying I got to work on the metal clips. The belt clips are also supplied by Mark and after doing some research on these, I found that troopers made 3 recommendations in modifying the TD:- 1. Bend the belt clips to better secure into the canvas belt and add accuarcy. 2. File the belt clip corners to prevent dings and scratches on the armour and add accuracy. 3. Apply velcro (soft part) to the clips to better secure into belt and prevent damage to the armour. I did all 3 to my clips and it will pay off in the long run. The glue dried and that meant I could place the metal clips on and mark where the drill holes would be. Hopefully this meets L3 requirement - TD completed.2 points
-
1 point
-
Corrected the teeth I think....and added the additional requested photos.1 point
-
I had to go a little thick with putty in spots to fill the holes. Hopefully I can gently file it down tomorrow... And just a little bit for putty filling on the ammo boxes. I'm really looking forward to adding velcro and elastic straps to the greaves and forearms tomorrow!! I'll have to wait 1 more day before I stick stuff on the thighs though...1 point
-
Hi Michael, welcome to FISD . Amazing work. I would like to recommend you, once your armor has arrived you can make a first fit test to see how you feel on your armor, take some photos and post here to receive some feedback for the first time. looking forward for your BBB day photos.1 point
-
they are multiplying!1 point
-
Fantastic, I'll definitely take a look.1 point
-
Nice modifications Glen this will be fantastic when it's finished.1 point
-
1 point
-
Ha! Thank the Emperor! Sent from my Imperial Communicator1 point
-
1 point
-
You will normally find the cod is just snug enough under you undercarriage so it doesn't cut off circulation1 point
-
Ok, good to know. I'll hold off doing anything permanent until I've made those then. Sent from my Imperial Communicator1 point
-
Looking good, you may find once you have your thighs on that the ab/cod may need to come up a little. Nice work.1 point
-
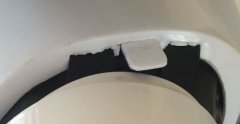
Thought I'd tackle the smaller ab button plate as there needs to be 5 buttons not 4 like most other versions of armor. So first work out the length of plate, then button spacing and drill Drill wood with larger holes than needed Make a plate identical to the first plate, this will house the rivets (which happen to be the right size). Added a washer behind to help hold them out a little more. Test the two pieces fit Heat up your ABS sheet Align and press together Let cool down then separate Trim to size Check for fit 5th button is now one button higher than larger ab button plate. Next to fill the area behind, may do the same method, use blocks of wood the same size as the original molded area, heat some ABS, mold then trim to match and add some ABS paste to fill any seams then sand and polish.1 point
-
Thanks. I am sure I have quite a few things to learn and work on. I presume as our height, weight and otger measurements were not exact I will need to test fit once it arrives before I start any of the recommendations. I am also working on my Grand Inquisitor armor while I await this arrival. Not much else to do in the COVID world though.1 point
-
Thanks for the feed back. The thighs sitting high was apparently pushing everything else up. Which is no big deal because I can change my thigh height pretty easily because the strapping holding them up is completely adjustable. I was worried about the frown teeth having too much grey after I looked at a couple over submissions, but I'm hoping it will be tolerable if not I'll try scraping some off, which sounds easier than adding white. I still want to add velcro to the ab and belt to keep it in place. Unfortunately my camera man doesn't know any of the finer details and seemed to think I looked good after looking me over. I'm not sure what I'll do about the thermal detonator and will just wait till the DO's advise.1 point
-
I am the one that purchased from Mike. I have all the soft parts en route or already on hand (neck piece from Grand Inquisitor). On Oct 2nd ImperialBoots.com opens up for orders and I will get the white boots and distress them. At any rate, I am looking forward to continuing on with the project. Let me know if you need anything from me. I will start taking Hi-Res (21MP) pics if you need them. I have several backdrops (tan, black, charcoal, red, green) in case there is something specific you are looking for and lots of pro lights. So I should be able to get any pics needed, I read through the old post about the red bleedover from the red curtain. At any rate, let me know what you all think I can help with. Lee DZ-21128 ID-211281 point
-
As Justin says, definitely check out Hellhounds. I have one of their E-11s from their very first run from about a year ago, and it looks and feels fantastic! I actually created a detailed photo review thread of it which is designed to be viewed alongside with kman’s Praetorian vs Hyperfirm thread. Here’s the link: https://www.whitearmor.net/forum/topic/48449-rubber-e-11-blaster-hellhounds-photo-review-vs-hyperfirm-praetorian/ Daniel is pretty responsive to IG messages, and as Justin linked to, he’s also on FB. Hope this helps! Sent from my iPhone using Tapatalk1 point
-
Hi Jakob, great advances mate!! About the helmet alignment , it would be su helpful to have a complete view of your helmet to give a better feedback. this thread could give you some tips to post photos of the helmet.1 point
-
Perfect ... I have a message out to praetorian , will check out the others .. thanks for tips [emoji106]...1 point
-
Tudor Davies Tk91175 EIB A4 Joseph Thanks alot My pleasure! http://www.whitearmor.net/eib/certificates/91175-eib.png1 point
-
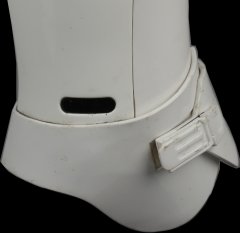
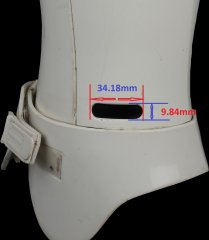
Hi Bryan, and thank you for your Centurion application! CRL and CENTURION Application Requirements: All required photos have been submitted, and on behalf of the entire D.O. staff we are pleased to welcome you to the rank of Centurion . Congratulations! Other-Armor Fit/Assembly; In this area we review observations made by your fellow troopers and the DO team. Some observations may lead to suggestions to improve the overall look of your armour. Certainly you have made all the corrections requested to meet the Crl requirements for Centurion Level and you looks much better now. We in the D.O. Team believe there is always an opportunity to go the extra mile. Starting from top: The paint on your left trap is a bit misaligned and we suggest to reshape the contour for more accuracy, just a few minutes of painting session and you're ready. Reference Images CRL :Fall of tube stripe tops ideally lean toward the front. Looking closely at your tube stripes , it seems that the front few stripes point up towards the eyes when they should go toward the nose. This is a fix to consider when painting the traps. Reference Images Your helmet seems to be riding a bit high in comparison with most seen onscreen. Not a deal breaker for Level 3 by any means, I had this same issue with my ANH TK due to have excess padding in the top. Removing or reducing it will help it ride a bit lower and look more accurate . Reference Images Moving on the lower part of your helmet, the Vocoder paint is normally a little higher on the second steps. Another easy painting fix that can guarantee that your helmet will look as seen on screen Reference Images Ideally, there should be no large tab on the back of the shoulder straps, we are mentioning here for you to consider it as a future fix. Reference Images There should be a small amount of plastic on the end of the belt next to the cover button, bit hard to fix that one, so we are suggesting that when you decide to take the step to look back your EIB app review to add the other suggested fix for your Ab belt Reference Images Your drop boxes are currently very thick. As below, we are suggesting reducing them quite significantly and as you can see in the reference chart , 12-15mm is good. Also, the inner part is currently protruding beyond the outer part, exacerbating the thickness. Reference Images Centurion is all about details, not because of the D.O. Team but because the main goal here is for you to get the best of your armor set and look and feel like ANH's on-screen Stormtrooper. Congratulations again Trooper Well Done !! ***************************************************1 point
-
I've been glueing snap plates to the chest plate and back plate over the last few days. I think they've turned out ok, but the test will come with fitting.1 point
-
Hi Mark, They look great, good work. if i can add a suggestion. If you plan to go for the upper levels, which we hope you will, you may want to check the amount of paint on the buttons. According to CRL for level 3. : Ab button paint shall not extend beyond the bottom of the actual raised button. It is a quick fix, you can use a non-acetone paint remover , or if you have surgeon's hands, you can use a pointed tool or cutter. (I have done this last) Reference images Cheers1 point
-
The weather has taken a turn so I'm adding an extra day to glue curing times on the inner strips to ensure a strong bond before glueing the cover strips, which all gives me time to sew! I've opted for elastic shin enclosures. I managed to find a heavy duty hook, which I've poked through the elastic and sewn on, then doubled that back and sewn over again - I heart redundancy. At this point I'm still debating how to glue these elastics inside the shins. Perhaps an ABS anchor that a lip of elastic wraps around, then glue the whole thing down...? Not sure. This all took about eight episodes of The Venture Bros yesterday.1 point
-
Back of left turned out ok after thumbs and heat gun screwed it up Can I take off a bit more on the right side of the mobility cut? or does it have to end on the ridge?
 1 point
 -
How did I not know this existed when I got to EI?! LOL Dave Galant 98695 EIB letter size Mike http://www.whitearmor.net/eib/certificates/98695-eib.png1 point
-
Well… as you might have guessed by my dropping off the radar for the past few months that things didn’t go as planned. She wasn’t approved. The paint was deemed “too aluminum.” The fit, it was remarked, was perfect, it was just the paint. “Just.” 2020- the gift that keeps on giving. Seriously, so many things, worldwide, state-wide, local and personal, first the world imploded around me and then my life imploded. Just ugh. Screw. This. Year. I wrote at least five drafts of an update, edited them heavily, and deleted them without posting. I really struggled with what to say and how to say it. I even drafted a sales post for her, but I deleted that, too. The moral of this story and the tl;dr version is this: You have to shell out for the spray chrome: it’s the price of entry. Know this from the beginning, budget it in from the start and you’ll go far. I’ve come to the conclusion based on others’ experiences that Al-Clad is not great for longevity and will likely need to be re-done as much as once a year. For that reason, I don’t recommend it. (If a Shiny Sister or Brother in the future cracks this code and makes it work, then by all means, disregard this, but as of now, and my own experiences and knowledge, I don’t actively recommend it). I ended up sending her to Chrome Factory, LLC in Las Vegas. I couldn’t let her beat me. I’m just too stubborn. Never underestimate how stubborn I am. I am mostly happy with CF. I am a bit hesitant to recommend them based on my experience, but I haven’t written them off completely. I would perhaps look into the spray chrome place back East (I forget the name, but other Phasmas have used them). The Good: The spray chrome is beautiful. It’s incredibly reflective, it’s chrome, it’s pretty durable- fingerprints and smudges aren’t automatic and rub off very easily, light scoots across the hardwood floors don’t scratch it up, scraping away dried liquid latex with various household brushes, fingers, and fingernails didn’t do anything to the chrome underneath (speaking of the blasters here, more on those later). The price was reasonable ($1.5k for spray chrome (plus $200 for old paint removal/prep) which is from my research, a good price if not the industry standard). He’s done several other Phasmas before and also Cylons from Battlestar Galactica. He knows his way around costumes and the lingo and unique challenges that goes with them. The Bad: I felt a few parts were bit sloppy and two sets of pieces were completely missed (yet they were wrapped up meticulously in plastic wrap like all the other parts, so it should have been noticed. I admit I have high standards. (Photos of all this below). Despite me telling him about four or five times (in writing, we were conversing via e-mail) that parts of the blasters were to remain black- they returned entirely chromed. The communication was good in the beginning, but broke down later (which, at this point, I’m just convinced in a prerequisite to be a 501st level vendor as I hear it like a broken record so often across the board with rare exceptions). I am mostly willing to blame COVID for a lot of the following issues: It was supposed to be a timeline of 4 – 6 weeks. I was fully excepting and okay with 6 – 10 weeks. After the six week mark, I started messaging him asking for status. It was always “done and ready to go” and was going to go out that Friday/that Monday/within a few days. We did this about three times, but no BBB on my doorstep and no tracking. The last time I asked if there was tracking for that last “I shipped it,” I never got a reply, but about four days later I had my BBB on my doorstep. Like I said, I’m mostly willing to blame COVID as this was all happening in late March/April when things really started going down. He was unable to work and tired to, got caught, kicked out of the shop for a while, there was a gap before he could get back in, etc. I wouldn’t worry too much about this if you send it in in the future, assuming we don’t go on full on lockdown again. The riffle also arrived to him broke, he fixed it, and it was broken again upon return to me. I stuck a dowel in it and re-glued it and I think that will do the trick now that it’s not being shipped anymore. (I believe this is a design issue, not the fault of CF). Toes and knees were missed, but will probably blend overall (laying it all out on the floor together they seem to kind of meld in). Smudge/scrape on bottom of inner shin. On the inside, so I’m not worried. Drip on the front of the shin. You can really see the reflectiveness of the chrome here, considering you can nearly make out my phone case. (It says “I am SHERLOCKED” in case you were wondering, for all my fellow BBC Sherlock fans). Underside of the helmet not chrome. Further changes, updates, and projects for completion: I fixed the riffle as I said, with the dowel down the body shaft and into the butt stock. I punched a hole for the dowel with my soldering iron and used a combo of E6000 and CA Glue to glue it back together. I used liquid latex again to mask off all the blaster parts to remain chrome and hit them with a coat of sandable primer and then glossy black. Liquid latex still sucks to get off even if it’s not weeks later. Which, by the way, don’t wait weeks, it’s a damn nightmare. Though waiting just long enough for the paint to dry (in 100+ F degree heat) and then trying to peel it off was only marginally better, so… just know you’re in for a challenge, thumbs rubbed raw and you’ll need patience. I also found a scrub brush like for the kitchen sink worked decently well in loosening and taking up the last bits. You do have to put muscle into it regardless. I’ll be touching up any black parts that scratched off/got missed with some black acrylic paint. Riffle mostly done, still some more latex to clean off. That stuff is stubborn, as you can see by the large pile of tiny scraps. Pistol is also mostly done, looking a bit better than the rifle, probably because it’s smaller and had less to deal with. I tightened the neck opening on the cape, just added an extra fold and sewed it down (it was just slightly big and showing a bit more shoulder than was ideal). I really love this cape. I tightened one shoulder connection. I added a Mr. Clean Magic Eraser (which I keep around for Jawa masks) into the front of each ankle spat for stabilization. I added the lens back in the helmet (I removed it for chroming purposes). I re-added a couple of Velcro connections I had removed for chroming- back to chest, yoke to chest. E6000 does not really like the chrome, so I roughed up the connection to help it adhere. I’m not entirely sure the yoke/chest connection will work or hold, so I might end up with a snap set up. We’ll see. If I were doing it from the start again, I’d probably just work out a snap set up and be done from the start. A couple of the Velcro connections for the gaskets inside a bicep came loose, so I re-glued it with a combo of E6000 and CA Glue. I also think I’ll try and remove the gaskets only when I have to. Less stress on the Velcro connections plus easier to get on and off. I ditched my second set of gloves (Nomex) and swapped them for stretchy compression ones (like we use for Jawas now), because the Nomex were just a bit large in the fingers and were too tight under the armor. They were kind of painful and putting my hands to sleep. I re-added the Velcro attachment to the palm for the fingers. I was smart this time, and split the seam to better access the palm. The fingertips still want to pop off, so I think I might need to add a bit of Velcro or try a stronger magnet on the outside of the glove. The magnets are still in the inside of the fingers from the first failed attempt. I also fixed a crack in the side of the abs. Third Time’s the Charm Approval Photos: Wish me luck, again! It’s 2020 so we can all use all the luck we can get.1 point
-
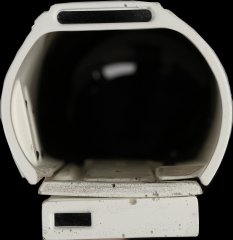
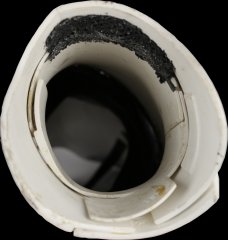
**Please be aware that is is my personal opinion, explained in detail below.** If you are looking for accuracy with your ANH Stormtrooper build, hopefully you will find this very useful. Before you start building, I’d highly recommend that you use the following; - Magnets; to experiment with, and fine tune, positioning of the two parts of your helmet (faceplate / back & cap) - screen reference photos (found on whitearmor.net and/or starwarshelmets.com) - free collage apps (example, LiveCollage) to compare your progress with screen used examples Aligning the faceplate with the back & cap is a key factor in defining the look of your Stunt Stormtrooper helmet. Based on the reference photos below, especially the various group shots throughout ANH, it is my opinion that the majority of screen used stunts had a ‘similar’ appearance to the photos below. There were, of course, a few variations, however, there is certainly a trend (backed up by the group shots). My suggestions are along the same lines as the CRL, following the most common appearance throughout the movies for an instantly recognisable look. Mounting the faceplate high into the back/cap leads to a long (front to back) but short (height) looking helmet, more reminiscent of ROTJ/ESB MKII. This can also lead to the eyes looking a little cross-eyed from the front. The following photos will give examples of this. I have seen this a lot recently and thought it was worth highlighting. As always, each helmet was handmade so slightly different, however, the vast majority follow this method of construction. Do bear in mind that, due to the differences in helmets from different makers, results may vary. Let’s start with the basic premise - the majority of reference photos show that if you draw an imaginary line (shown here in green) from the rear molded line of the back and cap, this will sit just above the eyes; or to put it another way, it is very unlikely that the eyes will sit HIGHER than this imaginary line; Let’s look at this with a helmet kit. The below example is using an RWA Stunt, 1.5mm helmet kit. The below images show how vastly different the same helmet can look, all based on the alignment of the faceplate and back/cap. There are many examples of the ANH style throughout the movie and reference materials, but very few with the faceplate mounted so high into the cap (in ANH). The below photo is a Hero helmet that also supports this theory. As with most Hero helmets, they also had a clear gap between the eyes and the brow trim. Here is Han’s helmet supporting the same theory; The below two photos are the RS Propmasters screen used helmet, again, supporting this theory and alignment. Another, just for reference. Here are some more examples of helmets following this type of alignment/appearance. As mentioned early on, each helmet was handmade so slightly different, however, the vast majority follow this method of construction, as shown in the many reference photos and screen shots. Do bear in mind that due to the differences in helmets from different makers, results may vary.1 point
-
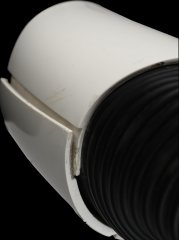
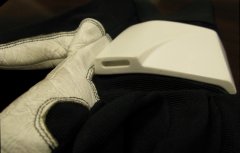
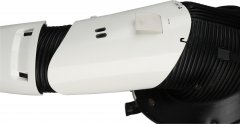
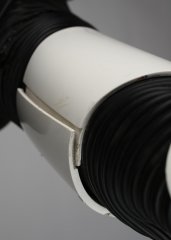
If a picture paints 1,000 words then this photo review of @Hellhounds' rubber E-11 blaster will be an EU-expanse worth of information for any Trooper seeking a product comparable to the old Hyperfirms and the newer Praetorian blasters. The inspiration for this thread came from the fantastic comparison (thread) of a Hyperfirm (HFx) B-Grade rubber blaster verses that from Praetorian Blasters (PB), by @kman. In fact, the angles of my photographs are intended to replicate those used by kman, to provide the opportunity for close comparison of the three models. Essentially, these two threads should compliment each other. The Hellhounds Props (HHP) E-11s (among other blasters) are new as of October, 2019, and are currently available from Daniel directly, as well as from @TK-4510 on Trooperbay. As I understand it, this purchase is from the first run of a dozen blasters, and thus far there appear to be no user photos of these Hellhounds rubber E-11s on FISD. Daniel from HHP currently has threads mentioning his E-11 product here and here. Regarding Rubber Blasters For those of you unaware, these "rubber" blasters are actually constructed of a combination of foam and rubber, and may have some form of armature (solid framework) serving as the skeleton. The benefits of rubber blasters are primarily weight, durability, and safety. These rubbers are heavier than standard Hasbro and Rubies conversions, as well as most resin builds—providing a slightly more realistic helf—while still remaining light enough for hours of trooping. Fully metal E-11s can start to feel really heavy really quickly. As you'll see below, the HHP weighed in at 35.03 oz, or 2.19 lbs. Rubber blasters are also less likely to break if dropped, and if a component does come off, it will likely just need to be re-adhered, rather than reconstructed (resin or plastic may have cracked or shattered). Finally, rubbers are safer when trooping in close proximity to children who may wander outside the line-of-sight of a Trooper with a bucket on. A swing and impact of a rubber E-11 is less likely to injure innocent bystanders. The most obvious disadvantage of rubber props is that they are generally not as detailed and refined as their resin counterparts, but advancements in molding techniques are changing that. Now, to be clear, I am in no way associated with or being compensated by Hellhounds or any other blaster maker for this review; I am simply seeking to provide Troopers with data on a new product. Note, too, that throughout this post I will link to parts of the official FISD E-11 Blaster Reference thread (here is the Rogue One Reference), to provide additional insight and imagery. So, without further ado, open kman's thread below, split-screen your device, and feast your eyes on three types of rubber E-11s from this (US) side of the pond! NOTE: The images below may not appear as clear/crisp as they do at full resolution since the FISD/browser display compression isn't great. Clicking each photo will open a full-scale version which should present better clarity, at least in a web browser. HHP TOP DETAIL VIEW The Hellhounds Props (HHP) magazine appears to be closer in length to a Praetorian Blaster (PB), rather than the notoriously-shortened Hyperfirm (HFx). HHP appears to be just a hair shorter than PB, but I've also seen longer magazines on some images posted by Daniel on social media. Perhaps HHP magazine length is still being fine-tuned, but I may try to see if I can acquire a longer one. Additional, note that the HHP Hengstler counter includes the two soldering pins, while the PB and HFx do not. Finally, there is a HFx-quality seam on the HHP between the rail and top T-track, but the HHP T-tracks' quality and installation into the venting holes matches those of PB. HHP TOP VIEW Immediately obvious from this view is that the HHP has a static (non-movable) aluminum D-ring installed, similar to that from PB, but the PB version is rubber cast directly to the end cap. This HHP is similar to HFx in that it does not have a faux recoil spring behind the charging handle and bolt, like that provided by PB. Notice a slight tinge of brass on the scope, and a pretty minimal and clean seam line on top (much like PB). HHP FRONT VIEW This is where further distinctions are easily identifiable between the three blasters. In general, the HHP has cleaner lines than a B-Grade HFx, but PB comes out on top with the crispest lines and no visible seams. One of the HHP front scews is excellently made (PB quality level), and the other is adequate. The front sight is also correctly thin, matching that of PB and differing from HFx's thick block, and the HHP barrel bore dept on the HHP is 0.5" (1.27 cm). Note that, with blaster in-hand, the tip of the HHP appears cleaner than this close-up photo presents. Macro photography tends to reveal blemishes which would otherwise be indistinguishable to the naked eye from normal real-life use distances. HHP BACK VIEW As previously mentioned, the HHP includes an aluminum D-ring (woohoo level 3), while the PB included a molded rubber one, and HFx none at all. Once again, PB came out ahead with the most detailed knurling on the rear sight, followed by HHP, with HFx at the bottom of the pile. The rear end of the scope appears to be of similar quality on all three E-11s, and notice the more visible brass color on the rim of the scope (also present on the front, seen later). HHP RIGHT SIDE Stormtroopers and Femtroopers, I present to you, a METAL SCOPE RAIL, with open space underneath! You read that right. HHP finally provides us with an OT E-11 without a solid rubber rail, which was and still is the standard with HFx and PB. This was actually one of the two major factors in my decision to go with HHP (price was the other). Of course, doing so sacrifices the recoil spring and the clearing strip and extractor detail on the ejection port. Make note, too, that this HHP scope does not have the round knob on the right side. HHP LEFT SIDE An iconic angle of the E-11. The trigger guard appears to be of similar thickness to than on an HFx, which may be just a hair thicker than a PB. The guard feels very sturdy and I'd have no concerns holding my index finger on it during a long troop. The trigger itself is cut out in the same fashion as an HFx, with more open space below and behind it than that provided on a PB, and the HHP trigger feels a bit flexible, which leads me to believe it is cast in solid rubber. Additionally, aluminum appearance is present beneath the selector switch on the HHP, a detail left out by HFx but included by PB. HHP BACK QUARTER VIEW This perspective highlights the metal scope rail, though take note that the rail is thicker than it appears in this image (due to camera lighting). I spoke with HHP about the strength of the rail prior to purchasing, and Daniel assured me that it is solid—which I agree with. That scope isn't going anywhere, and I do not foresee any sag in the long-term. Notice the screw head on the underside of the rail, which secures the scope (a second is obscured from view by the counter). Additionally, this angle, once again, shows the magazine length, which is significantly longer than the HFx but perhaps just a hair shorter than the PB. And finally, two notes regarding the rear sight area. First, the horizontal retaining pin area has been molded as a recessed space on the HHP, as opposed to raised and textured (faux) pin on both the HFx and PB. Second, though not easily discernible in any of these images, there is a locking notch band at the end of the receiver tube on the HHP. HHP BOTTOM VIEW Another major differing point of this HHP blaster with PB (unsure of HFx), is that Hellhounds hollowed-out and split the arms (wishbone) of the folding stock. On the Praetorian the two arms are actually a solid piece molded with and surrounding the trigger guard. The second photo below shows this up-close. AWESOME! The only other distinguishing feature from this angle is the length of the magazine, and the already-discussed aluminum appearance beneath the selector switch. HHP EXTRA VIEW This angle shows several features which are missing from the HHP blaster but were included by PB and HFx. The ejector knob is missing on the HHP, as are some greeblies on the magazine which are present on the PB (but also not included on the shortened HFx mag). These omissions, and perhaps also some missing details on the front and rear of the power cylinders are perhaps the greatest shortcomings of this Hellhounds blaster. It's possible that the ejector knob fell off in-transit, so I will be reaching out to Daniel to inquire about a replacement/addition. On the plus side, the casting of the Hengstler counter appears very nice. EDIT: I reached out to Daniel at @Hellhounds and he said that future versions of his E-11 may include the ejector knob and magazine catch. In the meantime, he is planning on sending me those individual pieces to add on to my baster. HHP ADDITIONAL ANGLES The images from this point on are all from new angles not included on kman's Hyperfirm vs. Praetorian thread. They are intended to highlight the fine detailing present on these Hellhounds blasters, and will so provide a better view of the of the differences in the three rubber E-11 blasters. These first two images provide alternate angles of the mag well area, showing the lack of the ejector knob. The two soldering pins on the Hengstler counter are also visible. EDIT: I reached out to Daniel at HHP and he said that future versions of his E-11 may include the ejector knob and magazine catch. Notice the detailed inscriptions and oval inlay on the bottom of the magazine well, shown below. Very nice, as is the texture on the magazine itself. The two images below highlight the T-tracks, venting holes and folding stock. As previously mentioned, the T-tracks are smooth and straight. While I am not certain that the original Sterlings had such a texture on the stock metal, I definitely like the presence of the it as it adds to the weathering and could even be considered to be carbon scoring. "You boys have seen a lot of action..." The image below shows a close-up profile view of the muzzle screw, front sight, flash guard, and folding stock butt. Notice that, in the same fashion implemented by HFx and PB, and clearly for the purpose of providing structural support, the front sight is not hollowed out on the HHP. The two images below are intended to highlight the charging handle, ejection port and guard, and texture on the folding stock and grip. Note that, as already established, there is no recoil spring, clearing strip, and extractor on the HHP. However, the grip detail is fantastic. Additionally, other than the rubber trigger, the grip is the only other place on the blaster where flex can be found—on the smooth front and back. I suspect this may be intentional to provide comfort in-hand, and I like it. Below: End cap and D-ring from both sides. Also shows the end cap clip, scope rail, and rear sight again. The textured and inscription details on the back of the scope can be seen on the photos below. While there is some brass weathering, a little more would be nice. These two photos below highlight area around the front of the scope, showing the molded screws, metal rail, power cylinders, and the soldering pins on the Hengstler counter. Notice more brass color on the scope rim. The HHP weighed in at 35.03 oz (2.19 lbs or 0.99 kilos), comfortable for long troops. FINAL THOUGHTS By my assessment, the Hellhounds Props blaster situates itself right between the HFx Hyperfirm line and the Praetorian blaster. Overall the mold/seam lines are of better quality and more minimal than those on Hyperfirms, and approach or in some cases match those of Praetorian. A few details are missing on the Hellhounds, such as the recoil spring, magazine ejection knob, and greeblies on the magazine (EDIT: I reached out to Daniel at HHP and he said that future versions of his E-11 may include the ejector knob and magazine catch) and power cylinders, but conversely, HHP has included details not currently seen on OT blasters from Praetorian or Hyperfirm—a real metal scope rail and split arms on the folding stock! While this may not be the case forever, it is also worth noting that the Hellhounds E-11 is currently less costly than one from Praetorian. For me, this blaster was an EXCELLENT choice, and I would not hesitate purchasing from Hellhounds again. And there we have it. Hopefully this photo review can serve, in conjunction with kman's thread, as a valuable guide for any Trooper in the US considering purchasing a rubber E-11. Perhaps in the future I'll have the pleasure of owning more rubber blasters (DLT-19!) and be able to create additional comparison guides. I'd be happy to serve as a weaponry photographer/reviewer Amazon Vine Program style here on FISD. In case any of you missed the link near the top of this post, here is the FISD's official E-11 Reference Guide, followed by a Rogue One variant: Move along, move along... MV1 point