Leaderboard


Popular Content
Showing content with the highest reputation on 04/14/2020 in all areas
-
Thank you very much, I am ecstatic and over the moon. I’ll take note of your recommendations and make sure upon kitting your I’ll double check the straps [emoji16] Sent from my iPhone using Tapatalk2 points
-
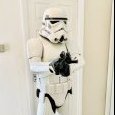
Hi Jon, Thanks for your application and well done on the fixes! CRL and Centurion Application Requirements All required photos are now in and, after review, we are pleased to welcome you to Centurion! On behalf of Joseph and myself, many congratulations! Other-Armor Fit/Assembly In this area we discuss areas that could benefit from additional improvement. Note that we consider both text (CRL) and pictures (screen caps/reference images) when reviewing submissions I mentioned in your EIB review that your forearms were overlapping your biceps and handguards a bit. They look improved in your Centurion photos but there are still some areas where they overlap or nearly overlap, so I'd still suggest reexamining the strapping for your arms, if for no other reason then it will likely improve your arm mobility. Ultimately, the choice is yours. Reference Image: And that's it! Although we're not able to be out trooping now, please accept our congratulations for achieving the rank of Centurion.2 points
-
For SLA printer printing services, I recommend 'The Imperial Factory'. www.facebook.com/TheImperialFactory/ With permission from Garmin, they have printed a couple of SE44C and F11-D for some troopers2 points
-
Not sure if you are posting trusted vendors for Commission work, but I've done about 20 commissions specifically for FOTK as well as other sets of armor. But I started with FOTK commissions. No worries if that isn't the type of thing being posted.2 points
-
This is how mine is looking the 45 go to the size of my belt I believe (currently getting washed. Sent from my iPhone using Tapatalk2 points
-
Been a while since I’ve gotten an update done. So my painter asked how I plan on wearing my barrel and thighs. I told him I’m planning on making suspenders. So he asked me to make them for him so he can hang the barrel and it’ll be easier for him to paint. So! A few weeks ago I got started on it. First thing I did was make snaps to place inside the barrel, and then using zap-a-gap I glued them in place. After that I placed snaps inside the thighs and cod piece. While waited for all of those to dry, I started on my belt. All of the boxes and the two black straps were riveted into the front piece. My painter sent me back my boxes painted. The belt teeth on the top were a bit big to fit perfectly into the barrel and I used a file to help size them down. Next thing I did was make this thigh garter with help from a friend. Using 2” webbing and buckles, I have 3 snaps here for different heights. But I find that the very top one suits me the best. Using 2” webbing and buckles, made the suspenders. And finally a test fit! I will say I’m very happy with the results how everything works and hangs. Hope to hear some feedback on this! Be safe, and remember wash your hands.2 points
-
Thanks Joseph, can't believe I missed that! Sorted Sent from my J8210 using Tapatalk2 points
-
Congratulations and welcome to the Centurion ranks trooper1 point
-
Enhorabuena chemaaaa!!!1 point
-
***Update, not what I used.....*** Allow me to answer in the form of a photo haha Rust-oleum Satin black for the underarm connectors and barrel side stripes, Gloss Brilliant Blue for the ab buttons and tube vents, Gloss Smoke Grey for the ab buttons, frown and traps, and PlastiDip matte rubbery black for the vocoder, brow trim, and neck seal trim. I also have a fine tipped black paint pen for the trap and tear vent vertical lines and outlines - I don't plan on cutting them out. I plan to paint the whole helmet gloss white after primer, then mask and spray the grey and black, then hit the whole thing with 2K clear, then finally the Plastidip last. Unsure quite how I'm gonna do the tube vents, but I'll probably just spray a thin piece of plastic blue, then tape it in from underneath. Are those colors "correct"? I don't know! But that's what I'm using, so I hope that helps! Get ready for lots of sanding haha Hit me up with any questions!1 point
-
Great Trooper, Congrats!!!1 point
-
Congrats, Jon!! :-)1 point
-
Felicitaciones Trooper, bienvenido a Centurion. Congratulations Trooper, welcome to Centurion.1 point
-
Well done Jon! Sent from my SM-G950F using Tapatalk1 point
-
Jose - apologies for letting this review sit for so long. I hope the wait is worth it! Congratulations on reaching Centurion!1 point
-
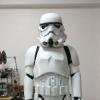
Hi Jose, Thanks for your application; I apologize for the delay! Fantastic job with the fixes, especially the shim seam! CRL and Centurion Application Requirements All required photos are now in and, after review, we are pleased to welcome you to Centurion! On behalf of Joseph and myself, many congratulations! Other-Armor Fit/Assembly In this area we discuss areas that could benefit from additional improvement. Note that we consider both text (CRL) and pictures (screen caps/reference images) when reviewing submissions The CRL actually calls for 'flat soled' boots, and it looks like your boots may have a very slight ridge to them. This is a very minor detail and nothing anyone would ever see, but you might see if you can eventually get a pair of boots that is flat soled to bring your kit to the ultimate level of screen accuracy. Reference Image: And that's it! Superb job on your build; I can tell how much pride you take in your armor. I'm very happy to join Joseph in congratulating you on reaching the rank of Centurion!1 point
-
That’s a pretty cool coincidence though. Your helmet paint job looks great Jonas, you just can’t beat doing it yourself. Sent from my iPhone using Tapatalk1 point
-
So I was told that my armour will be ready for collection this Saturday! Can’t wait! In the meantime, resin hand plates arrived from Dan. They are beautiful!1 point
-
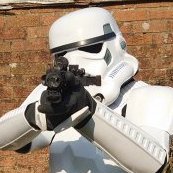
Hi Trooper, great improvements Trooper. I would suggest to consider in advance for higher levels to make some adjustment to your belt as the Crl states for level 3 : Drop boxes are vertically aligned with the end of the ammo belt with minimal gap between belt and box. The corners of the plastic ammo belt shall be trimmed at a 45 degree angle that that meets the outer edge of the cloth belt. reference photo of the alignment of the belt and canvas. Note that the drop boxes are behind just for the picture, they must go aligned under the plastic tabs of the ammo belt with minimal or no gap as suggested. . Keep on being safe and doing a great job.1 point
-
Hi, just a suggestion : i would recommend to use some Soldering Iron to cauterize the strap's edge to prevent fraying Keep on doing an excellent work trooper!!1 point
-
Hi, I'm not and Helmet expert, but by my short experience, (I have built 4 ANH helmets only) , once I get the correct face-cap alignment, I used magnets and clamps, make the holes and place the rivets to affix this main two pieces and start to align the ears using photos and trim little by little the zone where there is too much gap. remember, they're no perfect fit. take a look to the following hero helmet photos. Another suggestion is to try to take the helmet photos showing it complete from at least one meter of distance and a crop the picture to have a closer view and a correct perspective, this is so helpful for us to have a better idea of your progress. Hope this can help. cheers1 point
-
Hey troopers if you have a supplier/vendor you like to see added to the list let us know1 point
-
Want it to be prefect for when I either make shims or lose the weight and can just slide it on take photos. Just need to grab some rubber gloves and I’ve hit EIB requirements [emoji106] Sent from my iPhone using Tapatalk1 point
-
They are VERY hard to fit, what i did was, measure approximately, trim a tiny little bit with a dremel in the spot or spots i considered needed, and measure again with the helmet, try to fit it in place, no good? Trim a tiny little bit more and measure with the helmet. Do that until you get a good fit, remember, it won't be a 100% perfect fit, but it can be pretty close. Watch the movies, pick a trooper and emulate him, as best as possible Sent from my GM1900 using Tapatalk1 point
-
Great to see you are still refining your armour Nadas, keep up the excellent work.1 point
-
Also have fixed most of my strapping my back armour sits great butt plate doesn’t move now and sits flush. I have also fixed the front but am still going to tighten it more so it sits better on me. I’ve got to tighten one of my drop boxes but other then that need to add some strapping to my shins to keep them straight when wearing it especially my sniper knee. Sent from my iPhone using Tapatalk1 point
-
updating this project a bit, i canceled the led drivers and moved to 3 transistors + 3 resistors 1/2w to control the 3watt RGB super bright leds i will post more updates with the scheme1 point
-
Hi all Another little update. I wanted to find a way to get a really nice finish for the wrist end of the forearms. So, rather than scissors, Dremel or saw, I decided to literally just sands the whole edge with sand paper. Full details of the process in this 6 minute video; Here’s some finished pictures. I’m really pleased with the end result. [emoji1303][emoji1]1 point
-
Glad to be of assistance1 point
-
Submitted my photos this morning and just got the word that the judges all agree that I meet approval! I couldn’t be happier and prouder of this build. It was quick but I loved it, especially building the pack. Sent from my iPhone using Tapatalk1 point
-
Sounds great, just let me know if there's anything else needed. Having fun working on this. Been trooping it for years and have been meaning to do this. Glad to finally get going.1 point
-
Small progress over the weekend. Spent almost 2 hours with my mouse sander and armor parts to get the seams super smooth. I had hoped to do more, but all I was able to tackle was the back plate, a thigh, and both shoulder bells. In the pic, the box in the front is all of my son's FOTK parts. The box behind it is all of my Shoretrooper parts (progress currently pending completion of this build). You can see some of the completed PPE face shields I've printed out, too (they're the orange curvy things on the left). My printer has been busy! Glad I was wearing an N100 respirator for sanding. Even though I was working outside, I was covered in powder-fine dust when I was done. I would not want that stuff in my lungs!1 point
-
Back chest connection This is the only thing in my EIB comments I haven't changed but intend too at a later date. Sent from my J8210 using Tapatalk1 point
-
It's certainly getting close now, super excited to see the finished product.1 point
-
Sometimes coincidences just happen. Probably the Force being at work... (had one of those funny coincidences, too last year when i met exactly that one TK that gave me a Pointer to a event where the 501st was. (there were enough TKs and visitors to lower the chances).1 point
-
Thanks for the warm welcome, troopers! I'll let you all know once I've decided, and then start a buil thread eventually1 point