Leaderboard


Popular Content
Showing content with the highest reputation on 03/28/2020 in Posts
-
This is an amazing thread. I've pinned this for posterity. Well done3 points
-
I agree with Dan (cableguy), despite i like the lower brow look, is more screen accurate put the brow with a small separation from the top of the eyes and I'm aiming to swat level, so, i don't have much of a choice there. However, I'm also agree that at the end is up to you. Look at my helmet... Sent from my GM1900 using Tapatalk3 points
-
Got the gaskets, straps and, Velcro finished up. After a test fit of the assembly I’m able to have a full range of motion, even doing jumping jacks, with everything staying in place and no binding or pulling. Sent from my iPhone using Tapatalk2 points
-
Looking Bada$$ right there brother.2 points
-
Learned something new today. My grandmother was a seamstress and for some reason I never learned. That changed today when I needed to sew up my gaskets a little tighter. My girlfriend has a machine and showed me how to do everything. Here’s my latest test fit. Starting to look good I think. If anyone has any feedback, please let me know. Sounds like it’ll be a couple weeks or so before I get my yolk/back pieces. Sent from my iPhone using Tapatalk2 points
-
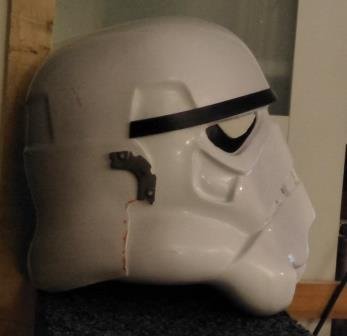
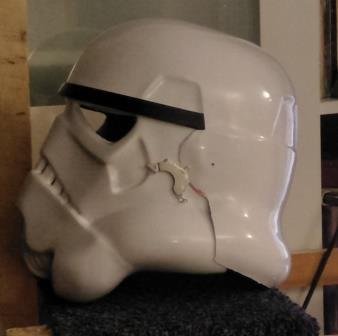
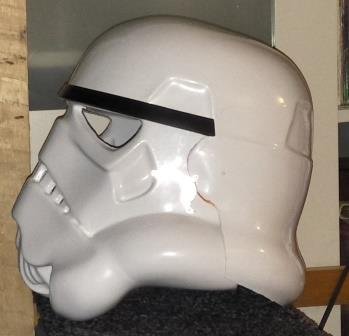
I see this topic come up a lot and I have not seen a comparison so I thought I would do one. Please keep in mind that my knowledge on this subject is limited and I do not have any experience with OT TKs. So the obvious… Rogue One TKs are more detailed than OT. As far as I know, all the OT TKs were vacuum formed in High Impact Poly Styrene (HIPS). This process requires a buck (mold) that heated plastic is laid over then sucked to the buck by vacuum. This is a fast and efficient method of mass producing these costumes; however, the trade off is that all detail is minimalized and designed so that the formed plastic can be removed without damaging the buck. For this reason, parts like the helmet and forearms are formed in parts rather than one solid object. Consider an ANH forearm, the rectangle details are not very well defined. There are 2 parts to the forearm. One part has the rectangles and the other does not. The two parts are glued together and then cover strips of plastic are used to hide the seams. Rogue One TKs are were not vacuum formed. I have heard (although I do not know for sure) that the RO TKs were injection molded. This process requires a 2 or more-sided mold that is completely closed off then heated liquid plastic is injected into the mold. Once the plastic is cured, the mold is opened, and the parts removed. This process allows for thicker and more detailed parts. So both the OT and the RO stormtroopers armor are made from plastic but the RO version is thicker and more detailed. Yes there are differences between ANH, ESB, and ROTJ TK’s but for the most part, the process of making the armor was the same. RO, Solo, and some of The Mandalorian TKs were made to the RO standard. Another consideration in comparing the two types TKs is the methods of assembly and strapping. There is a ton of reference material on how the OT TKs were assembled. There are very specific requirements in the CRLs as to what type of snaps, straps, Velcro, and rivets are used and how they are used. Oddly enough we have less information about how the RO TK is assembled and strapped. One of the best sources I have found for RO TKs is the images from Celebration Europe 2016. In these images we can see Velcro in various places as well as some sort of plastic hook lines connecting the shoulder bells to the biceps. Regardless, the 501st CRLs for RO TKs does not specify how the TK is strapped as long as the strapping is not visible with the exception of the drop boxes and the thighs. It would be awesome if someone who has some contacts with LFL could get some more detailed information and pictures since there is no reason for this information to remain secret this long after RO, I digress. Additionally, there are significant differences in the soft parts of the costume. OT TKs have a neck seal and a black one or two-part undersuit. The undersuit has no detail and most of the people I know who have OT TKs wear under armor. The gloves were rubber military chemical gloves and the boots were slip on brown chelsea boots dyed white. RO TKs have a undersuit that has ribbed fabric at most of the joints and the neck seal. The top shirt has hex mesh in the armpits and the ribbed fabric runs from the top of the neck seal to mid chest. The ribbed fabric must be stitched between the ribs. The boots are the same as the FO boots with a flat sole and side zipper. The gloves are also the same as the FO; although they are all black with leather patches and gridded fabric similar to a mechanics brand glove. Lastly, the OT Tks had holsters and their E-11s are slightly different from the RO E-11. RO TKs did not have holsters. I suspect that it would be difficult to holster the E-11 with a tac-light on the side of it. So lets look at some comparison pictures. These were taking at the ROSW premier. On the left is a member of my Garrison (TK 41808) in his RS Prop Masters ANH Stunt. On the right is me (TK 20980) in my Jimmiroquai RO. Initially, we look very similar; however, closer inspection reveals the level of detail, shape, construction in each part. So, let’s start at the top and work out way down. The helmet: On the left is an OT TK from ANH, on the right is my ROTK helmet. One of the most talked about parts of the helmet is the infamous eye bump. Look at the right eye on the OT helmet, notice the bump along the bottom of the eye just left of the nose? That is the eye bump. All of the bucks for the OT helmets were hand sculpted and it is unclear if this bump was in the original buck or if it is a result of the vacuum forming process; however, what we do know is that the helmets are not symmetrical. RO helmets are symmetrical and although some people swear, they can see the eye bump, I do not see it on the RO helmet. Moving on, the frown is more pronounced on the OT helmet. The number of visible teeth is also an issue. There are images from ANH that show between 6 and 10 teeth. RO helmets have only 7 individual teeth backed by a dark grey mesh. Another difference is the height of the brow trim above the eyes. The brow trim on the OT helmet fits on the edge of the top dome and is adjustable. I believe the proper gap is about ¼” while the gap on the RO helmet is about 1/8”. It is unclear if the brow trim on the RO helmet is actually separate or painted on. On my helmet it is molded into the helmet and I painted it. I should note that is on of the things that must be modified on the Black Series helmet to make it CRL compliant. The gap on the black series is closer to an OT gap. Lastly, the V-coder on the OT helmet is a molded part that is painted. On the RO helmet, the V-coder is a separate part and there must be a visible gap at the bulbous part of the V-coder and the helmet. Looking at the sides of the helmets, the OT tear traps are a simple depression that is painted. The vent lines are painted as is the black outline. The same is true for the temple boxes, although there are no vent lines in the temple boxes. On the RO helmet, the tear traps are also depressed; however, there is a raised portion in the center that is painted grey and the vent lines are cut out (engraved) in this raised portion. I suspect on the screen used helmets the depression is painted black and the raised portion is a glued in part that has the vent lines cut out. On my helmet, I cut the vents out completely and backed them black breathable fabric. The temple boxes on the RO helmet also have a raised portion that is painted grey and just like the OT, there are no vent lines. I have seen a gap between the end of the brown trim and the top of the ear cap on some OT helmets. On the RO, the brow trim comes past the temple box and terminates at the center of the ear cap. There is no gap between the brow trim and the ear cap and the brow trim terminates at an angle. The OT ear caps have visible flat head pan screws (3 of them) and the CRLs require them. These screws actually hold the helmet together connecting the front and back halves and attaching the ear caps over the seams. On the RO ear caps, the screws (2 of them) are molded in and are non-functional. Additionally, the ear bumps on the OT helmets are different. The RO ear bumps are all the same and a very different design from the OT. The outer circle of the ear cap as well as the ear bumps are more detailed and defined on the RO helmet. Lastly, the blue tube stripes on the OT helmet is either a decal or painted on. On the RO helmet the tube stripes are completely cut out and for the screen used helmets, they were backed with blue painters’ tape. On my helmet I backed the stripes with a blue breathable fabric. The back of both helmets are very similar. On the OT helmet the rear boxes are more trapezoidal rounded in the corners, the box is a depression that is painted grey and again the vent lines are painted. On the RO helmet, the boxes are more rectangular and again they are depressed with a raised portion that is painted grey with vent lines cut out. Again, I believe the screen used helmets had a depression that was painted black and additional parts with the vent lines cut out was painted grey and glued in place. On my helmet, these vent lines are cut out and backed with a black fabric. On the black series helmet, there is a battery box and speaker that must be modified for approval. Although the shape of both helmets are very similar, there are some minor differences. The RO helmet looks thinner overall. On the black series I had to extend the jaw line about 1.5” to fit a proper RO V-coder. The Hovi mics on the RO are exactly the same as the ANH Hovi mics with white interiors and the proper mesh screen. The lenses on the RO are also the same as the ANH lenses, green. If you are considering a ROTK, there are several options for helmets available to you. The least amount of work would be a Jimmiroquai helmet and the largest about of work would be modifying a black series helmet. I have a tutorial for the modifications I recommend in the RO thread. I do not recommend attempting to convert an OT helmet to a RO helmet, but I guess anything is possible. Next, I will be comparing the upper torso and arms. Thanks for the interest.1 point
-
Hey guys, I'm officially a first order stormtrooper! I just got approved and honestly I'm so glad to start a journey within the 501st. Looking forward to meet new friends and companions in the 501st! This is TK-77731 reporting in from theCalifornia Garrison. Thanks, Sebastian1 point
-
Great work1 point
-
Looks awesome1 point
-
Looks good to me. A little tip - try turning your flash on. As many of the reference pics use a flash - using yours will highlight the return edges in the same way the reference pics do. I found this especially helpful when finishing my helmet. You might have to back away from the helmet when taking the picture and then digitally zoom in the photo to get the same look. Keep up the good work!1 point
-
Taking some time this morning to use my new sewing skills to tidy up a few annoying things. First and foremost was shortening the four adjustable straps that attach to the thighs from the harness. Now that I have the straps adjusted to where I want, I wanted them to stay that way and also not flipping around. Easy fix. Applied Velcro to the excess strap material so it will stay put, yet be adjustable if ever needed. I’ll be going around the entire harness doing this. Sent from my iPhone using Tapatalk1 point
-
Hi Les, Those photos are great. Really helps to get a better look at how it’s shaping up. [emoji1303] Honestly, what you have is fine and could be attached together as you’ve done it. Many troopers like the slightly lower brow look. The final finish is up to you, Trooper. Personally, I’d be tempted to pivot the faceplate down, but that’s just me. (I’m mega fussy with helmets [emoji6]) Imagine approximately where the green circle is as the pivot point. Bringing that down by around 1cm at the bridge of the nose would give a slightly bigger gap above the eyes and perhaps a slightly smoother ‘swoop’ from the tubes to the rear. Again, this is purely why I would do and not something that needs to be done. Perhaps just something to try out and see which look works for you. Keep up the great work, Dan :-)1 point
-
...with and without flash!
 1 point
 -
Making progress. :-) Do you have any pictures from side on, from around 6 feet back? The 6-foot rule really helps us to gauge the proportions of the helmet. [emoji1303][emoji1]1 point
-
Hi Les Good start. Whilst I agree that you could trim the actual brow a little, the main thing here is that the faceplate alignment is a little out. Here’s a full section on the topic; https://www.whitearmor.net/forum/topic/48293-anh-helmet-alignment/ In your specific case, I’ve tried to highlight the adjustments below. It’s colour coded so here we go: Blue - the faceplate needs to rotate to allow the tube/cheek to align better* with the ‘back&cap’. *see yellow Yellow - note how the yellow line on the screen used helmet follows organically from back&cap through to the tubes/cheeks Pink line - note on the originals how this line follows the mould line on the back&cap, then rises slightly on the brow area (only a little). This is common. As per the link I shared, best bet is to get some magnets, experiment with the position, compare with originals. If it’s of use, here’s a video where I talk about alignment and other tips for accurate helmet building: Any questions, don’t hesitate to ask. :-) Dan1 point
-
I'm starting to think this is common for all modern/Disney-era troopers - there are a few pic of Deathtroopers where I'm pretty sure you can see the same system.1 point
-
Not a lot happening this past... month? Jeez, where does the time go... Between chemo, COVID, and just a particularly rainy last few weekends, things have been moving slowly, but I try to put time in each day into some aspect of the suit. Many of my updates either don't photograph well, or I just forget to take photos in my fervor. Apologies! Also, the convention (WonderCon) that I wanted to debut this suit at ended up being postponed/cancelled, so... oh well... Hopefully Celebration still? Anyways, I went back and filled any pinholes that materialized from my last round of primer (particularly around the edges of panels), then resprayed primer on top. Most of the main body panels are now FULLY prepared for final paint - the insides are reinforced with resin and sprayed flat white with all noticeable pinholes filled, and the outsides have been primered and wet-block-sanded to 1000 grit to level any dust nibs, small insects (ha), etc. that would prevent a (hopefully) excellent final spray of gloss white once the rain stops (this weekend?). I also was able to finally psych myself up, bite the bullet, and trim several of the panels. I'm about 6ft, 160lbs, so on the slightly tall and slightly slim side - I got Jim's regular height kit, (not the Tall version) and ended up taking 1" off the top of the cod, 1" off the top of the barrel and added the underarm cutouts, and 3" or so off the black side connectors. This kit really would fit a pretty big range of people! Arms and legs are also still in their first coat of primer and will probably get their second soon. I know it's not exciting, but I can't tell you how much time I've spent in paint prep on this suit, sanding and priming - really hoping it pays off! (I totally should have paid someone to do it, but I guess I get the pride of knowing it was my work when all is said and done!). Attempted my first round of glossy white on my first (easy) panel, but got a weird paint reaction already. Unsure what caused it, but I'll sand it out with like 1500 and try again. Everything will likely get at least two coats anyways. My rear zipper closure, ultra thin velcro, and flexible shoulder straps also all arrived, here's some photos IRL! Doing more sanding and priming, spraying final gloss on some panels, and figuring out strapping/test fitting things in the next go around! Belt assembly soon and also gonna try to get my HWT submitted for EIB. On the health front, had my (hopefully) LAST chemo infusion last week and am nearly fully recovered from it. The hospital keeps trying to push out my next PET scan, but my doctor and I have been pushing back to get me in next week - the scan will let me know where I stand, and where to go from here (even if I delay radiation while the world settles down). Fingers continue to be crossed for good results!1 point
-
Here's what I came up with...
 1 point
 -
Here's my attempt. I couldn't decide on a few things so I'm providing some options. One has gradients and would need to be digitally printed but the other two are more or less patch-friendly (I may have to simplify the troopers a bit). I'll probably tinker some more and change things... knowing me. Ok, now I’m just playing around but this might look cool as a T-shirt or sticker. I have some extra time on my hands thanks to COVID 19 - and it is too cold in the garage for building. Lol.1 point
-
Yesterday afternoon the Connecticut Garrison hosted our second armor party of the 2018 year. This is my sixth armor party I've "lead". The Location The Portal in Manchester. The Portal is a local gaming store. Normally not quite the ideal scene for this sort of event, a member of the CTG (Jonathan Roath) is the general manager / partial owner of the place. He loves the 501st, and though he rarely has the time to actively participating in troops he goes out of his way to make sure these sort of outreach events have a place to happen. Just his way of giving back how he can. The cool thing about using this public venue is we get people that are just wandering in for tabletop gaming or whatever see us, come talk, and sometimes it leads to new recruits/events!! The Troopers Quentin - ID Pending Quentin is a new recruit of the CTG. He's working on a Del Mekko TIE Pilot uniform. Pretty slick, and he had tons of questions about approval, requirements, etc. He came with a printed CRL and a big smile and we were able to help point him in the right direction on a lot of stuff--and save him from a few ebay purchases! Michelle - TK 24124 Michelle is the newest CTG member. Recently approved as an ANH Stormtrooper, she brought along her helmet to ask some questions. Her main concern was replacing the eye pieces from acetate film to an actual harder material. I pointed her in the direction of green tinted face shield and let her snag some pictures of the buckets I'd set those in for ideas. She seemed to have a great time, and is excited for her first troop this Saturday!!! Nick - TX 686 Nick is our resident Death Trooper. He's also at just about every armor party to help, socialize, and put smiles on faces all around. His currently project is an all metal E-11D for his death trooper. Partially aluminum, he's machining several bits himself. Since I had a torched Sterling L2A3 I brought it for him to take for reference (since I'm still a long way from finishing my pipe to weld it to). It was really cool seeing the aluminum parts he'd gathered. He also hooked me up with a spare Hengstler Counter, so that was awesome!!! Brian - ID Pending Brian is a recruit of the CTG that was brought in by stumbling upon our armor parties! He purchases an Anovos TK kit a while back and has been assembling it over the past couple of months. He brought his kit to work on and ask some questions. He had us look over some parts, notably the leg and arm pieces, for a sanity check. Not that it was needed! Brian is doing an amazing job assembling it! I'm hoping to see him in our approval inbox very soon Christopher - TK 66402 Christopher is one of the CTG event coordinators. He brought along his stormtrooper kit to shine up like he does for most events, as well as talk and help out new members/builders. He's pretty fun to be around, that's why I married him. Arthur - ID Pending Arthur has been a recruit of the CTG for a while now. He's most of the way through a stormtrooper Rogue One style kit. He had a few personal complications along the way, but the end of those seem to be in sight and he should be in our approval inbox soon! He came by to meet the other recruits, say hi, and get a set of my Patented (patent pending) Floppy Silicone TK Hand Guards™ (trademark pending) Joan - ID 31461 Joan is the second event coordinator for the CTG. She lives wayyyyyy on the other side of the state, so it was a real treat to have her out and meet up with us Joan has been convinced to start building an ANH Stormtrooper, and came by to ask us where to cut some parts, and what parts are left/right for legs. She also came to nab a set of my Patented (patent pending) Floppy Silicone TK Hand Guards™ (trademark pending), since I'd asked her to testrun the first pull of them Now that she's over her fear of cutting into ABS I expect her to be up and running in no time. Oh yeah, I was there too. Group Shot:1 point
-
Does anyone know if the cover strips can have 'rounded' corners or does everyone 'square' them off? Would a 'rounded' corner pass centurion?, I just think it looks better. Also a lot of cover strips I am seeing on various armor builds look as though they are sticking out past the armor slightly, is this usual? Something I have noticed on the Anovos Kit is the return edges all look a bit too wide, What would be the minimum you could go to shaving this edge down?1 point
-
Chris I have rounded corners on my coverstrips because I like the looks of it and I passed for Centurion.1 point
-
If it's E6000, then it's easy to do - no heat is required. Slip something like a flathead screwdriver or a razorblade (be careful not to accidently score the plastic) between the cover strip and the armor, and slowly and gently pry up the strip. Clean up any residue simply by rubbing it off with your thumb. This is one of the reasons why we recommend E6000 so highly. Unlike with CA glue or 2-part epoxy, mistakes are easy to undo.1 point