Leaderboard


Popular Content
Showing content with the highest reputation on 12/20/2019 in all areas
-
So after seeing Bishop’s TD ring, I’ll be changing the inner diameter of my test ring. But for now, I had the day off and got some rough trimming done. (I’m starting to enjoy the smell of hot ABS.) I have to leave this afternoon to catch a flight back to Texas for the weekend for an early Christmas with my family, but I’ll be back at it next week. I’ve set aside some time over this next weekend to get some more trimming work done. Also, decided to snap a shot of the framing job I had done on the Baby Yoda print I got for my gf for Christmas. We’re big fans of The Mandalorian and she absolutely loves the little green kid. (As do I.) Until then, Merry Christmas troopers. Sent from my iPhone using The Force3 points
-
Mind the tone please. There are people behind those images.2 points
-
Just watched the film last night. Did anyone get a good look at the guards around Palpatine? They never showed them up close. It almost looked like a Captain Cardinal type character at first. Red suit and cape. Couldn’t tell if it was a trooper with a cape or another variant of a praetorian guard. Sent from my iPhone using The Force2 points
-
Had my first troop and everything helt up great. I managed to walk ok in stairs and nothing pressed too hard. We trooped for 5 hours, so was an ok test. A great photographer took this picture of me. I have never looked this good before. Sent fra min SM-G960F via Tapatalk2 points
-
2 points
-
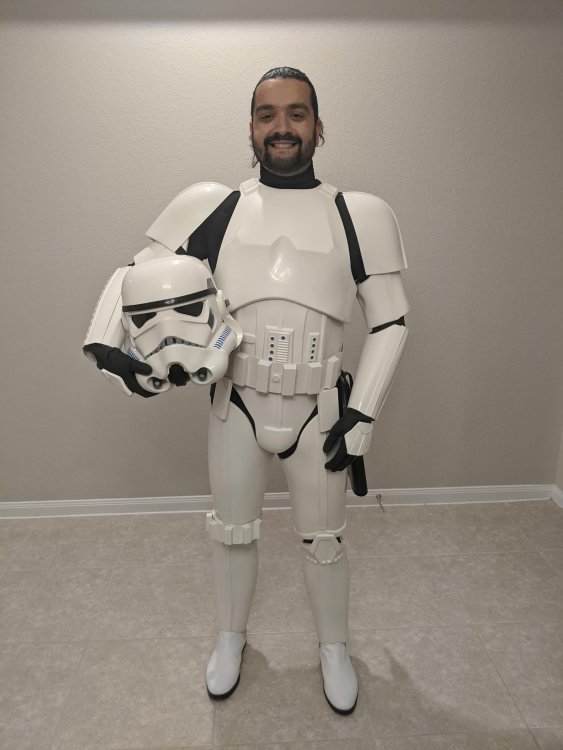
Just recently approved on Dec 1st, just in time for a hospital troop. I can't tell you how excited I am to be a part of this organization and how rewarding it was to interact with the kids and faculty. Had a few audio hiccups (velcro wasn't strong enough for the speaker in the chest plate, and since reinforced) but all in all was a great experience! Shout out to the forums,@ukswrath's very helpful guide and members of Star Garrison who helped make my first build a reality!
.thumb.jpg.69b0652fa8755bc5a1bd29a1267e90be.jpg) 1 point
1 point -
More reveals coming in the soon to be released The Art of The rise of Skywalker book.1 point
-
You and your super secret spy photos! Lol Is that an extended brow I see too? Yeah sick helmet for sure. ‘Ok people, we need a new trooper. Just take leftover parts from all the troopers and see what you can do.’ Sent from my iPhone using The Force1 point
-
The wraparound cowl is beautiful... Sent from my iPhone using Tapatalk Pro1 point
-
Visual dictionary should be out very soon, so hopefully we will see more then, there could be figures too1 point
-
Thanks that answered what I needed!1 point
-
Definitely a guard variant, interesting weapon too1 point
-
It is a variant. Very interesting hybrid. Part Stormtrooper, part Shore, part Tank, yet unique. Very interesting design. Sent from my iPhone using Tapatalk Pro1 point
-
Nice work on the TD. I have to do the same to mine. I like the thickness of the ring you made. Definitely a good look. Sent from my iPhone using The Force1 point
-
To me, it looked like they were wearing red capes but with Sith Trooper helmets, or something very similar. I watched TROS last night as well1 point
-
Cool Don, looking so good on your armor. Enjoy and almost there trooper !!1 point
-
Thermal Detonator (con't): @gmrhodes13 pointed out that there should be a indentation on the right side of the TD. Time to fix that. I decided on a 2-1/8" inner circle and measured the outer circle to match that of the TD. Used a vinyl stencil to cut a ring from scrap ABS. You might notice that the scrap was just a tad undersized on 2 edges but this will get filled with putty. Using the inner vinyl circle as a mask, I removed the primer to expose the raw ABS on the TD. This will allow for a good bond with CA glue. Fill, sand, prime and done. Hope this passes muster.1 point
-
Cool Jonas !! keep on doing a great work.!!1 point
-
PERFECT! Great job, Jonas!!1 point
-
Coming along nicely1 point
-
Today it looks like all I am going to be doing are the drop boxes. I never did a Troop at a Star Wars premier so I am going to do that today instead of doing my build. But this morning I completed the drop boxes (except for the elastic that attaches to the belt, ill worry about that when I get my belt assembled). So Walts replacement drop boxes came in not too long ago and the shade of white is not too different: This is probably the easiest part of the build so I wont go int detail on what I did. I just cut the boxes from the excess plastic and sanded them down. I couldnt find on the forums a standard thickness for drop boxes but my friend who has a centurion approved walts kit said she did 15mm and my RS drop boxes are 10mm. My drop boxes ended up being about 14mm. Next ill probably get these buttons sanded down, but tomorrow I intend to finally get my stupid left bicep fully assembled. I hate that thing.1 point
-
Guys - I just got approved yesterday. I am now TK-92019 Feels really good to finally have reached this goal, and be ready for the troop at my local cinema on the premiere in just 2 days. I would really like to thank you guys. This has been my main source of help and advice. Means more then I can express, and the answers have been fast and helpful. Everyone who reply here! THANK YOU SO MUCH. Specially want to thank UKsWrath aka Tony. Your guide and answers here have been so vital. If I ever meet you, I want to buy you a beer or a coke..or both. TheSwed... same applies to you m8. Guys like you motivated me a lot. Also wanna mention TK-1650 for the helpful snap sheets and TK-300 for the snap guide. Sent fra min SM-G960F via Tapatalk1 point
-
Never, ever be sorry about asking any question here, Adrian! We are a 100% judgement free zone, and our primary purpose is to help those who need it, so always feel free to hit us up if we can help. Many times future troopers run into issues/problems because they didn't ask questions, so keep em' coming! The RS blaster can be approved all the way to Centurion level with no major alterations, but there may be a few items that need some attention. In the photo below, there is a bit too much brass showing on the scope, and there is "weathering" (sliver color) on the T-tracks and grip. The original grips and T-tracks were plastic, and should not have this. Fixing this is super easy, just grab a can of black spray paint (preferably flat or satin) and touch up those areas. Ideally, the grip should be painted with a gloss finish, but that will not affect approval at any level.1 point
-
Hello fellow Troopers. The original post of How to use Magnets in your costume was affected by the recent stunt that Photobucket pulled and now the pictures and video are unavailable to use. TK4205 from Garrison Titan did a great job showing everyone how to get suited up with less hassle. It has helped me a great deal with my build and I figured that I would post another HOWTO with a video and pictures so that TK4205's method might help some one in the future as it did me. I used this method on the Abdomen and Posterior part of my armor but the concept can be applied to pretty much the whole suit if desired. Abdomen: Here is a video link to how the method works: [/url] I was able to get the Abdomen Section of my armor on in about 12 seconds without any help. My Plug and Sockets aren't as clean as TK4205's build, but if you are new to this hobby like me, hopefully you can get jest of how its done from the pictures below. Step 1: I ordered some Styrene Sheet from Amazon. In hindsight I wish I would have ordered Styrene that was a bit thicker but I used what I bought. Link below https://www.amazon.com/gp/product/B00ICMZ7PQ/ref=oh_aui_detailpage_o02_s00?ie=UTF8&psc=1 Magnets: TK4205 suggested going Super Magnets at Home Depot so that is what I went with. If you don't have a Home Depot Neodymium Rare Earth Magnets should work as well. https://www.amazon.com/Super-Magnet-Neodymium-Permanent-Magnets/dp/B01LWPHF2E/ref=sr_1_1?s=industrial&ie=UTF8&qid=1500301280&sr=1-1-spons&keywords=neodymium+magnets&psc=1 I took one sheet of Styrene and cut some squares. I had to cut 4 squares and glued them together since my styrene sheet was so thin (hence the reason I wish I would have went with a thicker size). Then, I cut out a space the magnet to fit inside. After I knew the bottom magnet fit properly, I removed it in order to glue it to the armor. After that, I glued a magnet to the top side of the Styrene Sheet. Next, I marked the spots where I wanted to place the magnets on the back of the Abdomen. I put a dab of glue (E6000) on the Magnet and grabbed some tape I had laying around and tapped the magnet to the appropriate spot: I also used Magnets on the outside of the armor that I later removed to further secure the glue and magnets to the armor while the glue was curing. I let it cure for 24 hours: Step 2: Now that I had magnets attached to the armor, I place the styrene squares I had cut out on the back armor and traced where they would need to line up in order for the armor to close properly. Next I prepped the squares with tape, placed glue on the armor, placed squares on glue. I wanted to make sure the styrene sheets really got a good bond so I got some wood and weights to press it down further. Let cure for 24 hours: Done Put on armor and feel accomplished Attaching Posterior Get Webbing, Glue, Magnets. Glue the magnets to an 8" long piece of webbing. Let glue fully cure to webbing and magnet. Take the Posterior plate and measure the spots you want to place the magnets and mark them. Apply glue to magnets and posterior. Let Cure Attach webbing magnets to posterior magnets and lay on to the inside of your armor and tape the webbing down to the inside of your armor and test fit to make sure that the posterior hangs to just below the bottom of the back of the armor. Once you get it where you want it, trace around where the webbing needs to go and glue it down1 point
-
So it's been a while since I've built anything - I got hit by a car while riding home from work and sadly my left hand was pretty badly broken, crushed little finger, 4 out of 5 metacarple broken! the hand was in a pretty bad way and I was sporting more metal in my left hand than a Skywalker! So i'm well on the mend now with 4 sessions a week of physiotherapy and to get my mojo back I bought a Prusa i3 MK2s kit with the full intention of putting it to good use! The original plan was to build either a 1st Order Stormtrooper or a Death Trooper but having seen Sean Feild's amazing 3D files I decided to build this. So first of all, Thank you Sean for these files, utterly utterly beautiful! So first the 3-D Printer - this is an official Prusa i3 Mk2s kit build, yes I know there are clones for cheaper but as I was new to this I wanted and needed any support from a dedicated community. Obviously I got the black edition - it's an imperial droid after all! So I decided that I would print off the small detail parts first to get a feel for the printer - after reading several forums and talking to a few people that 3D print for a profession I decided to use PETG for the build. The greeblie came out perfectly so I then decided to move on to the more complex snout. So far so good! (everything dry fitted nothing bonded)1 point


.jpg.36b3b1e5d654cd6b1d983d2561a78478.jpg)