Leaderboard


Popular Content
Showing content with the highest reputation on 07/14/2019 in Posts
-
Metalmite vintage caps,,, thanks to Dennis..............3 points
-
One part Anovos abs armour to 6 parts car bog, glue and hard work [emoji12] Sent from my iPhone using Tapatalk2 points
-
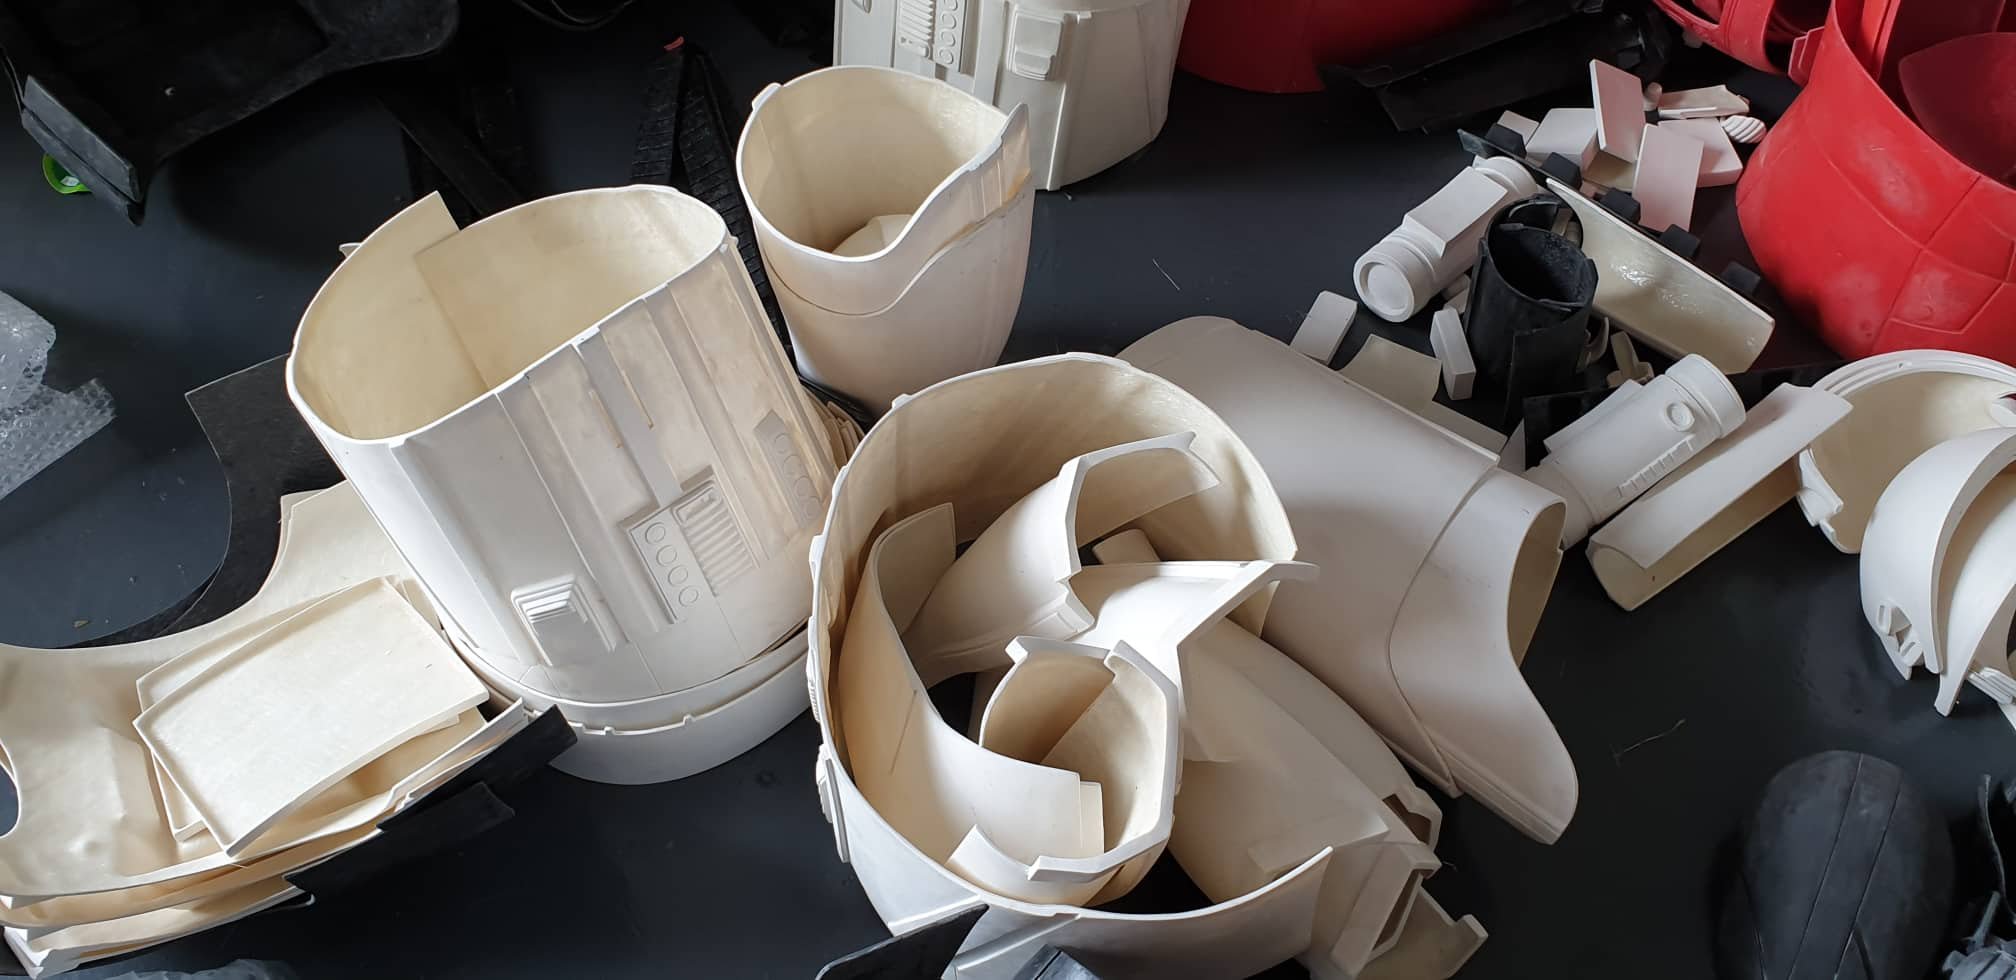
Made a very limited run of these with my power cylinders.... A thru E2 points
-
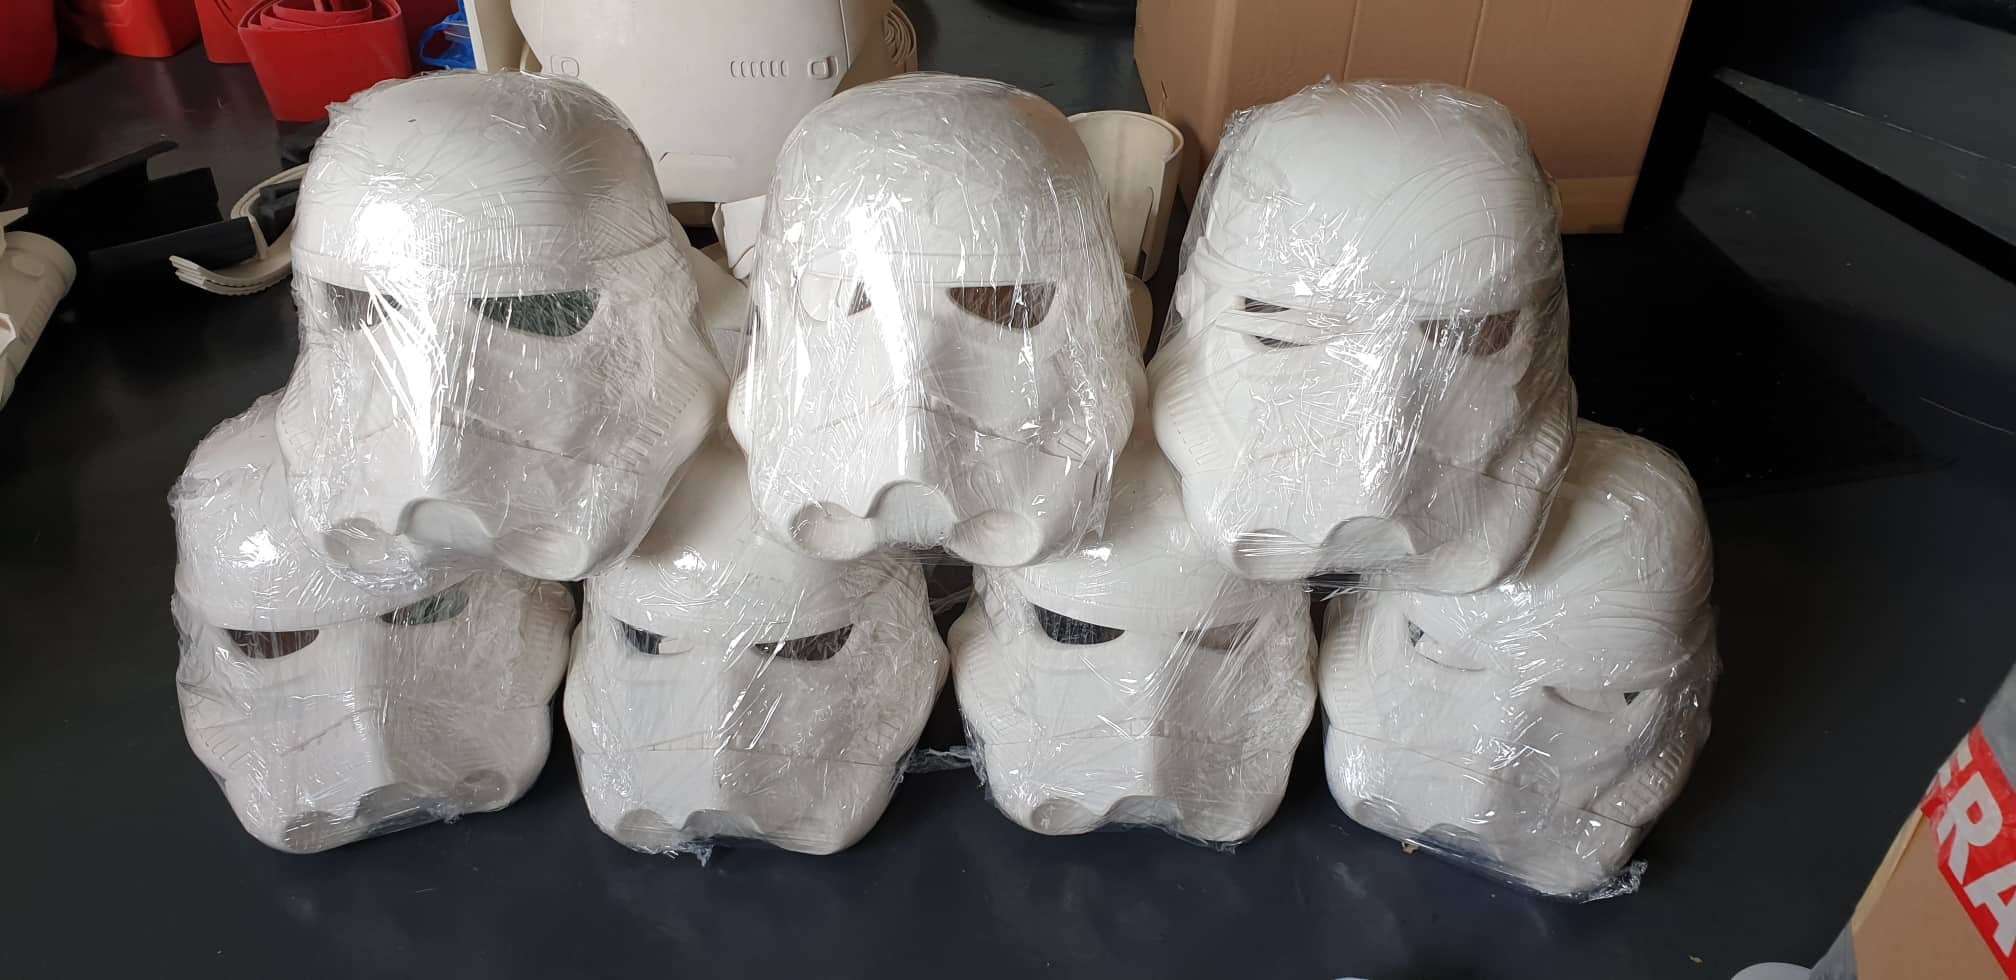
Hey party people, Justin "TheRascalKing" R. here. My Anovos ANH-S TK is starting to show some wear and tear after 3 years of trooping in it pretty frequently, and I've decided that it's finally time to start moving towards retiring it. That being said, I'm a stormtrooper through and through (Centurion #396, TK Mentor for SCG, working towards Armorer), so I knew I had to replace it with something else white and shiny. After some research, (at time of writing) it looks like Jim Tripon ("Jimmiroquai") from the Philippines' kit is the only high quality one currently available (aware of 850AW soon at least). But I liked the idea of flexible fiberglass and I was very impressed with some of his Praetorian Guard suits that SCG members have. Plus, it looked most similar to the material used for the suits I saw on set (recycled from R1 and Solo). I already knew shipping from the Philippines was expensive and group buys were the way to go, so I started reaching out to others in my Garrison to see if we could get something going. Turns out another member was already starting to do the same and we were able to get together a group buy of at least 7 suits! Parts are starting to come off the line and Jim has been great to work with. I'll post back with more when BBB day comes, but I thought I'd start a thread and get things going. I'll do my best to document our build, as there isn't much out there on these suits yet. We have some experienced builders and we plan to loop in some master Clone builders as well, as this almost has more in common with a Clone or FO build in many ways. Teamwork makes the dream work. Planning on getting Jim's undersuit and having it tailored if needbe, and having a friend who has his own paint business spray the kit for me (he mostly does motorcycles, but has sprayed helmets in the past for me and does top notch work). Boots from Imperial Boots, gloves from Endor Finders. Excited to get started and I'll post more soon! Thanks for the interest and keep checking back!

 1 point
 -
Starting this topic now that we're seeing leaks and other shots! Post here with any cool finds or notes1 point
-
Hey guys thanks to everyone here for all the support, ideas and advice. And to Ross at RWA for a terrific kit (and lots of support), RS Props for the gloves, Doopy's for an ace E11 kit and Tino for the finishing kit that made my E11 more awesomerer. Just been approved by the UK Garrison - time now to get that Centurion application in! Here's the link to the build: Hope everyone's having a great weekend, wherever in the galaxy you're based! Best Simes1 point
-
Make sure to leave the helmet alone for a few days to allow the paint to cure properly before you start the detailing. I know it's hard but it will be worth it in the end.1 point
-
Coming along nicely Dan1 point
-
Thanks guys! First proper helmet mod - soldered up my own set of helmet fans, powered by a USB power bank (props to Dan's post on helmet interior - solved for me the problem of working out where to stash the power bank - it just wouldn't fit behind my head or above it - so stashing it in the 'pipes' area really worked) I bent a small piece of aluminium and installed a bit red push button behind the hovi tips, having struggled with gloved fingers on my Mando kit that had a fiddly slide button. Just taken a stack of supplemental photos for Centurion application. Here goes...1 point
-
Thanks guys T-tracks are at home. Need to find some time to prepare them. Need to test how to curve them. Will try hot water first.1 point
-
And paint that you don’t need1 point
-
You mean from the above view and move it slightly more to the left? Thought this shifted placement is a result of the asymetrical shins as long as the two bumps at the bottom of the sniperplate are in line with the coverstrip. I won't get sloppy on the last pieces But that's now higher movie accuracy right? Trimmed it down to no edge and sanded to edges with very fine sandpaper. Once in its final shape I'll repeat that and hopefully get a round edge instead of the blade I've now.1 point
-
Great to meet you yesterday, Mark. Hopefully the AP has reinvigorated you [emoji4] Sent from my iPhone using Tapatalk1 point
-
Took ages to tape face, going to spray a bit lighter as first coat on some a bit thick Sent from my iPhone using Tapatalk1 point
-
After getting some tips at this weeks armour party, put bucket together then pulled apart to plastidip inside. Taped everything up and ready for first coat. Sent from my iPhone using Tapatalk1 point
-
Congratulations trooper, welcome to EIB!1 point
-
haha looks that way1 point
-
Agreed and more filler or abs paste1 point
-
Correct Tony I should have said Anovos's TLJ Version but I was just comparing that to the TFA A side by side and no mater which version TFA or TLJ some rework will be needed on the Anovos forearms1 point
-
Hey Max, congratulations, Welcome to EIB. Next step Centurion !!!1 point
-
I think showing the TLJ with split side Ab seams and over lap shoulders is a bit confusing. This won't be allowed1 point
-
Congratulations trooper hope to see you issued with number soon, be looking forward to seeing you at EIB.1 point
-
You've pretty much narrowed it down. The only other area I've seen that is different is the forearm construction near the elbow. Once you have your armor and begin your build it won't take much to alter and should cost very little. Lastly, take a look at the TFA CRL details and keep an eye on the TLJ CRL as I'm sure it will update in the near future.1 point
-
Submitted application and request for approval last night and was just approved by my GML! Waiting to hear back from Legion for my official indoc! Thanks for everyone’s help! Sent from my iPhone using Tapatalk1 point
-
1 point
-
I'm working on removing the return edge at the bottom (curved Lexan scissors are my new friend), and will definitely work on the new edges with fine sandpaper. Thank you!1 point
-
Thanks! Did a test run today! The pic is cut off at the waist because my boots haven't arrived yet and some of the strapping wasn't finished. I've finished strapping up the armor since this picture was taken, so it's pretty much done! My boots and voice amp should be arriving within the next few days, so I should have a completed photo soon!1 point
-
Nice work, looking much better1 point
-
Runs some fine sandpaper around the inside edge too, make sure there's nothing sharp there once trimmed.1 point
-
1 point
-
I like it better in white In comparison I still think this is more impressive1 point
-
Movement is good. Hope I'll see mine this year... getting it done by IX premiere isn't likely but still, one can dream.1 point
-
A few others from the drawing board1 point
-
Thank you. This has been more of a project than my friend and I thought it would be. The kit was made for someone smaller and I am a little overweight so we have been trying to compensate. This was also my first time putting it on fully.1 point
-
Well in all my costume prefixes I don't have a TX so suppose I'm looking at getting one now It would have been nice though to see out the new trilogy films with the final Stormtrooper version falling under the FISD and TK designation, YER I know Spec Ops get's specialist troopers but it is still the base of a Stormtrooper. Reading the Phasma comic yesterday and there's a Stormtrooper with the id prefix DB, I want to be a Dead Beat too1 point
-
One thing is for sure, it’s going to make a great Santa Trooper costume [emoji23] Sent from my iPhone using Tapatalk1 point
-
With SDCC approaching the reveal of the Sith Trooper is upon is.... Sent from my iPhone using Tapatalk Pro1 point
-
Hi again Mike. Sorry for the delay. These changes have taken me a long time because I had to rebuild some of the pieces. For the knee modification I had to remove the piece. It was the third time I had done this change, so the abs plastic was very fragile and because of this it have broken a little bit. I had to restore the calf before sticking again the sniper piece with the changes you had told me. I think now is quite better, however it is not possible to place it entirely horizontal, because the calf of the sds armor is not symmetric. I am able yo force the sniper piece a lot, but not more than you can see in the photos. Moreover, when I forced the piece a small crack appeared, nearly imperceptible. This crack prevent from forcing it more. I hope it will be enough About the arms, I done the changes you asked me to do, trimming the pieces and reducing the width of them. Also I have reduced the diameter in the wrist zone. I hope now they are correct. Thank you for you patience. Regards1 point
-
I did some more painting on my bucket. I have it loosely assembled to see what it looks like, but I don't want to mess with it too much for a couple of days to make sure the paint has cured completely.1 point
-
cutting up some real sterling mags for my alum replica1 point
-
These little pains in the an impolite person are tough to form with there compound radius and proper bends... had to get these right so they would form close to the body tube for welding... If you have ever tried making these by hand you will understand the horror1 point
-
Started listing alot of the individaul parts that make up the e11 assembly1 point
-
Copy that lol1 point
-
Oh good, I won’t have to empty my wallet to make changes. Sent from my iPhone using Tapatalk1 point