Leaderboard


Popular Content
Showing content with the highest reputation on 06/16/2019 in all areas
-
2 points
-
I’m working on getting rubber gloves, hopefully will have those soon!2 points
-
Hey gmr, I should have elaborated. The clips on my pictured TD are the SDS supplied ones. That's how it was delivered. I have an unbent piece of aluminum that will replace those The Velcro is the SDS supplied stuff as well. That has already been taken off. I haven't had a chance to hit the fabric store to get the white webbing for the drop boxes or shoulder strap. To confirm: The original drop boxes used loops that went around the belt, but then they were glued down. Right? I've separated the two ABS belt pieces (ammo portion and the wrap around). I now have a good piece of ABS to attempt my first cover strips. The rivets that SDS used were a bit of a pain to drill / cut out... The 3 tab buttons were a little rough from SDS. They had sharp corners and weren't cut very straight. I just cleaned them up a bit. Belt snaps I was just looking up the measurements on another forum (Ukswaths build) before adding: a) the female snaps on the fabric that attach belt to ab b) The Chicago screws I am using to attach ammo belt to fabric,1 point
-
Nice work on the holster straps, just a couple of minor things: TD clips should be straight on the TD side, yours appear to be curved, the TD screws also need to be black. Drop boxes should align with the end of the front plastic belt. I would advise doing away with the vecro and use elastic, it allows some give otherwise they can get stuck with movement.1 point
-
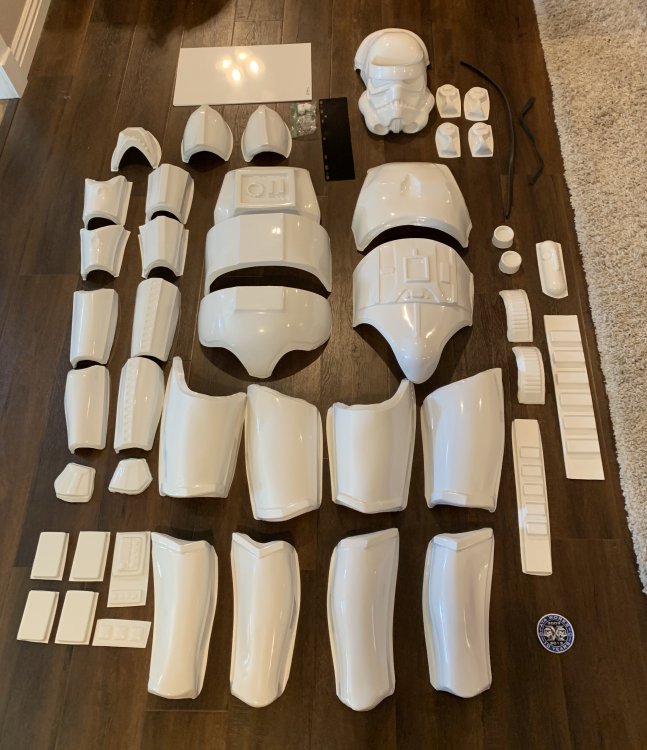
Hello Everyone! I just got received my ATA Works Kit in the mail today (Happy 10th Anniversary to them btw), and I am beyond overwhelmed! I’ve been looking into the forums and it’s been really confusing as it seems everyone does it different. I think the main thing I’m asking is: 1) Can someone point me in the direction of some really informative stunt builds? 2) What’s next? What and how much do I need to buy to make my building experience more enjoyable? (Rivets, buttons, velcro, magnets, etc.) Thanks for your help!
 1 point
 -
I read @ukswrathbuild thread and I ask several things to @justjoseph63and @Alay Also @Alayis selling centurion strapping set..they're great Goodluck with your build !1 point
-
Thank you for that. The folks at ATA got back to me and said the same thing. Sent from my SM-G950U using Tapatalk1 point
-
ATA supplies 2 sets of ears because they can be tricky to trim for the first timers1 point
-
"First, why is there 2 sets of "ears" for the bucket"? It is more that likely that you have a set of "Stunt" ears and a set of "Hero" ears. The difference is that the Stunt has 4 raised ridges on the "bump" and Hero has 3. "Second, should I have gotten decals for the bucket, or will I have to order some or hand paint myself? If I want to order, any suggestions from where?" If you didn't receive decals with your kit (some armorers supply them, some don't) you can order a set. Just be sure that you order ones that have a "hand painted" look as required for ANH. ANH Stunt/Hero ESB/ROTJ If you want to go the decal route, these are what I would recommend: https://trooperbay.com/dave-m-helmet-decals This set also includes the tube stripe decals** **As per the new CRL standards, note that tube stripes: Ideally, the tube stripes are positioned approximately a pencil width from the side of the cheek. Fall of tube stripe tops ideally lean toward the front. If you have basic painting skills you can do them yourself (which is what I suggest). They don't have to be perfect. Just try to make sure the outside lines are not too thick. I noticed that you did not cut out the 4th tooth. (GREAT job on the others)! Are you aiming for Hero? For basic Stunt approval and above, Frown is painted gray and does not leave the teeth area. Eight total teeth on the frown are cut out. For basic Hero approval and above, Frown is painted gray and does not leave the teeth area. Six total teeth are cut out and frown is tapered at both ends.1 point
-
Nothing better than BBB's1 point
-
You are correct on the teeth, I did convert a Stunt to Hero but does require some heat. https://www.whitearmor.net/forum/topic/23694-hero-bucket-build/?tab=comments#comment-298339 Also just a tip but adding the tube stripes make sure you have them facing the correct way and angle, should also be a pencil width from the cheek Good luck with the build, looking forward to the progress1 point
-
Gonna post pics before I glue, lol Sent from my SM-G955U using Tapatalk1 point
-
Oh, yes. Fascinating stuff and really helpful. But, a little thin on the ground r.e. estimates of dimensions. But thanks!1 point
-
Did you get a chance to read this, Simon? Quite informative: https://www.dropbox.com/s/s53lnuh9rq5xe7a/E11 Power Cylinders Analysis.pdf1 point
-
So I did some metal work... A little aluminium latch for the magazine Also, I finally cut the scope rail and created an aluminium plate for the power cylinders, 3D printed some more accurate-looking capacitors than I can hand-model with green stuff and rod. The plate, I found a great little template on the forum (link below), but am eyeballing all the rest of the measurements from the Doopy's resin part, since (having spent days pouring over the various research threads and guides here) I can't find any actual definitive 'agreed' dimensions for the power cylinders. (I know there's no absolute screen accurate dimensions - they're all best guesses, but there's not a thread or guide that I've found that actually states what they are/should be - thankfully the template for the bottom plate matches the Doopy's one, so I'm happy with that.)1 point
-
Honestly, I love following this build. Not only because the updates are coming on an almost regular basis, but also because of the precise way each item is installed. Seems like somebody is eager to indeed use EVERY item from his completion set, he?! That is how it should be.1 point
-
So, I had a busy weekend.... Scope screws.... I used a stepper drill bit (much easier to use for controlled drilling of big holes than those massive, scary spade bits!) to drill as deep as I could through the scope and decided not to try and risk drill all the way through But everything's now opened up enough so I can drop in all the lenses from Tino's kit and create a nice illusion of depth End cap.... Scratchbuilt inner bolt which is going to be fun, squeezing back down that interior once it's all painted up Rear sight, plus underside catch - decided to make that non-functioning, but trimmed it all down to fit within the aluminium u-channel Power cylinder bolts (boy, those were sooo fiddly!) Capacitors... So here's everything so far... Big things to do: 1. Cut the scope rail + counter bracket 2. Finish off power cylinders And then it's the puzzle of priming, painting and assembly ...and I just discovered that I'd put the front flash shield on the wrong way around....thankfully I managed to easily unseat it, flip it and reattach. PHEW!1 point
-
Busy Saturday afternoon.... Decided to 3D model and print the sight block (again, I'll post these 3D bits to Thingiverse when I'm done) Installing the sight Magazine installed... Starting to look like something at last... Maybe it's the spring and inner gubbins next...1 point
-
And now, the trigger, trigger guard and selector switch are locked in. Used some nice two-part epoxy that's reinforced with aluminium, and modelled in some remaining details with green stuff. Decided to make everything static in the end - ultimately this is more about being a robust trooping blaster for me than having the functionality (if I wanted that, I think I might have done a Hasbro conversion.) And installed the pegs for ultimately attaching to the receiver... That's the grip kinda sorted (although if I find a dome nut, I'll swap that in beside the selector switch) Time to ponder which component to tackle next over the weekend.1 point
-
Thanks! Actually, it wasn't that hard - maybe 2 hours, tops! (And I've never done this before, but all the work I've done with wood and plastic helped me a great deal) For the trigger, I bought a small chunk of aluminium the thickness of the trigger, traced around it and made efficient cuts with a hacksaw to slice the metal away from the shape. Then I went in with a rough and smooth file (both with curved/flat sides) to finish off the shaping, and then went over it with some fine emery paper. For the trigger guard - that was a strip of aluminium that I bent in my vice - I laid the strip on the resin trigger guard and then drew a line where the aluminium strip deviated from the guard - I then put the aluminium strip in the vice, bent it a little, laid it back on top of the resin guard and then bent it more, or drew a new line where the aluminium and resin didn't line up - I did take this extra-careful because I knew I'd never be able to bend anything back on itself if I went too far. For the selector switch, I traced the resin one, cut it with a hacksaw and rounded off the ends with files - for the knurling, I put the end in my vice between two course files and tightened the vice until I couldn't tighten it any more = boom! real knurling! For the body of the selector switch - that's a piece of aluminium tubing I cut to the right height and then cut a 2mm slot in to slide the switch lever in, then I glued a washer to the bottom and packed out the rest of everything with plumbers resin (one of those two-part resin putties that has aluminium in it) For the sight - I just took the offcuts from the stock screws in your kit, and just filed them following the blueprints in the document you guys put together - the pair of digital calipers I use for my 3D printing came in super-handy! Thanks again though - I hated metalwork as a kid...but then again, they never let me build Star Wars blasters or nothing... ;)1 point
-
WOW! This must have taken a while and some serious efforts to bring these up. Very nice. That selector lever and the front sight pin are stunning.1 point
-
You'd make a good R1 Death Trooper.1 point