Leaderboard


Popular Content
Showing content with the highest reputation on 05/22/2019 in all areas
-
3 points
-
Looking GREAT, Simon! I am SO stealing that magnet on the belt idea, lol. I did notice one small thing (and it may just be a wonky camera angle) but it appears that your shoulder straps are a little uneven. Once you kit-up it may not be noticeable, but though I'd give you a heads-up. Looking forward to seeing the whole ensemble!2 points
-
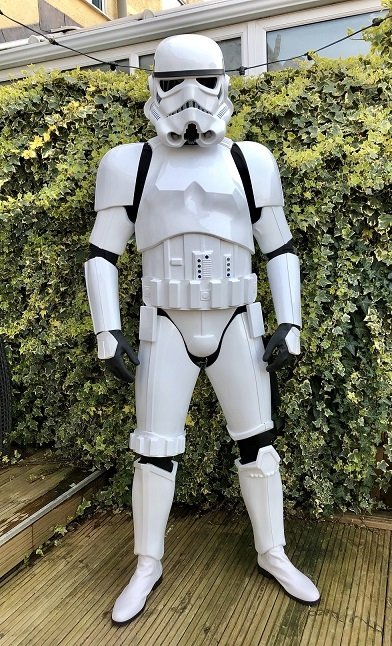
So lots of clamps and lots of waiting for glue to cure, but getting there. The 'Cricket' magnetic shins proceeds... And finally, the shoulder bridges get glued down... To fix my belt drift, I decided to get some hardcore magnets and solve the problem this way: Cut a couple of small slits in the front of the canvas belt and slide a couple of magnets into the middle of the canvas belt... Hold them in place with a couple of magnets while I use a bit of superglue on the front side to hold the magnets in place and close up the slits in front. Then, while held in place, get a needle and strong thread and sew twice around them so there's no way that the magnets can twist or come loose. Then, I glued a couple of magnets onto the inside of the ab plate... The result - the belt 'snaps' into position cleanly overlapping the ab button plates slightly - so much so, I can suspend the ab plate in mid-air and everything stays where it should... Next to come - finishing off the shin magnetic closures, attaching the sniper knee and working up a solution for keeping the calves held down to the boots. Then, I'm guessing it's time to kit up and take some photos!2 points
-
Hi, I recently bought a complete E11 blaster kit from Chris Fieldmarshall (sterling replica, M38 scope and rail, T racks, Hengstler counter, sensor type A, real sterling mag). It was quite complicated to import it in Europe (I'm French) but it's finally at home ! This kit is absolutely incredible and I can't wait to start assembling it. It's a long journey that begins and I want to share it with you. I send a friendly greeting to Chris with whom I had very good conversations on the phone and on the web! Thanks again to you!1 point
-
This is a warning for those looking to purchase from Diversity Props. There are numerous people in a kit collectors group on facebook reporting of unanswered communication attempts with Diversity Props. Some are saying Wayne has gone out of business, some get the "its almost done" bit and then nothing more, and a few having difficulties getting a refund, having to go through paypal by filing a claim. If you currently have a kit on order, I recommend attempting to contact him to get a firm update on your kits status. If you are thinking of purchasing a kit from them, make sure you have solid communication with them before attempting to purchase, and when using paypal, make sure that there is a fee for good and services, in the event you may need a refund. There may be a reason why Wayne is unavailable right now, and hopefully that is rectified quickly. Please note, this is not an attempt to slander Wayne or Diversity Props, but merely a warning to those who are financially involved and may be at risk. I hope that whatever is going on gets fixed asap, so I can delete this post, and the membership can continue to have a trusted armor supplier.1 point
-
Greetings Everyone, Not sure if this is the right place for this or not, but today I officially began the process of acquiring my TK armor. I spent nearly a month looking through my options in order to best choose my character, film, and most difficult of all, my seller. I finally decided on RS Prop Masters, I got into contact with them and they were very helpful, very thorough, and fast acting. Excellent customer service so far. It sounds like I have about eight to twelve weeks of waiting ahead of me before “Big Brown Box Day”, and I’ll be waiting with as much patience as I can muster. Thank you all for your help so far, looking forward to posting pictures when my armor finally arrives and continuing this build thread. For the glory of The Empire!1 point
-
Printed BlasTech SE-14R, completed Sent from my iPhone using Tapatalk1 point
-
Hi everyone, Aiming to achieve EIB level. I've struggled with resizing images so loaded them using Imgur so I hope it works. Name: Linz Harding TK ID: TK24037 Forum Name: Tallmonkey Garrison: UKG Armour: AM Armor Helmet- AM Armor Blaster: Doopydoos Height: 6'4" Weight: 88kg Belt: RWA Boots: Imperial Boots Holster: Burkbench Designs Gloves/Handplates: Imperial Warfighters Neck Seal: ? Front Back Lids off Action shot 1 Action shot 2 Left side Right side Left side arms up Right side arms up Left ab Right ab Front ab Cod and butt Interior strapping Helmet front Helmet back Hovi tips Helmet side Helmet lens Blaster left Blaster right Neck seal Thermal detonator Holster attachment Gloves Boots
 1 point
 -
Sir , yes Sir !!1 point
-
Just one reason for using makers from the vetted sellers list1 point
-
Congrats and welcome to EIB!1 point
-
FOREARMS - Improved: Per UKwraths advice, I trimmed down the thickness of the end of the forearms. It definitely fits much better now.1 point
-
thanks, next goal Centurion.1 point
-
Got some Riot gear and some spare parts (spats) The webbing, elastic and grips are for the shield. I broke a clip greeblie on this Troop and had to go spat-less I did manage to get the rest of the clip off (not one for using E600) and replaced it but never felt content with closing the spat by that small clip and velcro, didnt feel like doing the snap variant. Then Anovos came out with their instructions I jumped on the idea and ordered new spats from KB and a spur of the moment skull trooper helmet and the sheild and consequently had to get the baton Much more secure and less likely to brake. As a bonus the spats came from a new mold and had a much better fit then the previous ones, JSIN also confirmed they had new shins so I guess the KB kit is getting more and more accurate.1 point
-
And you're thinking, Ah man, that longwinded Old Fart is back again. Shouldn't he be yelling at kids to get off his lawn or something? Well, yeah, it is prime yelling-at-kids season, but they're at school at the moment -- or they oughta be, the little juvenile delinquents -- so I've left my lawn unguarded for a little while to bring you up to date on my build. Haven't updated anything since March, at which time I outlined a few issues: One was my left Bicep constantly coming loose. After two troops I knew that I was satisfied with the Bicep position, so rather than replace or add more snaps to the Bicep, I simply squirted a bit of E6000 around the snaps such that it cemented one strap to the other right around the snaps. Not a lot of glue, but enough that it never comes undone on its own anymore, but would be easy to pull apart if I needed to. (Thanks, E6000.) I also had a clicking Sniper Plate, even though I had already added padding in the front of the Shin and Back of the thigh on that side. A bit of judicious Sniper Plate trimming along the top edge, along with hiking up the thighs pretty much solved that. The final issue I needed to deal with at the time was the rampant and incessant pinching around the, ahem, nether regions. The armor bites were terrible, even leading to a bleeding wound at one spot on my leg after three hours of Trooping. I shaved a bit off both sides of the Cod, as well as off the inner edges of the thighs. Next troop I still got some bites, but not nearly as many. I shaved some more off the inner edges of the thighs again, and the problem is all but gone. Since then, I submitted for and achieved EIB (yay!) and intended to immediately go for Centurion. As always, the EIB review was filled with lots of great suggestions for improvement that don't directly affect Centurion approval, but there were two things I was requested to fix before applying for Centurion: The gaps between the Shoulder Bells and the Chest plate in front, and the overlap of the Back Plate over the Kidney. The first was an easy fix by just tightening up the shoulder straps, but that Back Plate was problematic. As anybody who has built a set of AM armor knows, the bottom edge of the Back Plate is a bit odd. Now, I absolutely love AM armor and consider it to be the best out there by far. However, it does have a couple quirks and that Back Plate is one of them. For some armor, the bottom edge of the Back Plate has a nice, flat return edge that mates flat on the top edge of the Kidney Plate. AM armor is different: That bottom edge isn't anywhere near flat, and the outer tips bend down and out like little "wings." The end result is that no matter what you do, those wings will overlap the Kidney, which is a no-no in general, and a roadblock to attaining Centurion. Here's a detail from the back photo from my EIB submission: Notice in the above photo that the actual bottom of the Back Plate is right on top of the Kidney where it's supposed to be (red arrow), but those wings overhang at the sides (green arrows). What's worse, with those wings overhanging they tend to pull the Back Plate out and down over the Kidney pretty much every time you move. Here's a look at if from the side just before I started to work on it yesterday. How badly the effect is may vary from Trooper to Trooper, depending on body characteristics. If your upper back arches out at an angle, it's a bit easier to get the bottom of the Back Plate to rest atop the Kidney. In the photo below, I'm holding the Back Plate out at an angle. If your back arches out, great, but even if the Back Plate is resting in the right place along its width at this angle, good luck getting it to stay there. Lean forward and your strapping will likely pull the Back Plate down over the Kidney again. I had brought up this issue way back during my build and got a number of suggestions, most of which dealt with heating those wings and bending them up to make them level. But I could tell that heating and bending would warp the side edges of the Back Plate because of the amount of return edge I'd retained there, so I balked on heating. Then, when I got my EIB, I corresponded with JustJoseph about it and got some guidance from him, as well. Joseph has a set of AM armor, so he knows exactly what this issue is like. He agreed that trying to reshape them with heat would badly mis-shape the side edges, and suggested that the only real way around it is to start cutting off return edges to reshape those pesky wings. Again, I put it off because I wanted those edges to stay (my shoulder blades tend to push the Back Plate out, creating gaps at the side that I wanted to minimize with as much return edge as possible),. However, I want to reach Centurion level even more, so those edges had to be dealt with. After giving it a lot of thought, I determined that a combination of return-edge trimming and heat would be the best way to go. I started by outlining the cuts I planned to make on the sides... ... and along the outer tips of the bottom. It took me a long time to do these cut lines, as I kept redoing them to ensure I started with the minimum amount needed -- I didn't want to cut too much. I wanted to do this in extreme baby steps: Do some cuts, then do some heat and see what I got. Then trim some more and heat some more, and check it out. By the way, remember that last photo above. You'll see it again a bit later. So, first I used Lexan scissors to cut off most of the waste up to my lines. After that, I headed over to my drill press and used that cutter drum you saw earlier in my build to shave the Back Plate smoothly down to my lines. Then, I heated those trimmed wings up using a hair dryer and did some bending, starting with the right side wing. In the photo above, you can see the result after several cycles of trim/heat, trim/heat, trim/heat. I was indeed taking it slow. Satisfied that I had the right side as good as I could get it, I did the same trim/heat, trim/heat, trim/heat routine on the left wing. OK, both sides are looking pretty good, and you can see how the bottom edge is now more or less straight across with no corner wings dipping down. Lastly, I heated both sides a bit more to curve the outer edges inward to more closely match the curve of the top of the Kidney to help the Back rest more firmly in place. This whole process took several hours, but I was determined to go slowly. I did not want to trim any more than I had too or, worse, ruin the Back Plate and have to buy another one and start over. Hey, remember earlier when I said you'd see that photo of my proposed cut lines again? Well, here's that same photo, but I've superimposed red lines where I ended up making my actual final trims. Yeah, I ended up taking a lot of plastic off, and as time-consuming as it was it was worth it when I reassembled all the straps and hung the torso on my mannequin to see how it came together. That's about as perfect as I think it can be. I still don't like the way the AM armor isn't flat along that bottom edge -- that bottom return edge is angled, not flat -- and I may address that somewhere down the road, but for now I'm satisfied that this fixes my issue with the overhanging Back Plate. Now it's time to reshoot submission photos and achieve that Centurion certificate.1 point
-
Welcome to FISD and congrats on placing the order! Now comes the hard part... waiting. There's a wealth of great threads and build advice to read on here in the mean time. You could also start collecting your soft pieces like neck seal, undersuit, etc. I'm not sure what all the RS kit comes with, but there's a great supply list here: Have a GREAT time!! Keep us posted and ask plenty of questions, even before BBB day. It'll be here before you know it!1 point
-
Nice work For future reference it’s easier to aligne the sniper knee without any lower return edge1 point
-
You have made some great progress buddy!1 point
-
If ya cant deliver then don't offer it up... This is an old issue with makers everywhere...1 point
-
Internal magnets now glued in... And that flippin' sniper knee tamed (took a little heatgun at either corner and a lot of clamps and glue) Time to wait another 48 hours for glue to cure...1 point
-
Well now I running out of excuses to get one...1 point
-
Thanks for all the tips guy! Will be going with an ATA kit, and I hope to troop with you guys in the future!! Thanks again1 point
-
This is very common. To answer your question there is no requirement stated in the CRL however, you don't want to take off too much because it might make your forearms look too small. I would use a photo editor and or draws lines to illustrate where you intend to cut and post them for us to see. From there we can give you better advice1 point
-
I'll be installing my own homebrew voice changer and I've bought an Aker amp. I see that most people seem to install the amp in their chest, but I find it is a little too thick to fit comfortably. Are there any other ideas? I'm starting to think I may have to design my own amp and put speakers in the bucket. Maybe I should buy Tony's hovi tips and amp, but I like doing things myself when I can. It's more fun that way. Tony; will your hovi tips meet Centurion approval, or are they something you swap in after approval?1 point
-
cutting up some real sterling mags for my alum replica1 point