Leaderboard


Popular Content
Showing content with the highest reputation on 12/20/2018 in Posts
-
8 points
-
Only by eating them. [emoji23] Sent from my HTC U11 using Tapatalk4 points
-
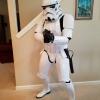
I think Glen has had more practice than most of us, lol! It takes me a good 15-20 minutes (with a handler) or so when I go HWT because of all the accessories. Speaking of mobility, I am constantly dropping bits when getting kitted up, and since I can't bend down after putting on my calves/thighs without looking like a contortionist I bought a "grabber" device. On my next troop the first thing I dropped was yep... the grabber.3 points
-
Fit test Yes I know, I need to fix the Bolts @T-Jay I had to cut down the front two bolts a little but they were same threads still needs spring and cleaning strip Got a bit of detail work in front of me still, but its coming along nicely2 points
-
I decided to work out a complete, comprehensive list for those about to start an OT TK armor build (ANH Stunt, Hero, etc,) to help get everything in place for when "Big Brown Box" day arrives! This list does not include soft parts, (neck seal, boots, etc.) but focuses on the hardware and supplies for building the armor itself. However, a list of soft parts can be found HERE I believe I have covered most items, but would appreciate additional suggestions/corrections to add, and will keep it updated as such. Yes, it looks a bit daunting, but some of the items you will already have, and the rest can be purchased at major home improvement stores, online, or borrowed from a TK friend! Plus, it gives you something to do while you "hurry up and wait" for your kit! This list is includes items used for the EIB and Centurion programs, (marked with double red asterisks)**. These items are not required for initial TK approval, but I encourage everyone to consider them as an option. Hope this helps, and best of luck on your build! PLEASE NOTE: Some kits come with all the hardware you will need to build to Centurion level, i.e. split rivets, ear screws, TD screws, etc., however, not all armorers supply the correct ones. If you are (hopefully) planning on aiming for level 3, please check with your armorer to see if they provide these. You can also reference the photos below to see if they are accurate. These supplies are based on using the snap method for connecting the armor. Example photos are shown at the bottom for many of the items, but not all. (Everyone knows what a hammer looks like). Items with photos have a notation. 1. E-6000 glue- Great for almost everything, and removable if necessary. Highly recommended. (Pick up some wooden tongue depressors as well, makes spreading it easier)! (Photo 1) (Please see updated information on E-6000 below, after #50 before purchasing). 2. Binder or notebook- To keep notes on your research. 3. Dremel or rotary tool- A "must have". (Photo 2). Be sure to get the sanding drum attachment and extra sanding drums (Photo 3). I suggest the 180 grit type. 4. Small plastic containers- Keeps everything organized. 5. Lexan scissors- Curved and straight, for cutting ABS. (Photo 4) 6. Small spring clamps- For holding things in place while gluing. You can't have too many! (Photo 5) 7. Line 24 snaps- For strapping. You will need at least 30, and do NOT "cheap-out" on these, but purchase quality ones. (Steer clear of Wal-Mart snaps). Tandy is recommended. Tutorial located here: https://www.whitearmor.net/forum/topic/44617-snap-setting-101/ (Photo 6) 8. Snap setting tools- There are 2 types to choose from- One is a two piece set (requires a hammer) (Photo 7) and the other is the pliers style (Photo 8) 9. Hammer- For setting snaps if you use the 2 piece style of snap setter. 10. Pliers/vise grips- 11. Screwdriver- Slotted head. 12. Rivets-** 5/16 (8mm). (Photo 9) Round head bifurcated/split rivets with washers. You will need 9. (3 for the kidney, 3 for the ab, one for the cod piece, 2 for the thigh ammo pack). You will also need 3 speed (Chicago") rivets to attach your ABS belt to your canvas one. These are attached by hand and not to be confused with the aluminum ones listed below (#19). Some like to use the screen accurate single cap rivets (Photo 10) to attach the ammo thigh pack but these are not a requirement. 13. Elastic- 1 inch wide black for shoulder bells, etc. (4 ft.) 2 inch wide white for ab/back plate shoulder connection (1 ft.), 1 inch wide white for drop boxes, (1 ft.) 1/4 inch wide white** (1 ft.) for shoulder straps. 14. Nylon strapping- 1 inch wide black, at least 6 to 8 ft. long. 2 inch wide black (48 inches) for high tension areas if you are using the double snap method. (NP) 15. Exacto knife/extra blades- For cutting, trimming, cutting nylon strapping. (Photo 11) 16. Heavy duty razor knife/extra blades- For cutting cover strips and scoring around pieces that will be removed. (Photo 12) 17. Heavy duty scissors/tin snips- For (carefully) cutting large sections of ABS. (Photo 13) 18. Metal ruler or straight edge- (At least 18 inches long). For use as a cutting guide, especially cover strips. 19. Hand Rivet gun/aluminum open end blind rivets- For putting your helmet together. Available for about $10-$12.00, EASY to use! (Photo 14) 20. Metric Ruler- 21. 2 x 2 or larger piece of carpet- Protects work surface, keeps dust down, and stops small parts from rolling away. 22. Rags/paper towels- And plenty of them. 23. Blue painter's tape- 1 inch and 2 inch widths. For keeping glued parts in place and dry-fitting your armor. 24. China marker/pencil- For marking cut lines. 25. Sandpaper- I highly recommend Sandblaster Pro Flexible silicone sanding sheets from 3M, 220 grit. You will never use anything else, I promise. They last forever! 26. Sanding block- The sponge type, 120 grit. 27. Band Aids- You will need these. Might as well keep them handy. 28. Rare earth magnets- (10 minimum) SUPER strong! I use the 20 mm x 3 mm round ones. Cover them in blue tape to prevent scratching your armor. You cannot have too many!!! Tutorial located here: https://www.whitearmor.net/forum/topic/44619-magnets-101/ (Photo 15) 29. Butane Lighter- For sealing the ends of nylon strapping. (see # 44 below for a better option) 30. Large "half-round" file- For smoothing out edges before sanding. I used this a LOT, especially in the curved areas. (Photo 16) 31. Small "Needle file" set- Very inexpensive, comes in 6 different shapes, and is perfect for the teeth and eye openings on your helmet. (Photo 17) 32. Foam padding- 1 inch thick. Great for helmet and armor padding. Available at craft or fabric stores. 33. Velcro- 2 inch wide black (various uses) and 1 inch wide white, for calf closures (about 36 inches). Go for the "Industrial Strength" kind. 34. PAINT: Satin Black: Humbrol # 85 or Testors # 1747 for vocoder, trap/ tear drop/ear bar outlines/stripe(s), ROTJ and ESB frown, TD screw heads. Gray: Humbrol # 5 or Testors # 1138 for trap/tear drop/ear bar background, ANH frown and ab-buttons. French Blue: Humbrol # 14 or Testors # 2715 ForTube stripes/ab buttons. Mediterranean Blue Humbrol (Tube stripes alternative color) Testors: No exact match Gloss white for all rivet heads (excluding cod rivet). Mineral spirits for brush cleaning 35. Goo Gone- Citrus based solvent that will remove latex and enamel paint and NOT harm your armor. (Photo 18). 36. Small paint brushes- Assorted sizes. Try to buy quality ones.. Cheap brushes =cheap looking results. I suggest picking up a "filbert" (Photo 19) style brush (photo 5) as well, as it's rounded tip works great for painting the ab plate buttons and vocoder. Another GREAT way to get clean, crisp lines on the ab buttons is to use Testors Micro-Sponge brushes (Photo 20). 37. Wire or fiberglass mesh- (Window screen). For inside the "frown" of your helmet. A piece 3 x 8 inches will work fine, and you can trim it as needed. 38. Safety Glasses- It never hurts to be too careful, especially when using a Dremel type tool. For your Thermal Detonator, (TD) clips: (Note: There are some GREAT pre-made TD clips you can buy on this site, and some kits include them, but you can use the following 5 items to make your own. 39. Aluminum strip- 1 inch wide 40. Screws- Size #6 pan-head slotted screws **, 1/2 inch long, You will need 4. (Photo 21). NOTE: The CRLs have been updated and round head screws are permitted, but they must be the slotted (not philips) style. 41. Hacksaw- For cutting the aluminum strip. 42. Drill- Electric or battery operated, with various size bits. 43. Vise grip OPTIONAL ITEMS: 44. Heat sealing iron- For making return edges. Not normally needed, but there are some great tutorials on this here on FISD. Try it on a scrap first, though! 45. Soldering Iron- For making holes in nylon strapping and sealing the ends. Pretty inexpensive, and worth the cost! (Photo 22) 46. Plasti-Dip- A black rubberized coating you can spray inside your helmet, (also available in a brush-on). Or, you can use spray paint. Just remember to sand and prime first! 47. Heat gun- Not normally needed. For shaping ABS. Use this CAREFULLY, and practice on scraps first until you get the hang of it. These things can reach 1500 degrees and melt your armor. 48. CA (super) glue- Not recommended for first time builders, as it is PERMANENT, and you can't fix mistakes. Also, if it drips on your armor it is nearly impossible to remove. It can also become brittle over time, causing connections to fail. 49. Acetone- For use ONLY in making ABS paste for filling small gaps, (see tutorials). Do NOT put this directly on your armor, as it will melt it. 50. SUGRU- This is an easy way to attach the lenses in your helmet. Tutorial located here: https://www.whitearmor.net/forum/topic/44593-how-to-attach-lenses-using-sugru/ 51. Respirator- An informative post was made by Clint, (cm325i) concerning the effects of E-6000 glue on some individuals. Definitely worth a read: http://www.whitearmor.net/forum/topic/33347-e6000-warnings-read-them-and-wear-a-respirator/ 52. Cut resistant gloves- Especially helpful if you are prone to cutting yourself. Available online for about $12.00 (Photo 23) E-6000 update: Please note that there are certain online retailers (including those in Europe) that are selling FAKE E-6000 or "knock-offs" like these: The genuine product is clearly marked Made in the USA, and has a batch number on each tube. They do not sell to distributors in Asia, so if you try to save a few bucks by ordering from a seller there it is not the real stuff. If you have any doubts, you can contact the manufacturer at www.eclecticproducts.com, and they will let you know where to get it. The fake stuff is garbage and will not hold up. 1. 2. 3. 4. 5. 6. 7. 8. 9. 10. 11. 12. 13. 14. 15. 16. 17. 18. 19. 20. 21. 22. 23. IMPORTANT UPDATE! To make life easier, Ray (Dieltski) made this into an awesome Google spreadsheet, which you can download to keep track and add notes! Just click here. Thanks, Ray! .1 point
-
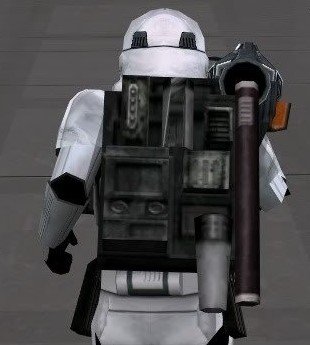
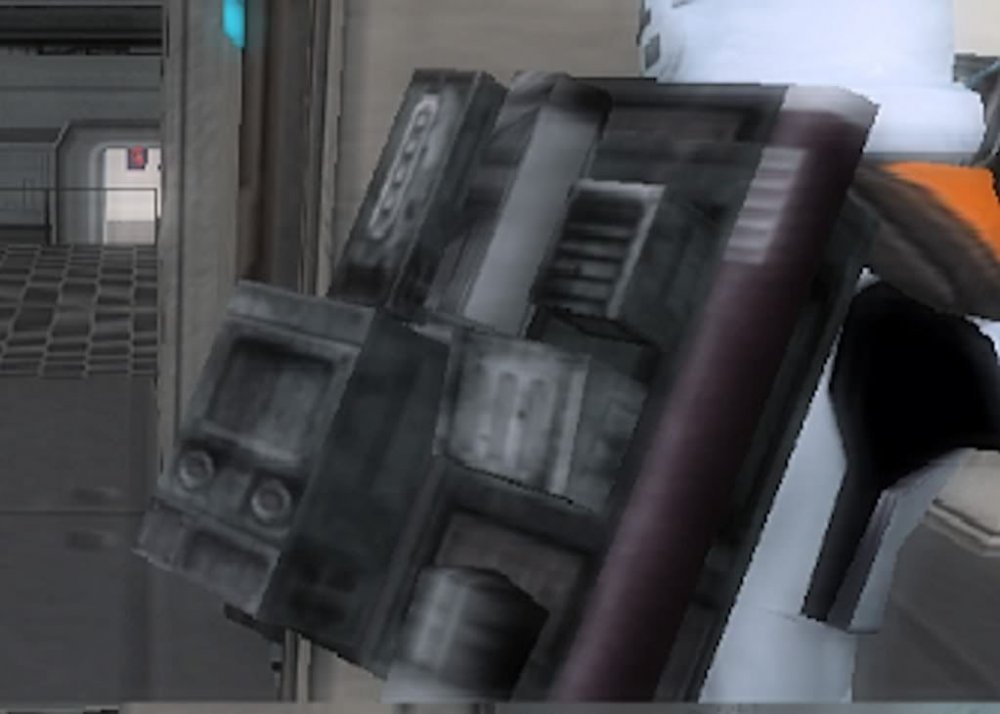
Hey Troopers! I'm finally getting around to building my HWT pack. From the very beginning of my ANH Stunt armor build, I have wanted to have the ability to also troop as a Heavy Weapons Trooper. I loved the original Battlefront series and there is something undeniably cool about the look of a Stormtrooper who has been through the rigor or battle and is equipped to stay in the field and provide fire support for his squad. I have read through and looked at many, many pack builds at this point and I am very thankful that my fellow troopers have already researched and gone through most of the trouble to provide visual reference and figure out how this build should be done in the first place. I have to give a large amount of credit to Tony and Joseph for their pioneering into the HWT trooper and the building resources they have provided. I will be using previous build threads as a basic outline to my plans, but I will be trying to match my pack as closely as I can (within my meager ability) to screen capture reference. I will be eyeballing most of the measurements and building to match what I see on screen in an attempt to put that item in hand (or on my back as it were). Let's get started! My first points of reference where the screen captures provided here on FISD: And secondly, previously built packs which have been approved: I also wanted to bring in a sense of real world "used" technology, just like props from the Original Trilogy. I ended up looking at Vietnam War era radio and communications packs.: The weathering on these radios and also the way the metal is finished and pressed gives me some inspiration on what this pack would actually look like in the real world. The screen reference can only take us so far when taken from a videogame with low res models and textures. Lastly, I also wanted to use OT screen used props (and their replicas) as reference as well. Packs seen in the films such as the ones Sandtroopers wore give me ideas for weathering, scale and detail. The radio seen on the Sandtrooper's pack is a real life found object and helps give a sense of what "real" Imperial technology would look like. To begin, I had to get a base for the pack. Most, if not ALL, builds use an oil drain pan and mine is no different. Why fix what isn't broken? I toyed around with different depths and sizes in deciding which pan to get. I ended up finding one on Amazon made by Garage Boss. It is relatively thin, which will keep me from being super thick while trooping. The first thing was to remove the center area to give my back plate room to rest. I brought out the Dremel cutting wheel. Mountains of black plastic dust later, the center was removed. This hole is also going to give me access to the inside of the pack for attaching the boxes, etc. in the future with bolts and/or pop rivets. I also removed the yellow plug for good measure. I will be covering that hole later: I have decided to go with ALICE style backpack straps for their comfort and versatility. I bought this hooks to attach them. They are standard ceiling mount hooks: Measured out and placed the mounts. I tried to put them in a placement that would be similar to how they are used on an actual ALICE backpack, then I marked them for drilling: Moving on, I decided to use my reference pictures to freehand sketch the layout of my radio. My plan is to use a sheet of PVC to build layers of depth and detail similar to what would be seen on screen. When I look at this picture, I see what seems to be multiple levels of varying depth that create different shadows across the radio. To be completely honest, I also see screws and/or rivets that are in different spots than what the CRL shows. I don't mean to rock the boat, but I am going to place my fasteners where I see them in the screencaps. Going by the second image, I also see some patterns that have not been addressed in the previous builds. I am going to attempt to recreate all of this. I used the recommended photo storage box from previous builds. The dimensions are 11.2 x 7.8 x 4.5 inches. So I got this sketched out with a rough idea of how many layers I will need to lay down to achieve the look I want. Front: Side: And that's where we're at for now. I will be out of town for the coming weekend, but I plan on getting some more work done once the Holiday Season winds down.
 1 point
 -
That's what I get for multitasking with alphabet soup LOL! Thx for the catch.1 point
-
https://www.ebay.com/itm/1235556814171 point
-
Helps when you have long arms and legs, although it's not ideal for the ideal Stormtrooper I do have a little more gap on my elbows and knees than most so I can bend a little more, so for me it's easy to get kitted up without help, people always look and say "how the hell do you do that". It also helps the way you unpack, I make sure helmet gloves, arms, blaster are up a bit higher, once that body section is on it is a little hard to bend down for those extra bits. I do find if I drop a glove I can still pick it up, I just have to do a half splits, it doesn't look pretty but it works . Sitting in a car I just wouldn't attempt, I'd never get out again, bet this trooper is still in there1 point
-
Anovos is not available (ignore their "pre-order" baloney) so they're not really in the discussion. And again, I make it work (barely) at 6'3" but there are compromises, and it definitely wouldn't do well for anyone even a little taller than me. AP, TM, RS, and ATA are all pretty much standard size armor, along with TM. (other than the longer shins TM has available, the rest of their kit is standard size) RT-Mod and AM are really the only two who cater to larger and/or taller troopers. Other kits can usually be made to work, but there will always be drawbacks and compromises.1 point
-
Yeah, that's an actual sterling stock. took a bit of work to adapt it, and still not done. @Dracotrooper Yeah, I dont think Im going to be able to match that due to the design of the Airsoft Rifle, Yes, it still works as an airsoft rifle, just think Glow in the dark red BB's1 point
-
The only part I need assistance with is my shoulder bell/bridge connection snaps. I can kinda get one side, but then because I have the full arm on, the other one is really tough. It's just easier to have a handler or someone who hasn't yet put their gloves on help out. I put mine together with the intention of being able to put most of it on myself, not because I don't want help but because I wanted to reserve the available help for those who had really tough costumes. And I just like to be as self-sufficient as I reasonably can. I'll be a handler-hog when I do my Phasma. Thighs go on first, but not snapped to the garter, boots, shins, thigh snaps, clamshell into the entire torso, then my arms are snap-connected into one piece each, and help with the shoulder bell to shoulder strap. Once that torso is on I don't bend well. It's hilarious to see TKs try and bend over to pick something up. I have a checklist in the appropriate order on the inside of my bin. Very helpful when I've been doing other costumes and then come back to the TK.1 point
-
It's not impossible- it's just hard, and depends entirely on you and your kit. I can sit, for example, in my AM. Carefully, on higher surfaces (my 50 gal Stanley bin, or the virtually identical 50 gal Husky is the perfect height), and not when the suit is fitting a little snug. As a general rule I tell people don't attempt to sit unless you have a flexible butt plate- because if the butt plate is rigid, it's more likely than not gonna crack, and no one wants a cracked butt plate. Also, the thickness of our suit- too thin it might crack, too thick it will just be uncomfortable, and also might not have the flex needed. Not that sitting in armor is particularly comfortable to begin with (but it does beat standing for hours). There's also the matter of how tight your snap connections are, how much stress is going to be put on them (just popping loose isn't a huge deal, but breaking is another). Finally, how much pinch do you get when attempting to lower yourself, and is it worth it?1 point
-
I second this- my original choice was RT, but I ended up with AM, and I have no regrets. I've trooped it pretty hard for going on three years and it's held up very well- good thickness, good quality. The shins are tricky to assemble but otherwise no known defects.1 point
-
..or ~ 1-7/8" (...which is not a thing ) I strongly believe that this is exactly a 2.0" wide elastic piece since it was originally made in the UK (English units) and because a 2" elastic is not quite 2" but slightly under, then once stretched longer becomes thinner in width. Once I get back home I will measure and post pictures of my two-year old 'stressed' straps and see if this hypothesis is valid. I'm SUPER curious now... You are really making me think hard today, LOL1 point
-
Sharp looking trooper. Sent from my iPhone using Tapatalk1 point
-
Good catch there Swede!!! Oops my bad, I guess it WAS 2".....I honestly forgot the size, but it was the same as my elastic, so I guess it actually is 2" (I'm out of town for Christmas while writing this, so I can't go to my armor box and measure right now) Also, I did not especially like the idea of velcro-ing the bridges, but it was a suggestion from a centurion garrison-mate (who I will not name) and an experiment I needed to try during the time where I had troops more frequently and did not have enough time to sew up and fit new straps. I have since removed the 1/4"x 1" velcro pieces almost a year ago from the back plate, but left the "fuzzy" side pieces on the underside of the bridge pieces to reduce scratching up the back plate from all of the movement each time I stoop down. It is completely unseen as it sits in on one of the 'bump' recesses. And honestly, for the temporary fix this worked good enough at the time as #1) these were non-canon events, and #2) this was better than the bridges continually slipping out then returning UNDER my back plate, which was not only uncomfortable, but made me look like an idiot. All that said, Swede I want to thank you for actually reading my update and chiming in with your 100% correct suggestions and comments. And for the record, my personal pet peeve is the continual overuse of pauldrons.1 point
-
So I take it that you don't live up to your screen name?1 point
-
Then 2" might be easier as Trooperbay sells some AND that would be the "correct" width if shooting for screen accuracy and you beeing a Centurion I courteously frown my nose upon velcro-ing the shoulder bridges in the back Keep Trooping1 point
-
Time again for me to make a forum appearance and update my build thread I really don't want to be one of those folks that make the build thread and then just leave it to time-out and die as one of the lonely unread threads that must now be deleted due to age and lack of interaction So...for others that have been trooping over a year, here are some more items that I'd like to add to pass along in case it can help another trooper: After 2 years of trooping at a rate of 15-20 troops per year, the elastic shoulder strap just do not hold up over time. Of course I could simply replace them with the original material I used, just not stretched out, and just do this on an 18 month repair cycle,...BUT, I wanted to try another route that a fellow centurion has done with success. I replaced my shoulder straps with canvas! The hardest part was finding 1.5" white canvas. I actually has to source this from a seatbelt manufacturer, LOL. Well, at least I know these will not stretch nor break! I hope that this will also aid in another issue I was having with the shoulder bridges popping out from under the 1/4" elastic on the back plate each time I bent over to talk to a child. With the stretch distance removed I hope that this is fixed as well. I initially tried velcro-ing the bridges to the back plate, but that only makes the plastic take the load and wound up cracking them, and with the worn-out elastic, the velcro simply pulled on the bridges until they cracked . Fortunately, this repair led me to reinforce and reshape my bridges, so this should not be an issue regardless. But, now with the canvas straps, I might try the bridge velcro hold-downs on the back plate again to see what happens, and report back here with the results. A major tip I can give for crack repair is to not to try to make it perfect. I tried so hard so many times to sand out the crack, repair it with ABS paste and spent all the extra time with the multi-stages of sanding all to find out this: Just fill the crack with superglue, and add a backer plate with ABS paste. once it's dry and cured, lightly final sand and buff the front side. I fount that the hairline that remains it no different than taking 10 times the effort for a full frontal ABS repair, but without th Meanwhile, using the voicechanger TrooperTalk and an Aker amp, a lot of experimenting went on with myself and a couple of other troopers to find the magic combination. We worked it out over at this thread: And if you checked out this update, I just wanted to say a big THANK YOU, as I try to post my trooping experience and discoveries here as without the same help, wisdom, and brotherhood of the troopers before me, I would never have gotten this far in what is by far my favorite SW character costume to date!!!1 point
-
Nice work so far, Zac! Not sure how you would cover those brackets to prevent them from scratching your backplate, as they stick out pretty far. I used bolts with washers to attach my straps, and used plastic screw covers to hide the exposed head. Nice and flat, and holding up great even after 50 + troops. To keep the raised O II area on my back plate from getting scratched, I installed black craft foam after cutting out the area like you have. It "gives" just enough to allow the pack to rest against the back plate. You will see that I use 1 inch nylon straps for mine. The reason being is that at first I had the wide padded ones, but found that they were adding a lot of pressure on the tops of the shoulder bells and shoulder bridges. Even though the pack is not overly heavy, I felt that over time the added pressure could crack those areas. Hopefully others can weigh in on this with their experiences. Changing it to the 1 inch nylon straps allows them to slip in between the shoulder bridges/shoulder bells, adding no pressure to any piece of the armor and it is stays pretty comfortable even after 2-3 hours (even 4 in one case). There are a million ways to do the strapping, and whichever works best for you is the one to go with. Keep up the great work, and I look forward to seeing another HWT in the ranks! Side note: Please notice that antennas are no longer allowed for approval, even at basic level.1 point
-
I’m not 6’4” but I have AM and I’m fairly sure it would fit. I took a little off of mine to get it to be shorter. Sent from my iPhone using Tapatalk1 point
-
Coming along nicely!1 point
-
Awesome. Who's rail did you use? Sent from my Pixel 2 using Tapatalk1 point
-
I can sit on the edge of a bench/table or arm of a chair, being taller I just can’t fully sit in a chair. I have seen a few others sit in cars I can only imagine it would have been difficult to get in and out. If there is no change area we do car park changes, try to park away from others in secluded areas, it only takes 5 minutes to kit up these days so your not exposed for long, note it pays to turn up wearing your under suit1 point
-
WOW!!!!!! Mark (AP)1 point
-
Unfortunately I have been seeing reports of this a lot lately, much more than usual. Not sure what exactly is going on with RT right now. If you’re in any sort of a hurry, I would just go with AM. Just because RT has an edge definitely doesn’t make AM a bad choice. And you’ll be trooping in armor a whole lot sooner!1 point
-
Technically, you can sit in armor. Might depend on the fit of the armor, but it is possible. I find getting seated and getting back up is the hard part. Also, I need to stick my legs out in front of me to make it work because I can't bend at the knees that much. I've never tried sitting in a vehicle- I don't think I could do it unless it was a very roomy vehicle.1 point
-
If memory serves, AP is pretty standard sized armor. As such, it'll fit some taller people but not others... all depends on your proportions, and how perfectly you want it to fit. Personally, I'm 6'3", 220#, and fit Anovos armor (also standard size, so very comparable to AP in terms of size), but barely. I had to add shims to accommodate my extra girth (Mmmm, beer), the chest / ab overlap can be tricky and needs to be tended to carefully on every troop, and there is more of a gap between thighs and knees than for shorter troopers. These are the standard things bigger guys have to deal with, when trying to fit standard sized armor. RT-Mod and AM are specifically made to accommodate larger troopers. They're sized up a bit, and have extra material on the size so side shims are rarely needed. From my understanding, RT-Mod can handle taller troopers (like 6'8" for instance) a bit better, and AM can handle wider troopers a bit better, but either will be a huge improvement for a larger trooper (no matter which direction(s) they're larger) compared to standard sized armor.1 point
-
How close are the chest and back tabs to each other (area in rectangle)? I've been staring at your photos for a while trying to figure out what to do with your chest plate positioning, and I'm wondering if actually it might help to drop your whole chest plate a touch: Then it should 'hang' from your shoulders a big more vertically, and I think that will help it sit against your ab plate more closely. Does that make sense? And actually looking back at this post in October, the chest plate seems to sit a bit more snugly against the ab in that fitting; do you recall what you did back then?1 point
-
I feel your pain, we all go through it, every time you hear a vehicle your heart skips a beat in anticipation it is a mail delivery, then only to find it was a vehicle going to next door Hang in there it can't be too far away1 point
-
I managed to pick up some nuts and bolts for attaching the ceiling hooks for the straps. For anyone who buys these hooks, these are flat head Phillips #8-32 1/4 IN: I backed them with some small washers and got everything attached: The straps are just standard backpack straps compatible for hiking packs and ALICE packs. They're very padded and feel pretty comfortable. Here's the part link for reference: (https://www.amazon.com/gp/product/B078VZXDM5/ref=oh_aui_detailpage_o00_s00?ie=UTF8&psc=1) The only problem I can see with this setup is the top hooks putting pressure against my backplate and creating dents or scratches. If it comes it that, I will pad them in some way. Otherwise, it feels good and works! I will eventually paint the reflective strips black. I don't want to be spotted by Rebels.1 point
-
I’m glad I read this. I am getting ready for my first troop, on September 9th. I’m getting Mynocks in my stomach thinking about it, but I am so stoked. I asked to be a handler because I’d like to see how Troops interact with the public, and get an idea of what that is like. I don’t have a blaster yet, but I was told that someone would most likely have a blaster I can borrow if I do decide to suit up. “Troopers Helping Troopers”! Thanks for this information.1 point
-
Yesterday afternoon the Connecticut Garrison hosted our second armor party of the 2018 year. This is my sixth armor party I've "lead". The Location The Portal in Manchester. The Portal is a local gaming store. Normally not quite the ideal scene for this sort of event, a member of the CTG (Jonathan Roath) is the general manager / partial owner of the place. He loves the 501st, and though he rarely has the time to actively participating in troops he goes out of his way to make sure these sort of outreach events have a place to happen. Just his way of giving back how he can. The cool thing about using this public venue is we get people that are just wandering in for tabletop gaming or whatever see us, come talk, and sometimes it leads to new recruits/events!! The Troopers Quentin - ID Pending Quentin is a new recruit of the CTG. He's working on a Del Mekko TIE Pilot uniform. Pretty slick, and he had tons of questions about approval, requirements, etc. He came with a printed CRL and a big smile and we were able to help point him in the right direction on a lot of stuff--and save him from a few ebay purchases! Michelle - TK 24124 Michelle is the newest CTG member. Recently approved as an ANH Stormtrooper, she brought along her helmet to ask some questions. Her main concern was replacing the eye pieces from acetate film to an actual harder material. I pointed her in the direction of green tinted face shield and let her snag some pictures of the buckets I'd set those in for ideas. She seemed to have a great time, and is excited for her first troop this Saturday!!! Nick - TX 686 Nick is our resident Death Trooper. He's also at just about every armor party to help, socialize, and put smiles on faces all around. His currently project is an all metal E-11D for his death trooper. Partially aluminum, he's machining several bits himself. Since I had a torched Sterling L2A3 I brought it for him to take for reference (since I'm still a long way from finishing my pipe to weld it to). It was really cool seeing the aluminum parts he'd gathered. He also hooked me up with a spare Hengstler Counter, so that was awesome!!! Brian - ID Pending Brian is a recruit of the CTG that was brought in by stumbling upon our armor parties! He purchases an Anovos TK kit a while back and has been assembling it over the past couple of months. He brought his kit to work on and ask some questions. He had us look over some parts, notably the leg and arm pieces, for a sanity check. Not that it was needed! Brian is doing an amazing job assembling it! I'm hoping to see him in our approval inbox very soon Christopher - TK 66402 Christopher is one of the CTG event coordinators. He brought along his stormtrooper kit to shine up like he does for most events, as well as talk and help out new members/builders. He's pretty fun to be around, that's why I married him. Arthur - ID Pending Arthur has been a recruit of the CTG for a while now. He's most of the way through a stormtrooper Rogue One style kit. He had a few personal complications along the way, but the end of those seem to be in sight and he should be in our approval inbox soon! He came by to meet the other recruits, say hi, and get a set of my Patented (patent pending) Floppy Silicone TK Hand Guards™ (trademark pending) Joan - ID 31461 Joan is the second event coordinator for the CTG. She lives wayyyyyy on the other side of the state, so it was a real treat to have her out and meet up with us Joan has been convinced to start building an ANH Stormtrooper, and came by to ask us where to cut some parts, and what parts are left/right for legs. She also came to nab a set of my Patented (patent pending) Floppy Silicone TK Hand Guards™ (trademark pending), since I'd asked her to testrun the first pull of them Now that she's over her fear of cutting into ABS I expect her to be up and running in no time. Oh yeah, I was there too. Group Shot:1 point
-
Great write up Joseph. We had to change the name of ours to Armor Workshops, seemed a few took the Party name too lituraly and some would indulge in some alcoholic beverages,early in the day which of course put a stop to building1 point
-
Thinking more about this, do any of you veterans have any suggestions for what type of events are a good starting point for trooping? I signed up for a Star Wars day at the local library as I figured a library would be a pretty controlled environment, but would love to hear from the experienced troopers on what events are "newbie friendly."1 point
-
Thanks for the kind words, Ken! I remember what it was like jumping around from post to post, trying to figure out everything I would need. Hopefully this makes it a bit easier for those embarking on their first build.1 point
-
For item #34 I would suggest changing paint thinner to mineral spirits. Some thinners avaialble on the market are based in the same chemical family as acetone, so it will eat ABS.1 point