Leaderboard


Popular Content
Showing content with the highest reputation on 12/19/2018 in all areas
-
Thanks to you and the DO team for your work and yeah I do need to do some paint touch ups all around. The ear and belt I think can be easily adjusted. Glen thank you as well Sent from my 5054N using Tapatalk2 points
-
Congratulation again trooper2 points
-
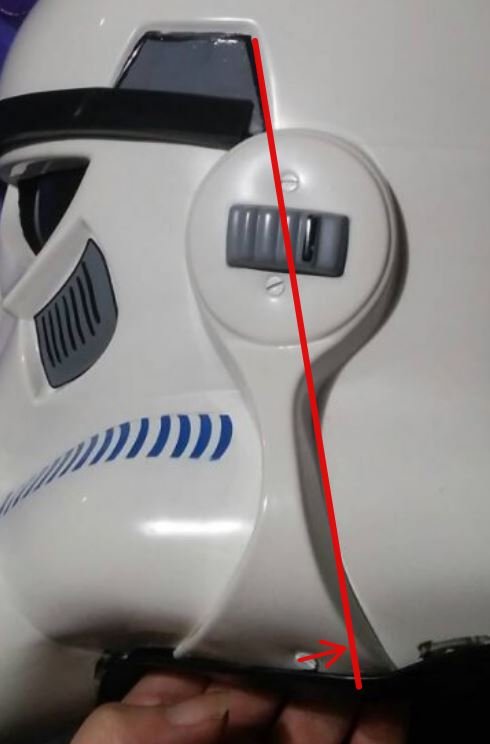
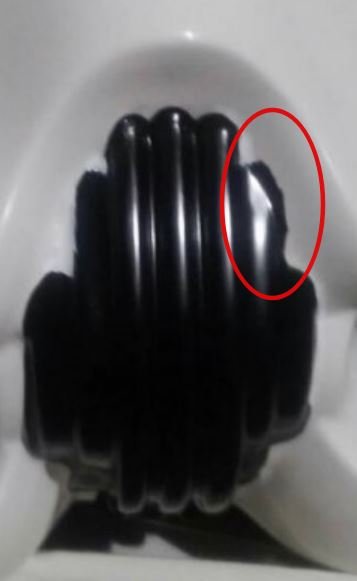
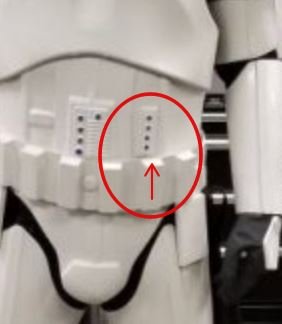
Hey Rat welcome back and thank you for your Centurion application. Thank you making any suggested corrections and for providing updated photos. CRL and Centurion Application Requirements: All required submission photos appear to be present. Fantastic job on your build. On behalf of the FISD Deployment team I'd like to welcome you to Centurion. Congratulations! Other-Armor Fit/Assembly: In this area we discuss any areas still needing some improvement. Though they will not hold you back from Centurion, Centurion is the elite level of accuracy and what we suggest here will help you reach that. Somehow I missed the ear placement during your EIB approval. As mentioned above though the following suggestion will not effect your Centurion application it's worth noting none the less. The ear placement should be so that the upper and lower ear mounting screws follow the trap trailing edge as seen in the provided reference photo. Reference photo Looks like you've done a little work on the Vcoder. That said, it could use a bit more TLC on the left side so it matches the right. Almost there brother. Reference photo Ab buttons could also use a little more TLC. A cotton swab and denatured alcohol could clean those outer edges right up Reference photo And lastly the left side of the waist ammo belt could still stand to come up a bit. Reference photo That's it. Great job on your build Rat. Time to get out there represent the Empire.
 2 points
 -
Greetings fellow Troopers, A few months ago, I finished a T-21 scratch build using templates from Pandatrooper. He did an amazing job on both the templates and the instructions. I was looking for something similar for the DLT-19. As many of you know, there are some blueprints available. These schematics do a nice job showing scale and detail, but they didn't provide piece by piece cuts. I guess I was looking to be spoon fed. Using these blueprints, I made my own simplified templates that can be applied to wood and PVC pipe/couplings. My goal was to construct a sturdy DLT-19 using standard hand tools with parts that are readily available. You will notice that there are some details missing, such as a trigger, sights, T-tracks, and other small greeblies. I left the trigger and sights off because I plan to troop with this thing and it will get thrown around. I was afraid those parts would snap off or get caught on something. If you decide to construct a DLT-19 with these templates, perhaps you can improve on the design. I've seen a few other scratch builds on here that are MUCH better than mine. I guess you can consider this a simplified version. If you find ways to improve the build, please share with the class! Before we jump in, I'd like to give a shout-out to Astyanax here on whitearmor.net. I used some of the ideas from his build (found here). Specifically, the mouthwash cap for the endpiece, and shelving brackets for the bipod. The trooper that drew up the MG34 blueprints is also a member here. If you are reading this WizardOfFlight, thank you for the awesome blueprints! Without them, I wouldn't have known where to start. Instead of writing up a bunch of steps with photos, I made an instructional video. It gave me a chance to play dress-up and incorporate some cheezy special effects. It's a DLT-19, there's a lot going on, so the video weighs in at 30+ minutes Here is the video: Here are some pics of the finished product: Here are the ingredients: DLT-19 Wood/PVC/Plastic templates http://wp.me/p6OqN2-1se FREE 1” x 10” x 6’ (actual: ¾” x 9-¾” x 6’ ) premium board http://low.es/2kW8vw5$10 1-¼” PVC pipe (2 feet) http://thd.co/2lCSM43$4 4 x 1-¼” PVC couplings (Home Depot couplings were more uniform on outside) http://thd.co/2kz0yMo$3 1” x ¾” PVC adapter http://low.es/2l3hUnX$1 (Lowe’s has wrong pic on the site...product number in the link is correct) ⅞” wood dowel http://low.es/2kksX7O$4 Plastic sign http://thd.co/2l3qALi$5 Shelving brackets http://thd.co/2kGRszu$6 ½” type LB conduit body http://thd.co/2kki7Pc$3 ¾” corner braces (2 packs) http://low.es/2hID3hB$4 Mouthwash cap (large) local Grocery/Pharmacy ~3$ 1-½” PVC conduit clamp http://low.es/2l8Uj4Z$2 ½” #8-32 flathead machine screws and nuts http://low.es/2iIIyOZ$1 2” #8 wood screws http://low.es/2kksAuj$1 2” #10-24 round machine screws and nuts http://low.es/2kgC3ra$1 ¾” #12 oval-head sheet metal screws http://thd.co/2kH4pJV$1 ¾” #6 oval-head sheet metal screws http://thd.co/2kktXJa$1 #6 finishing washers http://thd.co/2lEocYK$1 ½” mending plates http://low.es/2lCRczh$4 #10-24 rubber well nut http://low.es/2kWn9Dv$1 ⅜” #6-32 round machine screws w/ washers & nuts http://low.es/2kgDxl9$1 ½” #4 pan head sheet metal screws http://thd.co/2h4Ikox$1 ¾” chicago bolts x 4 http://low.es/2kH3EjY$4 ½” chicago bolt x 1 http://low.es/2kkq1Z7$1 ⅝” or ½” #8 oval head sheet metal screws http://low.es/2l7O8yd$1 1” #6 oval head sheet metal screws http://low.es/2lD7zfr$1 ½” #8 machine screws, nuts, and finishing washers used to fill the holes in the shelving brackets $1 Approximate cost of materials: 66$ Finishing Materials Bondo E6000 adhesive Elmer’s Wood Glue Sandpaper (60, 120, 220, 400 grit) Friction tape #0000 steel wool Graphite powder http://amzn.to/2lFq4R7 Rustoleum Painter's Touch gray primer spray Rustoleum Painter's Touch flat black spray Rustoleum Painter's Touch metallic aluminum spray Satin clear spray Polyurethane in satin finish Tools Jigsaw http://amzn.to/2klqxGd Dremel http://amzn.to/2lFpfrB Drill http://amzn.to/2klyStp Drill bits http://amzn.to/2kluKtE Hacksaw http://amzn.to/2l8Vl0R Files & rasps Screwdrivers Lexan scissors http://amzn.to/2klB5Fi Star Wars pencils! http://amzn.to/2l4wHz0 Airbrush (optional) http://amzn.to/2l4x7VV Hope you guys can improve on the design. If I add any additional templates for the build, I'll put them in the zip file in the d/l link. Thanks for looking! This build does take some time and patience. Your hard work will pay off in the end, the DLT-19 is a beautiful weapon!1 point
-
The front of the stripes are angled , if you look from the sides you have yours like this (back) \\\\\ (front) and they should ideally be like this (back) ///// (front) You can see in the images below:1 point
-
1 point
-
Nice one trooper!!1 point
-
Testing the battery charger: 20181219_202759 Fully charged! 20181219_210436 Checking the battery voltage: 20181219_210333 Ready for BlastFX to arrive!!!1 point
-
Hey thanks, Phil! I didn't take terribly many photos of the process because it required more hands than I had to begin with, but I can certainly go into more detail if you'd like. Just let me know.1 point
-
Well done, Rat. Well deserved. :-) Best wishes, Dan/Daniel/Danny/Bob ;-)1 point
-
Congrats and welcome to Centurion!!1 point
-
Hey congrats Rat! Looking forward to trooping with you!1 point
-
To elaborate on how to fix the sniper plate going under the thigh (I'm actually yet to see someone who didn't have at least a bit of this problem, so very, very common!)- Get a cheap washcloth (like from the dollar store), wrap it up in duct tape, tape it into the top of the shin. It gives it just enough punch out that it doesn't slip under the thigh, and problem solved. Provided your thighs aren't overly large for you, and therefore not helping the situation.1 point
-
Congratulations! Looking sharp!1 point
-
Congrats D'angelo! Sent from my 5054N using Tapatalk1 point
-
@Frank75139 - Welcome to the maelstrom that is my mind. For those of you still with us, I hammered the beginning of the next bend using the file as my edge again. That left me here so I measured 1" from the bend and cut there with a pair of aviation snips (which are the bee's knees). It does pay to be somewhat conscious of the direction your aviation snips are made to cut so you don't get the harsh curve on the side you want to keep. I did not do that. Read and learn. Test fit with the pipe again - looking relatively good! I fiddled with the distance between the vertical piece and the curve a while, then finished the second clip (which I had been making on the remaining piece of aluminum all along). It took some work to make them even, bending with my hands and occasionally a pair of pliers, but it was fun. Figuring out where to trim the round part was a bit challenging as the many pictures of real O2 canisters didn't have the angle I wanted. Turns out it's really (really) hard to get pictures of an O2 canister from the side. Placing the control panel (?) at the angle I wanted and making the straight parts of the clips perpendicular to the ground gave me a line at which to trim the clips, right below the panel. A little snipping, and here we be! The shape was satisfactory, but the finish was awful. Couldn't imagine letting Lord Vader see me in that condition. Hit it with a little sandpaper, and it looks great! I highly recommend wet sanding to avoid all the aluminum dust. Here's where it stands now, with my freshly painted screw heads. Speaking of which, I believe these to be the proper screws. If anybody needs to correct me, now would be a good time.1 point
-
I got one of the Wireless Trooping Systems mics when they were selling them on the forums a couple years ago. I don't think they sell them anymore. The only issue I've ever had with it was accidentally pairing it with another trooper's mic when we apparently both turned them on at about the same time. I was just about to get on an elevator to the troop when I heard someone else talking through my speaker. Luckily it happened before getting on the elevator and not after I got off.1 point
-
I have my aker amp facing outwards up against the chest plate, doesn't sit flush so there is enough sound coming out, also gives it a nice muffled sound. I have two small angles of abs glued so the amp and icomm can't fall down and I use Velcro to hold them in place.1 point
-
Getting there. Had a major problem where the weight of the barrel was too much for the receiver....long story....it was a mistake on my part. So what is did was add a mending plate as a support brace between the barrel and receiver. I know I know, it's not the most screen accurate but then again neither is this blaster if you want to be honest. It will be a fun blaster for trooping and it didn't cost me $300! Sent from my SM-N920V using Tapatalk1 point
-
Making progress. Just hit the ends with a little black primer just to get an idea of what the bondo would look like painted and if I needed to sand more. To be honest it's not a hard build. Just takes time. I would like to add t tracks but not sure how to. Looking forward to having it complete. Sent from my SM-N920V using Tapatalk1 point