Leaderboard


Popular Content
Showing content with the highest reputation on 09/29/2018 in all areas
-
Well this is not something I would have thought that I would need to consider; however, recent experience has caused me to investigate this issue, here is what I have learned. When I started my ROTK build, the only supplier of ROTK gloves that I knew of was Imperial Boots (IB). IB calls these gloves Anthology Trooper Gloves (ATG) and they sell them for $69.90 plus shipping from the Philippines. I just checked their web site and they have reduced the price to $59.90 plus shipping. https://www.imperialboots.com/product/anthology-trooper-glove-shore-trooper/ So I purchased a set of the ATGs along with the T-7 boots for my ROTK build. When I received the gloves I tried them on to test the fit and the wrist immediately separated from the gloves in several areas. Additionally, the side seam separated as well. I assumed that I may have received a bad pair that were not stitched properly and decided to not contact IB about the issue since I had a sewing machine and I did not want to wait for the extended shipping from the Philippines. I re-stitched the gloves and did not give it another thought. I put the gloves on several times since then for application pictures and test fitting of the armor as I built it. My first troop in my ROTK was at DragonCon 2018. This was 4 months after I purchased the gloves. During the 3 hours I wore my kit, I observed that the gloves seams along the thumb had separated. I detailed all of this in my ROTK build here on FISD. https://www.whitearmor.net/forum/topic/44463-11b30b4’s-rotk-build/ In this picture you can see the re-stitched wrist (Yellow Circle), the freying of the elastic wrist from contact with Velcro (Red Cricle) I assume, and the separated seam on the thumb. So after DragonCon I first did a search to see if the gloves that they used for the screen version was a modified off-the-shelf glove. I was unable to discover any existing gloves that match what was used for the movie; however, I did find another manufacturer who sells a ROTK glove. The company is Endor Finders (EF) and they are located in the USA. EF sells a Rogue One Trooper Glove for $55.00 plus shipping. So I ordered a set and received them. https://www.endorfinders.com/costume-accessories/rogue-one-trooper-gloves Shortly after I ordered the glove from EF, I contacted IB about the issues I have had with the ATG gloves. After a few back and forth e-mails, IB sent me a new pair of the ATG gloves. I won’t say it was a painless experience but they did replace the gloves so there is that. I have held off doing this comparison until I received the replacement ATG gloves and now that I have them, it is now time to do this. At first look both gloves look almost identical. Honestly, I expected the gloves from EF to be the exact same as what IB sells. Once I got the EF gloves I quickly noticed the differences. As you can see the cuff on the EF gloves is longer although both gloves are the same size. The EF gloves fit a bit tighter but that is because they are lined on the inside while the IB gloves are not lined. Here is the palm and back of the IB glove. And this is the EF palm and back. A side by side of EF (left) and IB (right) Inside lining of the EF (Left) and no liner on the IB glove (Right). Inside the EF glove. Inside the IB glove. Wrist of the EF glove. Wrist of the IB glove. The EF glove with armor. The IB glove with armor. My observations: 1. The ribbed fabric used by each manufacturer is different. So I looked at some reference pictures from SW celebration. In this picture the glove fabric looks like the grid fabric used by EF. However, in these pictures, the fabric looks more like the ribbed fabric used by IB. So I am at a loss to determine which is correct. I suppose that both could be correct. 2. The wrist on the EF glove is fabric and not elastic. The fabric on the IB glove is elastic. 3. The EF glove is lined and fits like an Isotoner while the IB gloves are unlined and fit like Mechanix gloves. 4. The stitching quality appears to be better in the RF gloves while even the new IB gloves are poorly stitched. 5. The Velcor patches on the back of the EF gloves are opposite (One soft and one hard) while the Velcro patches on the back of the IB gloves are both soft. 6. The leather on both gloves looks to of similar type and quality and screen accurate. Conclusion: The EF glove seems to be a better product and is sold for a few dollars less than the IB glove. I have not trooped the EF glove as of yet, so my opinion may change once I get more experience with them but I doubt it. I hope that some of you find this information helpful. Happy trooping.2 points
-
The left shin has a clip greeble and two boxes on the outside and using the CRL pic I eye-balled the locations, the clip greeble also rest in a little indention (on the ANOVOS armor anyway) and I wanted to give that a go - probably won`t make any difference but I like to have it Used the greeble to trace out the space and then used the dremmel and some sandpaper….was I worried about cutting to deep? naaah...that was my first thought, to cut all the way through and glue a backing piece and even the edges out with abs paste so just went for it. Not cutting all the way though. The two boxes are fixed just below and I shaped them to follow the contur of the armor and layed it in place to check against CRL. Works for me and I opted to simply weld them on, glued extra abs on the inside to ad the contact surface. Also marked them to avoid confusion. And welded on and I did some shaping with a hairdryer to get the clip to bend just a tad, abs pasted the boxes to be seamless as per CRL. Sanded and ready for paint. Some painted stuff2 points
-
Thank you Sir!1 point
-
Was sizing up the spats (boy they are ugly) when I realized I forgot the greeble on the right shin...so dremmel away and glue. wasn’t finished with painting so that’s why I just glued it on. And the spats I planned for1 point
-
Great build .your doing a great job. Sent from my SM-J530F using Tapatalk1 point
-
Helmet (reworked)1 point
-
Changed the short area1 point
-
So, unfortunately I started out with a set of fiberglass eBay armor. Man, do I regret that. I had to do a lot of work just to get it wearable. Now I plan to upgrade each piece to better armor. Sorry I didn't take more photos along the way. This is the armor after the coat of red paint, but before the final weathering. In between working on the armor I made a pauldron, a pouch (made out of foam), a sandtrooper style backpack, and the flamethrower. And finally, here is the finished armor. I know the Incinerator troopers don't wear backpacks, but I'm not applying to the 501st, and I like sandtroopers...so there. 1 point
-
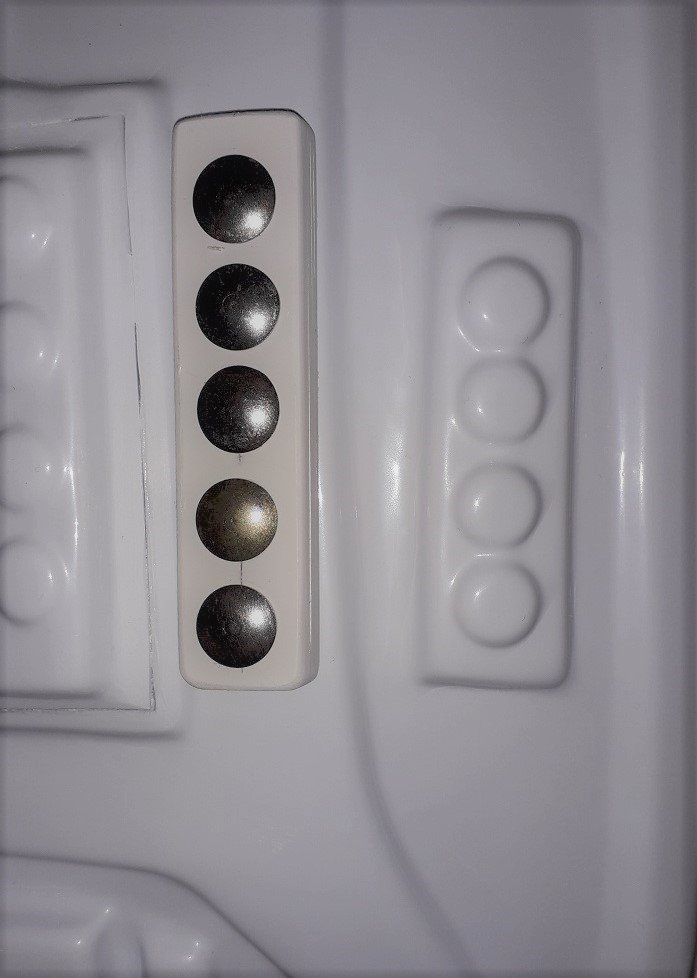
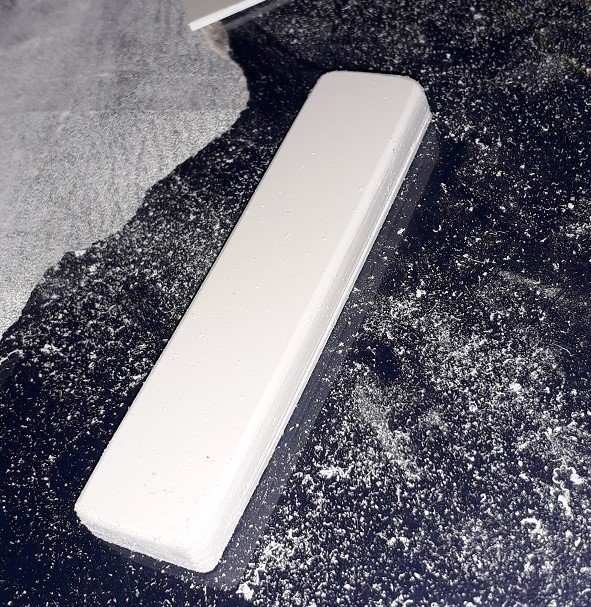
Okay, so today, I looked at adding the fifth ab button, even though it's not mandatory for level 2 clearance. Or so I believe - the CRL doesnt mention that the main ab plate is inverted, and only mentions the fifth button under Level 3 criteria. I cut out five ABS strips, glued them together into a block, and added five large brass drawing pins for the buttons, glued in place by epoxy glue. In the pics below, you can see the size and shape of it next to the existing 4 buttons. I'm going to cut out the four, and insert the new block with five, then add some filler (most probably 'porcelain white' Milliput) , sand it and see how it looks. The weathering and scorch marks will be handy to hide a multitude of minor sins...
 1 point
 -
I'd rather not have to, but it it comes to it. What would be great is for someone that has Photoshop skills to lay out the template and put just the slightest bit of a curve on them so they will lay flat. I'm not the guy for it, but somebody should. LOL! I mean if we can get people that can 3-D model something this should be a simple thing. Sent from my 5054N using Tapatalk1 point
-
It's probably just the angle of the pic, but your right shoulder brigde on the chest piece looks shorter than the other. Also, if you get the back piece in their, you can see if the ab and chest need to come up, the kidney go down, or a bit of both. Although gaps in the back won't matter as much since you aren't going for centurion. But overall, nice work! Can't wait to see it all come together!1 point
-
Oh I did that Glen and still had bleed through. However when I went to clean it up it was apparently not dry and smudged everywhere. Sent from my VK815 using Tapatalk1 point
-
Perhaps ab / chest needs to come up, it’s not quite match with your kidney, or bring your kidney down (once its on correctly ), what ever works1 point
-
Looking forward to the progress. I haven't had my hands on one of the toy versions so I'm not sure how they sound and look but I can tell you that the public does like to hear and see all the bells and whistles. We also add a jack amp to our batons and blasters, takes the sound from the internal speaker and transfers it to your aker, it's just a case of running a cable down your arm1 point
-
Many still are happy to wait and nobody is suggesting everyone pulls out, it would just be nice if for once Anovos could get their act together and actually tell the truth on when they will deliver this long awaited product, many have already missed trooping at one movie and don't want to miss the last one in this trilogy1 point
-
@Scalawag Thanks Paul for sharing that knowledge about the crinkle paint with us.1 point
-
Guys, I just posted a comparison of the Endor Finder glove vs the Imperial Boots Glove here:1 point
-
I am willing to wait and see. If they have a blowout sale because of too much stock at some point that is fine with me too and I'll grab a couple for spare parts. The way I see it is I'm not in a big hurry and Anovos has always delivered at some point and if they cancel I will get my money back at some point too. So, yes I am out the money until they deliver or cancel but if $700 was a big issue in my income I would have never bought it in the first place. In the meantime I am enjoying my ANH TK.1 point
-
There are several ways you can accomplish securing the shin, in addition to what Glen mentioned you can also add a square patch of industrial strength velcro to the front of your boot and inside your shin. That's my go to choice with most of my armor.1 point
-
What a great build, I just popped over from my DLT-19 build where you left a link. This looks fantastic. The crinkle paint finish always fascinates me as the first time I saw a sterling with that finish was when I started to look at E-11 prop builds. I don't know how much you know about the finish and I hope I am not talking out of place here, but the crinkle finish is seen on 'export' versions of the sterling and so is very common outside the UK. All contracts for the sterling from outside the UK had the crinkle finish. However the UK military contracts all specified that sterlings should be finished in a smooth paint. Its the only difference between the UK military and export versions, other than this they are identical. In the UK we are far more used to seeing military surplus sterlings which all have the smooth finish which tends to wear more easily too. We hardly ever see the crinkle paint here, but occasionally we see a UK military sterling that has a crinkle painted shoulder stock, which I think is a result of the UK military buying parts from a canceled export contract some time in the early 1970s. They bought a load of internal parts and stocks as spares from the canceled export contract as sterling were anxious to make back some of the money they lost when the contract fell through. Interestingly the suppressed versions used by the UK military do have the crinkle paint finish. This is just my theory, but I suspect that Bapty & Co supplied ex British military Sterlings for use in Star Wars. It's impossible to prove of course, as records would not reflect this as they would not of noted this type of detail when the guns came into inventory with them, but it would make sense as the majority of Sterlings available on the UK market would be ex UK military spec ones, and buying export versions would have probably cost a lot more. Anyway, both finishes are accepted by the community, and the crinkle finish does add a more interesting look to the E-11. Not a patch on your build, but this is my Doopy Doos E-11 with BlastFX electronics which I thought you might like too. Paul1 point
-
Looking good, sir. The F-11D has really grown on me, (much like the armour itself). This is a dangerous, potentially expensive thread for me to be following! Lol1 point
-
Okay. Here's a little bit of what I have so far. Boots (Imperial Boots) Neck seal Pouches Yoke Forearms (left) and gloves (Imperial Boots) I've he the right forearm put together, but the inner box popped off. Or maybe this is the right one. Couldn't remember which side the black box goes on because it's late..... Test fit the ab section, and thanks to the weight loss I don't have to shim it anymore. Shouldn't have to shim the yoke/chest either. I had to on my FO TIE, but I wound up cutting the shims off in April because it was waaaay too big. Shoulder bells are also done. Just didn't get a picture yet. Anyone know if the Jimmi or Anovos decal sheets on Trooperbay will work with her KB armor?1 point
-
Just found this thread and it is a goldmine of information for me as I'm intending to start a sterling conversion soon and this is the first time I have found someone showing how they drilled a genuine hengstler for mounting. Fantastic work and an awesome looking blaster. Sent from my iPhone using Tapatalk1 point
-
Blaster looks great! Loving the stand BTW. I would do one of two things with the scope. Either strip it down and repaint or leave as is. Depends on what effect you want to go for [emoji106] Marc1 point
-
So I was lucky enough to find a genuine 1943 M38 scope online! The scope was located in New Zealand, and the owner there purchased it in Argentina, so this thing has really gotten around! As you can see, the original paint finish is almost completely gone on the right side. I'd like to use this on my Sterling E-11, but would need to paint it in order for it to fit in with the finish on the rest of the blaster. Does anyone have any thoughts or recommendations about painting this?1 point
-
Very nice photos, Jon. I really like your result. And that last picture is just "BAMM"!!!1 point
-
Okay, I have reached a point where I can call it finished! (at least for now anyway) It's far from perfect, but I am VERY happy with it! Here are some pics. I'm also really pleased with the stand I found for it. It has a remote control, lots of different light colors, and various lighting effects. Best part is it holds this heavy beast most solidly! Another thank you to Chris (Fieldmarshall) for the M38 scope and the power cylinders. I left the resistors and the red cloth wire covers unpainted, I only dry-brushed them some to dirty them up just a little. They are just too nice to cover up and I also wanted to leave little bits unpainted here and there to show the various materials, colors and textures. My T-Tracks didn't come out too bad, but next time I hope to do better. I love this view of the business end! Once I get my TK number, I'll set it on the Hengstler and block the reset button internally to lock it in place. I'm sure once I've had a little break, I'll come back to this and tinker with it some more, but right now I just want to enjoy it for a while. Oh, and the final weight completely assembled??? 7 lbs 12.2 oz (3.52 kg)!!! This baby packs quite a heft! Thanks to everyone who helped on this by providing parts, helpful advice and instruction, or who just followed along. Hopefully something here will help or inspire someone else someday.1 point