Leaderboard


Popular Content
Showing content with the highest reputation on 08/08/2018 in Posts
-
I am 5'4", so you are taller than I am! Never too short to be a TK! The WTF kit is a good choice for the Vertically Challenged. I think you'll be happy with it. They have great customer service and it's super easy to quickly get replacement parts from them. I'm glad that you're finding my build to be helpful! I hope that you will post your own build thread when your BBB day comes so we can watch (and learn from) your build as well.3 points
-
KABOOM! And if my head was not inflated enough, there were no recommendations to fix anything or do anything different for Centurion. I am totally speechless since I know and see all the issues with my kit but I guess that is always the case with people who seek to do their best and are never completely happy with the results. Don't get me wrong, I do love my kit and I am very pleased with how it turned out but there are things I would like to fix on it. I also realize that I can get stuck in a cycle of fix this or that and never finish the kit.3 points
-
really pleased with the progress I made today indeed. First time I had the full armor on without any blue tape, feels like such an amazing achievement!2 points
-
Lots of progress today. Had a very productive evening. Finished 99% of the strapping today: Going to tighten the shoulder bells a bit more, then I will add the straps around the biceps, Still need to fix the buttons to the stomach and attach the dropboxes. Once that is all done I have some minor paint work to do on the costume, the rivets all need a drop of white. The rivets for the ammo pouch need to be closed properly still. I also need to extend the canvas belt a bit to make it a better fit. \ I want to shorten the coverstrip on the right upper leg a bit so it looks better. Next time I put the full costume on I will also pay a bit more attention to the alignment of my calves closing, doesn't look nice like this. Fortunately I am using velcro there so that is really easy to do right. Also considering shortening the elastic on the left elbow a little bit to pull the lower arm in a bit more. Another tiny detail to be added: elastic bands on the shoulder straps. This Sunday going to finish the helmet as well. For completeness sake:2 points
-
The short build continued yesterday. And I took more pics as promised... We spent about 2.5 hours on fitting thighs and biceps. I focused just on getting the pieces trimmed to fit for width at this point. All parts are glued with an inner cover strip in the front. I will wait to put on the outer cover strip until we have cleared the hurdle of trimming for length. First up, left arm. I trimmed the biceps to fit and taped them together so she could try biceps and forearms on at the same time. Clearly this arm as it's fitting now is too long. I will most likely remove material from the bottom of the bicep and bottom of the forearm to adjust for length. The good news is that the seams are lining up in the front and back. Yay! Next, right arm. All looks good here, so now moving along to legs... (I only took pics of the left leg.) Both legs ended up looking good. Seams line up straight in front and in back, and the thighs aren't too loose or too tight on her. Even though these are the "short" thigh parts from WTF, the thighs will still require trimming at the tops. But all of that will have to wait until after we get the torso fitted. Oh! Wait! Torso is fitted! I had adjusted the glued elastic straps in the chest and back after our last fitting session, and I was hopeful that everything would line up nicely. I also moved the shoulder bridge straps down further on the chest and bent them to curve nicely along the shoulders. Note that the bridges end in the "sweet spot" on the back plate- not too close, and not too far from the OII box. And I am particularly happy with how the back plate finally fits. See the before and after: We ran out of time to make any further progress in the session. I want to make small adjustments here and there still, and we have plans to meet again next week for more fitting. We should be able to focus on getting the limbs sized down for length next time. Stay tuned!2 points
-
I first got my numbers in an ROTJ suit that came together in Frankenstein fashion over a couple of years but always wanted the look of a Bespin deployed TK. Finally got around to ordering some ATA armour and assembling it over the last couple of months. Love this kit, solid 2mm ABS, funky OT asymmetry and even the cream white finish of the plastic is tasty. I’m preaching probably to the converted here but for price versus accuracy versus sturdiness this kit is a pretty happy compromise [emoji106][emoji106][emoji106]1 point
-
It's really a kick in the teeth when armor makers drop the ball, hopefully you get something worked out soon.1 point
-
Well look at that - a Stormtrooper Sound like you got a good plan for making it even better and I just have a small addition and that is to round the lower corners on the knee ammo pack but really great job1 point
-
These 3D builds are incredibly interesting to watch. Thanks for posting this build.1 point
-
Yeah, it’s a wonderful feeling when it all starts falling into place. :-)1 point
-
That’s coming on nicely. :-)1 point
-
I allowed for 2 fingers width inside the upper and lower parts of the thigh, and I am hesitant about getting it much more snug on her at this stage. Her thighs are more... well... female shaped. She is pulling the thigh up and outwards to keep it in position, so it also looks like more space is in there than there actually is. I will probably need to bring the thighs up as we adjust for length. If they are smaller around the lower thigh at this length, then once they're brought up, it'll be even more narrow around the lower thigh. I don't want that. Once things have been adjusted for length, if still I need to taper things in near the knee, it'll be a super easy alteration because I haven't put the outer cover strips on yet. Once the boots are on, they bring up the shin quite a bit. When she tried on the shins with the boots at the last session, the shins completely covered her knees. Remember that she is 4'9". I am 5'4", and these shins still needed to be trimmed down a little for my height (or lack thereof). I never got around to trimming the shins down to fit me because I sold the kit before getting to that part of the build. I would have been wasting my time to trim for my height, only to have to trim again for her height. I have to say, it's really fun (and much easier!) to assemble a TK on someone else rather than on myself. I need to clone myself for my next build so I can have something to build on that I can see from other angles! A mannequin doesn't cut it.1 point
-
Awesome, glad it helped1 point
-
Great work on the torso and what a difference on that back plate I was wondering on the thighs though, could be that I’m looking at pics and that make the difference but to me it seems that the thigh is a bit big and/or could taper in more at the knee? and the hight looks spot on to me, I know the shin will come up ones the boots are on but still looks like there’s enough space to walk and do stairs1 point
-
Coming along nicely Pam, keep up the good work1 point
-
In order of primary usage: 1. Exacto knife 2. Belt sander 3. Dremel1 point
-
Looks good , just ensure the cover strip doesn't extend beyond the edge of the armor itself.1 point
-
thank you very much!1 point
-
There is also this list which is the best info we have on FOTK armor vendors: https://www.whitearmor.net/forum/topic/43484-wtb-tfatlj-armor-who-is-current/1 point
-
1 point
-
@Cricket Hopefully will get new kidney tomorrow and start again.1 point
-
Thank you so much for continuing to post, I have been following this because I am waiting on my BBB from WTF and I am 5'6 which is a little short to be a stormtrooper. So you and sha sha I have been following, please keep up your great build, I am excited about your build and how I will grow and learn from you!!! Sent from my SM-G965U using Tapatalk1 point
-
I will most likely remove some material from the tops as well to keep the bicep visually balanced.1 point
-
Would it be easier to remove from the top of the bicep as the bell will over this area?1 point
-
Looking good!1 point
-
Wow, great attention to the details in a scratch build. Very nice to read - following...1 point
-
Sorry for replying so late, Jesse. I am currently away from home with limited internet access and will check the measurements of the spring cup when being back again (in about 28 hrs). If somebody else is able to help in the meantime, I guess Jesse would be happy to get the correct measurements.1 point
-
Great build brother !! Good job and welcome to the ranks !!!1 point
-
The brown box has arrived ! But I have an exam next week , so I cant work on it right now haha wish me luck !1 point
-
Darthcue, Bulldog44, DEVOLVER and everyone else who has congratulated me, thank you and I appreciate all your comments. So EIB is under my belt and I have submitted my application for Centurion, fingers crossed. https://www.whitearmor.net/forum/topic/45367-tk-20980-requesting-rotk-centurion-status/1 point
-
Wow! Congratulations. What a milestone! Sent from my iPhone using Tapatalk1 point
-
Belt is done now.: Since I put chicago screws through the canvas so it is adjustable if needed. The screw side is on the canvas side. finally put the ammo pouches on the thigh as well: Put it lined out on the coverstrip in the end. Still need to paint the rivets, but first need to fully close the split rivets. For the rest spent the evening putting in the majority of the snaps, still have 3 to go now. Also prepped all elastic to be able to do a full fitting later on this week, hopefully this weekend. And of course, not to foget, the rivets in the kidney plate are in place as well And yes, these also get painted last Just to show, they really are the split rivets: So happy to be almost done!!1 point
-
Below is a link for a chemical compatibility chart. Need to know if something is safe on your ABS? Use the chemical compatibility chart! https://www.coleparmer.com/chemical-resistance This will help anyone know what to chemical/solvent is safe to use on there armor. Simply select what the chemical is and the material is and click "view compatibility" It will populate an alphabetical code from A to E and a chart to the side stating the chemical effect of the chemical/solvent on the material of your choosing.1 point
-
Great work so far1 point
-
This looks impressive. As Greg said, the shins should be open. Pepakura is a lot of work, I suggest you use epoxy resin on the surface. Put thin layers of it on the paper, one after another until you have a hard and durable material. After that you will still need to sand the surface until it's smooth and round instead of poligonal. This will take a lot of time and you might use some more layers of epoxy resin or filler. In the end I recommend you to get the whole armor painted or if you have the skills, paint it on your own. looking forward to this build!1 point
-
Getting close. Just a tip, I added some foam behind the back and chest sections so they don’t rub on the ab and TD, could be worth a look to save the paint getting rubbed off.1 point
-
Update time! This weekend made a lot of progress. First and foremost, thanks to @VulpX for the help, support, guidance and steady hands with making my bucket awesome! Vocoder is nice and black as well now: Still need to install the mesh behind the teeth and in the hovi-tips. Next up: I finally prepped the dropboxes. Got the elastic band attached: They are all pretty and closed, although not glued closed yet, since I ran out of e-6000 this weekend. Drilled some holes and installed the rivets in the stomach plate: Nice authentic split rivets from trooperbay Removed the last bit of edge from the ammo pouch for the belt. Cut the corners, without cutting corners The ammo pouch is connected with chicago screws to the canvas belt. Next up, get the cover buttons a bit smaller and put them over it. But again, need some e-6000 first Placed the shoulder straps on the chest plate. Fixed the strapping for chest and back plate, added all strapping from shoulders down to the lower arms. Added the snaps in the chest plate for connecting to the ab-plate. Added the first snap on the left side of the ab plate and again, ran out of glue to awaiting more glue to finish placing all snaps. Also fixed the belt for my upper legs, attached the strapping to the upperlegs and belt so I now have wearable upperlegs. Todo this week: finish closing the calves with velcro, add more snaps all over the place so I can finish the strapping. Get a bit more help from our Attache to get the ammo pouch properly on the upperleg. Hopefully we will have a chance this week or next week to finish the stripes on the bucket as well, so that one is just checked off.1 point
-
Your going to be the short trooper master! Great work so far!1 point
-
I have AM 2.0, and got to Centurion. I did replace the back plate with an RT-Mod, because at the time the CRL indicated the AM back plate was to be replaced with a more accurate version, but to my knowledge, the current AM is fine as-is. I do know the AM 2.0 chest is fine, but AM 1.0 would need to be replaced. If you're getting a new kit direct from them, it will be the current version, so no need to worry about 1.0. Differences are subtle: helmet has black frown, decals not hand-painted or hand-painted-look decals on the helmet (you can get the decals off Trooperbay.com). Lenses are flat smoke or green (I personally prefer smoke to go with the black frown). Holster is black looped and on the right (Darman makes excellent holsters, I have four of them, and will add more as I get more blasters). Hand guards are the Snowie hand guards, and attached either with a black elastic strap or the sewing pattern (there's a tutorial on that on here). You can do black chemical gloves with the elastic strap attachment, or you can do silk gloves with the sewing attachment. I cheat a little in that I have the chemical gloves, but I also have a spare pair of Nomex for long troops or summer troops, and the elastic band attachment means I can swap out. (Silk are harder to wash, and in hot weather like we get around here, chemical gloves collect sweat like nobody's business). The E-11 is a parred down version of ANH, no ammo counter, no cord, maybe something else, but basically it's a ANH with some stuff removed (I have a Hyperfirm, so I didn't have to think, just ordered an ESB version- Lewis/Slave5 makes great Hyperfirms, and his b-grades are almost indistinguishable from his a-grades). Pretty sure I got them all... sometimes when I rattle them off I forget one or two little details. They're all mostly little details. There's a handful of ESB Centurion threads, I'd check those out, those should make things pretty clear as to what you're shooting for. To my knowledge, most all TK armors come with the parts to be either ANH, ESB or Sandie. I know AM does, because mine did. The only one I wouldn't be sure about on that would be Anovos- I've not heard of anyone doing ESB with Anovos. I've seen a handful of people selling their extra parts for Sandies that came with their kits, so it's also possible to grab the conversion pieces on the forums, just keep an eye out. I'd just indicate when ordering what you're planning to do, to make sure you at the very least get that kit set up/extras. I would also vouch for AM- I love mine. I troop a lot, and fairly hard, and it's held up great over the last two years. It's a nice thickness and has good bend to it. Glad to see another aiming for Centurion! Good luck! Ask any questions you come across- it makes life so much easier, and then your Centurion will be in the bag.1 point
-
Hi Troopers. Thought I would share how I have been adding my photos from Google Photo if anyone wants to use google photos as there image hub. First you find your photo that you want to use and click the share icon (circled in red) Than click get link And click copy From there go to https://ctrlq.org/google/photos/ and paste the link where it states paste google link here and click on generate code The webpage will perform its internet magic and provide you with a link below Copy and paste into the direct link into whitearmor forum of your choice and you have your picture! <a Hope this helps everyone!
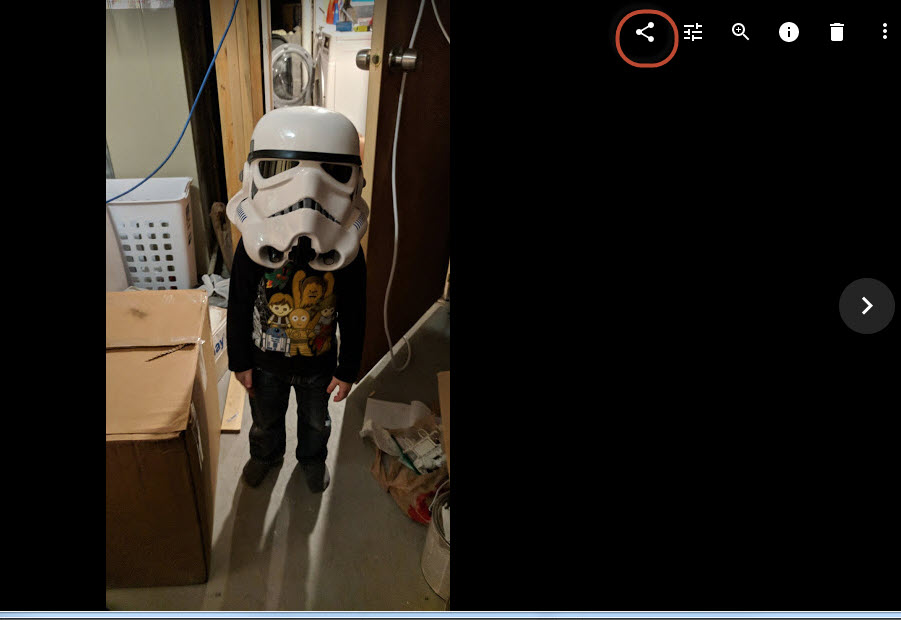


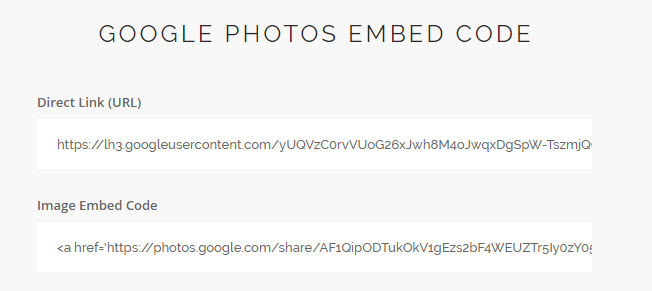 1 point