Leaderboard


Popular Content
Showing content with the highest reputation on 08/07/2018 in Posts
-
Guys thank you.3 points
-
KABOOM! And if my head was not inflated enough, there were no recommendations to fix anything or do anything different for Centurion. I am totally speechless since I know and see all the issues with my kit but I guess that is always the case with people who seek to do their best and are never completely happy with the results. Don't get me wrong, I do love my kit and I am very pleased with how it turned out but there are things I would like to fix on it. I also realize that I can get stuck in a cycle of fix this or that and never finish the kit.3 points
-
Great to see that we have another future HWT! In looking over your pics I noticed a few things... For approval at any level for HWT there can be no drop boxes or holster present on your belt. Looks like Daniel is helping you out with the photo posting, (thanks!), so once you get it mastered don't forget to post up the required photos, which you can find on this thread. https://www.whitearmor.net/forum/topic/43831-tk-pre-approval-program-overview/ Looking forward to seeing the final product!2 points
-
Below is a link for a chemical compatibility chart. Need to know if something is safe on your ABS? Use the chemical compatibility chart! https://www.coleparmer.com/chemical-resistance This will help anyone know what to chemical/solvent is safe to use on there armor. Simply select what the chemical is and the material is and click "view compatibility" It will populate an alphabetical code from A to E and a chart to the side stating the chemical effect of the chemical/solvent on the material of your choosing.2 points
-
First is to choose ”direct link”, click the top left corner were it says ”link” and the select bar comes up..then close it and tap the HTTP adress and then tap and hold there and the ”mark all” appears, click that and then ”copy” appears so click that and go back to FISD and tap and hold in the post and paste appears so hit that and the link shows but wait a few sec and the image has arrived2 points
-
If you use it dab a little bit on a cloth then use that don’t put it directly on there. Sent from my iPhone using Tapatalk2 points
-
Its just something I wanted to call out that it can damage it if you use too much and if you leave it on. Chemistry Major Incoming: ABS is prone to being attacked by polar solvents (acetone) From the web: Acetone acts as a polar protic solvent that can generally solvate a wide variety of polymers. Both of these solvents can make a dilute ABS solution meaning it dissolves your ABS Mineral Spirts or Stoddard Solvent can do the same but is a poor protic solvent. IF you let mineral spirts/Stoddard Solvent sit on ABS and left overnight you would see a blemish/scarring. In the short it is safe to use to clean paint, just wipe clean with a wet rag when done to remove any excess. If you want to know "will X dissolve Y" use the following site from Cole Parmer https://www.coleparmer.com/chemical-resistance Select your chemical you are using in section 1, than select your material section 2 and let the magic of the internet do the work for you.2 points
-
As someone new and about to start their first build, I feel it incumbent upon me to paraphrase our glorious Emperor: "I will be watching this thread with great interest."2 points
-
I think it's high time we create individual photo check lists. New armor types with new details require a new photo check list for each, or at minimum make a universal one. Also, we need to update the application required photos lists. The ROTK alone has enough changes compared to the OTTKs to warrant it's own list.2 points
-
No need to trim the whole top, just the offending area. I also think the tops could have been left and they would have overlapped onto your cod plate or you could have pulled them more to the outside so they don't rub. But what's done is done. Just trying to point out ways that could help others who may be reading and in the same situation2 points
-
Half an hour writing gone away! I'll have to practise more editing posts. Let's try again. 32 mm OD PVC for the bolt, 0.2 mm plasticard for the cleaning strips. An overall picture, fake spring made from soldering wire ( tin, for soldering copper or brass) and the first steps creating and fixing the coking handle. I really don't know the name in English, it's a 6mm attachment/fitting for brick or concrete walls. Here we call it "taco", the same as Mexican food. "Taco de 6, de 8..." isn't the same as "taco de pollo,verdura". The later chicken, vegetables. Finally I think I got it, hope you like it.2 points
-
Hi all, Quick (and hopefully hilarious) back story... in 2012 I decided that I was going to make my lifelong dream of owning a fine set of realistic trooper armor a reality. Being a fairly industrious and mechanically inclined sort, I figured that the best way to do this was the way the masters did it in the mid-70's! I would build my own, sculpting each piece to a body cast of myself, and, having a set of master molds, would be able to have pieces well into infinity. After one near-death experience and several pounds of putty, I had birthed... STORMIN' NORMAN!!! I know... crazy idea; and expensive! After a hard look at reality I decided that a kit was the better and most economical way to go, so I ordered two form Anovos, waited the arbitrary year for shipping (what are they doing there?) and finally got the kits on Friday. I got right to work on them last night and trimmed the first kit. Last night's progress I plan to trim the second today and begin fitting soon. Happy to finally be on the road to trooping!1 point
-
Name: Jeff Rich TK ID: 20980 FISD Forum Name: 11b30b4 Garrison: Georgia Armor: Jimmiroquai Rogue One Helmet: Jimmiroquai Rogue One Undersuit/ Neck Seal: Jimmiroquai Rogue One Blaster: HFX Rogue One E-11 Height: 6’1” Weight: 225 lbs Boots: Imperial Boots T-7 Canvas Belt: N/A Hand Plates: Jimmiroquai Rogue One Electronics: N/A Holster: N/A Build Thread: https://www.whitearmor.net/forum/topic/44463-11b30b4’s-rotk-build/ Front- Arms at Side Back- Arms at Side Left-Arms Raised Right- Arms Raised Right Side Detail- Arms Raised Left Side Detail- Arms Raised Abdomen Details Action Shot Cod and Butt Plate attachment Interior Strapping Helmet Front Helmet Side Helmet Back Helmet Hovi Tip Detail Helmet Lens Color (Backlit) Blaster- Left Blaster- Right Neck Seal Thermal Detonator- Back1 point
-
Oops, should have said1 point
-
See I knew I wasn’t going crazy [emoji23][emoji23][emoji23][emoji23] Sent from my iPhone using Tapatalk1 point
-
Belt is done now.: Since I put chicago screws through the canvas so it is adjustable if needed. The screw side is on the canvas side. finally put the ammo pouches on the thigh as well: Put it lined out on the coverstrip in the end. Still need to paint the rivets, but first need to fully close the split rivets. For the rest spent the evening putting in the majority of the snaps, still have 3 to go now. Also prepped all elastic to be able to do a full fitting later on this week, hopefully this weekend. And of course, not to foget, the rivets in the kidney plate are in place as well And yes, these also get painted last Just to show, they really are the split rivets: So happy to be almost done!!1 point
-
Once you figure out how to load images. Review pre approval procedure and post all info. Put on costume and take photos. Individual parts dont work for an approval. Love seeing another HWT in the making! We'll be here waiting......1 point
-
Thanks, that worked. I guess it recognizes the links from imugr but not google photos. Here is the other pic.1 point
-
Speaking for myself only, I've used mineral spirits on 100s of occasions, it's perfectly safe. Like everything else in life too much of anything can be a negative. Use sparingly, allow area to breath and dry. If rub too hard you may get a blemish, that's why there Novos #2 polish. Finally and most importantly, as DOs we always state "The accuracy of your armor is ultimately up to you the wearer".1 point
-
Definitely going to shoot for centurion suits!1 point
-
I recommend Imgur, use the ”direct link” and then paste it into the thread, do not klick ”display as link instead” when that pops up1 point
-
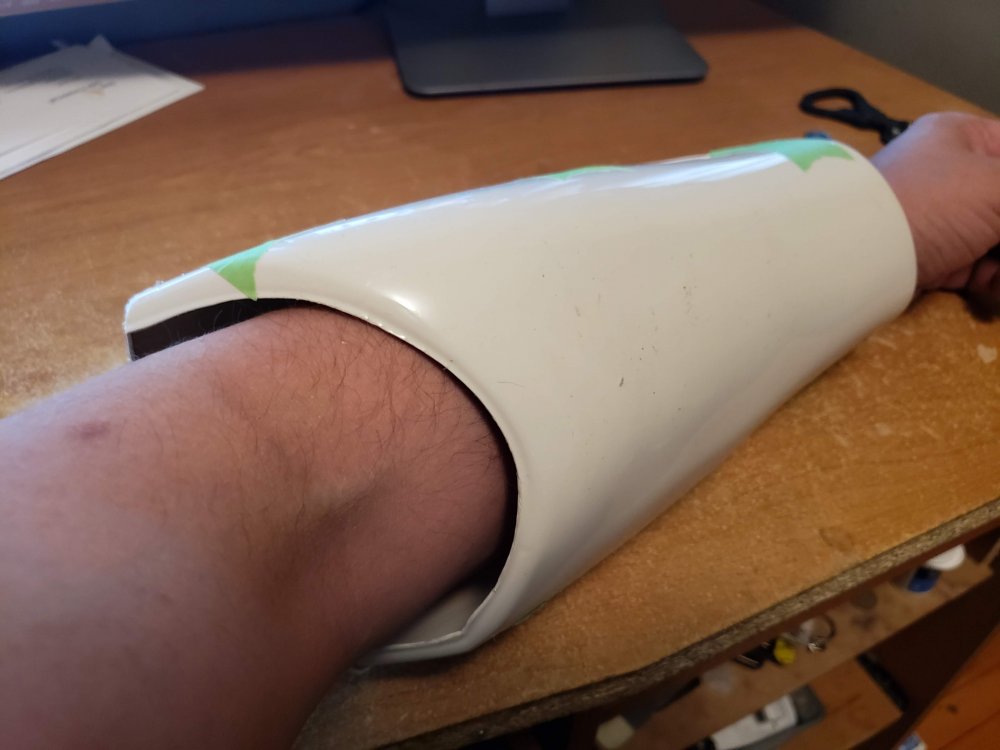
Sidetracked by life again for a bit, but have all parts trimmed up now. Some need some cleanup still, but will do that as I go. working on forearms. Not sure if I need to be trimming/reducing the size. As the pics below show, I have very thin forearms. My worry is that already it is a bit tight getting my hands through. Removing the return edge on that end will help (since I will likely do that for L3 anyway), but I worry reducing the overall diameter will make it too tight to get hand through.
 1 point
 -
Ty... Sent from my iPhone using Tapatalk1 point
-
Is this what u used to clean ur teeth ? Sent from my iPhone using Tapatalk1 point
-
Congrats, man! The first EIB ROTK! Soon to be the first Centurion, I'm sure.1 point
-
Sorry to hear you’re not enyojing the build, I looked but couldn’t find a build thread, do you have one? It will be easier to help you that way so if you don’t have one I sugggest you do And the strip in the pic don’t look to far of the 25 mark but I’ll take you word for it and regarding the thighs that does sound a bit strange but even with let’s say 30mm you should be fine but if you are as you say on the thinner side bigger might become a problem as they should ”match the Trooper” meaning if you are bigger the armor is bigger and the strips can be bigger....bigger strips on smaller armor parts don’t look right and might be an issue for approval. I say might because it’s ultimately up to your GML....and it’s about overall look so start a build thread or point me in the right direction and we can get started in making you into one awesome Stormtrooper1 point
-
Use Imgur, its super easy. Search the "how to post photos" here in the forum it will help you out1 point
-
Can’t go wrong with TM armor, great choice1 point
-
Copy that In the meantime you could look at this thread, last pages has some good advice regarding trimming of thighs1 point
-
Congrats bro! Sent from my iPhone using Tapatalk1 point
-
Until proven otherwise or a general consensus is formed the CRL will probably remain the same however, something we do need to get confirmation on.1 point
-
WOW! I am speechless. Thank you all and I will be pressing for Centurion in the next week or so. Wow.1 point
-
I've trimmed several sets of thighs from different suppliers, almost everyone one was trimmed differently. TM obviously has more experience with his armor. so I don't doubt his technique. Bottom line, whoever's armor you do have take your time, double and triple check as you go.1 point
-
Ab side (first) Top rivet - Roughly 10mm from the top, firm 10mm from the edge Bottom rivet - Roughly 10-15mm from the Ab/Cod seam, firm 10mm from edge Middle rivet - Split the difference from top and bottom, firm 10mm from edge Kidney side Across from Ab locations, firm 10mm from edge1 point
-
Dude! my heart just dropped...Why not go for Centurion?!?!?! They don't measure the cover strips, like Joseph said "Ideally" but not mandatory. the armor is built to the wearer, and we understand 100% that some are required to make some extra material for fitment, but don't let that stop you from reaching Centurion. I would request that you change your attitude right here, right now. YOU WILL BE A CENTURION LEVEL TROOPER! and we can help get you there. Keep these questions coming, its why we are here!1 point
-
Extending the paint on my left tear is another request before centurion submission. This was just a matter of painting over the black lines to extend the grey, allowing to dry and than repainting the black lines, and extending the "vents" to make the just a tad taller. Before: Extending the gray: Adding black lines: I need to touch up the black lines just a pinch. This is an easy hit with a toothpick and clean up paint with a touch of gray.1 point
-
1 point
-
Similar with me. Longer torso proportionally. Plus I’m shorter overall. I ended trimming my shins. Leaving my new thighs as is and I’m probably going to cut the cod and move it up slightly to give a bit of clearance.1 point
-
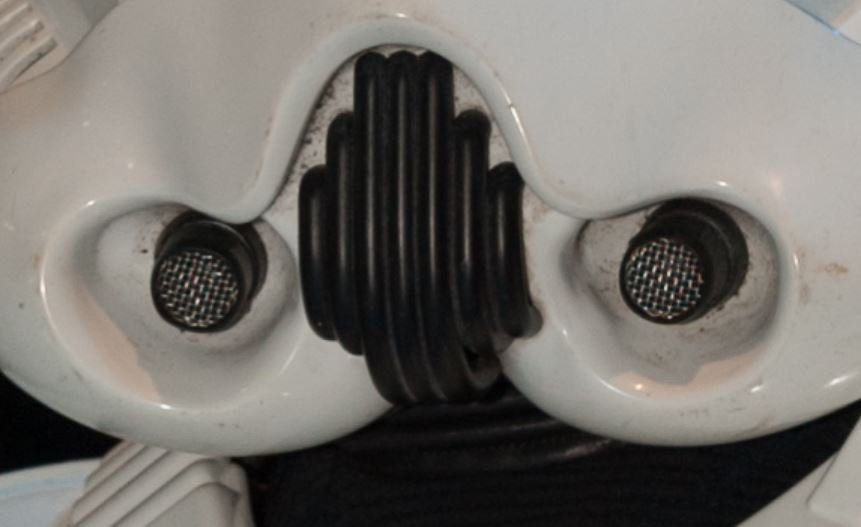
I totally agree with the hovi mics interior being black. Sent from my iPhone using Tapatalk1 point
-
Another possible change. I could be wrong but I think the hovis have black interiors. Anyone have photo that states otherwise?
 1 point
 -
Possibly gonna do it tomorrow. Sent from my VK815 using Tapatalk1 point
-
Thanks for your patience Rick, just finishing up some last minutes checks.1 point
-
Looking forward to seeing what they look like all cleaned up.1 point
-
Mine but up to each other and the velcro is on the cover strip and the opposite side if that makes sense. Unfortunately I don’t have a pic handy. Sent from my iPhone using Tapatalk1 point
-
Neck seal finished Here’s one knee. Gmrhodes, I think it’s lose enough. Pretty flush against the inside of the hard parts. Sent from my iPhone using Tapatalk1 point
-
So finally got to trimming and I ended up only taking roughly a 1/4" off, plus removed a bit more return edge. Not a big update, but it is coming along. Also working on a DLT-19 and trying to salvage a THG E-11. So far the blasters are coming along just fine. Sent from my VK815 using Tapatalk1 point
-
I'm liking the work you did!1 point
-
Can not wait to see a fully finished product, awesome work.1 point
-
Looking great. Aces for level 1, as others have said. One suggestion, and this is strictly for wearability while trooping. It looks to me like you should shorten your chest to ab straps...when you raise your arms your chest is almost coming above your ab plate. While trooping like that, you can almost count on your chest plate occasionally ending up underneath your ab plate, and you won't even realize it. Again, great job!1 point