

bleedn21
-
Posts
31 -
Joined
-
Last visited
About bleedn21

Recent Profile Visitors
1,259 profile views


-
 TK-65532 requesting 501 access https://www.501st.com/members/displaymemberdetails.php?userID=29865
 -
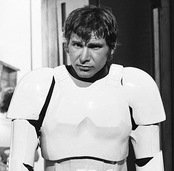
Hi all, Well, I put the hot water on and did some removal of some return edges and I think I have some pretty good results. I was able to narrow the gap down to around 1/2" between the back and kidney plates. In this picture the shoulder tabs are pretty much sticking straight up. I'll reshape them into a form-fitting curve, my only concern is the neck hollow between the shoulder tabs. I'm thinking this might need some shimming? Not the best picture to show the position of the backplate in relation to the chest plate. My helper/photographer was short! I think i'm going to install the strapping and get some better pics with more of the suit together. I think I'm on the right path. Let me know what you all think. Many thanks!!!
-
Well... darn. I think I might give shimming the too of the kidney and the ab plate a go after I lower the back plate as much as possible. I can make this work, I think. It’s more than I thought I’d have to take on, but I’m up for it. Sent from my iPhone using Tapatalk
-
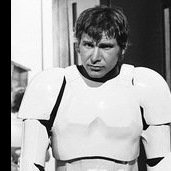
Hi Luc, Thanks for getting back to me. I jumped into my onesie and took some photos of the test-fit. You can see the back plate riding high up here, compared to the kidney plate. The butt plate is at a decent location, and the top of the kidney plate lines up well with the ab plate. Orientation of the ab plate. If I hike this up anymore I'd feel... vulnerable. In looking at this picture it looks like the inside edge of the neck hollow is sitting on my trapezius'. I think I can get a little of the gap out by trimming off some return edge and forming the tabs that extend to the chest plate to a better contour. I don't know if it'll get all of the gap out, but it will lessen most of it. Let me know what you think! Thanks again!
-
Hi everyone! I have moved on to trying my suit out, and fitting this to my moderately tall (6'1"-ish) frame, have run into a funny issue with the back to kidney connection... I have a gap of about 2 1/2" between the two. I know for centurion minimal to no gap is acceptable. I think I have a solution to straighten out the tabs at the top and drop the back plate down to meet the kidney plate. May have to install shims to the top tabs on the back plate. Is this an acceptable fix for this? Thanks again for you guidance!
-
TD Question regarding back/kidney plate?
bleedn21 replied to juliet95's topic in Other 501st Costumes
I'm having problems with this too. Were you able to find a solution? -
Thanks Greg. I did trim a little of the return edge of both the forearm pieces and the bottom of the biceps. In the process of gluing the elastics between them now. Glad you liked the brew kettle for the forming/bending! It worked like a charm!
-
Thanks, Luc! I really didn't want to have to do any trimming - I think that's unavoidable for the thigh pieces (pics of those coming after this weekend). I'll get a pot of water on shortly and bend those tabs down!
-
Hi all, It's been a while since my last update. My wife and I have still been building - usually a little each night, but figured we'd update when we made a little more progress. Long story short, all my snap material and tools have come in the mail, and my wife and I have been busy strapping all her torso pieces together. We are using a hybrid system of JustJoseph63's snap system and some Ukswrath's tutorial (Dritz Sew-on snaps). Lots of double snap attachments for all the extreme trooping we plan to do, plus we figure that it would be nice to have each piece easily removable for future fitting/adustments! Here are the pictures Front View Back View - I still have the electrical tape on where I thought I might trim. I'm rethinking it now.might trim the sides of the back plate lower down. The shoulder bells like to tuck underneath the chest plate. I think I may have to pull the shoulder bells up higher to fix this, or possibly trim the sides of the chest plate a little. Shot of the right side. Bell also tucked in. Side shot. I might bend the tabs on the back plate down with hot water, or trim the bottom of the plate to bring it down. We forgot to do up the snaps on the right side of the torso. It comes together nicely though... believe me! Other side, complete with "Warrior Hair". Thanks all! We have been referencing Cricket's build and trimming guide a lot, and it is great to have all of this info in one place. As always, really appreciate any feedback you have to offer.
-
Back again with another update! Tried my hand at using hot water to form my wife's armor to a more fitting shape, and it worked (for the most part). I also tried some re-shaping with my heat gun on a scrap chunk of plastic, and was okay with that too. Since I haven't seen too many posts on re-shaping with hot water, I figured I'd share my adventure Pieces I wanted to re-shape. Scrap for experimentation at the bottom left. Hard-hitting sci-fi to read while waiting for water to boil on the right. My setup for this task... I re-purposed my boil kettle and burner for home brewing, which came in handy. I kept a tub of cold water close by for a quick quenching. This pot held the whole ab plate.... NOTE: I shut the burner down any time i took the plastic near the pot. The interweb says ABS has melting point of 221˚F (105˚C), and water boils at 212˚F (100˚C). No chance of ever melting this stuff with the water. Propane flame is around 3,500˚F. DOOOOOM!!!! I found the plastic didn't get pliable until close to the boiling point. Skipping a couple steps, but I reshaped the ab and kidney plates to a nice shape using the inside of a 5 gallon bucket. I pushed the pieces inside until they were about as wide as I wanted them, poured the water in, held for about 40 seconds and then submerged the whole thing in the big cold water tub. Here is the lovely shape I got. They now fit m'lady's body quite a lot better. RIGHT SIDE ... I re-fit the sections back on her, and am happy to report that my old marks were bang on! LEFT SIDE ... I am left with about 1-1/4" (30mm) at the top on each side that I think I will have to trim in order to get these to meet up properly. BACK FIT-UP... I figure I'm going to have to reshape the tush plate. The upper back was moved up to show the rest. Here is how the back plate fits up. I'll give this a bit of a reforming to better match with the kidney plate. I have reconsidered trimming anything off the sides until it is reshaped a bit. Illustration of the area of where the butt plate and rear thighs are mingling a little too much. I might have to break this party up! What to trim? the butt plate? the thighs? I think I should trim the thighs. The right thigh. I've marked out a rough cut area with a removable marker. A few questions... -Trimming the ab and kidney plate... do I split the difference between both the ab and kidney plate and trim 3/8" off each? that will give me a straight line right up the side. If i trim just one or the other, it will give me a more angular seam line that already exists. Is there any preference between the two? -The butt plate looks to be a good size. I'll need to form the bottom "tab" in a bit. Are the thighs the right thing to cut here? In other news... I've been working on my suit while we're waiting for snaps and setting tools to arrive from Tandy Leather. It looks like I'm either going to have to shim my kidney plate (1-1/2" total) or hit the gym! I honestly don't know which would be harder. Let me know what y'all think! Until next time!
-
Ah! I meant it looks like the Anovos helmets, while an improvement from previous versions, may still need some painting on the frowns. Sent from my iPhone using Tapatalk
-
It looks like they’re still missing that last little triangle at the corners of the frown. Otherwise not too bad. Sent from my iPhone using Tapatalk
-
ANOVOS CHANGES??? Good evening everyone! While looking over the kits, I have noticed a couple of changes that Anovos must have recently made. See below... Belt no longer comes assembled in "hero" configuration. If I'm not mistaken, I should be able to get this right without any modification. The frown on the helmet looks a little more screen accurate than the previous versions with the teeth not fully painted. Does anyone else have a kit similar to this form Anovos?
-
Update: I've looked through Cricket's build thread and found her trimming guide. I though about it for a day or so, and came up with (what I think) may be a new idea I've tried a new fit-up tactic. I'm using black electrical tape to knock out any areas that I think may need trimming - heavily referencing Cricket's trimming guide. My wife is 5'-6", and for the most part, things seem to be fitting okay. I've notices some areas where the armor appears just too bulky in places. I've used black electrical tape to knock out some areas at the sides where the shoulder bells go. I think I'm on the right path. It looks like the chest plate should hang in a good location on the ab plate. I think I've got too much of a taper at the bottom of the back plate. Chest Plate to Back Plate - Here is one of the areas I think is going to need reforming with heat, or will just need to be removed entirely. I've pulled the Kidney Plate in to fit her form. There are gaps at the corners of the Back Plate that look like they will need to brought in with a little reshaping. Again, looks like I've too much taper at the bottom of this piece. Another shot of the Back-to Kidney Plate gap. The reason I wanted to cut down the Ab Plate - the top landed in a somewhat uncomfortable spot for a lady. I took the return edge off, and she says it is comfortable. I don't think I'll trim this unless it really bothers her. Another shot of her left side alignment. I'm going to split the difference between the ab and kidney plates for the trim. I've marked the proposed seam location , and it still looks pretty straight. Right side again. I don't know why, but I'm nervous about trimming this piece. Whole back assembly. While we were test fitting these pieces, we did a fly-by on the thigh pieces too. not too shabby. some trimming on the back might be required. I didn't take any pictures yet, but once I have the chest and back finalized, I'll concentrate on the thighs and shoulder bells. I'm hoping that once I have the whole torso assembly riveted and buttoned, it will fit her shape well, and won't need too much reforming.
-
I'm looking to reshape the ab plate and kidney plate, as the outside edges flare too far away from her body. There is a large gap of 2" or so on both sides in places. The fitment pictures I shared don;t show it, as the armor was taped tight to her shape. I'll post some pics of the gap(s) later tonight.
