Leaderboard


Popular Content
Showing content with the highest reputation on 07/12/2018 in Posts
-
We like never say this, like ever. To me your belt is to high. It's completely covering the lower button. It will probably get by your GML but you should lower it a bit. All your other fixes look great! Good Luck!3 points
-
Small update. I've been very busy the past few nights, so only had time to do this. I will get the other rigging photos tonight as I finish the snaps and get going on sanding. I installed the welder's mask liner with some CA glue and then padded the top and the sides with this lovely green padding stuff. This way it fits perfectly as well as isn't bobblehead trooper. Soon, gentlemen, soon3 points
-
As the title says. Year and a half wait.
 2 points
 -
Knee plates and that’s me done mini-posting as I go along...to be continued2 points
-
Yeah these are wierd2 points
-
Sorry but it was the same for me, didn’t like it very much to begin with, the helmet in particilar, now...I really like it - go figure I was more concerned about getting the belt to sit properly, I want a new ab plate I checked all the other KB references and they all have that edge...I sent him a PM so I’ll wait to hear back...not to happy bying stuff that needs fixing the minute you get it.....*sigh* EDIT: I was wrong about the ab plate, it’s a new mold. that’t me complaining.....time to start on the other parts2 points
-
Looking good, sir. The F-11D has really grown on me, (much like the armour itself). This is a dangerous, potentially expensive thread for me to be following! Lol2 points
-
Imperial Attache Outstanding Achievement Award In order to recognize those who have gone above and beyond the call of duty as members of this program, the FISD would like to announce a new accolade: The Attached Outstanding Achievement Award ribbon, (as seen above) will be bestowed to those who consistently exemplify the meaning of Imperial Attaché, which will be added above their EIB or Centurion badge. This distinction will go to those who are not only consistently assisting present Troopers but helping future Troopers on their white armor journey as well. This includes greeting first-time posters, offering advice and guidance, assisting with EIB and Centurion levels and staying active on the FISD and/or their local boards***. Recipients are considered on the basis of a combination of those contributions and been an Attaché for at least one full year. These recipients are awarded based on going above and beyond their Imperial Attaché duties. This Thread will be Pinned and Locked to display the recipients of this award and serve as a reminder to us all of their dedication and unquestioned loyalty to the FISD and our mission. Thank You, Attaches. __________________________________________________________________________________________________________________________________ Joseph (justjoseph63) FLG Awarded May 2017 If anyone is deserving of this award the most it is him. A pioneer of the Attached program. Constantly on the FISD boards serving proudly on the Attaché Staff, FISD Staff and as a Deployment Officer. He offers a variety of items to help get your trooper to Centurion! One of the true Legends of this community. Glen (gmrhodes13) DSG Awarded May 2017 What can I say... the guy is truly a legend here on the FISD, so no explanation necessary. To be honest, if we could only give out one ribbon, it would go to him. Aaron (Pyrates) BG Awarded May 2017 With almost 3000 posts in 18 months (and 1800+ "likes") his record speaks for itself. His informative and helpful posts have been an enormous assistance to many, especially in the Badlands Garrison. Christoph (Ripper_L) GG Awarded May 2017 Our "main guy" in the German Garrison has also moved up to Admin. status, he continues to do us and the GG proud as Attaché A "Trooper's Trooper". Chris (themaninthesuitcase) UKG Awarded May 2017 Chris truly embodies the spirit of "Troopers helping Troopers". His participation and advice have helped hundreds, and both we and the UK Garrison are lucky to have him. Kyle (Zarlon) GLG Awarded May 2017 Kyle is constantly on the FISD, greeting new posters, offering advice, and encouraging everyone. In my opinion one of our best. Anthony (Redforce) ECG Awarded May 2017 A mainstay on the FISD, he always takes the time to greet new folks, has sage advice and is happy to share it. A definite PLUS for this program. Eric (Tolo) GFI Awarded May 2017 Another legend here in the FISD also serving dual roles as Attaché and Admin. A plethora of information, he is always willing to help out anyone who needs it. Christian (v7sg) PRG Awarded May 2017 Besides doing the I.A. patch run, he is a fountain of knowledge and is always there to help, especially for those going for FOTK. Gary (flashpoint0214) FLG Awarded May 2017 Gary is incredibly active on the FLG boards and very active in the Makaze Squad, also serving as the Charity Liaison. He (and his father, also a Centurion) hold frequent armor parties and have been responsible for countless basic, level 2 and 3 approvals for TKs in central FL. Steve (starsaber25) ECG Awarded May 2017 Although Steve has moved up to the Admin. staff, he also serves as one of our best Attaches and does an outstanding job in both roles. Tony (ukswrath) GGG Awarded June 2017 ... Really? Ok. It's Tony. Probably helped you with your TK if you were on these boards. How many tutorials did this guy make? I mean seriously.. What can I say. Tony has been an extraordinary asset to the FISD and troopers around the world. In addition to serving as one of our D.O.s and helping folks on a daily basis, Tony's build threads have been viewed over half a million times! With over 8,000 posts to his credit, his contributions to the FISD are legendary. Andrew (Sly11) RBG Awarded June 2017 The "Wonder from Down Under" is also one of our D.O.s, and his knowledge of armor is simply amazing. His white armor wisdom and sage advice have helped countless Troopers become members of the 501st and FISD as well as join the ranks of EIB and Centurion Allan (allan1313) ECG Awarded June 2017 Also a mainstay here and one of our best I.A.s by far, he exemplifies the "Troopers helping Troopers" motto. Randy (magni) NEG Awarded June 2017 Is always in the forefront of providing great information, greeting new folks and assisting future and approved TKs with advice and guidance. Kalani (kman) SoCal G Awarded September 2017 A member since January of 2016, Kalani has consistently been an exemplary team member of the I.A. program and has gone above and beyond in all aspects of the position, especially in the area of welcoming new folks. Christian (Novak Dimon) GG Awarded September 2017 As a member of our German Garrison, Christian has reached out to members of the FISD worldwide and used his knowledge to help them on their white-armor journey. Shane (Shanester) BAG Awarded February 2018 Shane continues to amaze me with the amount of time and effort he puts into sharing his knowledge and making new folks feel at home here, exemplifying the spirit of "Troopers helping Troopers" He sets a pace that I hope all others will follow, and see bigger things in his future here at the home of shiny white armor Sarah (Alay) CTG Awarded June 2018 She has been serving with the FISD as an Attaché for well over a year. The most notable service is for her tiring and relentless efforts in the most recent FISD racing shirt run. This is a true labor of love, and we feel that is well deserving of this prestigious award. Ben (Buttons) CG Awarded July 2018 Ben has been serving with the FISD as an Attaché for well over a year! Ben is recognized for his continued efforts in the Attaché program, but most recently hosting and re-opening popular FISD ID Badges for the community. We love the new designs! Daniel (TheSwede) NG Awarded August 2018 Daniel has been on the front lines giving troopers extremely detailed advice. He is on the boards almost every day if NOT every day! You can see the passion in his posts. More Attaches can look to him as an example! Luc (Lucnak) CCG Awarded October 2018 Luc has been an extraordinary part of the I.A. team and is currently at the forefront of assisting new FO TKs. His experience and loyalty to the FISD are unquestionable with his great advice. We are honored to have him part of the team. Christine (Cricket) GG Awarded October 2018 Christine has been an extraordinary part of the I.A. team! No doubt that you may have already seen her vertically challenged build threads that many troopers referenced. She is a valuable resource and we are very lucky to have her on the team. Brien (Harbinger) CCG Awarded November 2018 Brien has earned this award for his countless contributions for the FISD & Attaché Program. Most merch that you have purchased, may have been designed by this trooper. His continued efforts on his graphic skills are something that should be celebrated and recognized. Today we salute you Brien! Mario (TKSpartan) CRG Awarded March 2020 Mario has been a constant, positive presence here on the boards, and is doing an incredible job as an Attache, going above and beyond the call of duty Eric (Hoda) SGG Awarded Augst 2020 Eric has received his award for the work he has been doing with the FISD trading cards. Today we salute you Eric! Justin (TheRascalKing) SGG Awarded June 2021 Justin did such a great job stepping up and keeping the pin run organized and running smoothly. The staff has all seen a lot of great comments on social media on how well this went. Today we salute you Justin James (jsilvius) GT Awarded October 2021 As we have in the past, I would like to officially award James the Attaché outstanding achievement award for exceptional service to the detachment for undertaking a large scale merch run. He not only helmed the Anniversary coin run, but did it efficiently and shipped all coins out in record time. Brilliant job James, the staff are truly grateful, as I am sure the membership are also. You are a credit to FISD. Arthur (giskard8) HKG Awarded January 2024 A seasoned veteran of the Detachment, when Arthur is not trooping he can be found welcoming new members to the forum and congratulating our new and higher level approvals. His actions contribute to the long tradition of FISD being the friendliest forum in the Legion, and no doubt Arthur will continue to consistently be at his Attaché post! Today we salute your unquestioned loyalty, Arthur! Gerald (Doggydoc) CG Awarded January 2024 It's nearly impossible to sneak in a new member introduction or special approval post without Gerald jumping in and welcoming the aspiring builder or joining the celebration of the new approval. He is also known to provide valuable input and helpful feedback throughout the forum. Today we salute your unquestioned loyalty, Gerald! __________________________________________________________________________________________ ______________________2 points
-
This program, as with others is an optional Detachment only award incentive. It recognises members who have gone over and above with contribution in our new 3D forum section, past and into the future. How do I get involved? The process is very simple and based on merit as judged by the command staff. What classifies as contribution? There are many ways to contribute to the 3D forum, and the more input you have the more likely you are to earn the award. Here are some examples 1. Create designs and 3D files accessible to the membership. 2. Be a valued member of our FISD 3D community in offering advice on any and all of the aspects of 3D printing, become a resident 3D guru. 3. Help the non savvy 3D printer members by creating, designing or printing an item for them. 4. Create detailed build threads of your 3D printed items, as long as they pertain to FISD costuming. If you have skills in this area that bring benefit to the FISD community at large and give members old and new a richer experience, then you have multiple ways to earn your way into the 3D Contributors award. Silver and Gold level awards The Silver award can be earned numerous times over the years, and this will be depicted by the number of silver cubes that appear on your badge. The Gold cube is awarded to those the achieve 5 silver cubes or have contributed at such an astounding level that it is deemed appropriate that they receive the Gold Cube. This can also be earned more than once. At its heart this award is all about troopers helping trooper and it gives the command staff great pleasure in acknowledging the valuable contributions the membership make. Award Recipients 07/20/2018 - Germain TK14492 "The5thHorseman" - French Garrison (Gold Award) 07/20/2018 - Aaron TK6063 "Garbz" - Mountain Garrison 09/14/2019 - Clint TK61281 "camprandall" - Dune Sea Garrison 09/14/2019 - Bryon TK14082 "trooper96" - Carolina Garrison 08/30/2020 - Basti TK????? "KeeptheBOX" - German Garrison 06/14/2021- Bryon TK14082 "trooper96" - Carolina Garrison (2nd Award) 06/12/2022 - Jason TK51923 "BigJasoni" - Garrison Tyranus Inferno Squad 06/12/2022 - Bryon TK14082 "trooper96" - Carolina Garrison (3rd Award) 09/04/2022 - Justin TK61490 "TheRascalKing" - Southern California Garrison 08/04/2024 - Helvio TKID: ----- "Kuroi_Sabato" Garrison -----

 1 point
 -
Our detachment leader Paul @Daetrinshould chime is at some stage as he does make changes to FISD CRL's1 point
-
Congratulations and welcome to the ranks1 point
-
hello everyone !!, I just wanna show off my other 2 Star Wars costumes 1st is my Mandalorian from the Mandalorian Mercs Costuming Club, she is named: Dha Ca Krast and the 2nd one is my Bikerscout from the 501st legion, Dutch Garrison!!!! I am so very proud to wear both these costumes!!! I just love them unbelieveable much greetings, Marielle (TB-11300)
 1 point
 -
Well done, Jared. :-)1 point
-
Thank you! I am working on the back plate kidney gap today. Reshaping some of the outer curve and probably adding straps to the outer edge. Also, I trooped earlier this week, and in the 90 degree heat the Velcro adhesive did not perform 100%. I will be adding snaps to help secure the belt. See you at centurion very soon. Sent from my iPad using Tapatalk1 point
-
Hey Jared, thank you for your patience and welcome to your EIB application. CRL and EIB Application Requirements: Looks like all the required submission photos have been posted. Your armor appears to display all necessary elements as set out in the level 2 CRL. Fantastic job your build, absolutely beautiful. Thank you for making the corrected fixes as suggested by your fellow troopers. That said, Joseph and I would like to welcome you to Expert Infantry. Congratulations. Other-Armor Fit/Assembly: In this section we review observations made by your fellow troopers and ourselves. Some observations may lead to suggestions to improve the overall look of your armor. If any suggestion affects any application it will be listed separately in the above or below sections. At this time the only suggestion we have to to watch your back to kidney plate gap. There should be very little gap here. Centurion Suggestions: In this section we prepare you the best we can for Centurion. If there are any areas of concern they will be discussed here. As mentioned above please reduce the back to kidney plate gap. Thank you for a nice clean build and application .1 point
-
That's awesome! It think Walt (WTF - Walt's Trooper Factory) makes kid sized armor. You can find him on Facebook.1 point
-
Land o' legs -- Part I I've set the arm assemblies aside for now till I can get some experienced eyeballs on them to take a look at my sizing. I think I have both the forearms and biceps just about right, but I definitely want some second opinions before I start slathering glue and cover strips on those. I'm eager to finish those assemblies, but there's plenty more to do with this build so I'm moving on to the legs for now. With A.M. armor, making the cuts on half of the legs is waymo easier than other armor not as generously sized. There's lots of extra plastic here, and a quick overlap and test shows that I won't need shims at all on the backs no matter how I cut the fronts. With that in mind I can, without fear, go ahead and cut the fronts to 10mm on each side as the base for the front 20mm cover strips before doing the actual sizing of the entire part. Unless you're a big trooper and need all that extra plastic, trimming the fronts of A.M. legs is important for the fitting process: As with the arms in the earlier section, there's just too much plastic to overlap during the sizing process to get an accurate fitting. Starting with the shins, I removed all of the lower return edge. Don't need any down there over my boots. I found that I couldn't clamp the part to my assembly table as I did the forearms because of the shin's ridged top and overall shape. Instead, I clamped a flexible metal straightedge directly to the shin itself to make my scoring cuts. By the way, you'll probably use spring clamps for something like this, but since I have a woodworking shop I have boatloads of these small bar clamps and prefer them for any flat surface due to their unmatched strength -- clamp up a straightedge with these and it just isn't going to move. If you use bar clamps for any part of your build, mind the free ends or you'll put your eye out, kid. The process of making all four cuts, two per leg remember because I'm only doing the fronts here, went smoothly. I'm still taking my time and being careful, but I'm not nearly as terrified as I was making those first cuts on the arms and biceps. As with the arms/biceps, I lightly sanded the cut edge to remove high spots and rough edges. Let's tape up the shins and see how they look. Yeah, that's the ticket. Nice and flush all down the line. There's still a lot of extra plastic on the backs, but I'll get that once I've marked the backs for fitting. Here's the thing, though: I can't do that by myself. I have no idea how you folks who did these without help managed it -- without being able to see the entire back of my shins as I fit them, I simply can't trust my guesswork at getting them marked accurately. Unfortunately, Mrs. Stormtrooper is out of town so her assistance isn't available. I thought about calling the retired lady next door to ask for a bit of help, but stopped when I imagined the conversation. ME: "Hi, Marion... Hey, have you got a few minutes to help me out with something?" NEIGHBOR: "Sure A.J. What do you need?" ME: "Well, I need you to come over and hold my legs for me while I get out a bunch of tape. Give me a couple minutes, though, because I have to put on some tight black leggings first." NEIGHBOR: *click* Yeah, that won't work. I'll wait till Mrs. Stormtrooper comes home or till I can get a Garrison member to help out. OK, I'll move on to the thighs. (Ha! Imagine replacing "legs" with "thighs" in that hypothetical phone call above.) As with the shins, there's far more plastic on these than I'll need, so I can safely cut those fronts to the required 10mm per side and still have plenty of overlap in back for fitting purposes. First, though, I want to trim the return edges. After all the reading I've done here, I've decided I don't want any return edges at the thigh tops for comfort and mobility. Plus, the A.M. legs are large and I'm sure I'll need to trim a bit off the tops anyway, so before fitting they have to go. There's a good bit there so I first used my Lexan scissors to cut most of it off. Then I went over to my drill press -- still fitted with that Microplane rotary shaper you saw in the arms section -- and ground it off the rest of the way. I also removed some of the return edge on the lower raised ridge. I didn't take all of that off, however, and instead trimmed it so it was at the same level as the inner sides of thighs, which I confirmed by laying a straightedge across the bottoms. My main purpose for doing this at this stage is so I didn't have extra material pressing into my legs during the fitting process and adversely altering initial fitting. Secondarily, the inner surface of the plastic will ride and bump on my legs a lot while moving, and I didn't want large returns on the raised ridge digging into my knees. When the legs are complete and I can put the armor on, I may elect to take a bit more of that return off the lower ridges, but for now making those edges flush with the inner surface of the thighs should be enough. With the return edges trimmed and sanded smooth, I cut the fronts to the 10mm-per-side measurement and taped them up. Both came out just fine. Again, though, I have to stop until I get some help with the backs as far as fitting and marking. With that in mind, this will be the last of the leg stuff for a while. Still loads of other things to do -- trim and fit my chest, ab, back, kidney, butt... "Hi, Marion, this is A.J. next door. Yeah, if you have a couple minutes could come over and help me trim and fit my butt?" Uh, no. I think I can handle these without help. A.J.1 point
-
Dang, that must have been a really impolite person. JK, Thanks! I hope to get a good build thread for everyone and have it done soon. Where I stand there's just a few snaps to setup on the armor and then from there it's sanding, priming and painting.1 point
-
I did that and fit seems fine, the ab plate when holding the cod (snug to you-know-what) sits just over the hip and I can see what you mean about better mobility.....and, heard back from KB and he said the edge is not required and the edge is now smalller than before due to making the ab plate longer and he said the same as you about the belt and mobility - thanks1 point
-
I only bring it up because his belt completely covers the bottom button on the right button plate. and more for the L2/L3. not basic. he should have basic no problem1 point
-
Hiya, Regarding the bicep to forearm, here’s some useful bits. Popper method Glued Most seem to follow either of these methods, with the straps on the inside of the of the elbow (if that makes sense). Out of interest, how big are the poppers you’re using? Do you know how strong they are? I think most builds use between 12mm and 15mm poppers. A bit like this: Hope that helps a little. :-)1 point
-
Not sure that the belt really needs to come down. It could come down a tiny bit, but it's not by much! The buttons can certainly be partially covered. Reference photo:/1 point
-
Did some more preparation for strapping. But first things first, cleaned the shoulderbells more so they are wearable and can fall over the biceps properly. Still pondering whether I should remove more of the return edge. Suggestions are welcome! Keep in mind, I did not sand the edges just yet, since I first want to make sure I do not need to remove more. With sanding they will smoothen and get more equal no matter what. As you can see I also started adding snaps inside the shoulderbells for strapping of both shoulder as well as bicep connections. Started off making a big set of snaps today: Going through them quite rapidly btw Also prepped the pink shoulderbell I intend to use for the Pink Ribbon fund raiser we have in September. Biceps also have snaps, since I really want all parts to be easy to maintain and separate from other parts Next up is trying to figure out how and where to attach the wide elastic to connect bicep and lower arm. The location of that is still a bit misty to me, seen a lot of differences all over. But that will have become clear once i put it all on. Hopefully I will also be brave enough this weekend to attach the ABS shoulder straps. Want to smoothen the edges still and possibly sand it down a bit to make it a smooth and tight connection to the chestplate.1 point
-
That happens a lot, James, so I wouldn't sweat it. As long as they have white paint on them (even if a bit has rubbed off) it's not a big deal.1 point
-
Thanks everyone. I dressed yoke and an and there’s heaps of overlap so I’ve trimmed the top down so it hangs on top and sits on the bottom. Best of both worlds. Sent from my iPhone using Tapatalk1 point
-
Hey man, between business and some family vacation I've not been home more than a few hours the last while. I'll be back home next week with some free time and I'll put something together then for you. Thanks for your patience!1 point
-
Started trimming: did the yoke and then remembered to start talking pics one can see the yoke a bit on the side the cod, fairly easy to see where to cut. And done...almost, there’s a little lip at the top The back And...then there was the ab plate where’s the lower edge the belt rests on? First I thought KB just got carried away and cut to much in a hurry to get the kit done, would be understandable...but as I looked closer there’s a little lip so now I’m confused...? EDIT: turns out the edge is not required and this is how the new mold is in order to make the ab plate longer- I stand corrected.1 point
-
Yeah, I made one for my TK but I was hoping to avoid it this time around. That is a good point regarding the pack and other various accoutrements. I think you convinced me to do it.1 point
-
UPDATE! So the RS hand plates served as a great base to make some latex hand guards. All I really needed to do was build up the some of the soft edges with some bondo and super glue paste hardened with baking soda. After a little spot filling, sanding, and filing I managed to get most of the details sharpened up. After that I made a Ultrical-30 (mask making plaster) mold and filled with a thick layer of white latex mask paint, and filled the rest of the way with latex. Ultrical is amazing at drawing out moisture from latex, but to speed up the process i tossed the mold into the oven (180 degrees for an hour or so) These were fully cured by the next day. Think they came out pretty dang good if I do say so myself!1 point
-
Some touching up and minor work to do but almost done with the blasters, they are not perfect but I put them together as trooping-blasters. No electronics in the blaster riffle as of yet but I can take it apart if I would like to ad that in the future1 point
-
Awesome A tab-and-slot? Did one on my Sandy, figured a solid connection was good as the fieldpack might push and shift things...made a longer tab so it made strapping easier as the side pouches were a nuisance when kitting up1 point
-
Ok cool. I already took a Q-tip with thinner and started taking off just that one extra stripe that's under the ear. Ill just go ahead and remove just that one. As for my GML, I received an email from him regarding the basic steps to submit photos. I told him I would be submitting mine soon. One of my other friends who are also working on this same type of kit has already submitted his photos to the GML. He is in the approval waiting queue. So far, the only thing the GML mentioned that might be an issue for basic was the Velcro showing on his belt when it was on and all closed up. Now he is just waiting to hear back.1 point
-
Thanks for the feedback, it’s appreciated. I submitted already via the Canadian garrisons webpage and emailed the GMLs, now just waiting to hear back from them.1 point
-
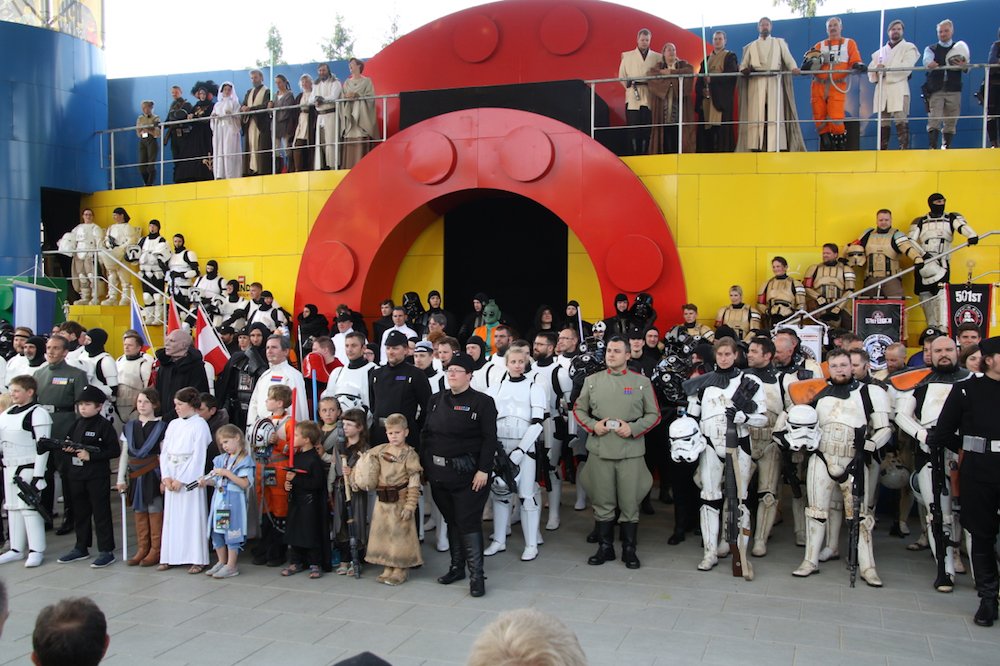
I'm probably too late, but I'll still try since that book looks awesome! I'm Vicky (TK-50893) from Germany! I joined the German Garrison in October after a long time of going to conventions and events and always being fascinated by the people in the 501st. My boyfriend (also a Trooper) convinced me to ignore my doubts and fears (I have some years of experience as a cosplayer, but I never built armor like this before) and to start building a TK armor (well I helped him build it as good as I could, but still, that counts!). And finally, at the end of May/ beginning of June, it was Legoland time again (it's our biggest event here in Germany with people from 13 different countries participating) and I could join my fellow Troopers for the first time at Legoland! And it was amazing, the kids and parents loved our costumes and everybody was so welcoming and friendly! It was not only a great opportunity to meet all my friends in and outside the Legion but also my first time on that huge stage in front of all these people. And I felt so proud, even more because I was allowed to stand in the first row that day. Nerdy little me standing there in that shiny (well not so shiny after the two days there but who cares ^^) armor and seeing the children staring at us with excitement. I could have been one of those kids a few years ago since Star Wars always was and will be a huge part of my life. When everybody started applauding, I felt so happy and when all the people on stage shouted the "who let the Troops out" I felt as a part of the huge family that is the 501st. On the picture, I'm the blonde Trooper girl far right in the first row of Stormtroopers, just behind the Officer lady with the glasses and all the little ones!
 1 point
 -
It is funny how these things come together. After picking away at little things for what seemed like forever - I started adding some strapping and voila, I can see the light at the end of the tunnel. I just need to finish some arm strapping and the basic build is done. For various reasons I am not using the original bracket strapping system for the chest. So I glued in some snap plates about 4inches up from the lower return edge. Added snap bases near the top edge of the ab. Taped chest to ab to double check alignment. Realized I need to shift a snap base. Test fit. I’m trying to get the placement if the chest with relation to the ab to match the reference but still fit okay. I did need to redo one chest to ab strap. Reference Left side (mirror) pic. More gap than I would like, but not terrible. Right side mirror pic. I’m using a plastic reinforced nylon strap for the right connection. It doesn’t overlap but it does cause the two haves to offset like this. May need to revisit this. And back. The gap between the back plate and the kidney plate is a lot less here than on my first TK. I’ll need to hot bath the shoulder tabs at the back to bend them down a bit - they are sticking up about half an inch or more above my shoulders. Sent from my iPhone using Tapatalk1 point
-
Nope that's not it That's more like it!1 point
-
Last pictures didn't show how I did the snaps, I will get more detailed photos later.1 point
-
Only thing I can see, and it will be for the next level (Centurion) which I hope your going for, is your back plate is sitting too high, and leaves a rather large gap. That will have to be closed up. Other than that you look great and should be an easy pass for EIB1 point
-
Hi again, Nizam, and thank you for posting the additional photos! Before I get started on your submission, there are a few issues I am sure you can get taken care of so we can get you approved at EI! : 1. Nice job on sizing those a/kidney shims, but as per the CRL the seam will need to be flush (flat), not overlapped as it currently is. A seam is allowed at level 2, Shims fit flush and seams are allowed but they will need to be covered for level 3. This should be a fairly easy fix by removing the shims and butting the edge up flat against the kidney and then adding a cover strip behind it for reinforcement. You can also add some ABS paste to cover the seam, but it will need to be sanded down smooth if you choose to do that.. Here is a tutorial on ABS paste if you need one: https://www.whitearmor.net/forum/topic/42866-how-to-make-abs-paste/ 2. Can you post up a few more detailed photos for me? Here is a list, along with some examples" a). TD screws- The ones on the top appear to be the required flat "pan" head, but the ones on the bottom look like round head. (It may be the camera angle, though): As per the CRL: Clips shall be attached with slotted, pan head style screws, and be black (two per clip) Reference image Yours b). Ab details- (Example) c). Interior Strapping- (Example) d). Bottom of cod/posterior plate showing snaps/rivet. (Example) e). Blaster- Looks like you did a spectacular job on that E-11, brother, so why not show it off! We will need left/right photos as shown below for level 2: (Example) (Example) Also, please list the baster type in your main post. Thanks again for your EI submission, and I have every confidence that you will do a great job on those shims, Nizan. Once they are done and the photos are posted we can move you along, Trooper1 point
-
yeah... true, stanley style knife would work of course.1 point
-
Update 09: - armor in the box For those who are wondering, if and how the TK with standard strapping fits into that box, here is how I pack it for a troop. Tetris level 1 Everything fits fine into the 113 liters box, including helmet, boots, blaster and the voice amp. Between some armor parts, there is still space left for food and drinks, emergency repair kit and spare clothes. Because the box is pretty full, you can store it vertically without everything getting mixed up inside - always good when using an elevator. Maybe this helps a few other troopers here in the decision process…1 point
-
Love it!!! [emoji1] Sent from my iPhone using Tapatalk1 point
-
For my prior build info where I detailed my blasters here is the link: Previous Build Thread1 point
-
Jim Just saw your thread and sent you a email, you can easily remove shoulder straps and reposition since I only use E6000 glue, worst case I can make you a set of extra long shoulder straps. BTW AP will not fit 6.4" I have a few customers who are 6.2" and it fit nicely, remember no two 6.2" person have the same proprotion some have longer torso some longer legs, long neck ect... so the fit will vary. Mark (AP)1 point