Leaderboard


Popular Content
Showing content with the highest reputation on 06/29/2018 in all areas
-
Yeah, that’s the idea. Just giving you a slightly straighter line down the back of your armour, allowing the butt to sit a little straighter on the lower ridge of the kidney. As I said, it’s an ideal time to play around with options like that and see how it looks, how comfortable it is etc. before you glue bits together. Your making a great job of this so far, by the way. Keep posting up pics and questions and we’ll try to give suggestions etc. Keep it up. [emoji1303][emoji1303][emoji1303][emoji1][emoji1][emoji1]2 points
-
I cannot speak for it being approved or denied. I personally do not see it being an issue for Level 2 or Level 3 if you use snaps instead of pop rivets. Because it is not stated or seen. @ukswrath or @justjoseph63 are the deployment officers. I have reached out to Joseph, but maybe one of them can assist. I am not sure if there is a correct answer, so I am hopeful that one of them will chime in on this one. Wait and hear from one of them, because they approve/deny L2 and L3. Wish I could give you an answer on this. But I am curious about the response, so I will be watching this one closely.2 points
-
Lengthwise is good to go do you have a lot of room in the biceps? Keeping them slim helps mobility of the arms (and ads to that nice screen-look) but not to slim though, just have to find the sweet-spot were they still can slide up and down on the arm....so...always make final measurements with the undersuit on2 points
-
I find myself looking at Han's suit the most, because I know for a fact he's only 3/4's of an inch to an inch shorter than me, though I'm a little heftier (not much). I figure the suits were from the same molds, so he's really the visual reference for me. If I remember right LTM, you're in that same height range (just under/over 6' 2") so it should be a good reference for you as well, as to how the suit should sit on our frames. There are a ton in the Gallery. I still haven't decided how much chest return I'm going to take off, but I can do that later. Sent from my HTC One M9 using Tapatalk2 points
-
Bulldog Props Resin 1943 M38 Telescope Review I contacted Brian Hall owner of Bulldog Props in Japan through his Bulldog Props Facebook page on May 9th 2018. I was familiar with his products from his post here in FISD and on RPF. I knew Brian made resin cast versions of the 1942 M38 scopes used on E-11s in the OT; however, these were not just a cast of the outside of the scope (like DoopyDoo’s). These were a complete reconstruction of the entire scope in resin parts. The scope can be completely assembled and disassembled and the price is less than $50.00 shipped. Anyway, I contacted Brian on May 9th inquiring about him making a 1943 version like the ones used in Rogue One. In our conversation Brian pointed out that they used the 1943 resin scope made by DoopyDoos for the film. I found his honesty and candor refreshing and asked him if he could make a version of his 1942 into a 1943. He advised me that he could not alter the 1942 model but he did have a 1943 scope and would be happy to attempt to cast it. Casting these small parts is very tricky given the level of detail in the threads and how the parts fit together. Timeline: 05/09/18 Contacted Brian with request 05/12/18 Disassembly began on the original scope 05/27/18 Mold Making 06/05/18 Molding 06/08/18 Mold Complete 06/09/18 First Casting 06/17/18 Completed and shipped 06/25/18 Received and reviewed After receiving the package sooner than I had expected, I examined it and determined the packaging was well protected and professional. Once I removed the outer wrapping and bubble wrap I expected a simple box with the scope inside wrapped in bubble wrap since this was the first cast and not a production item. I was surprised with the presentation. I recalled Brian testing out ideas on how to package the 1942s and M19s on RPF and I thought his advertisement sheets and packaging were first rate. Well, not only did I get the scope which looks awesome but also two sets of instructions on different types of paper. These were not an extra set of instructions from a 1942 scope but a 1943 specific instruction sheet. Apparently Brian is all set to produce and sell these 1943 scopes. All the small parts were packaged and wrapped in protection then neatly secured in the shipping box under the scope. Brian put some serious thought into how he would package these scopes and parts. Once I unwrapped everything I discovered just how detailed the scope was and how much time and work Brian put into this. All the parts are a resin plastic that is slightly flexible and less rigidly shatterable if that makes any sense? In other words, I do not think it would shatter if dropped and you are more likely to scratch and dent it than you are to crack it. For anyone who 3D prints, its more like ABS than it is PLA. This is also a pleasant surprise for me because I was concerned just how fragile this scope would be to drops and trooping. All my concerns are now set aside for basic trooping. Anyway, the lenses are crystal clear and two of them are convexed on one side. The screws are all machine thread and look to be near perfect matches for the original screws in the original scope. So what to expect from a resin cast scope. The small thin parts (like the locking rings) are brittle and cannot take a lot of force. They don’t just break like a rigid plastic would, instead the plastic will deform and peel away like nylon would if you forced it with a tool. Once Brian finished making the first scope, Brian notified me that one small ring not screw into one of the lens subassemblies properly but that it would most likely not be needed. Brian even included a few extra rings in case I damaged some in the assembly process. This is obviously one area where actual metal parts win out but it was not the goal of this product and I did not want a metal version of the scope. Regardless, this is the first version of this product and I do not know if Brian will make an attempt to address this issue. Even if he does not, I am very happy with the results. Next, due to the molding and casting process, most of the screw holes need to be drilled out. For this you will need some very small bits (which you can get at harbor freight or in Dremel kits). Brian notes this in the instruction sheet and suggests using a bit that is slightly smaller than the screw. The only difficult part in drilling these is making sure they line up properly with the parts. There are a few screws that pass through two or more parts and must be aligned properly. Once you get one drilled, the rest are fairly simple. Lastly, the prism cell is a cast part and does not have any reflectivity, so actually looking through the scope is not possible unless I alter the prism. This is because the objective lens is not aligned with the eye piece. I will toy around with some mirror vinyl when I have time and see if this works but to be honest I wanted this scope to add a reticle and LEDs and possibly the small micro display made by Trooper Amps. Looking through the scope was never my intention. So far the only issues I have found are the two things that Brian told me about before I agreed to purchase the scope. There is a small bubble defect in the Eyepiece Mounting Plate which is an internal part and will not be seen and does not affect the scope in any way. The other issue is the Ocular Lens Retaining Ring not screwing in properly. So to address the Ocular lens subassembly I put a piece of aluminum tube on my lathe and machined it to fit inside the subassembly. This is necessary because the actual lens from the original scope is thicker than the one furnished by Brian. Once I milled the sleeve (yellow arrow), I cut it to fit inside the subassembly and then screwed in the retaining ring. It will only screw in three or four threads but that is all that is needed to hold the sleeve and lens in place. After that I finished assembly and I am very pleased with the results. So I wanted to also compare this scope to other options available. For a 1943 scope like the ones used in Rogue One and Solo, there are only three other options that I am aware of: 1. DoopyDoos resin cast scope which is only the outside of the scope. I believe it is solid and most of the builds I have seen, people have drilled out the scope to add lenses. It sells for 9.99 British Pounds or $13.08. This is not including shipping to the US. Also keep in mind that it would still need to be sanded before painting. 2. An actual 1943 M38 Sherman Tank Sight Scope if you can find one for sale goes for about $185.00. 3. A 3D print of the scope, I found one version on Shapeways for $32.00 and I do not know if that includes shipping. With some time I could probably find a free version of the model but like this paid version, it is just the outside body like the DoopyDoos; however, it is hollow and modifying it would be less work in my opinion than the DoopyDoos. Also keep in mind that it would still need to be sanded before painting. The other available M38 scopes out there are 1942 versions like the ones used in the OT. There are some really nice options for the 1942 versions made in brass and aluminum ranging from $169.99 for the brass version, $105.00 for a hybrid version of aluminum and brass parts, or 79.00 for the all-aluminum version. All of these are completely assemble and disassemble capable; however, I have not found a 1943 version of these and there are enough differences that for a Rogue One or Solo build, you really need the 1943 version. Overall, I am very impressed and pleased with this product. Personally I feel for the price and the detail, you cannot beat this option. Last month I asked Brian to make something new. Something he was not already making and had no way of knowing if it would sell. This scope was a special request to fit my needs and Brian achieved this. I appreciate his willingness and professionalism. I recommend this product and doing business with Bulldog Props. I have been in contact with Brian and we have discussed many of the things I have mentioned here. I also suggested that he make a video and post it showing the assembly for those people who are not as mechanically inclined as he or I am. Brian has been very receptive and open in our conversations.1 point
-
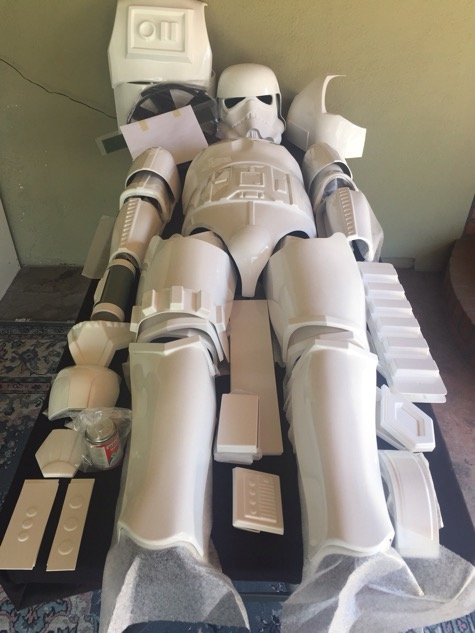
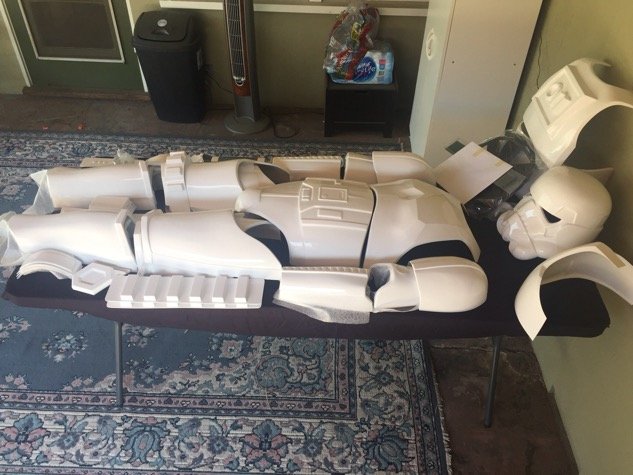
This is my first build. May the force be with me! Goal is to build ANH TK Stunt Centurion Armor from AM Newbie =Yep Excited = Hell Yeah! Worried I Might Srew Up = Yes, of course. Box opening and unpacking (posted these in the wrong forum the other day)
 1 point
 -
Yup! That section I marked would be removed. Yea, I'm not the one to complain as a medium heighted guy. Are you bowed like the maiden head of a ship? I have big thighs, that's a challenge for me, all my pants are toight.1 point
-
Agreed I should have been more clear and said: try to keep the back plate as high as possible with minimal gap between back and kidney and idealy no gap kidney/butt1 point
-
I kind of agree on the backplate needing to sit a bit lower - if the seams between back, kidney and posterior are to be under .5 inches, I don't know how any of this would fit without massive shimming - the length is entire back to from shoulder to posterior is roughly 30 inches (- 1 or 2 inches for cod to ab strap pull, i bent my shoulders subtract 1 more inch), 27-28 inches, if your back is longer than that you'd need more material to cover. Only time I'm glad I'm under 6 foot...1 point
-
Daniel, you're awesome and I always highly respect your comments, but I respectfully have a different view than you on this one...especially as a taller trooper. "As seen on almost every trooper" that's standing beside Vader...the short troopers. Note the 2 slightly taller ones on the right, especially the tallest one in front right...and you can find other photos of troopers not with vader, where they're taller and the neck's lower. As a taller trooper, if I had my neck line like the ones on the left, either my butt plate would be up my back or I'd have a 1 inch plus gap between my back and kidney, both of which trump a slightly lower neckline. It all has to come from somewhere, and I'm just telling him that IF the butt plate is too low (from the side shot it looks like a possibility) all isn't lost.1 point
-
Ok, so I think it kind of worked - I heated up the kidney plate to be a little more round- BEFORE/AFTER After some tighter tape - I think this might work guys... I'm going take some return off the ab near the hip bone, it's kind of tight there and any little room I can give it so that the posterior to kidney plate isn't that stressed, i'll take it.1 point
-
I see...try more/stronger tape from the inside and that should change things Haha yepp pretty much1 point
-
Cupping....lol1 point
-
You could also put tape further to the ends (as illustrated) were the connection is meant to be, and see how that works and also use tape to simulate the crotch-strap (on the outside) and that will also help pull the ends of the butt plate up aginst the kidney and also dropping the center "butt tape" a few mm so it`s not air-thight between the peices And yours look just like the Troopers in this sceen so you`re actually screen-accurate And speaking af screen-accuracy, keep the back plate high, as seen on almost every Trooper in the movie (above and below)1 point
-
Thanks for the encouragement from all of you! Makes me even more excited knowing that this group is full of spirited, kindhearted and constructive people!1 point
-
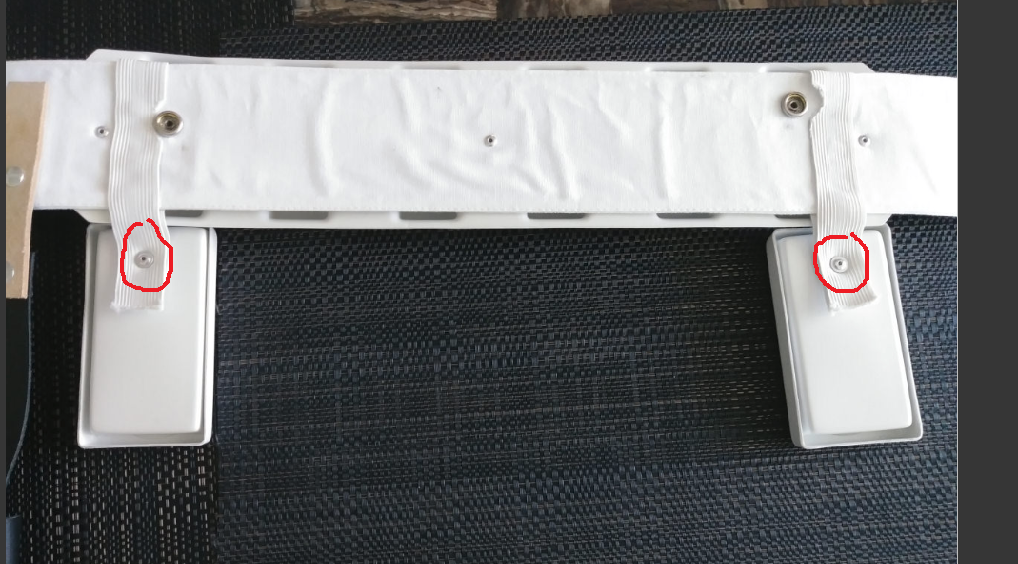
Hi Winston! Some great questions there, and I will try to help you out. "So if any of you out there do Centurion inspections and have any input, it would be greatly appreciated!" Along with Tony (ukswrath) I am one of the Deployment Officers who approve EI and Centurion levels. Crotch strap- The one Anovos supplies (1 inch black elastic) is what you will need, so no problems there. As for snaps, any snap that can be seen cannot have paint on it, and must be silver/chrome/nickel in color. Belt- The type of fastener does not have to be pop rivets. I have seen people use split rivets, Chicago screws, etc. Since the head is covered by the square button covers and cannot be seen it will not affect approval, although pop rivets work really well. Does someone in your Garrison have a pop rivet fastener you could borrow? You do not need rivets to attach your drop boxes. Many of us just make a loop of white elastic and glue it directly to them. BUT... remember to make sure that the tops of the boxes touch the bottom of the belt. There should be no gap. Also, for level 3 the outer edges must align with the outer edge of the ABS belt. Please feel free to ask any other questions you may have!1 point
-
Thanks for taking the time to post all the steps. It's good for you, fun for us, and good for other people just starting out to follow! Excited for you man!1 point
-
The rear belt shot is mainly to check for the inner drop box. but it also shows if the loop that holds the drop box is fastened/glued to the cloth belt or not, which is the major cause of misalignment, a very common problem. If it isn't fastened to the cloth belt with rivets or glued it is something that we (or anyone) can suggest to keep it in place. The rear shot also usually shows a closer shot of the approved fasteners, (rivets, snaps, Chicago screws). The inner box can be held in place with whatever holds it there securely... glue, magnets, chewing gum, (well, maybe not chewing gum). Some Troopers make them where they can be opened/closed to store keys. etc. As long as the inner one is in place all is good at level 3. Hope this helps!1 point
-
Hiya, Whilst you’re in the “tapping things up” phase, perhaps you could try loosening the kidney a little. This could give you a little more movement, pad out your midriff a little and help to align the butt plate. Here’s a (very bad) illustration of what I’m on about... Not the best picture in the world, but perhaps worth a shot with your arms up. You could add a little foam inside the kidney to help with that gap at the back. How you had it is fine, however this was a thought as you’d mentioned the butt plate. Best wishes Dan1 point
-
I don't think it needs to be rivets, but will wait for others to chime in. I permanently closed my boxes1 point
-
I made mine snaps so I can switch to HWT and back as needed. I also added a little bit of weight to keep them down and not flipping all over the place. In this pic, you can see the back of the snap1 point
-
Just so I understand you correctly, are you referring to the pop rivets on the back on the drop boxes circled in Red?
 1 point
 -
Parquette, you have been updated.1 point
-
No worries bro! Roughly around May 25th, 2018. TK-33130.1 point
-
Ripper_L, thank you. Parquette, I apologize. The only information available to me at the time was everyone's build thread and you never stated in your thread that you finished and got approved. Please let me know the approval date or close to it and I will correct the table to reflect your status.1 point
-
Actually this could help out already. This is the picture I took last week, and so far nothing has changed. So this is the current state1 point
-
I've set an alarm for when I come home later today so I can take a picture of the issue and then upload it here1 point
-
I’d be wary off cutting of any length. They should be the correct length as-is so ideally you’ll only need to make cuts to fit around the leg, rather than length. Regarding the arms, do you have any pics of your full arms in place? (Shoulder, bicep, forearm?) You might be able to shift the forearms and biceps up a little to give clearance at the glove end. (And thanks for your kind words - happy to help :-))1 point
-
After reviewing the CRL for level 2 it sounds like all I need to do is get a D-ring on the back of my hyperfirm E11. Looking at sourcing a D-ring now. I think home Depot has some from what I recall1 point
-
Okay, good progress so far. For the scope rail I would suggest to bring the front end down a bit. If you get it parallel to the receiver tube below it, that would be perfect. Depending on the material of your blaster kit, you might be able to correct the folding stock forks with a heat gun. Check the temperature and distance to avoid burning the material and keep the forks in position when cooling down. That should do the trick.1 point
-
Mine's approved1 point
-
OK... figured it was fair to come back and look at yours. Yes, I'd remove more of the shoulder plastic from the chest plate. At the moment I have mine just a little past the collar bone towards the back. I haven't trimmed the back plate shoulder plastic yet but will. Will also make it thinner, width wise. Two things that really helped me with my fit, and getting it to feel "right". First is easy, make all your vertical straps and connect the pieces, rather than tape. I found it gave me a better feel for everything. The second, or I guess I should say "first" (as you kind of want to do it before figuring out your elastic lengths) is trim the returns on the bottom and sides. The angle of the bottom return, and those points on the side are what seems to be what keeps the plate poking out. Also the return at the back of the neck and shoulders. These were pretty nerve wracking, and it was the first time in my build I thought I had really messed up. But once I out it all on connected, it felt much better. I'm building with snaps, so my method of measuring the elastic was putting a female snap on one side of the elastic, then marking the other end with a silver sharpie where it touched the male snap. When doing this I stretched the elastic just a tiny bit (4-5mm) to simulate the weight of gravity of the adjoining piece. Shoulders are just elastic with adhesive velcro, which will become snaps later. I used Ukswrath's measurement (from the AM 1.0 guide) for the shoulder elastic, as a guide with a 1" by 2" velcro strip (hooks) where he had snaps. I then put at 2-2.5 strip of the fuzzy on all 4 shoulder points. This way I could easily adjust the points at the shoulder easily to level out the back, and raise and lower where the kidney and Ab meet, since back, kidney, and butt were all strapped together. Once every sat right I marked where the 1x2 hook velcro (same dimension as the future snaps in webbing) ended up on the armor. (I also used black elastic, and black fuzzy, but white hook, to make it easier to see where this points would end up. The black elastic also helped me see (through better contrast) where the front and back shoulders should be shortened two. Sorry to be so wordy, but I hope it helps you understand my thought process.. Sent from my HTC One M9 using Tapatalk1 point
-
Yea his concern was just the strap to cover more of the bicep. But gotta do what ya gotta do1 point
-
I paid for them..... just waiting now for KB to make them and ship them1 point
-
That's shaping up nicely. Keep up the good work.1 point