Leaderboard


Popular Content
Showing content with the highest reputation on 12/21/2017 in Posts
-
Continue to hollow scope: I use hole saw bit 25mm (1") diameter2 points
-
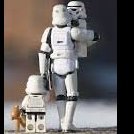
After trying out my new compression top I managed to pack everything away in my bin, helmet excluded. I need to make a bag or something for the blaster. I have enough left over material from the bin I can use. I'm pretty happy it all actually fits. Arms with shoulders attached go into calves which go into thighs. Thighs sit in opposite direction from each other in the abdomen. Boots go on either side of cod. Undersuit and neck seal just tuck in where there is space. Belt wraps around everything on the outside. TD tucks next to shoulder strap. Gloves tuck in at sides or other space. Blaster and Aker amp sit on top. The lid closes and I can't feel any sort of resistance. Sweet! Helmet bag coming for Christmas. No, I didn't peek. It's the only thing I asked for.2 points
-
Hey everyone. I thought it was high time I started a build thread over here as well as my Garrison. I couldn’t pass on the 40th anniversary deal that RS had going earlier in the year. After finance officer approval my BBB was on its way and I received it just in time to deploy overseas for six months. That’s a long time to do some research and make a bunch of online orders for parts and other bits and pieces during limited time off. I decided to go the HWT route via ANH Stunt with the aim of making the two interchangeable with belts, pauldron, cleanup etc. I’ve posted here rather than HWT, but will probably start a backpack build over there soon to seperate the two. ANH Stunt first then HWT. Anyway, I’m back now and have been making some progress between much needed family time. I pretty much came home to this. There are a few bits of merch in there in case anyone is trying to identify everything. Bucket partly assembled and painted here. Stepping back a bit, I should start with the bucket. I marked out the cut lines for the eyes and used a Dremel to carefully remove the material. The eyes was a combination of drill, Dremel and files. Being an RS kit there are many bumps and wrinkles but I love it. Did I mention this is a PVC kit yet? Once I was happy and had trimmed the parts a little I fitted the two together. You’ll probably notice that I’ve made them a little loose and there’s a gap between the faceplate and brow. That’s the issue with blinding using the hole marks in an RS kit, folks. I fixed this up later on after some good advice from the guys in the SCG (that’s the Southern Cross Garrison, not the other one I see around here a bit :P). Next up I began painting. The frown first followed by the tube stripes. I used some stencils from Trooperbay as I didn’t trust myself. A little bit of cleanup to do... ...followed by the traps and tears. Black first, then carefully laying down the gray. I really tried to take my time to get it right. You don’t realise how much your hands shake until you try to paint perfectly straight lines, and fail. More templates for the lines... again I have some clean up do to but I’ll do that later. Now its time to do the dreaded ears. I really didn’t want to do these as I was sure I’d mess them up. I went nice and slowly, trimming a little at a time, just the high points until I had a nice fit. Now I’m not entirely happy just yet but I’m leaving them for now. I think overall they should be thinner. I then fitted the lens. This was also from Trooperbay as I wasn’t at all happy with the film-like stuff that RS provides. (I know, I know, I haven’t finished the vocoder - waiting for a better brush to arrive because it’s nearly Christmas and going anywhere is crazy right now lol. Also, yes the brow is high, it works for me right now. I may alter it later but I know that will take some work at this point) And lastly, just last night in fact, I painted the black for the ears and fitted the mic tips - I forgot to take pics of that process sorry. And that’s where I’m up to. I’ll try to post things as they happen from now on, rather than playing catch-up. Having fun so far and that’s the main thing in my book.1 point
-
READ ME BEFORE POSTING Tutorials Armor - General: HOWTO: Buy Armor TIP: Staying cool cost effectively Dressing in Armor: HOWTO: Dress in Stormtrooper Armor Armor Specific Tutorials Helmet: HOWTO: Helmet Building Tips HOWTO: Make your MRCE ears thinner HOWTO: Modding the MR CE TIP Request: Lens Fog HOWTO: Make clips for a hardhat liner HOWTO: Tube Stripe Stencil TIP: Pads for TK helmet HOWTO: Change MRCE frown from Hero to Stunt HOWTO: different way to install mesh under the teeth HOWTO: Create a Clover template HOWTO: Make replacement MR-CE Brow Trim HOWTO: reinforce aerator sockets on your helmet HOWTO:have hand painted helmet details for the less skillful Neck Seal: HOWTO: Make your own Neckseal HOWTO: Create a neckseal Abdomen, Kidney, Back, Chest Plates: HOWTO: Create a paint mask for the chin and ab plate buttons HOWTO: Use a white 3 ring binder to close side gap Buttplates and You Hand Plates: HOWTO: different way of attaching hand plates HOW TO: Make your own latex ANH hand guards Belt and Drop Boxes: HOWTO: Make Inner Drop Boxes HOWTO: Mod Drop Box to Carry Items TIP: Thermal Detonator Attachment Help HOWTO: Get a good heat bend on your belt HOWTO: A guide to making a canvas belt Holster: HOWTO: Make a Holster HOWTO: Apply the holster Blaster: HOWTO: Create a Scope Visual Effect (Pablos way) HOWTO: Create an E-11 Tutorial HOWTO: Make a Metal Scope Rail & Counter Bracket HOWTO: Pimp a Hyperfirm, Billhag style HOWTO: Make your own T-Track... TIP: T-Track example HOWTO: Easy Laser sight for Hasbro Blaster new T-21 blaster template HOWTO: DLT-20A from a Cushman Base TIP: Hyperfirm Modifications? Thighs and Shins: HOWTO: Garter for thighs TIP: using velcro closure for shins Boots: HOWTO: Make your own boots TIP: Boots poppin out of the shin pieces-my fix General Tutorials Accuracy Tips: HOWTO: Making your TK as accurate as possible... HOWTO: ABS raw edge mod, how to turn a raw edge and give it a return HOWTO: Heating and forming plastc. HOWTO: Battle Damage HOWTO: Clean Up FX Armor HOWTO: Weathering Assembly: HOWTO: Adding snaps - its easy TIP: Tips of the day #1 & #2: Velcro, and Snaps are your friends HOWTO: Make snap plates TIP: Tip of the Day #3 - More strap tips TIP : ABS Cutting Tip HOWTO: Make your own ABS repair paste TIP: Making HIPS armor tough HOWTO: Snap Tutorial TIP: Hot Glue Removal HOWTO: Remove E6000 paint of HIPS HOW TO: Another way to make snaps Paint: TIP: How to remove a bad paint job HOWTO : Painting Basics and Weathering TIP: Recovering from a bad spray paint job Sound: HOWTO: Sound System HOWTO: Make a Wireless Wally HOWTO: Add Static Burst for around $10 HOWTO: Wiring aerator speakers to a mini plug TIP: small pad mic tutorial - less feedback HOWTO: Create a Finger Trigger - ROM / FX HOWTO: increase the volume of mic tip speakers HOWTO: Wire up a RomFx to take AA batteries TIP: A better black for vocoders TIP: Installing screens on Hovis HOWTO: Helmet mounted speakers Fan Systems: HOWTO: Another Fan Setup Tutorial Other: HOWTO- Have Fun With Photoshop HOWTO: Homemade TK Handcuffs HOWTO: Helmet stand for the lo-lo HOWTO: Make a Grip Cross Hatch Cutter HOWTO: Make a Mouse droid HOWTO: Scratch Build a Comlink HOWTO: How to Videos on You Tube HOWTO: Maple Leaf Template Last Updated: Ripper_L - December 20th, 20171 point
-
Hi guys. I hope you dont mind if I start over on a build thread. I proved my internet ineptitude by starting my build thread exactly in the area titled "please dont post build threads here." I dont mean to clog up the forum but I really enjoy following other members threads and I hope to be able to glean as much expert advice from you all as possible. I had posted a bit in my other thread that maybe I will summarize and repost here for completeness sake as long as you all dont mind.1 point
-
Hey guys, I have to sell one of my costumes - it´s on ebay - have a look: https://www.ebay.de/itm/STAR-WARS-Kostum-Clone-Commander-Neyo-prop-costume-Stormtrooper-cosplay-8-EP3-/122871013257?clk_rvr_id=1398214221087&rmvSB=true Cheers Eric1 point
-
Check the build threads in this section and you'll see the process. It looks pretty labour-intensive from what I've seen but your mileage may vary.1 point
-
You've come to the right place. This forum has a section specifically for kit builders to log their progress, report problems, and make suggestions. There are plenty of "build threads", each one by one builder. Pick one and read through it. If you decide to take the plunge, then read a few threads again. When you think you have learned the material, read a couple of threads again. There's a lot of detail to cover, and a lot of tricks and traps. https://www.whitearmor.net/forum/forum/152-first-order-stormtroopers/ I don't think you can buy a smaller one; I suspect you'll have to modify yours. You're probably not the first person to have come up against this problem: look through the threads; I'm sure you'll find a couple of threads written by short builders. Best of luck and patience. (You don't have to be skilled to build a kit; you have to built a kit to become skilled.) (Well, you do have to be careful.) Oh, look what I found, just by browsing. This is for the Anovos ANH kit, but it may give you ideas for yours. https://www.whitearmor.net/forum/topic/42043-zels-anovos-stunt-build-for-the-mini-and-vertically-challenged/1 point
-
They could be rainbow coloured really. Wearing a cotton glove under your rubber ones prevents swampy hands and stinky gloves. They are a must wear.1 point
-
Also, great job on the ear gap. Well Done.1 point
-
It all takes practice, a sequence that works for you, and a table (or the top of your bin). Picking up items from the floor is not advised for TK's. My dressing procedure is close to Pretzels, but a little different. undersuit neckseal thigh garter thighs boots (you should be able to bend over and put these on) shins/calves torso (I have my back, kidney, butt, chest, and ab plates all pre-assembled as one unit. I leave one side of the kidney un-snapped and slip into it putting my head through my already attached shoulder straps. All my electronics are attached to my back and chest plates) belt TD shoulder bells with biceps attached forearms helmet white under gloves (very important) gloves grab your blaster For me, the belt and TD are the hardest part. I find it difficult to line up the belt while pulling firmly. I usually ask one of the other troopers to help me out for the belt. It ensures it's tight and lined up nice.1 point
-
Congratulations Sean! Welcome to the Garrison!1 point
-
TK-19165 reporting for duty! Wow, that was fast! Thanks everyone for your help and feedback. I look forward to serving with my garrison and meeting many of you in the future. I will continue my build thread with the mods and electronics I plan for my TK as well as any interesting info I may find useful.1 point
-
Great news, Sean. I'm sure it will happen before Feb. You'll probably be Centurion by Feb .1 point
-
Congrats!! Good Luck with 501st Acceptance1 point
-
I do have elastic between them. I have made a few tweeks since I finished my build in february. I shortened the elastic the morning before this troop.1 point
-
Looking great! I found the chest plate to be asymmetrical. Hand sculpt, go figure. The bevel on the right side made gluing up the strap there tricky. Once you're wearing it I don't think anyone will be able to see what you perceive to be asymmetrical. The reason you'll get Centurion is your attention to detail.1 point
-
Never go lowbrow You are probably right about the black lines. I stressed out so much going closer and closer with the gray. They do look nice and bold now I suppose.1 point
-
Those Hasbro blasters aren’t accurate, but they’re a great starter/placeholder blaster!1 point
-
But still....one step closer of being a Stormtrooper1 point
-
My brushes arrived - time to finished the vocoder... nope. eBay strikes again, these brushes are terrible, the kids can have them for crafts. Sigh. Oh well, perfect weather for some trimming outside. I got setup out the back of the garage, mask and eye protection on, Dremel plugged in, some tunes playing... and the rain starts. So I shuffled back under cover and continued anyway. I trimmed up the chest and ab pieces leaving an even amount of return edge over both of them, but a little more on the lower-chest and upper-ab. I didn’t want to take too much off here as I’ll be using the accurate bracket kit from Mr. No Stripes. There’s probably a bit more tidying to do once I see how it all fits but I think I’m close to what I want. One thing that that I was concerned about is the stresses on the plastic so I’m adding extra strength like many others before me have done. I measured and cut small strips of spare material and glued into place with E-6000. Not too concerned with overflow in here as I’d rather a good, strong bond - but it’s easy to clean up afterwards. Just the centre pieces in place for today. Some magnets and clamps later and it’s time to let it cure. I haven’t got a timetable or plan for this build so it’s sure to jump around all over the place rather than follow some linear path - just fair warning.1 point
-
Looks fine, for screen accuracy they should be trimmed more in the front, see pic, the CRL however shows them just like how yours are CRL No1 point
-
The last spray painting I did was all the pipes in my basement in the ANSI colors for water, gas, electric, and sewage because. It takes a light touch and patience to do this. I'm pleased that the copyright notice and the CE thing still show up: that means I didn't overdo it.1 point
-
I found it helped to pick up some hobby cotton swabs (like these: https://www.tamiyausa.com/items/paints-finishes-60/tamiya-maintenance-material-62000/craft-cotton-swab-87105). You can use them with some rubbing alcohol (the higher strength, 90% I think?) to clean up/remove the overspray (which the DOs will ask you to do for Centurion) as well as any painting mistakes.1 point
-
No TKUK does original trilogy armor not first order. fnarmour is believed to be a recasted armor and not very good quality.1 point
-
1 point
-
Nice and compact. Good job on the liners.1 point
-
Just don't forget it when you get home! I haven't trooped but I can tell you tales of horror based on skater pads...1 point
-
Early congratulations! You GOT this!1 point
-
Silly me! I should have guessed that from the most excellently detailed and explained Anovos instructions, which are almost as good as Ikea's!1 point
-
My OCD is something I struggle with all the time. Hopefully it will get me to Centurion. I keep reminding myself the screen used suits were practically thrown together and you can even see white tape on one of them at the beginning of ANH.1 point
-
I think I'll use some of your parts to finish my sterling restoration. But when I build your complete kit I'll probably leave it raw to show off the machining.1 point
-
They are They normaly are 25mm (can vary) but they should stop at the ridge, not go all the way up.1 point
-
1 point
-
Having read the whole thread now I can offer some possible assistance to future attempts at this. Arduinos have a resistor that you can optionally enable on each pin using INPUT_PULLUP mode. This has the side effect of reversing the reading the pins but means you don’t need an external pull up/down resistor which can save a lot of space in small space builds like this. The only note is you don’t want much draw in the line or it will blow the resister in the CPU module. The feature is documented here : https://www.arduino.cc/en/Tutorial/DigitalPins1 point
-
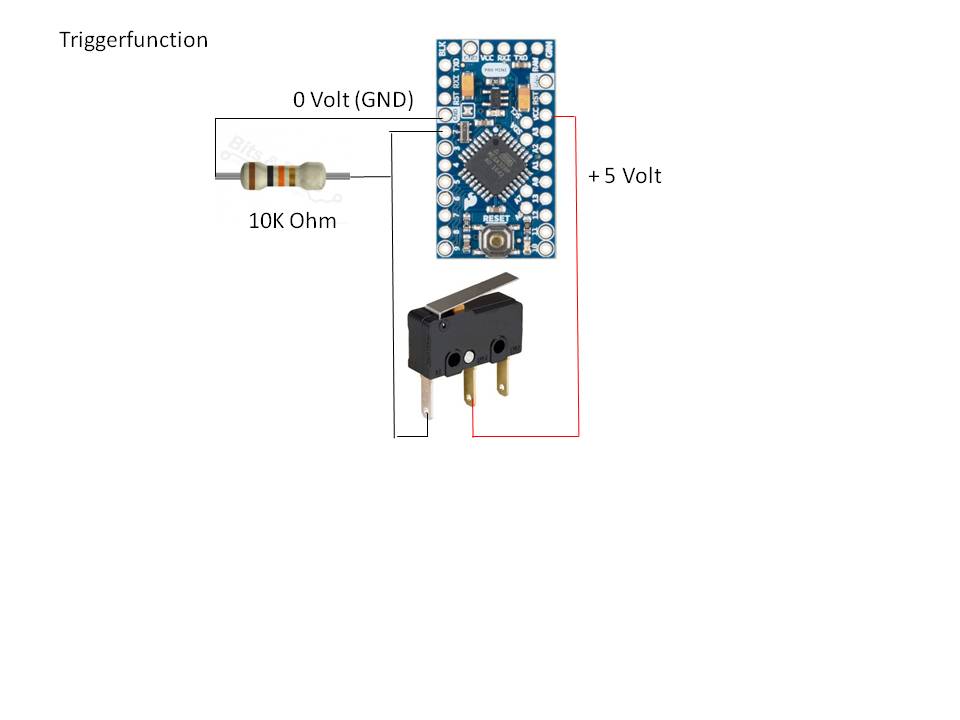
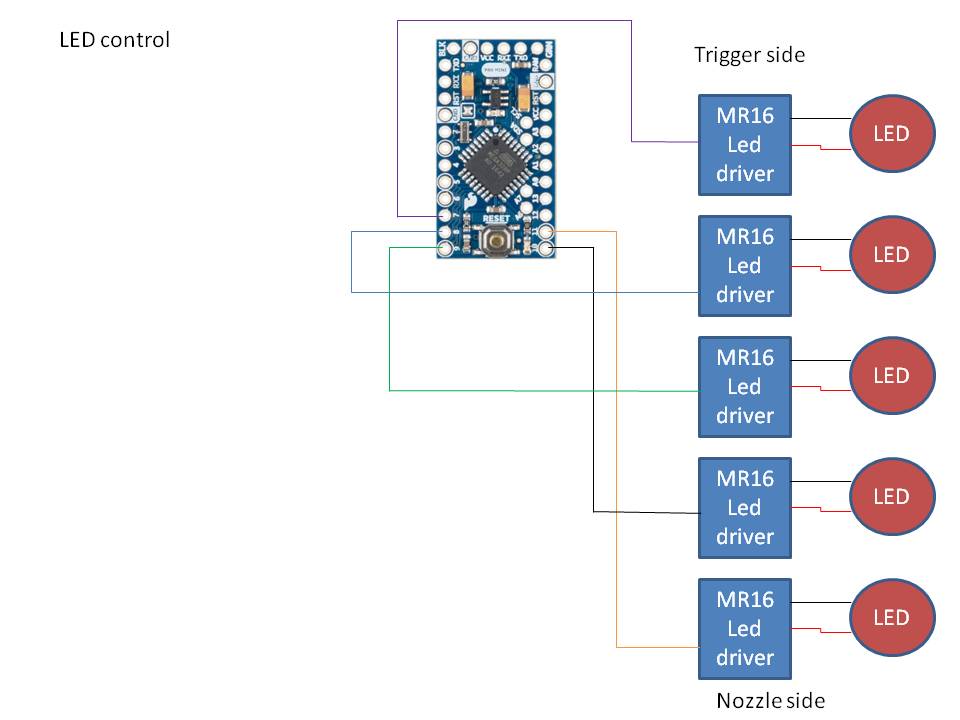
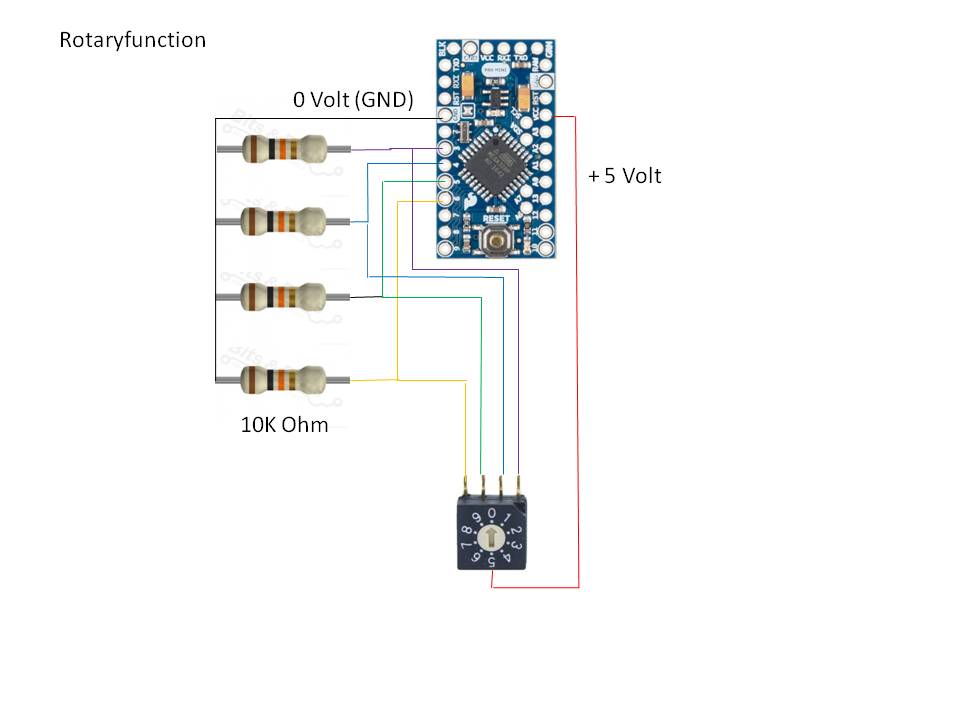
After describing all the subsystems it's time to combine it all. Beneath are the schematics of the electrical circuits. To keep everything "readable" I split each function into a separate sheet. 1) Data channels of the Arduino. There is a TXD/RXD-line towards the WT2000M02 player. To detect if the MP3-player is still busy the "BUSY"-line is used. The control of the OLED is done by the SDA/SCL port on the arduino (A4/A5) 2) Sound control Electrical connections from WT2000MO2 to 3W amplifier and speakers 3) Voltage supply of LED's and amplifier. As the amplifier needs 5V I added a buck converter (DC-DC Step down module : SG125-SZ) between the 9V-battery and the Amplifier. A buck converter is able to lower the voltage without much power consumption. 4) Triggerfunction A pull-down resistor is added to the trigger to create 0V or 5V when the trigger is pulled. 5) LED-control Not much to tell here. (At the latest moment I added 5 pull-up resistors to this circuit. This way the LED's are not lit when the blaster is starting up). 6) Rotary function Same as the triggerfunction. There are 4 pull-down resistors used. 7) Voltage supply arduino/OLED and MP3-module As the arduino module is able to convert 9V into 5V there is no need to add a buck converter here. sheet.
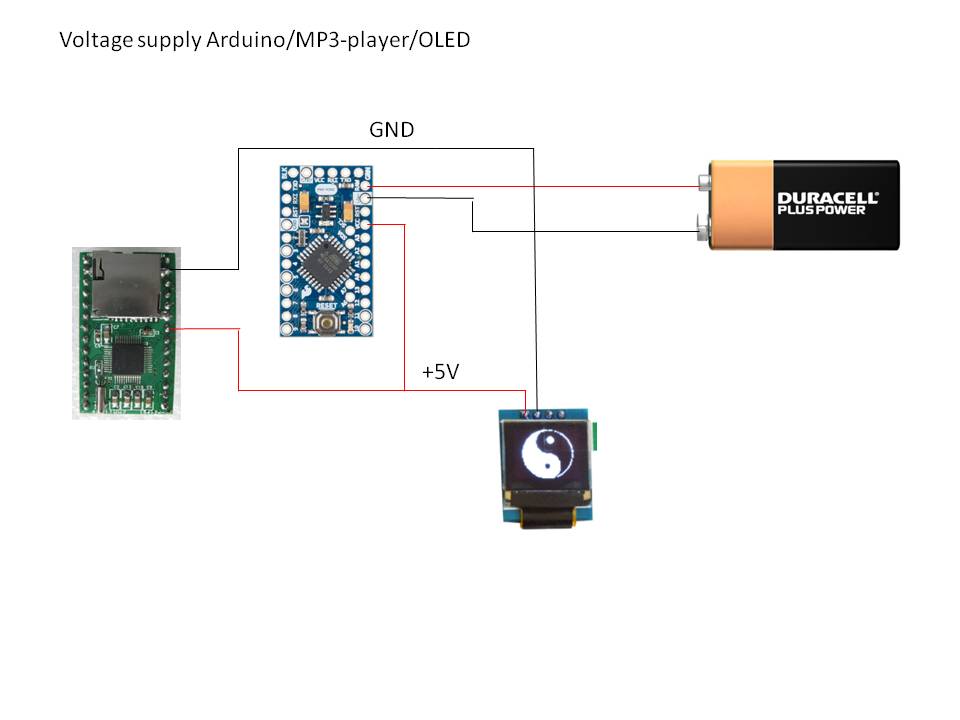
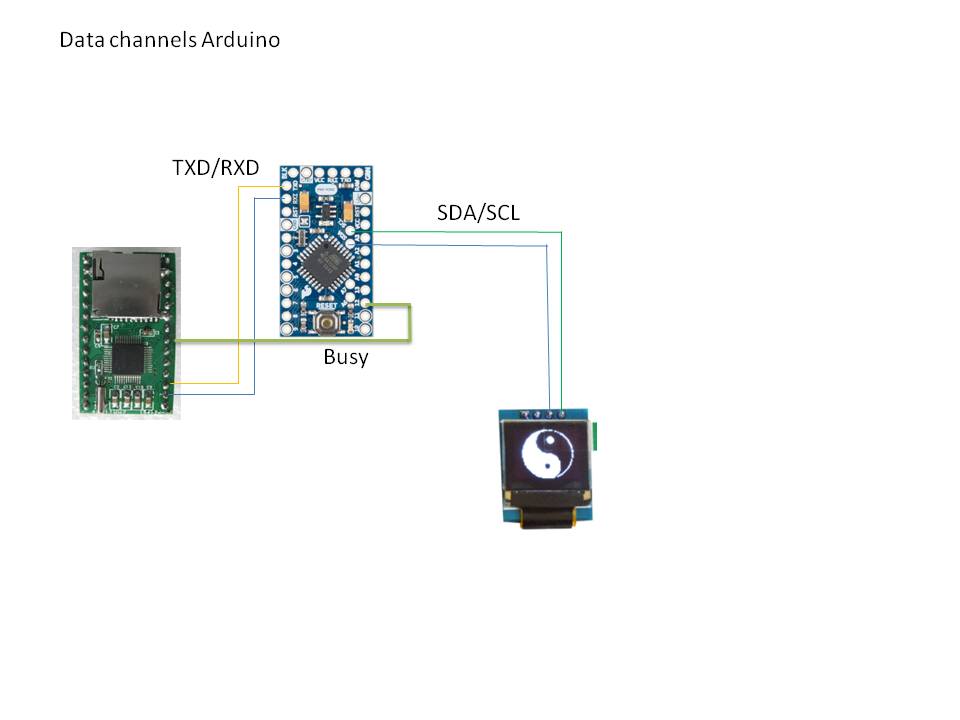
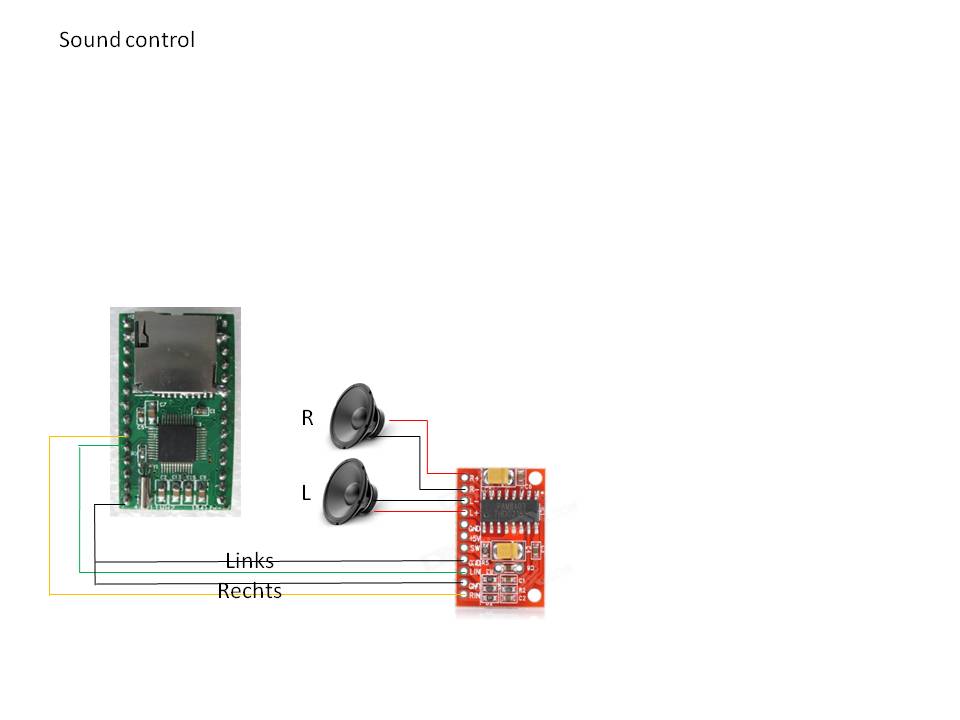
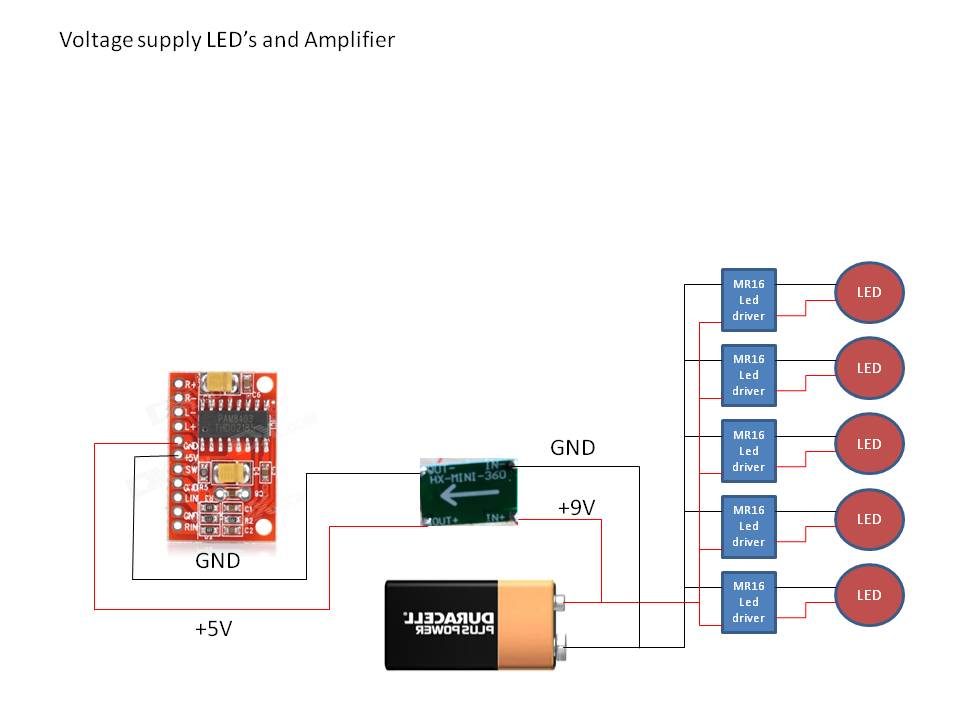
 1 point
 -
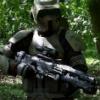
Last night we received our HyperFirm E-11s, I have to say I am very impressed with these! As far as components go, I'm just waiting on my Imperial Boots order (early Dec. run) and S-trim for my helmet, and then the "gathering" portion of the build should be complete.1 point
-
If you want to see the resoult of mine look at my built post I’ve use 5 hands of plastidip, I’ve close the eyes the ears and the holes that we have on the bottom of the tube(normally cove by the ears) and the teeth Inviato dal mio iPhone utilizzando Tapatalk1 point
-
I saw TLJ Yesterday Afternoon in 3D. It was a mix bag. It was better than TFA. I did not care for a remake of ESB and ROTJ. A Chase, Ice planet with walkers going to destroy the base. An Apprentice killing his master. A Mining Planet. Here are some things I did not agree with about TLJ. 1. How can bb8's dome stays on when Poe is going full force against the Dreadnought while his dome comes off in an explosion in the Star Destroyer? 2. How can you drop bombs in Space? The Tie Bomber shot them out in ESB. 3. How could Leia survive the explosion and outer space? 4. What Jedi training did Leia receive under Luke? Is she a Jedi? 5. Why Kill off Snooke? Build him up and done, 6. How did Snooke not feel Kylo moving the Light Saber? 7. The 2 Code Breakers which one was the real breaker? 8. What happened to the one that betrayed Rose and Finn? 9. Tracking through Hyperspace? Should that have been explained at the end of Rogue One? How did Darth Vader track The Rebel Blockade Runner to Tattoine? 10. Explaining that Rey's parents were dunks was weak for her parents background? 11. How did Phasama escape? Is her character done? 12. How could Fin survive heading into the cannon at the end? 13. bb-9E? I thought that there would be more scenes with him in it? 14. How are they going to write out Leia in IX? 15. Too many subplots. As someone who has seen the Original Star Wars in 1977, Empire in 1980 and Jedi in 1983, It is very disappointing to wait 34 years to see Star Wars and then to see Han, Luke and Leia not together again and die off! I have said this before. George should have taken a page from Peter Jackson's Lord of the Rings, and filmed VII, VIII and IX at one time and did it they way he wanted it as he told Mark Hammell, In Episode IX he hands his lightsaber to someone else. I hope that George releases VII, VIII and IX as novels so that we can see what he wanted. I was hoping that VII, VIII, IX would have been about tying up what happened from Jedi to now. Add some characters then after IX, Go from there.1 point
-
5th coat dry and clean from the protections I can do better, but, not the worst resoult, I’ve put the screw in place, and the next step are all the optionals, I’ve choice fan system from troopacoola https://www.facebook.com/Troopercoola/, a powerbank 6700 really lighthttps://www.amazon.it/dp/B01LVW7YVX/ref=cm_sw_r_cp_api_sN57zbS2Y99GR an aker 1506 https://www.amazon.it/dp/B00898SW78/ref=cm_sw_r_cp_api_UQ57zb6HD5Q6F Softpad Andux https://www.amazon.it/dp/B01DZU4DX6/ref=cm_sw_r_cp_api_rS57zbE56PNV1 Inviato dal mio iPhone utilizzando Tapatalk1 point
-
4th coat Inviato dal mio iPhone utilizzando Tapatalk1 point
-
I put a small square of sheet metal inside the counter and glued a nut to the back with a hole. simple to screw in a bolt.1 point