Leaderboard


Popular Content
Showing content with the highest reputation on 07/14/2017 in Posts
-
You should be able to take it to the top! You're doing good so far! What do you think is stopping you? I'll be starting a TKC next week when I pick up my WTF kit. I'll keep an eye on your build. Keep up the great work especially when our leader gives you props!1 point
-
Yeah, if you look at my pics earlier in the thread, it looks like ALL of the leg armor has perfect seams on the front edges. Even the thighs (Look just above the sniper knee plate) don't have any sort of seam in the bottom edge. Maybe the edge rims are separate pieces as well? (Put on like a cover-strip?) I second this. It's visible in the pictures I posted and the ones Par_ linked. YES. I definitely think that we need to be careful. But, I also think that we're doing good by cataloging every detail we come across. We just need to sit down, probably at the end, and separate the items that are CRL worthy versus total accuracy detail. I agree that the eyelid warp thing is probably best left completely out of the CRL, but we should address that its there. Proof and point: the ANH TK famous bicep thumb print. Nowhere listed in the CRL, not even for centurion. But everyone knows it's there, and is looked for during the extremely high accuracy checks. - The Captain1 point
-
There is zero chance that you will find a fully-built, professional-quality set of First Order stormtrooper armor with all the trimmings for that price. Add a zero to the end of your asking price and it's doable - provided you can actually find one for sale. As a data point, I built my Anovos FO kit over two years ago, it is one of the original "Alpha 75" prototype kits sold to members of the 501st Legion as part of the marketing lead up to the big TFA reveal at Star Wars Celebration Anaheim back in April 2015. As a rough estimate, with all the accessories and upgrades I've done I have at least $3k into it right now.1 point
-
Hi John. So there is one thing I can tell you about this hobby and that is do not always believe people's estimated ship times. Even people who are "vetted", have a proven track record, or anything of the sorts. There are many reasons why products get delayed. I have had numerous situations where I finally got my product many days after the quoted shipping times. After a while you just learn that you will get them when you get them. If they are vetted or a person who has a proven track record you can be certain that you WILL get your product. Having said all this, the one thing that has always bothered me is if something is going to be delayed then please just send me a quick message and let me know that. Of course after I did say this to one of our "vetted" vendors in the past the response I got was, "well you have to understand that my mailbox on here is always full. If I sat and always responded to everybody all of the time then I would never have time to actually make the product." And I guess I can understand that to a degree as well. So if anything, I would say it's unfortunate that you have not received your product in a timely manner and I understand the frustration of not having any response to your messages but you will certainly get your product. I just had one of the most frustrating times dealing with a vendor for Tie Armor that anything stormtrooper related that I have dealt with has been a walk in the park.1 point
-
Unfortunately it does happen from time to time, there can be many reasons why, sometimes it is personal issues and are away from email/social media, sometimes there is a backlog in orders, sometimes supplier issues, I'm not trying to make excuses for whoever it is but I suggest trying to contact them once again. If they are on Facebook try there, as well as email and private message, a lot of suppliers are on forums. I have had an issue myself in the past, I just kept sending messages via email and posted on their Facebook until I finally got a reply. It is hard but try to keep if civil, it doesn't help to escalate things even with the frustration you have. Did you pay with paypal, if so could you start a dispute?. Good luck and I hope it is something that will work out for you soon.1 point
-
Looking good. Can't wait to see it finished1 point
-
Hi all. Starting painting last night. Satin black (85) for mic tips and vocoder. Not completely finished these bits yet but first coat is looking okay, I think. ;-) More to follow shortly. :-)1 point
-
Upload it to youtube and post the link.1 point
-
I used plastic dip on my helmet and it did cut down on the light and it does look more awesome when you look at the inside now.1 point
-
Hi Mike. So I'll give it a shot. 1. Yeah you are going to need to heat the butt plate in order to reshape it. You have two options, 1. Use a heat gun and reshape it. Be careful because you can melt the ABS with it. 2. You can get some twine or rope and tie it around the butt plate very tightly in the position you want it. Then get a large pail and put the butt plate in it. Boil up some water and pour it in the bucket. One it cools take the butt plate out and remove the twine. It should stay in that position. 2. I'm unsure of the issue going on here. I use the brackets as well and my chest sits out some but only because of the size of the return edge on my chest plate in order to put the brackets in. The elastic shouldn't be effecting it. I would need pictures for this one. 3. In my opinion I would rather have them closer together instead of having the back plate sag down. But you need to have some elastic showing between the two plates so you can connect the shoulder bells. You son sounds skinny but his height is spot on. I think you should be able to work on it and make it look right. I wouldn't try to reshape either peices. Anyway i hope this helps some. Of course I would love to see some pictures somehow. Just keep working and you guys will get it to where you like it. Good luck!1 point
-
very nice! i want one for my scopes!1 point
-
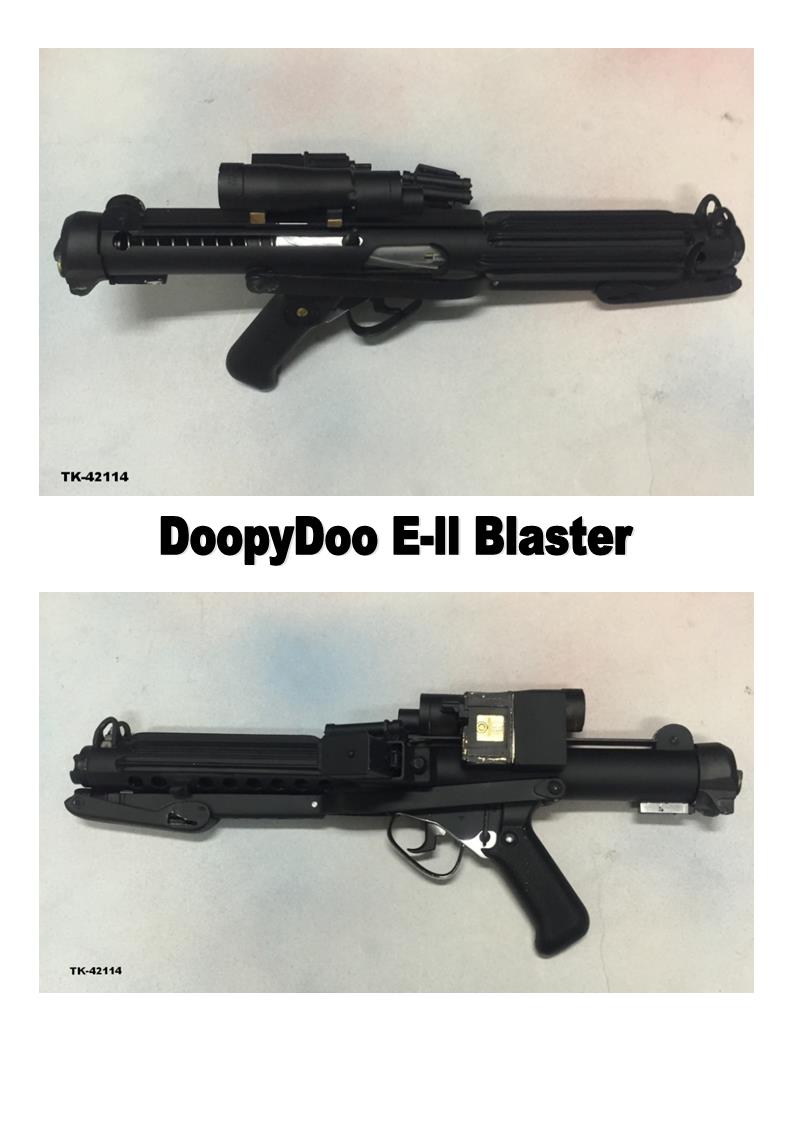
For my previous built E11 DoopyDoo and also for the current Death Trooper blaster I used mostly these tiny little fellows named neopixels. While they start to get recognized as the new generation of LEDs, due to their programmable nature, it is less well known that apart from stripes (white PCB on the bottom) with different LED densities you can buy from Adafruit neopixels sticks (in the middle on black PCB, neopixel stick) which I used now in place of the traditional PLI/bar grah. Big advantage of the neopixel bar is - apart from the obvious color mix capability - that it needs only 3 wires instead of a huge amount necessary for a traditional bar graph. Due to the fact that neopixels stripes are awesome, but hard to solder if singulated, I bought for the 2 nozzle lights so called Floras, single neopixels on a round PCB which is smaller than a STAR PCB but can be attached to the same 20mm Carclo lenses used for high-power LEDs. My E11 has those brutally bright HP-LEDs, however since this blaster will be for a kid, I concluded it would be a bad idea to let them blind each other so I went for neopixels in the nozzle. Neglecting the fact that it is much more easier to a.) install b.) program such a neopixel it is crazily bright while far less dangerous to the eyes as HP-LEDs. I will actually stop using HP-LEDs, these guys are sooooo much better and fun to program.1 point
-
Yeah. That was what I was leaning towards as well - great reasons. I think I can hear the Emperor's approval now:1 point
-
Hot off the press and using the newest TINY display and driver board, Bulldog's M38 scope kit fitted with custom electronics. Everything fits inside the main front collars including a convex lens, red acrylic cover and the display itself. and a quick video... https://youtu.be/ZNMxuq9ewi4 Brian, can you hit my up on PM or FB messenger please, I seem to have lost some of your details! Paul1 point
-
You cannot get white armor completed for $350. The newer the armor, the more demand for the armor, the more expensive. I recommend buying the parts slowly. First buy the shoes for example, then the gloves, etc. This will put you in the right direction and you will feel invested. It makes it that much easier to save up for the more expensive parts like armor, assuming you have the income.1 point
-
In my shopping around for various kits, the entry point seems to be around $500 for anything with a helmet and hard armor. I'd estimate $850 for a completed TK with boots, strapping, under suit and around $1200 for my planned FOTK build. If you're building on a budget, I'd recommending checking the sales boards here and on the main 501st site for either older kits or a b-grade. First Order will be hard to find though, regular storm troopers, biker, Tie pilot and clone troopers tend to pop up fairly regularly though.1 point
-
One final note: In the Level 3 requirement for the Sniper Knee plate, it says it must be lined up with the trim at the top. From my observation of displays, it's not exactly lined up. It's always placed a little bit below the trim line. This could help with mobility and keeping it from sticking up the thigh easily (depending on how it's set up. I thought I saw a behind the scenes photo where a trooper's knee guard was up his thigh). Also I think for Level 2 or 3 we should make it a requirement that the lenses on the helmet have a slight bubble shape, it's very subtle however. Like in the pictures below: search images of rogue one stormtrooper display The first picture also shows that the shoulder straps are slightly rounded at the edges, so maybe for Levels 2 and 3? It's easy on the Jim Tripon armor (I have his chest/back armor) to sand down the edges because the fiberglass is soft.1 point
-
Hi Marc. Sorry it took me so long to answer you. I definitely recommend ANY Rubies conversion. The plastic is very easy to work with and with very little effort you can get a great improvement. Mine has become an obsession but you can find around here many threads that with a lot less modding get to a great looking pieces. Probably if I had to start all again I'd do some things differently or even easier. good luck on your mod and if there is anything I can help you out just let me know. I'm here also to learn from all of you.1 point
-
Congrats Toni, good job1 point
-
This is my view on the matter Sent from my Imperial data pad using Tapatalk1 point
-
Wow, you look great! The brow trim looks a wee low, but that's a personal nit. The fit on this armor is outstanding, truly.1 point
-
Looking good, sir Quite possibly wins the prize for most uncomfortable cod/butt connection pics, though1 point
-
Because we have a CRL in development for this trooper, and if someone wants a helmer for their armor until a more accurate one comes out this (modded) fills that quota It doesn't matter if it's a toy or how it's constructed, it's how it looks. If it is modded to look the part, construction shouldn't even be a problem. This modded is a R1 helmet, and if it looks a curate enough, then it shouldn't have any major problems. Besides, vac formed plastic thin enough could be called "Halloween mask cheap." And for the CRL, we are settling for things that reflect the image of the suit in the film, but not 100% perfect. As time goes on and more kits are made, then it will be more detailed. The Black Series should pass basic with mods, judging by the current requirements for the CRL in development.1 point
-
I've seen something like this for Army Flight helmets, so I don't think it's impossible with some creativity getting it to reach the sides of the helmet.1 point
-
Love these little gems! Great work MTK!1 point
-
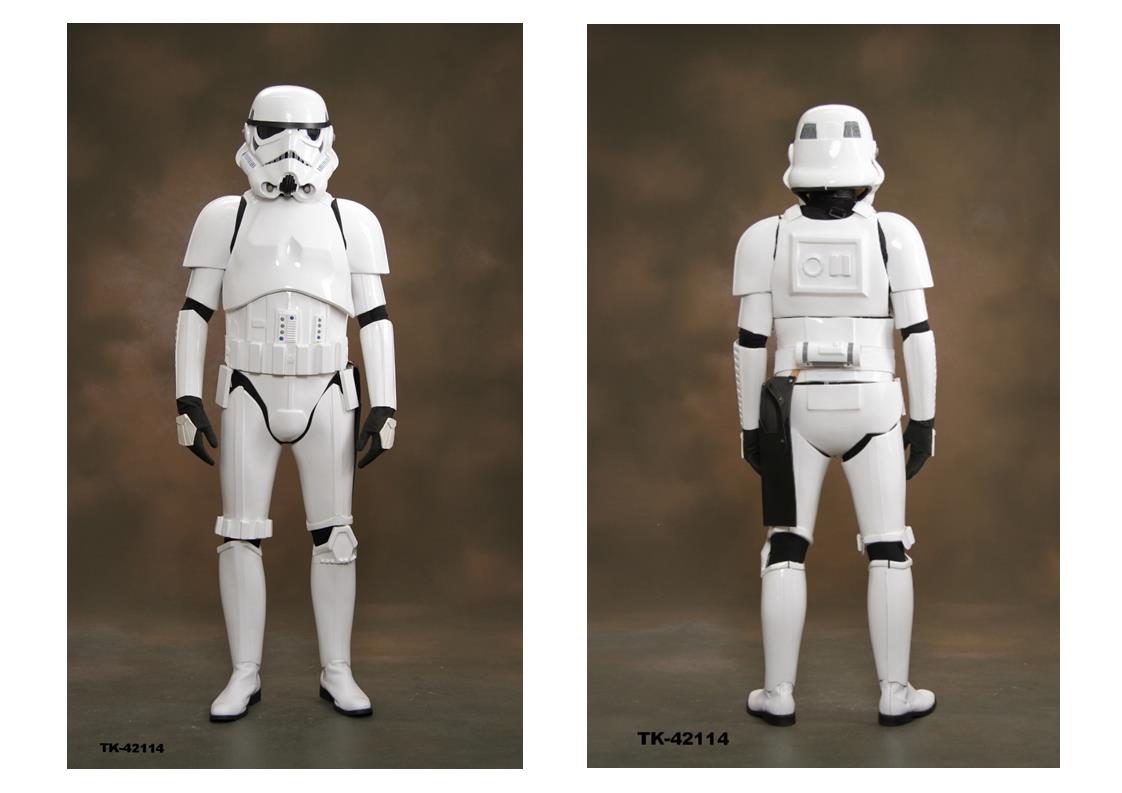
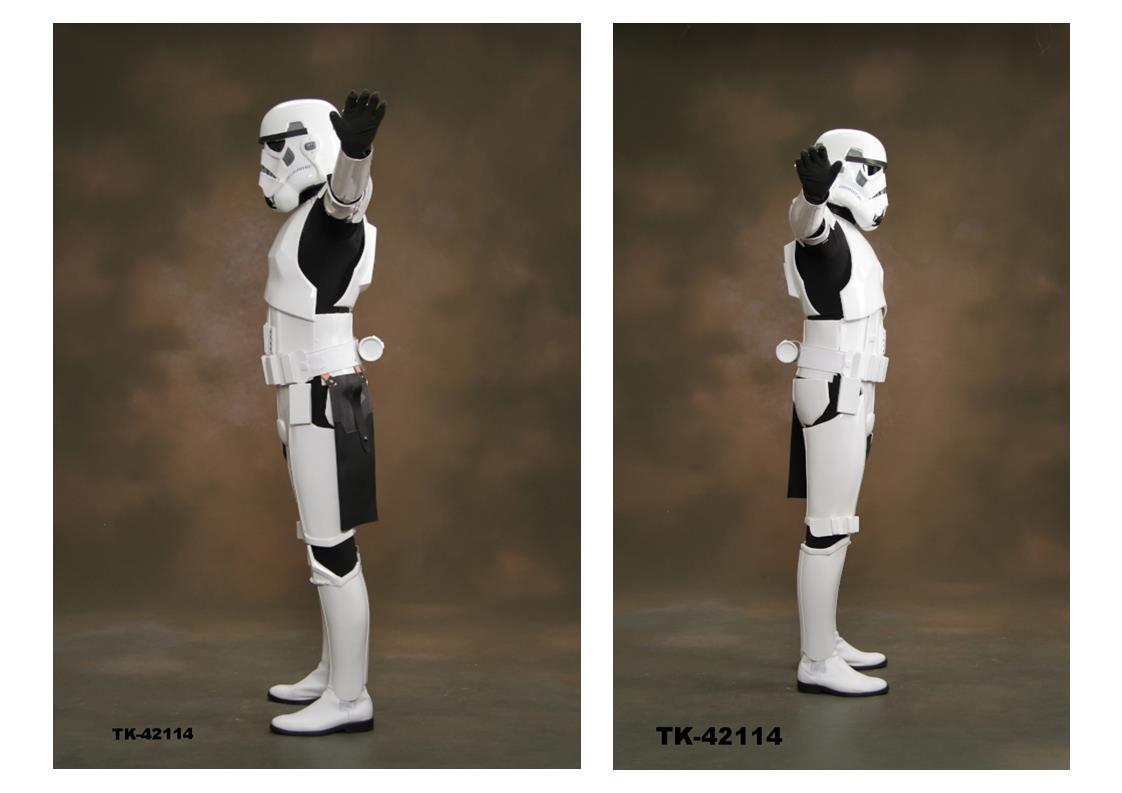
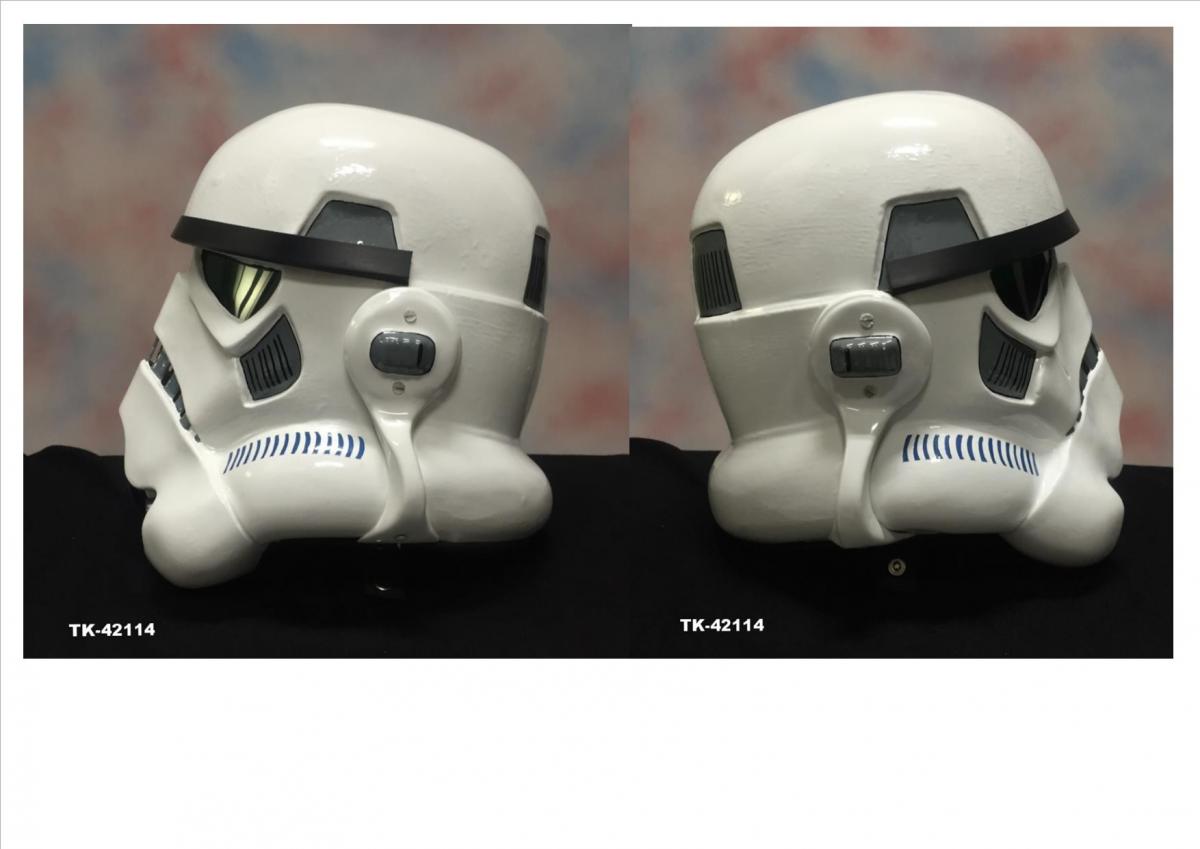
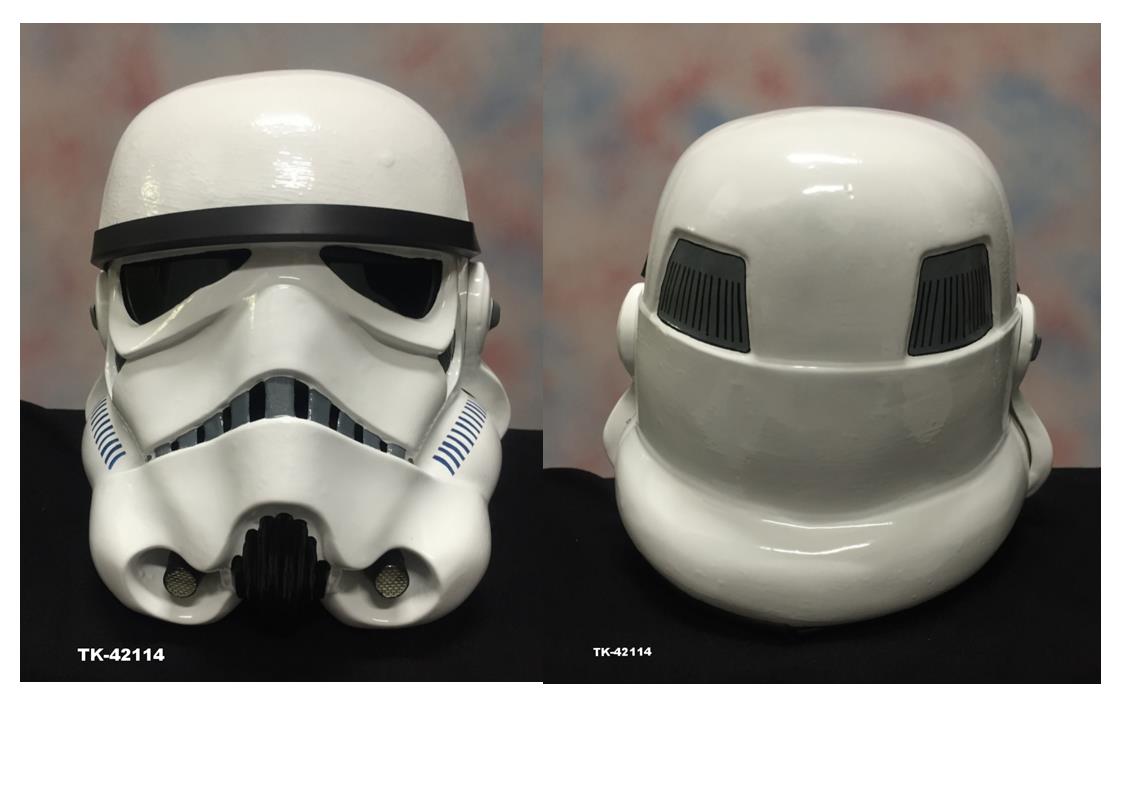
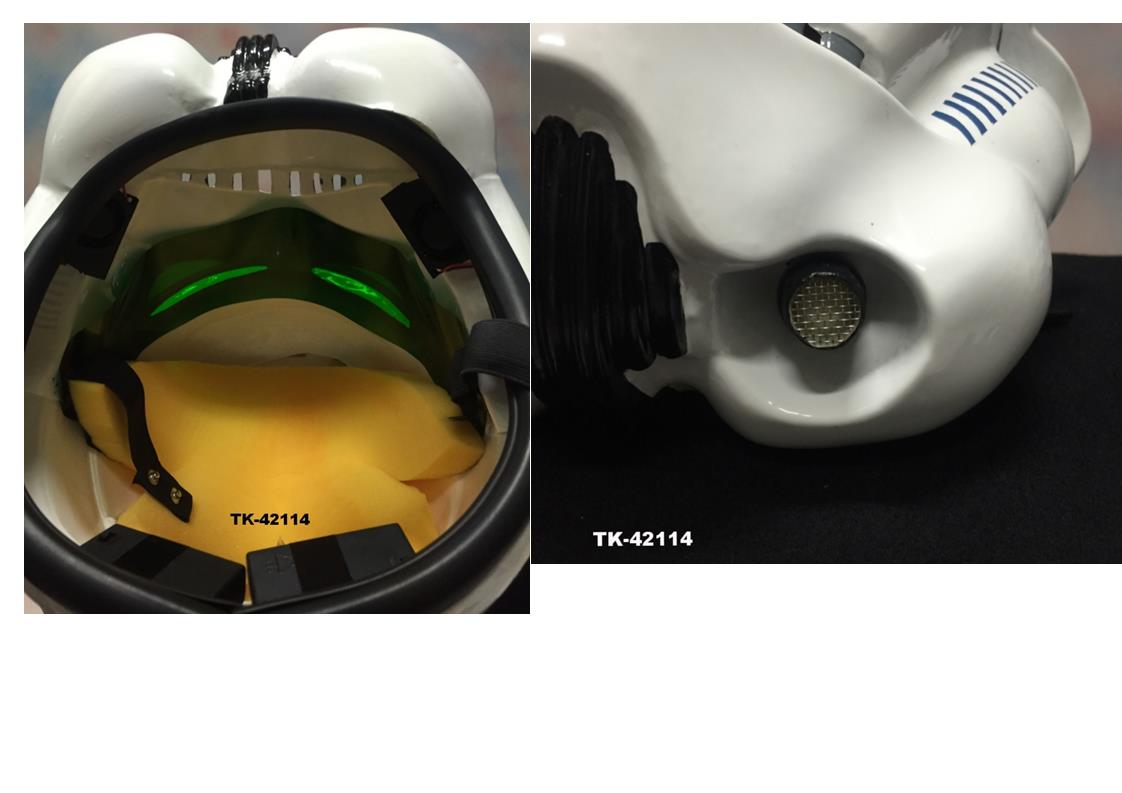
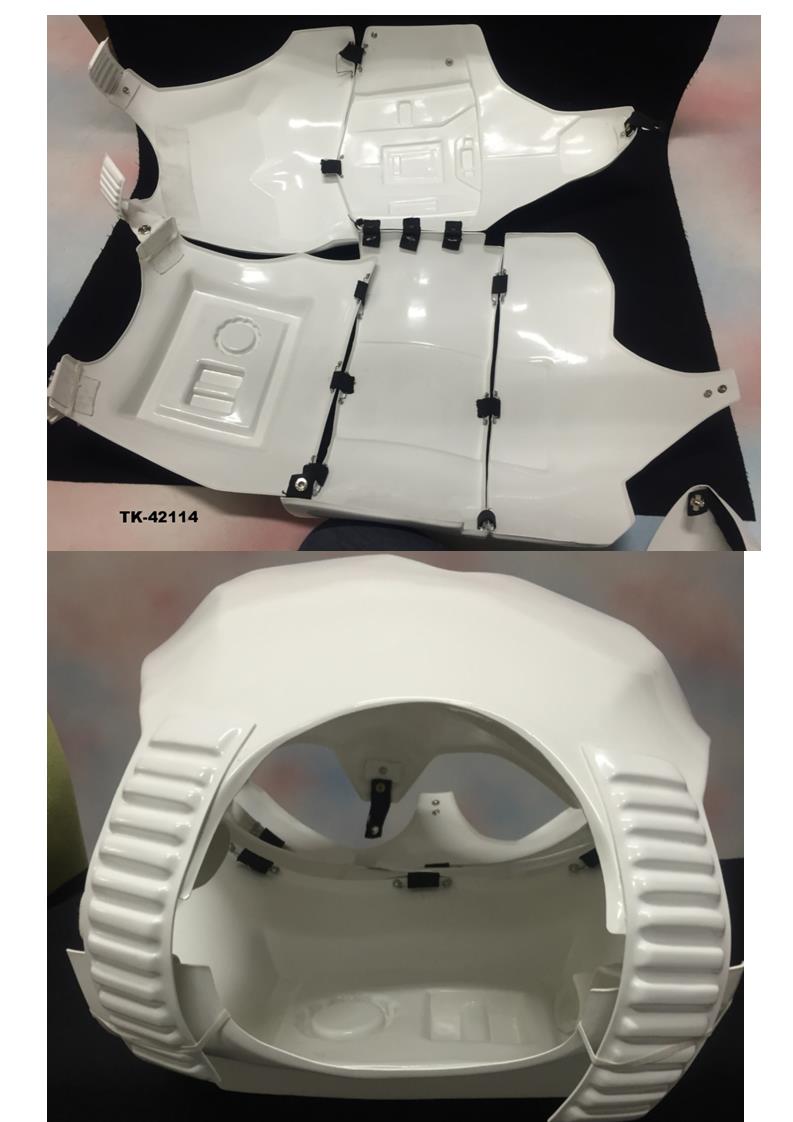
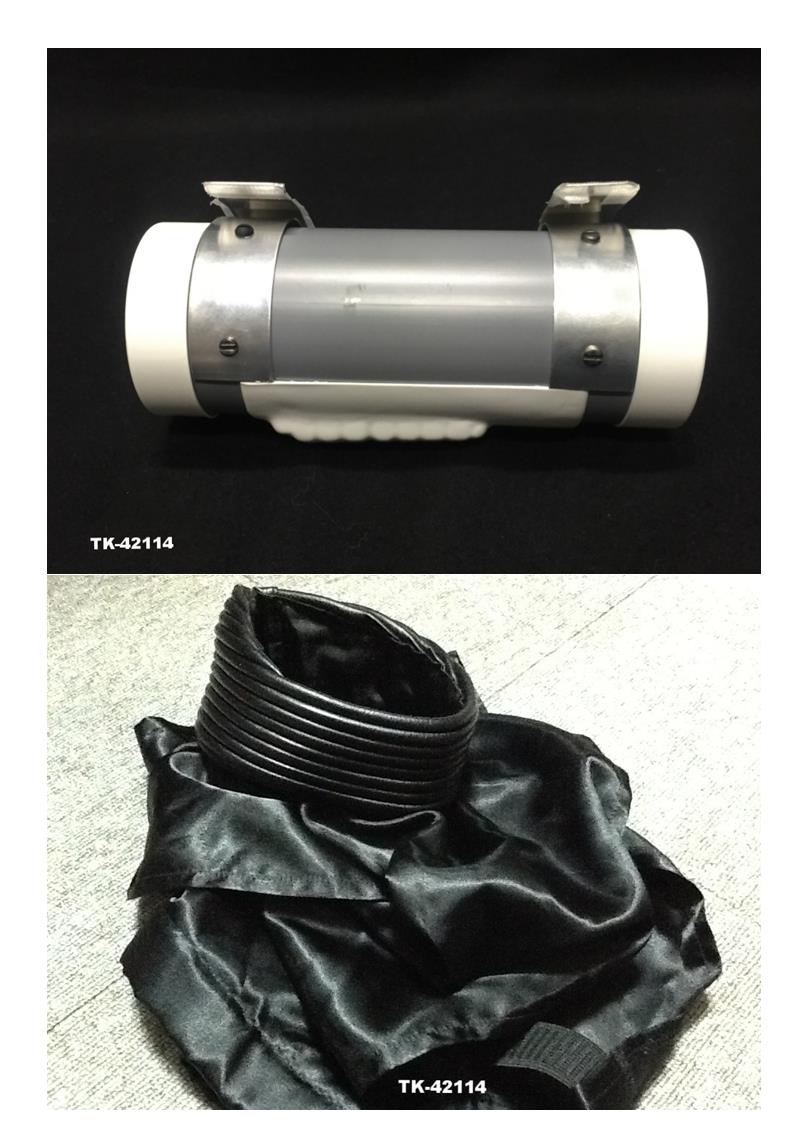
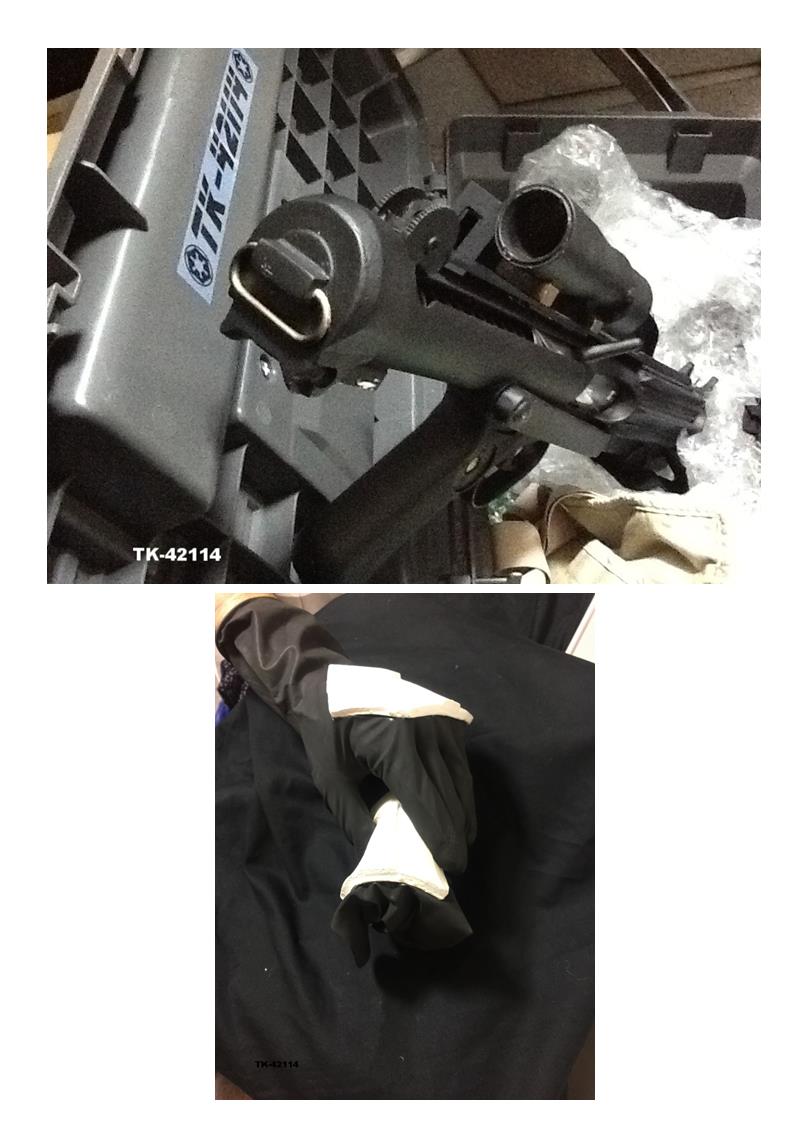
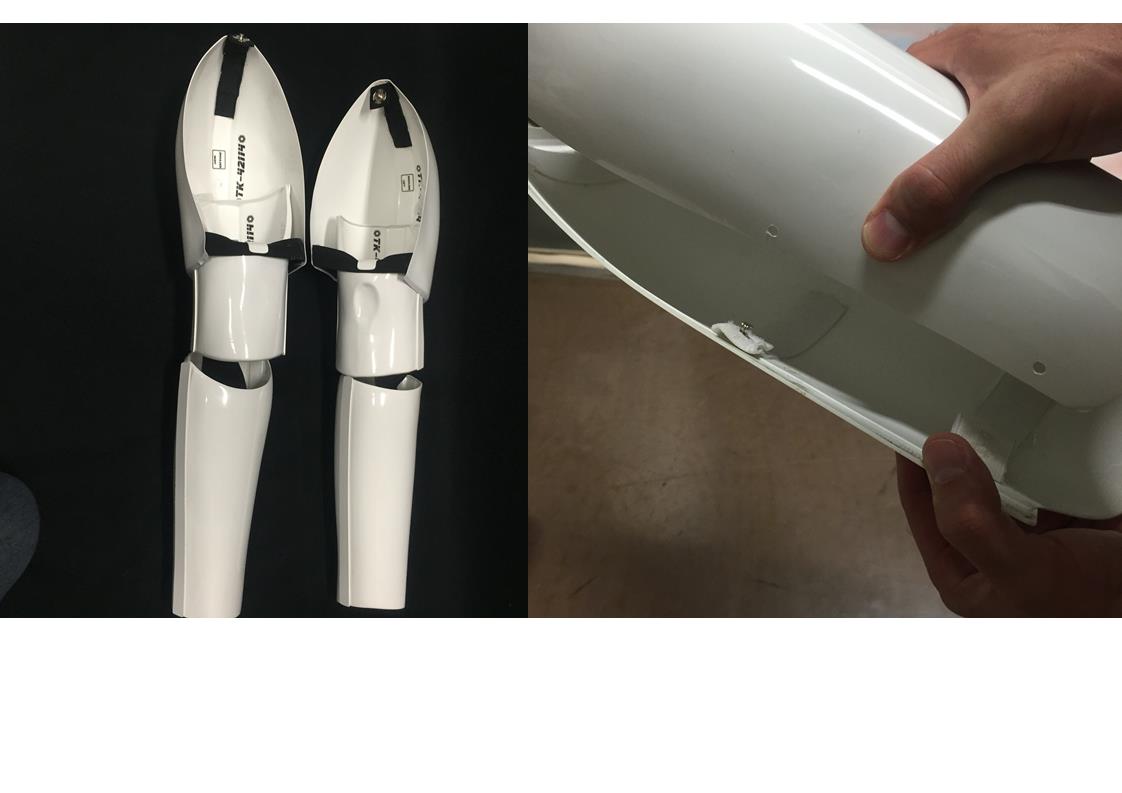
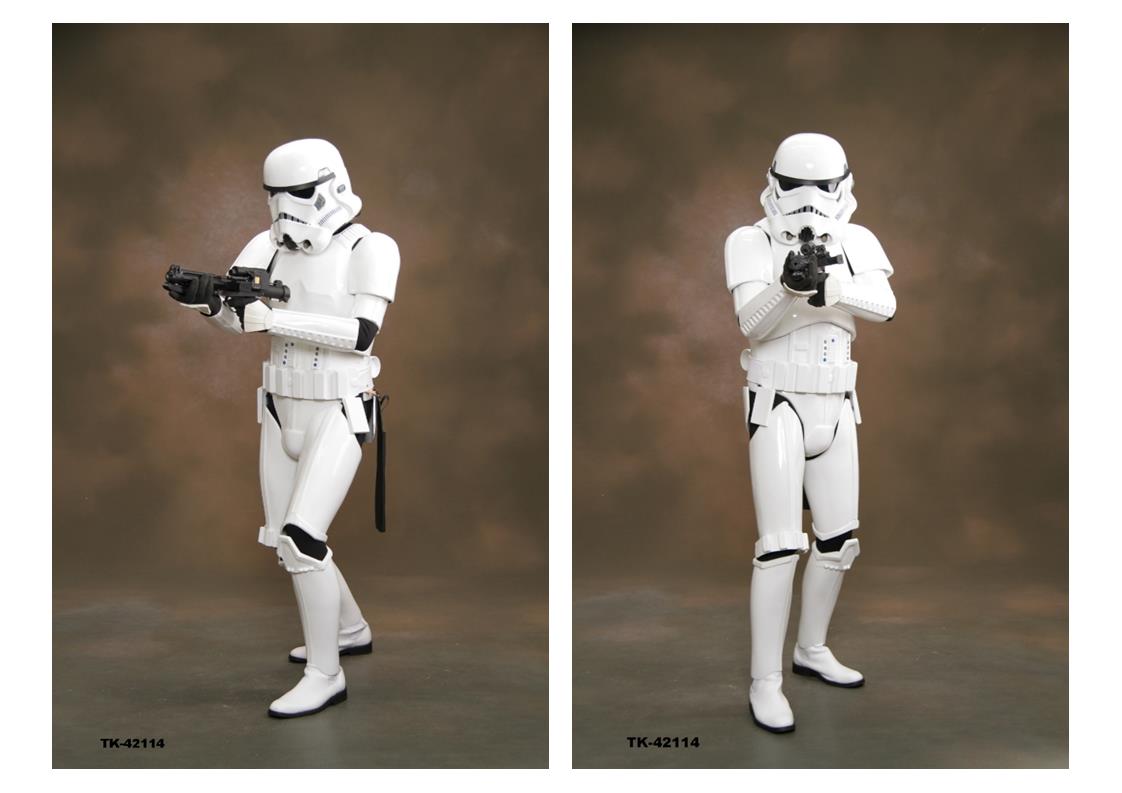
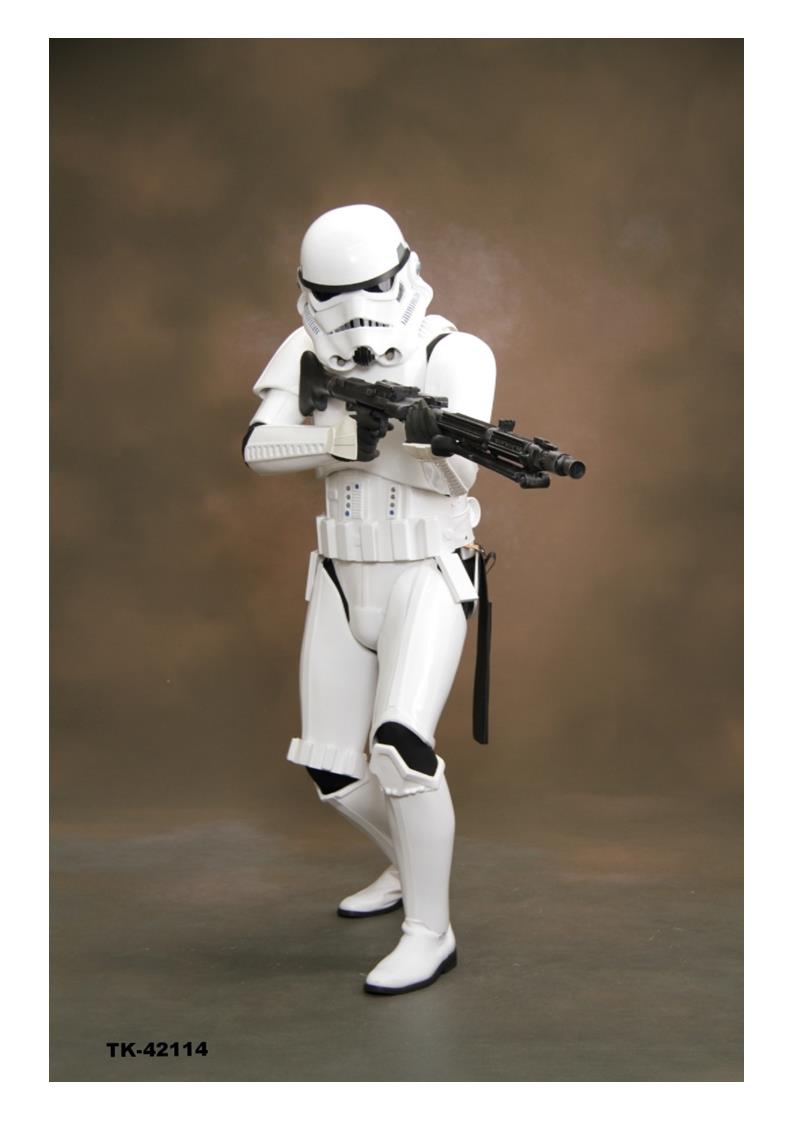
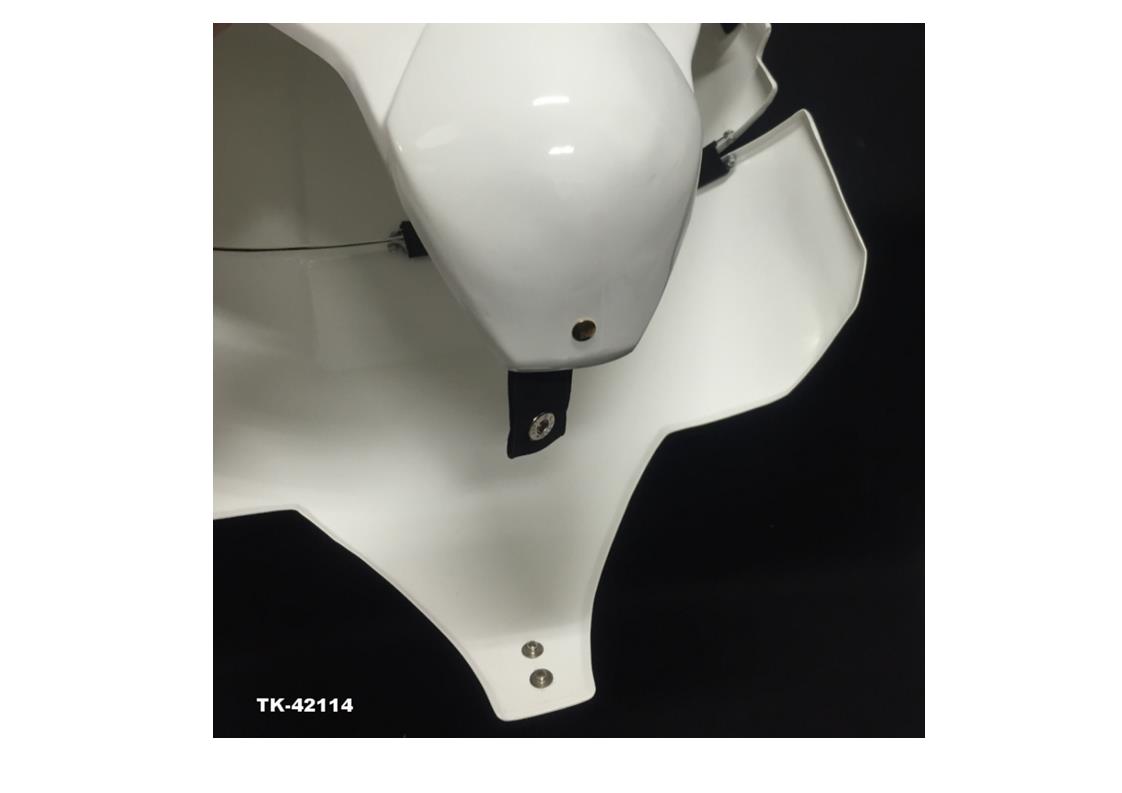
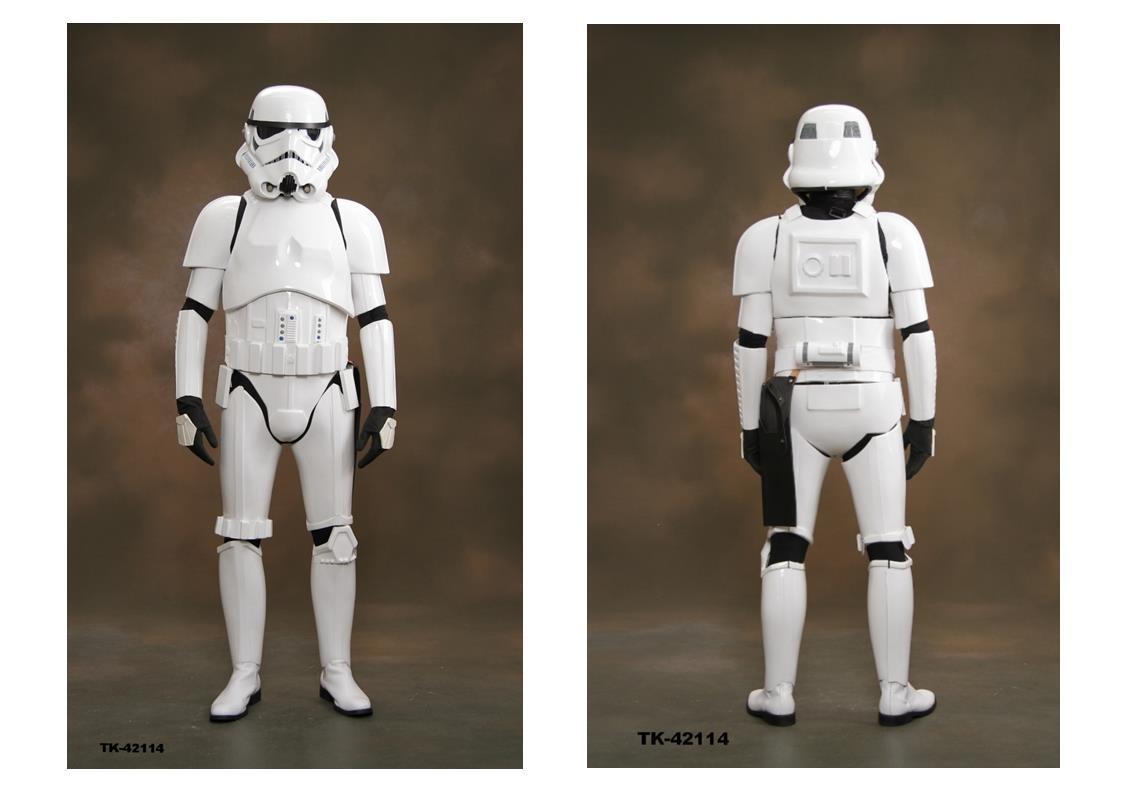
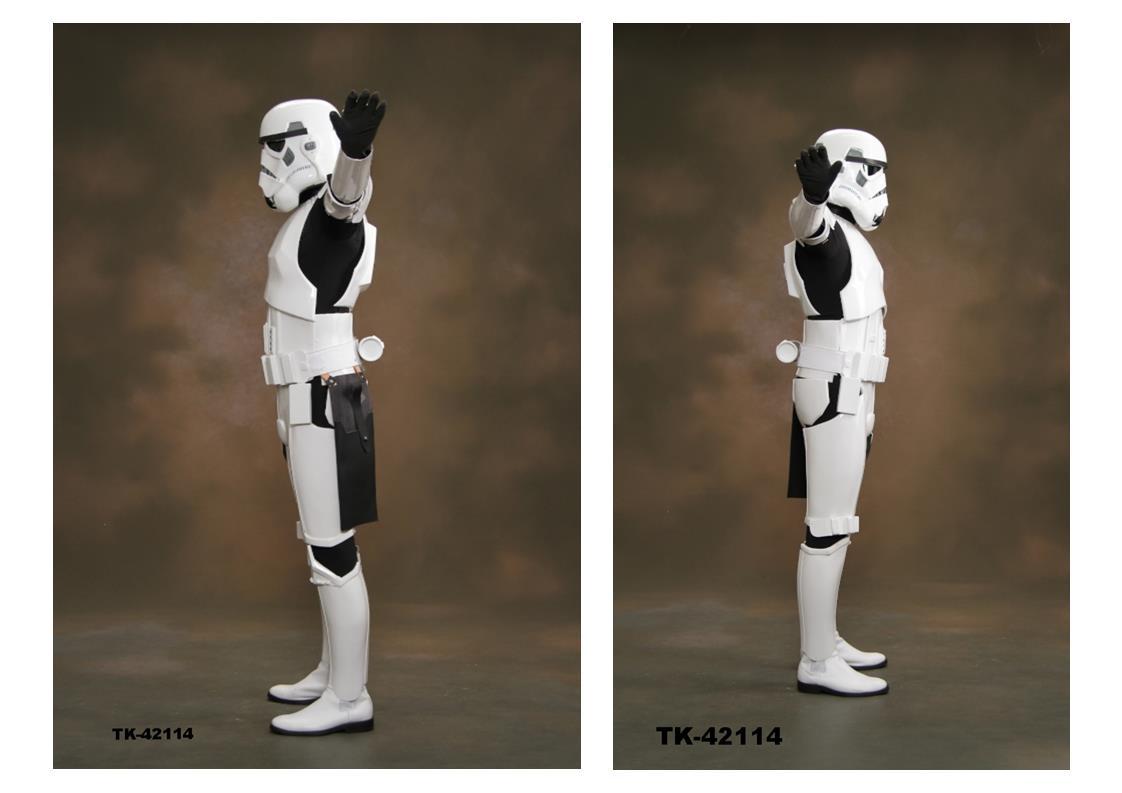
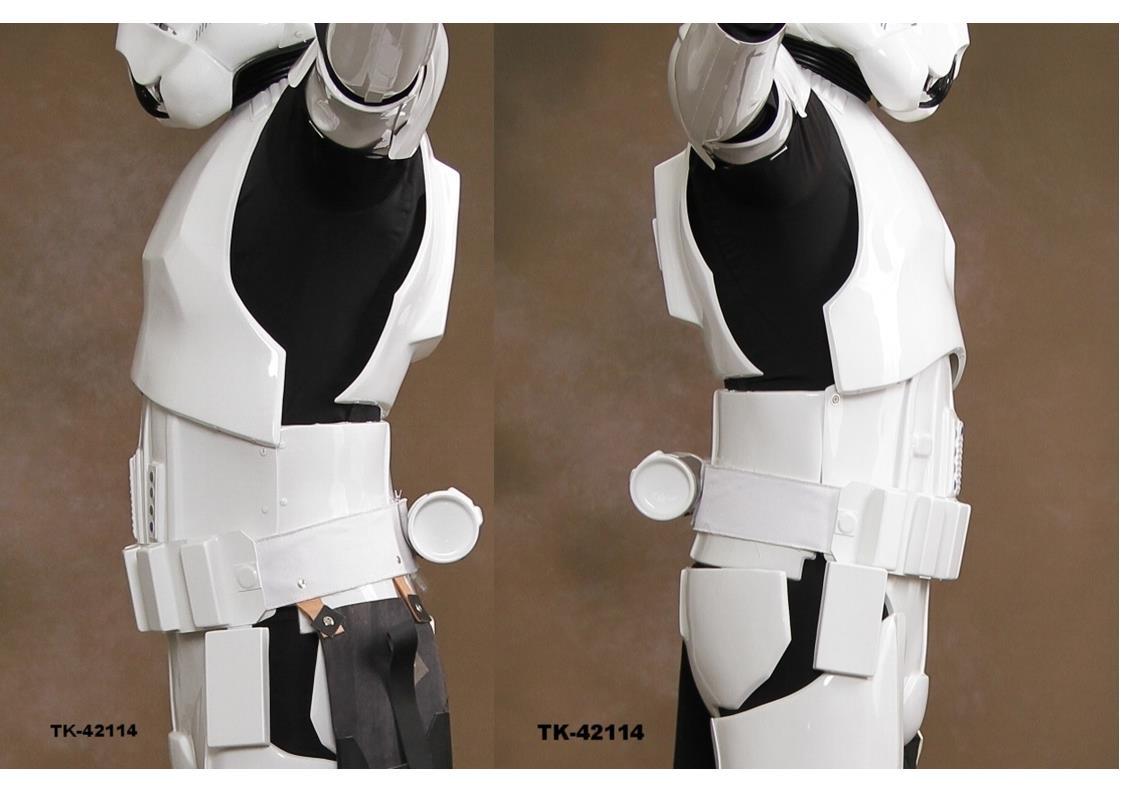
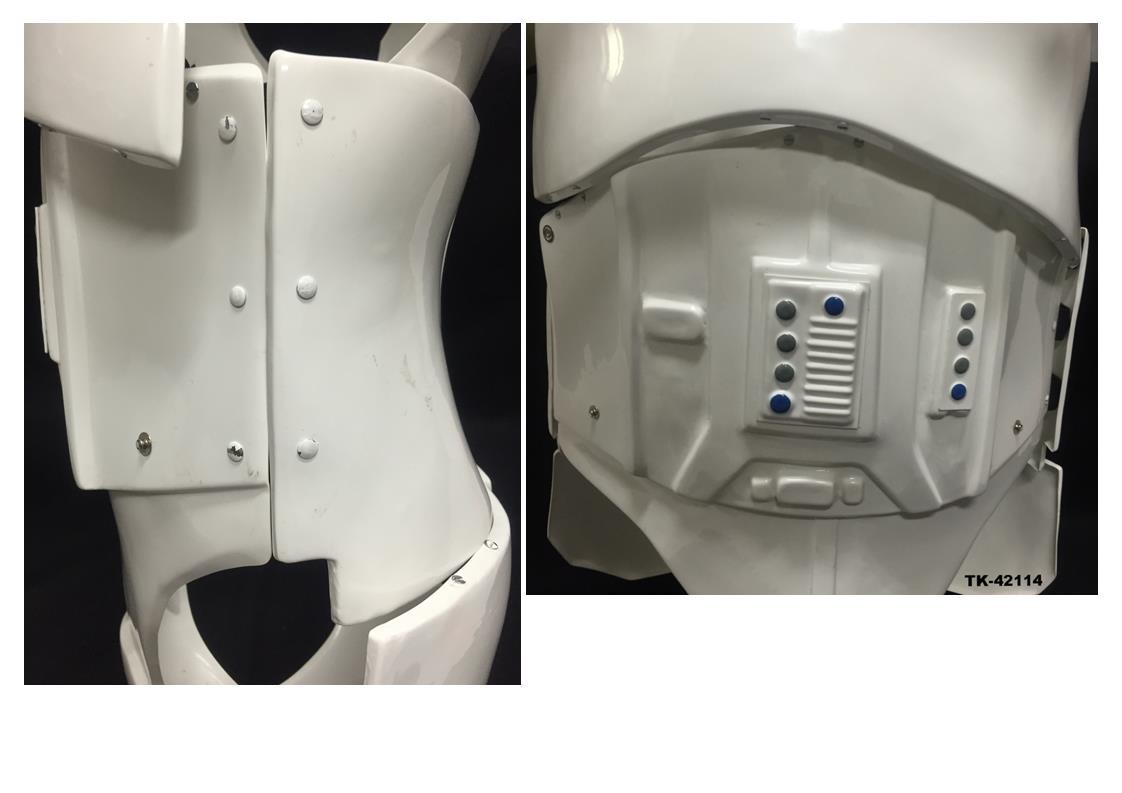
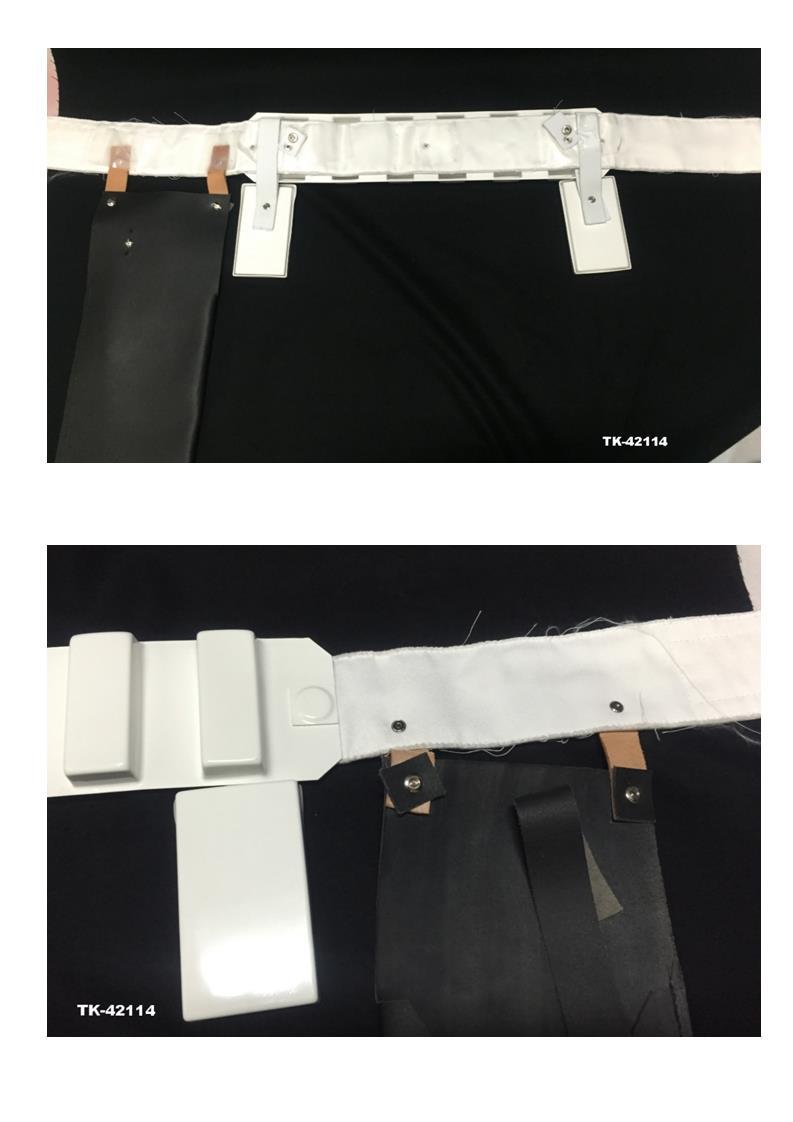
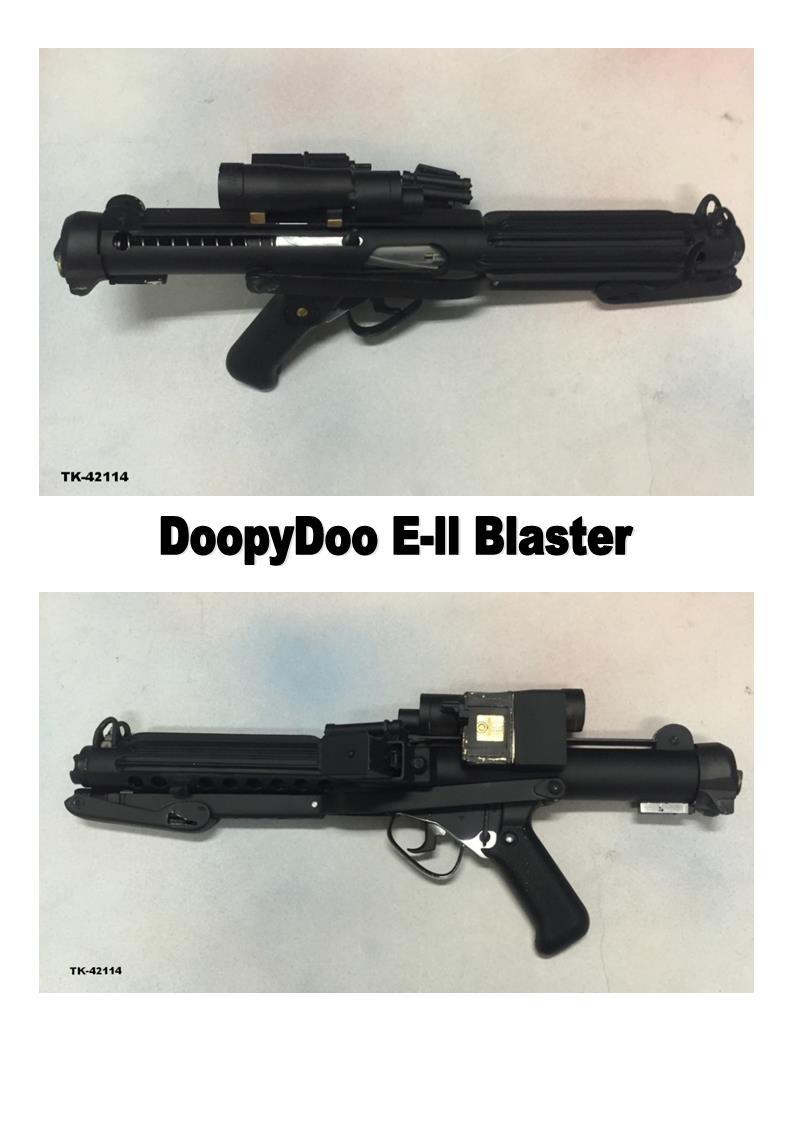
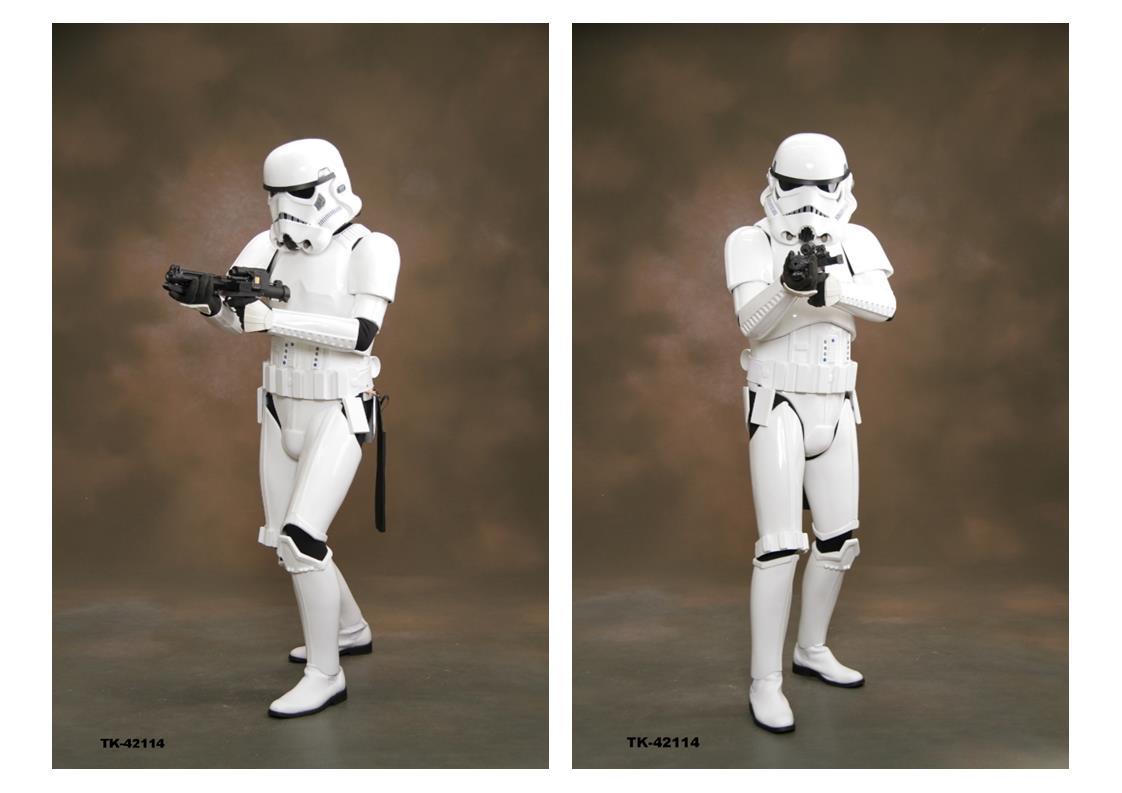
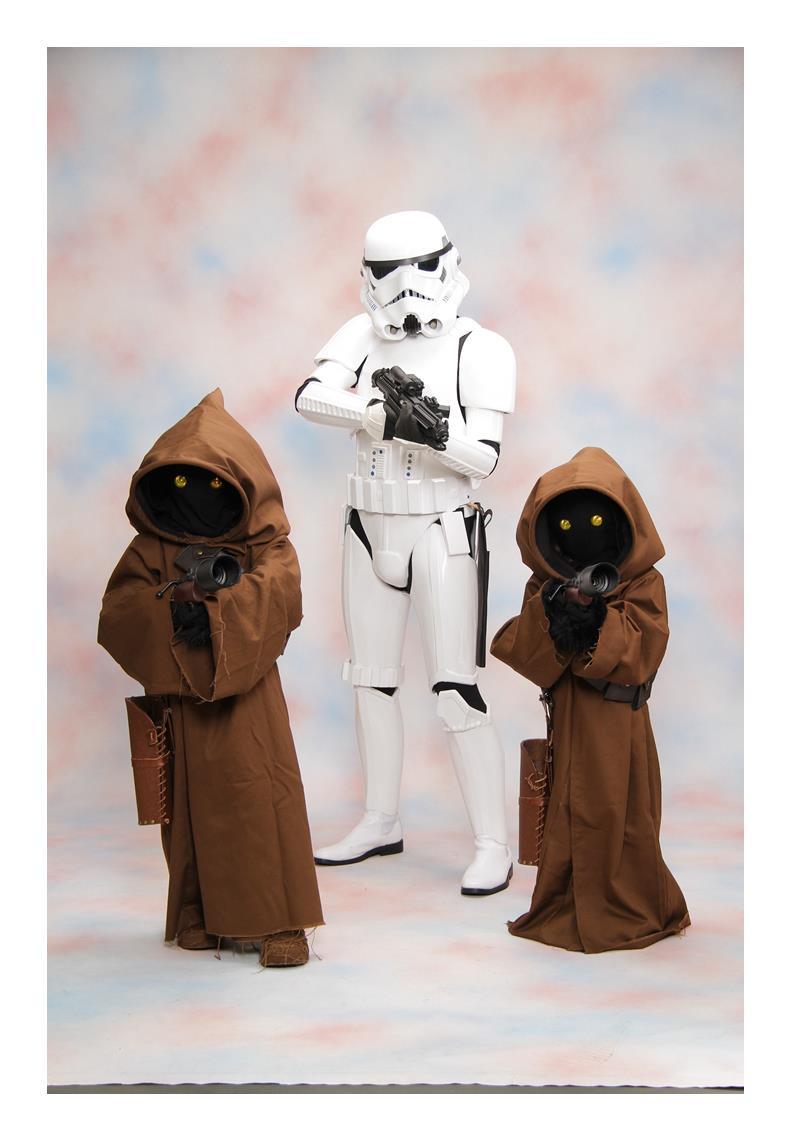
Name: Brian Hall 501st Legion ID: TK-42114 FISD Username: Bulldog44 Garrison: Japanese Garrison Mandatory Information: Armor: RS Prop Masters Helmet: RS Prop Masters (built by RS Props) Blaster: DoopyDoos E-11 Additional Information: Height: 179 cm Weight: 70 kg. Boots: TK Boots Canvas Belt: RS Prop Masters Hand Plates: RS Prop Masters Neck Seal: Veedox Holster: RS Prop Masters DLT-19: Hyperfirm Electronics: Icomm (TK Products) Inner Strapping: RS Prop Masters Brass Rivet: Echo Front and Back Side Profile Right and Left Side Details Right & Left Left Side Rivet Detail & Abdomen Detail Cod & Butt Plate Attachment (Brass Rivet & Double Snaps on Butt Plate) Action Shots Helmet Front & Back Helmet Right & Left Helmet Green Lens & Hovi Tip Canvas Belt & Holster Placement and Attachment (Front & Back) Inner Strapping & Shoulder Bridge Attachment Thermal Detonator Back & Neck Seal Blaster D-Ring and Latex Hand guards/plates Knee Ammo Pack Rivets Arm Strapping & Calves Original Hook Strapping Bonus Photo


 1 point
 -
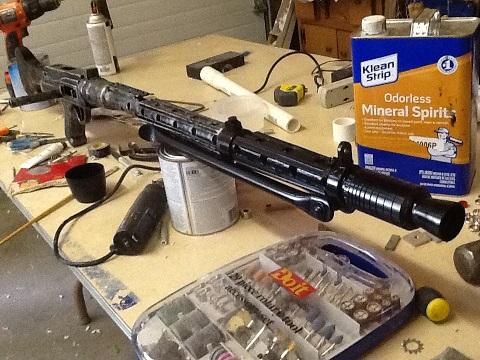
I started this project while waiting for my armor to arrive. Took the ideas form the poor man builds here in the forum. Threw in a few of my own. Wanted to see what I could come up with in a day with local parts and pieces. It is turning out better than I expected, been having a blast (pun intended) doing it. The base is an ebay build a blaster, $15. I took various sizes of pvc, used a plastic rake for the t-tracks, aluminum flashlight for the bolt handle (going to replace it with a shorter, stubbier one). Turned a few of the PVC pieces on a wood lathe. I made the bi-pod out of an old light ski pole. I used bondo to fill in the butt stock, the toy one was flat, rounded it out. Have a few more things to ad to it. I painted it with plastic satin black spray, and started weathering it using silver acrylic, and the "dry brush technique". Project is on hold because my armor came today!
 1 point
 -
1 point