Leaderboard


Popular Content
Showing content with the highest reputation on 06/30/2017 in Posts
-
Greetings Stormtroopers! Our incredible webmaster Eric Brager (Darth Aloha) has completed the long, long overdue update of our forum to the latest version. One of the cool new features is being able to drag and drop photos directly in to posts. The boards are now modern and on par with our sister detachments of MEPD & SpecOps (and even IOC). Over the next several weeks we'll be doing some small UI tweaks here and there, however if you do see anything out of line, do create a post in the tech center and we'll start taking a look. Note, some pages like the EIB/Centurion list will need to be re-created, but should be easier now. So there are a few things that we know we need to do. Thanks for your patience, now let's get the party started!8 points
-
I use it a pretty decent amount, sort of "I've read this I agree/like/approve but don't really have anything to add or say further". Beats the bad old days of +1 posts.3 points
-
We are aware of it. Tapatalk is independant of the forum upgrade and needs to worked on separately, which will be done eventually. Don't freak out.2 points
-
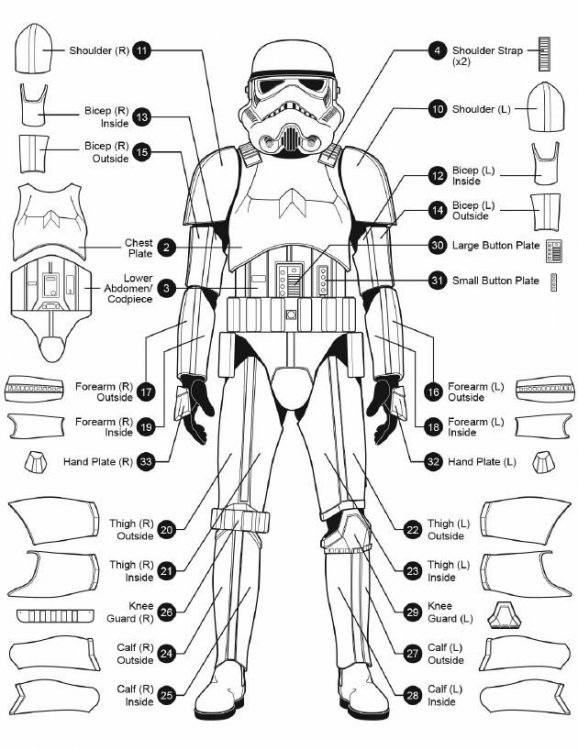
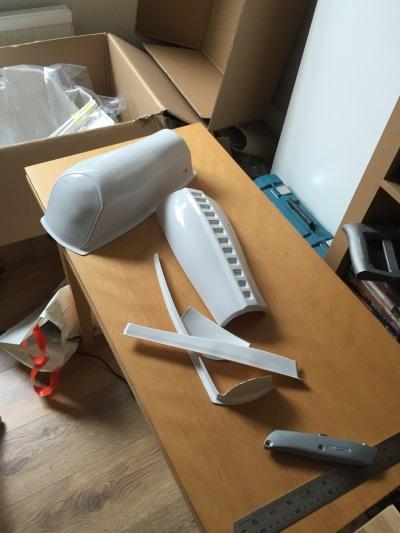
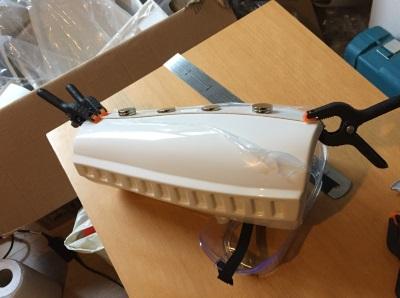
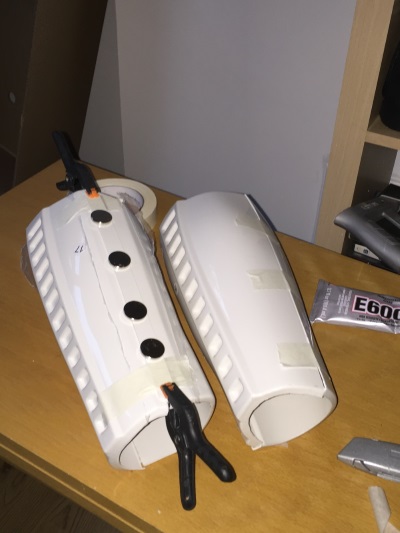
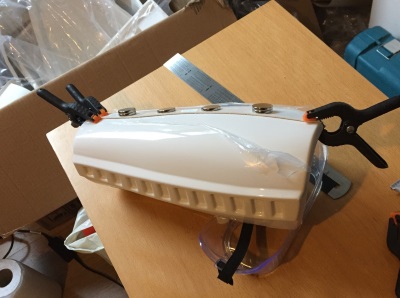
In this tutorial I'll be building the ANOVOS TK armor as ANH Stunt. Though the kit appears to have all the necessary components for 501st basic approval I'll be changing a few things in hopes of making it Centurion (L3) level acceptable. Materials, Strapping & Other used in this build will be highlighted in BLUE Areas that will be changed: NOTE: These changes are NOT required for 501st basic approval A. The kit includes velcro and snaps for the internal strapping which I'll be switching out for brackets and straps provided by Mr. No Stripes. My choice to use brackets is just a matter of preference. Note: The included velcro and snaps appear to be Centurion acceptable except for the chest to back connections which are required to be white. B. The kit includes black elastic for the chest to back connection which I'll be switching out for white, a Centurion requirement. C. The kit includes velcro to connect the shoulder bell strap to the chest to back strap. I'll be using a Dritz #10 sew in snap. Accuracy update but NOT a Centurion requirement D. The kit includes philips head screws for the TD brackets which I'll be replacing with slotted pan head screws, Accuracy update but NOT a Centurion requirement but recommended E. The kit includes velcro for the rear calf connection which I'll be replacing with the elastic and bra hooks set up, Accuracy update but NOT a Centurion requirement F. The kit includes ABS hand guards which will be switched out for Latex style, a Centurion requirement G. Waist belt accuracy modifications - Remove upper holster mounting screws, Repair holes to fabric, Replace line 24 snaps with "Popper" snaps, Correct elastic to drop box connection, Glue drop box elastic to belt. I'm sure this list will build, stay tuned Tools: Pencil Exacto knives, large & small Scissors Steel straight ruler (metric) Dremel with sanding wheel or sand paper. Small carbide bit for helmet teeth or small file. 3M scotch brite pad (any color, gradient) Drill 5/32" & 1/8" drill bits Hammer Screwdriver (blade) Spring clamps (set or 12 or more in various sizes) Earth magnets 1/2" x 1/8" (12.7mm x 3.1mm), 20 to 40 magnets Painters tape PPE (Personal Protective Equipment): I can't stress enough how important it is to wear PPE, especially when working with some of the tools listed above. Wear it! Safety glasses - Hardware store Cut resistant gloves - Hardware store 1/2 Respirator. Sanding releases small carcinogens into the air. Protect your lungs. - Hardware store or http://www.amazon.co...ailpage_o05_s00 Materials: E6000 - two to three+ 2oz tubes, or two+ 3oz tubes Zap-A-Gap & Zip Kicker Elastic (Chest to Back plate) - White 2" x 2' in length recommended) Elastic (Drop Boxes) - White 3/4" x 20" Elastic (Bells to Shoulder Strapping) - Black 1" x 12", ANOVOS supplied Elastic (Bicep to Bicep around arm) - Black 1" x 20" Elastic (Bicep to Forearm) - Black, 2" x 6", ANOVOS supplied Elastic (Thigh to waist belt) - Black, 3" x 24" Elastic (Kidney to Ab right side) - Black, 1" x 8" Elastic (Posterior to Cod) - Black, 1" x 12" Nylon Webbing (Kidney to Ab, left side 6 rivets) - 1" x 6", ANOVOS supplied Single cap rivets (Waist belt drop boxes and thigh ammo belt) 7.4mm or 5/16" Paint: Gloss White: Testers Gloss black: Humbrol #21 Testors # 1747 Gray (Ab plate), Humbrol #5 Testors # 1138 -http://www.humbrol.com/us-en/shop/paints/enamel-paints/5-dark-admiralty-grey-gloss-14ml-enamel-paint.html French Blue (Ab plate & Tube stripes), Humbrol #14 Testors # 2715 - http://www.humbrol.com/us-en/shop/paints/enamel-paints/14-french-blue-gloss-14ml-enamel-paint.html Gunship Grey (TD tube), Testor #1923 (spray paint) NOTE: Painting the TD tube is NOT required for any level of approval Internal Strapping: A. ANOVOS supplied B. Internal Strapping Brackets - http://www.whitearmor.net/forum/topic/20859-accurate-anh-stormtrooper-strapping-brackets-v-20-now-available/. Alternative lock nuts to replace the nuts that come with the bracket kit - http://www.amazon.com/gp/product/B000NBKLOQ C. Snaps: 1) Ab - "S" snaps "poppers" (Used on the following locations: Ab to belt, Ab to Kidney right side, Cod to Posterior, Shoulder to Back plate strapping right/front) 15mm, (bag of 15 is the smallest)- http://www.ebay.com/...=STRK:MEBIDX:IT 2) Ab - "S" Snap die punch and set tool 15-17mm, (1x) - http://www.ebay.com/...=item5413a405e2 NOTE: For the "S" snaps and set tool kit you may need to contact the seller who is in the UK and have him set up a auction with US shipping. The original sales did not have a ship to US option at the time I purchased the items. 3) Thigh Ammo Belt - Single Cap Rivets - 7.4mm or 5/16", Ebay - https://www.ebay.com/itm/Solid-brass-nickel-plated-single-cap-rapid-rivets-7-mm-cap-100-pair/222251554883?hash=item33bf399843:g:zTsAAOSwLnBX2zzO:sc:USPSPriorityFlatRateEnvelope!94513!US!-1 4) Thigh Ammo Belt - Double Cap rivet tool (1x) - http://www.ebay.com/...=item463922315d, or Hobby/Craft store 5) Ab/Kidney - Split rivets (bag) - ANOVOS supplied 7) Inner strapping - Line 24 snaps, nickle, 100ct (recommended), Tandy - https://www.tandylea...ts/1263-12.aspx. Fasnap - http://fasteners.fas...nap-fasteners? 7a) Inner strapping (canon brackets) Not illustrated in this build. For informational purposes only - http://www.whitearmo...-now-available/ 8) Shoulder to Bicep - Dritz Sew in Snaps, Nickle, Size #10 -http://www.amazon.co...YH1DNAAPPP1R3H1 9) COD split rivet - ANOVOS supplied D. Calf closure 1) Elastic - http://www.amazon.com/Dritz-9506W-Non-Roll-Elastic-4-Inch/dp/B004ALO9CK/ref=sr_1_2?ie=UTF8&qid=1454439839&sr=8-2&keywords=3%2F4%22+white+elastic 2) Bra hooks - http://www.amazon.com/Dritz-Hooks-Eyes-Nickel-Size/dp/B005S7FA28/ref=sr_1_10?ie=UTF8&qid=1454440102&sr=8-10&keywords=dritz+bra+hooks 3) Velcro - ANOVOS supplied Other: Thigh Garter belt - http://www.whitearmor.net/forum/topic/29991-thigh-garter-system/ Gloves (ANOVOS supplied) or - https://trooperbay.com/flexible-hand-guards-in-white-black-or-plain.html Rubber hand guards (Joseph) - http://www.whitearmor.net/forum/topic/35702-latex-hand-guards-for-centurion-level-anh/ Boots - Totally killer Boots - http://www.tkboots.com/, Imperial Boots - http://www.imperialboots.com/ Undersuit (ANOVOS supplied) or - Shirt, Pant Waist Belt - ANOVOS modified Waist Belt other - Kittle's belts) - http://www.whitearmor.net/forum/topic/19803-fs-white-canvas-belts/ ANOVOS assembly instructions (if anyone wants them) - https://cdn.shopify.com/s/files/1/0346/5761/files/SWTROOPER001-KIT_V1.pdf?18334450603693831912 UKS Assembly instructions - PDF - https://drive.google.com/file/d/0B-d8yBFyd0CgWGtmSWx6ZHRjbFE/view Sections, Navigation & Check List: 1. Forearms: 1a. Forearm trimming 1b. Forearms Pre- assembly 1c. Assembly (front) 1d. Assembly cont (rear) 2. Biceps: 2a. Bicep trimming right 2b. Bicep trimming left 2c. Bicep Pre-assembly 2d. Assembly 3. Calves/Shins (lower leg): 3a. Shins trimming left & right 3b. Shin Sniper Knee trimming 3c. Shin Pre-assembly 3d. Assembly (front) 3e. Sniper knee Pre-assembly 3f. Rear Closure (Straps and Bra hooks) 3g. Sniper knee, rear cover strip and calf closure elastic system installation 4. Ab: 4a Ab trimming 4b. Ab Button Panel trimming 4c. Ab Button Pre-assembly 4d. Ab & Kidney Split Rivet Pre-assembly 4e. Ab Waist Belt Mount assembly 4f. Ab Right side rivet assembly 4g. Ab Cod Rivet Pre-assembly 4h. Ab Button plates - Painting and Installation 5. Posterior: 5a. Posterior trimming 5b. Posterior rivet assembly 5b. Posterior to Cod connecting strap assembly - Under "Strapping" section 5c. Assembly - Under "Strapping" section 6. Strapping: 6a. Bracket System Pre-assembly 6b. Bicep to Forearm strapping 6c. Chest to Back strapping assembly 6d. Ab to Kidney left side strapping 6e. Ab to kidney Right side strapping 6f. Posterior to Cod 6g. Bracket System final assembly 6h. Bracket system support pads 7g. Thigh Support System (part 1) 7h. Thigh Support System (part 2) 7. Thighs: 7a. Thighs trimming left & right 7b. Thigh Ammo Pack trimming 7c. Thigh Pre-assembly 7d. Assembly (front) 7e. Assembly (rear) 7f. Thigh Ammo Pack installation 7g. Thigh Support System (part 1) 7h. Thigh Support System (part 2) 8. Chest and Shoulders: 8a. Chest trimming 8b. Chest Shoulder Covers trimming 8c. Chest strap to Shoulder Bell connection (Shoulder side) 8d. (6c) Chest to Back strapping assembly 8e. Shoulder Cover assembly 8f. Shoulder Cover Retaining Strap 9. Shoulder Bells: 9a. Shoulder Bell trimming 9b. Chest strap to Shoulder Bell connection (Bell side). 9c. Shoulder Bell strap installation cont. 10. Thermal Detonator: 10a. Pre-assembly 10b. Paint (not required) 10c. Assembly Final 11. Waist Belt: 3/3/16 NOTE: New information regarding the Anovos waist belt, PLEASE READ. The official word is the waist belt is accepted at the EIB (L2) with the previously mention belt modifications however, it is NOT acceptable at Centurion (L3) regardless of the modifications. The cloth portion of the belt assembly will need to be replaced for Centurion approval. You can either skip the following belt modification tutorial and replace the cloth portion of the belt all together, or continue on if EIB is as far as you plan on going. A tutorial on how to change out the cloth portion of the belt is in the works. 11a. Waist belt EIB (ONLY) Accuracy update 11b. Waist belt Centurion Update 12. Back Plate: 12a. Back plate trimming 12b. Assembly - Refer to "Bracket system final assembly" 12c. Upper connection point modification 13. Kidney: 13a. Kidney trimming 13b. Kidney to Ab right side connecting strap - Refer to "Strapping" "Ab to kidney strapping right side" 13c. Kidney to Ab left side connection strapping - Refer to "Strapping" Ab to kidney strapping left side" 13d. Assembly - Refer to Bracket System Final Assembly" 14. Hand Guards: 14a Hand Guard trimming 14b. Hand Guard, Centurion Update 15. Helmet Accuracy modifications: 15a. Helmet Modifications for Centurion and accuracy (Part 1) 15b. Helmet Modifications for Centurion and Accuracy (part 2) 15c. Hovi Tip Mod 16. Fitment Alterations (if any): N/A 17. Final Pictures: 17a. 501st Submission and completed armor pictures 18. Additional information: 18a. Making and install support pads for Mr. NoStripes bracket system (Not a requirement) 19. Helmet Electronics: 19a. Installation of Ukswrath's Hovi Audio system, SHA (hearing assist) and Cooling system Out of the Box
 1 point
 -
So - I've been lurking on whitearmor for a fair while - and am now quite a way through my Stunt TK build. Luckily I've taken quite a few photos along the way - so i'll drip feed a few in here every day or so until I catch up with my own progress! Looking forward to seeing what people have to say, and advice on how I can improve! Before I get going, I need to say a thank-you to ukswrath and the work he put into his ANOVOS TK BUILD thread - it has been an invaluable resource for this build (as have many other posts here!) Here we go! the big box - ready to go! Straight into trimming down the forearms! Being patient with the E6000 - It's really hard to get hold of proper E6000 in the UK. A lot of the stuff available is not the real deal. Luckily I have a cousin in San Antonio that went out and bought out a whole shop of its supply! Continuing with the gluing more to come!


 1 point
 -
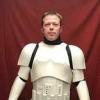
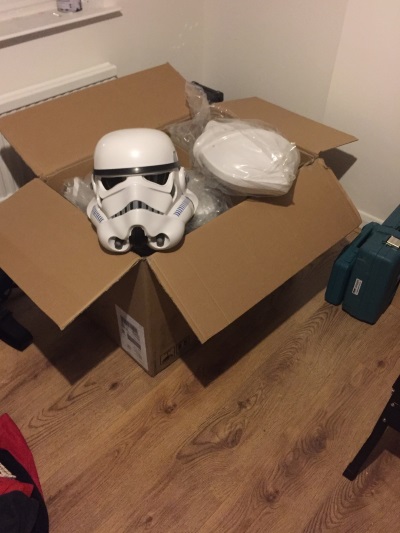
I finally did it! It took a lot longer for me than most but I did FINALLY finish my TK and was accepted into the 501st Makaze Squad in the Florida Garrison. I've wanted Stormtrooper armor ever since I was a little boy so this is one of those dream come true moments. I'm so happy and can't wait to do my first troop. I'm looking forward to working with all the different charities helping children throughout Central Florida. Thanks to all the folks on here for all the advice, tutorials and encouragement :). Long live the Empire!
.thumb.jpg.1d615901f857000e352e85c9f334177d.jpg) 1 point
1 point -
I have a Rubies that I'll be "upgrading". Not sure I'll be as detailed with the conversion, but it's been great following this thread. Thanks for posting.1 point
-
Going to make a few back cap rings (or at least thats what i call them) Im setting up to cut the bayonet slots on the mill NOw1 point
-
That's how I use it too. Originally I was on the other side and found it sort of unnecessary, but I've come around on the matter since we added it.1 point
-
I hear you. Thankfully you can drag/drop photos directly to posts now, which will make it far, far easier.1 point
-
Congrats on getting your armor. Good luck on the build!1 point
-
I got it! I think I got it! Ok so Tony there is a little down arrow next to your avatar and name on the top right. Click it. Click on Account Settings Then on the left side you will see signature which is the last section. I haven't tried to edit mine but that is how you should be able to do it.1 point
-
Happy BBB day and Welcome to the White1 point
-
FYI, unable top log in with Tapatalk1 point
-
HOLY SMOKES! This may take a little getting used to. . . . . . OK I'm up to speed LOVE IT!!!!! Excellent job Eric1 point
-
In the beginning there was out of the box FX, and the Legion was built on waves of new troopers getting theirs off of Ebay from the likes of CostumeJunkie, GotArmor, and similar purveyors of kit that offered oversized helmets, plastic belts and large black ab buttons. MEPD decided to encourage people to up their game with the "deployed" program, and after the start of WhiteArmor.Net FISD knew a good thing when we saw it and launched the Expert Infantryman program to encourage people to go beyond out of the box FX with a modest bump in cost and time. In the 10 years of this above and beyond program, we've recognized over 700 people who have taken their costume to the next level. For every Expert Infantryman Legion Stormtrooper, there have been countless others who donate their time, expertise, sweat, and at times blood too in helping them get there, yet up to now there has never been a way to recognize them for their positive contributions in helping the EI program succeed. The FISD Master Armorer program is an optional, detachment only incentive award to recognize individuals who have directly helped an FISD stormtrooper to achieve Expert Infantry status. To register a “win” in the program, the assistance must have provided hands-on help trimming, building, and fitting of said armor for the person who was awarded Expert Infantry status. Other program notes: • Helping remotely, giving advice, or taking payment in exchange for help does not count as a "win". We reward in-person build assistance and volunteerism. • All work must be voluntary and without expectation of compensation (e.g. if you got paid for building a suit, it doesn't count). • The assistance must be for a period of 30 minutes or more. Spending 15 minutes tweaking someone’s fitting or taking photos does not count. • "Wins" can be retroactive, e.g. if you helped 5 people in 2016, those can count as long as they are fully documented. Award Levels • 5+ "wins": FISD Armorer Badge • 15+ "wins": FISD Senior Armorer Badge • 25+ "wins": FISD Master Armorer Badge The Process • The person applying for the award will create an application thread in the Master Armor Program forum to track the help they give to others. • For each "win", they will list the person they helped achieve Expert Infantry status by copying their EI approval thread. • For each "win", the person who was helped will validate that this person helped them to complete the process. What does the badge look like? Here is the current artwork (pending approval). Thanks Glen! Bronze Silver Gold Questions? Concerns? Please feel free to ask!1 point
-
My shins don't move around too much at all, especially when wearing the boots. I'm going to re-submit new photos tonight and will post an update on the feedback. Hopefully I get approved!! I appreciate all the help and feedback!1 point
-
Looking good, keep up the good work!1 point
-
Hello and Welcome to FISD Good luck with your build, I believe ANOVOS kit after approved for Level 1, with some tweaks and adjustment you can reach level 2 (EI) and level 3 (Centurion) http://www.whitearmor.net/forum/forum/113-advanced-tactics/1 point
-
I realise it's been a while since I posted on here, I've been busy with, well, all those things that go on in life. We have been away for a few days in Wiltshire , seen stone he he and Salisbury cathedral as well as Winchester cathedral, corfe castle plus loads more, I've wanted to see these things since I was a small boys so it's an ambition come true ..... just like building my armour, but I'm not to sure it's going to plan ..... You will recall I sort of messed things up with the heat gun..,, Well I've tried to put it right I did as Frank said and use a piece of wood as a template Today I did a bit more with the heat gun Admit ended up like this And the bit that was most damaged.... I'm thinking it's not too bad.... What do you think? Oh. And for our friends across the pond.... Winchester cathedral Corfe castle Salisbury cathedral Stone henge My grandson Nathan And getting the award for the most improved player in the under 7 team 2017 It's been a good day [emoji3] Sent from my iPhone using Tapatalk1 point
-
I wanted to update my post. I ended up ordering from Heston on Etsy. The blaster is pre-assembled with LEDs included. They communicated really well and it was well packed for shipping. You can tell that the blaster was 3D printed. I would have sanded it more before assembly, but I got a good deal on it assembled and such so I won't complain. From more than 3ft off, it looks really good. The build quality is well done. In all, I'm happy. I recently purchased a 3D printer so, I'll be making my own version to indulge my inner perfectionist. I'll try to get some pics up soon.1 point
-
Just found this thread and it is a goldmine of information for me as I'm intending to start a sterling conversion soon and this is the first time I have found someone showing how they drilled a genuine hengstler for mounting. Fantastic work and an awesome looking blaster. Sent from my iPhone using Tapatalk1 point
-
Mmmmm. This sounds right up my alley! Also, it seems like a great way to encourage or entice troopers to really help Troopers. That saying will take on a bigger meaning.... And this will be glorious to see. I must note how much I valued the time spent together with my Brother Barcoder on my ANH Stunt building her together with EIB and Centurion in mind, as well as with him and my TK Twin Pyrates over the 9 months it took to complete Phasma. Aaron and I promised one another we would achieve these levels, for our ANH twins, and I value their encouragement and support on my journey to Centurion. The 3 of us literally became a force of ABS nature, and developed a very close bond. This is important. On SO many levels. Besides helping each other reach costuming goals, and increase the higher level numbers, it will strengthen the bonds between the humans that wear them, therefore strengthening their respective Garrisons. This is vital. Incentives and goals are always lovely of course to strive for, though, this program may ignite all those wishing to help one another, get out there and really be troopers helping troopers!! I have valued every second building with Peter and Aaron as well as offering my hands on building help and experience to the 2 TKs that have joined in my remote area since I became a Legion member last year. I feel an affinity to them, simply by being involved in their builds. I have already promised that I will help anyone build as I recruit and encourage. No matter the costume. Whether it's sewing, trimming, sanding, gluing, pinning.... I'm happy to offer up blood! HA! (That comment made me giggle) I'm hoping that this will help inspire others to do the same. I'm excited to see and hear how this new program will go! Sent from my STV100-3 using Tapatalk1 point
-
NAVIGATION LINKS AT THE BOTTOM OF THIS POST Hiya, all! I’ve been hanging around here, soaking up the knowledge for a bit while I waited for, and the started working on, my BBB from Anovos. I think it’s time I started a build thread of my own, though, so I’ll walk back through the process. I didn’t take as many photos as I wish I had, during the process, but I think I have another to convey the idea, and I’ll do more going forward, now that I have this started up. Obligatory BBB shot. Ordered May 4, received January 27. That was a long wait! (not as long as some others have waited; I was actually pretty fortunate) Fortunately, I was not in a hurry, and comfortable with their “Q1 2016" estimate, so it never actually felt late or like it wasn’t going to happen. Naturally, a quick photoshoot was necessary, which gave me my spiffy avatar. I'll break the next two weeks worth of updates into individual posts for more logical groupings... AUGUST 2016 UPDATE: This thread has gotten long enough that it's easy to get lost, looking for particular bits of assembly info buried amoung updates, photos, and posts back and forth, so I'm updating this section here to add navigational links for easy access to the info you're seeking. Hope it helps! NAVIGATION LINKS: Page 1: Trimming: http://www.whitearmor.net/forum/topic/35552-kmans-anovos-tk-adventure-build/?p=466328 Tape fit: http://www.whitearmor.net/forum/topic/35552-kmans-anovos-tk-adventure-build/?p=466334 Blaster: Rubies vs. Hyperfirm: http://www.whitearmor.net/forum/topic/35552-kmans-anovos-tk-adventure-build/?p=466336 Helmet examination (stock config): http://www.whitearmor.net/forum/topic/35552-kmans-anovos-tk-adventure-build/?p=466337 Gluing arms & shins: http://www.whitearmor.net/forum/topic/35552-kmans-anovos-tk-adventure-build/?p=466338 Gluing thigh fronts: http://www.whitearmor.net/forum/topic/35552-kmans-anovos-tk-adventure-build/?p=466341 Sniper plate test fit: http://www.whitearmor.net/forum/topic/35552-kmans-anovos-tk-adventure-build/?p=466341 Detail Pics of glued/trimmed parts: http://www.whitearmor.net/forum/topic/35552-kmans-anovos-tk-adventure-build/?p=466345 Gluing thigh backs: http://www.whitearmor.net/forum/topic/35552-kmans-anovos-tk-adventure-build/?p=466670 Sniper plate: http://www.whitearmor.net/forum/topic/35552-kmans-anovos-tk-adventure-build/?p=466670 Button Cover prep: http://www.whitearmor.net/forum/topic/35552-kmans-anovos-tk-adventure-build/?p=466670 Shoulder strap gluing: http://www.whitearmor.net/forum/topic/35552-kmans-anovos-tk-adventure-build/?p=466670 Rigging hand armor plates: http://www.whitearmor.net/forum/topic/35552-kmans-anovos-tk-adventure-build/?p=467072 Shims: First Attempt: Part 1 http://www.whitearmor.net/forum/topic/35552-kmans-anovos-tk-adventure-build/?p=467267 Side Rivet placement (Initial): http://www.whitearmor.net/forum/topic/35552-kmans-anovos-tk-adventure-build/?p=467267 Inner cover strips: http://www.whitearmor.net/forum/topic/35552-kmans-anovos-tk-adventure-build/?p=467267 Page 2: Shims: First Attempt: Part 2: http://www.whitearmor.net/forum/topic/35552-kmans-anovos-tk-adventure-build/?p=468809 Rigging torso: Anovos Velcro http://www.whitearmor.net/forum/topic/35552-kmans-anovos-tk-adventure-build/?p=468809 Inner cover strips (cont) http://www.whitearmor.net/forum/topic/35552-kmans-anovos-tk-adventure-build/?p=468826 Shingate: http://www.whitearmor.net/forum/topic/35552-kmans-anovos-tk-adventure-build/?p=469092 Inner cover strips (final) http://www.whitearmor.net/forum/topic/35552-kmans-anovos-tk-adventure-build/?p=469094 Thigh rigging: Torso plates (Anovos): http://www.whitearmor.net/forum/topic/35552-kmans-anovos-tk-adventure-build/?p=469579 ABS Paste: http://www.whitearmor.net/forum/topic/35552-kmans-anovos-tk-adventure-build/?p=469579 Shingate: http://www.whitearmor.net/forum/topic/35552-kmans-anovos-tk-adventure-build/?p=469850 Page 3: Belt Teardown: http://www.whitearmor.net/forum/topic/35552-kmans-anovos-tk-adventure-build/?p=470486 Thigh ammo pack: http://www.whitearmor.net/forum/topic/35552-kmans-anovos-tk-adventure-build/?p=470486 Bicep to Forearm: http://www.whitearmor.net/forum/topic/35552-kmans-anovos-tk-adventure-build/?p=470486 Shingate conclusion: http://www.whitearmor.net/forum/topic/35552-kmans-anovos-tk-adventure-build/?p=470794 Button cover cleaning: http://www.whitearmor.net/forum/topic/35552-kmans-anovos-tk-adventure-build/?p=470794 Page 4: Belt upgrade: snaps: http://www.whitearmor.net/forum/topic/35552-kmans-anovos-tk-adventure-build/?p=471011 Crotch strap: Front: http://www.whitearmor.net/forum/topic/35552-kmans-anovos-tk-adventure-build/?p=471470 Shims: Final: Part 1: http://www.whitearmor.net/forum/topic/35552-kmans-anovos-tk-adventure-build/?p=471470 Thermal Detonantor: Parts Test fit: http://www.whitearmor.net/forum/topic/35552-kmans-anovos-tk-adventure-build/?p=471470 Anovos Rigging snaps: http://www.whitearmor.net/forum/topic/35552-kmans-anovos-tk-adventure-build/?p=471470 Thermal Detonantor: Build: http://www.whitearmor.net/forum/topic/35552-kmans-anovos-tk-adventure-build/?p=472062 Shims: Final: Part 2: http://www.whitearmor.net/forum/topic/35552-kmans-anovos-tk-adventure-build/?p=472130 Page 5: Shins: Back cover strip & Velcro: http://www.whitearmor.net/forum/topic/35552-kmans-anovos-tk-adventure-build/?p=474985 Belt Ammo Pack: Belt Repair: http://www.whitearmor.net/forum/topic/35552-kmans-anovos-tk-adventure-build/?p=474985 Crotch strap: Back: http://www.whitearmor.net/forum/topic/35552-kmans-anovos-tk-adventure-build/?p=475599 Side Rivet placement (Final): http://www.whitearmor.net/forum/topic/35552-kmans-anovos-tk-adventure-build/?p=475599 Hand plate shaping: http://www.whitearmor.net/forum/topic/35552-kmans-anovos-tk-adventure-build/?p=475599 Belt Ammo Pack: Belt Repair & Attachment: http://www.whitearmor.net/forum/topic/35552-kmans-anovos-tk-adventure-build/?p=475599 Shins: Back Velcro: http://www.whitearmor.net/forum/topic/35552-kmans-anovos-tk-adventure-build/?p=475599 Clamshell strapping (screen accurate) http://www.whitearmor.net/forum/topic/35552-kmans-anovos-tk-adventure-build/?p=475733 Button plate painting: http://www.whitearmor.net/forum/topic/35552-kmans-anovos-tk-adventure-build/?p=475733 Page 6: Shins: Hot water reshaping: http://www.whitearmor.net/forum/topic/35552-kmans-anovos-tk-adventure-build/?p=476998 Button covers: Rebuild: http://www.whitearmor.net/forum/topic/35552-kmans-anovos-tk-adventure-build/?p=477052 Helmet eye flashing reduction: http://www.whitearmor.net/forum/topic/35552-kmans-anovos-tk-adventure-build/?p=477052 Button covers: Install: http://www.whitearmor.net/forum/topic/35552-kmans-anovos-tk-adventure-build/?p=477841 Rivet painting: http://www.whitearmor.net/forum/topic/35552-kmans-anovos-tk-adventure-build/?p=477841 Backplate hot water reshaping: http://www.whitearmor.net/forum/topic/35552-kmans-anovos-tk-adventure-build/?p=477981 Snap plates (chest) http://www.whitearmor.net/forum/topic/35552-kmans-anovos-tk-adventure-build/?p=477981 Page 7: Drop box alignment: http://www.whitearmor.net/forum/topic/35552-kmans-anovos-tk-adventure-build/?p=478078 Snap strip straps (chest): http://www.whitearmor.net/forum/topic/35552-kmans-anovos-tk-adventure-build/?p=478243 Button plate gluing: http://www.whitearmor.net/forum/topic/35552-kmans-anovos-tk-adventure-build/?p=478243 Blaster D-Ring installation: http://www.whitearmor.net/forum/topic/35552-kmans-anovos-tk-adventure-build/?p=478243 501st Submittal Photos: http://www.whitearmor.net/forum/topic/35552-kmans-anovos-tk-adventure-build/?p=478259 Page 8: Helmet fans: http://www.whitearmor.net/forum/topic/35552-kmans-anovos-tk-adventure-build/?p=480425 Helmet interior: Painting: http://www.whitearmor.net/forum/topic/35552-kmans-anovos-tk-adventure-build/?p=480425 Page 9: Helmet fan bracket: http://www.whitearmor.net/forum/topic/35552-kmans-anovos-tk-adventure-build/?p=480532 Helmet lens mounting posts: http://www.whitearmor.net/forum/topic/35552-kmans-anovos-tk-adventure-build/?p=480772 Page 10: Helmet lens modification: http://www.whitearmor.net/forum/topic/35552-kmans-anovos-tk-adventure-build/?p=481104 Belt correction changes: http://www.whitearmor.net/forum/topic/35552-kmans-anovos-tk-adventure-build/?p=489418 Thigh garters: http://www.whitearmor.net/forum/topic/35552-kmans-anovos-tk-adventure-build/?p=489798 Torso snap strip upgrade: http://www.whitearmor.net/forum/topic/35552-kmans-anovos-tk-adventure-build/?p=490632 Page 11: Helmet accuracy upgrades (Frown repaint, ear screws, TD screws): http://www.whitearmor.net/forum/topic/35552-kmans-anovos-tk-adventure-build/?p=493633 Hovi mesh replacement: http://www.whitearmor.net/forum/topic/35552-kmans-anovos-tk-adventure-build/?p=493934 Helmet electronics & padding install: Hovi speakers, iComm: http://www.whitearmor.net/forum/topic/35552-kmans-anovos-tk-adventure-build/?p=496051 Shin water bath details: http://www.whitearmor.net/forum/topic/35552-kmans-anovos-tk-adventure-build/?p=499854 Page 12: Armor bin upgrades: http://www.whitearmor.net/forum/topic/35552-kmans-anovos-tk-adventure-build/?p=502077 Centurion shoulder strap upgrade: http://www.whitearmor.net/forum/topic/35552-kmans-anovos-tk-adventure-build/?p=5038781 point
-
One of my new favorite things to do at non-canon events is this: I have the ability to stand perfectly motionless, (thanks to the U.S. military). I stand near an entrance, and inevitably people walk up for a photo with the "mannequin". When I look over at them and say "Can I help you", the looks are priceless. A word of caution if you try this, do NOT lock your knees. You can pass out.1 point
-
Great stories, Troopers! It is great to hear others have been able to "spread fun in a charming way" and make people smile. Yes, by all means, there must be a balance between having fun and being serious. There are times for both. We can be very scary to little ones and doing something funny to help them comfortable with you may be just what it takes. And as for what would Vader say? The Vader I troop with has over 280 troops and he knows the balance. Many of the fun tricks that I do, I learned from Vader! I read somewhere an old timer put it all in perspective... "We're middle aged nerds wearing Tupperware. Keep it fun."1 point
-
Megacon 501st area. Compactor with my babes. This is Derek, me, my fiancé Megan and Brad at Megacon!1 point


.jpg.e7eb35a88a2b3e2247905c500a2d3815.jpg)