StrmTRPR85[TK] Posted June 2, 2018 Report Share Posted June 2, 2018 Looking good! Glad to have another TK in Ohio 1 Quote Link to comment Share on other sites More sharing options...
Frank75139[501st] Posted June 2, 2018 Report Share Posted June 2, 2018 Thanks, Frank. I'm wondering how is it made? You say it's light so is it solid rubber or is it rubber skin over a nerf-like foam rubber? Also, did you paint/weather yours? Does it take paint well? I’m not 100% sure on how it’s made but I believe it’s full rubber. I contacted Slavefive and he was great about explaining the different grades. There is an increase in price between A & B grades. I went A grade, I’ve seen B grades that are just as good. I haven’t dropped mine but I think it would hold up well. Although some parts that hang off worry me. I did not weather mine used it right out of the box cause I though it looked great as is. Edit after post... Now that I think about it. I did drill small holes in the back for the D-ring and it was all rubber. Sent from my iPhone using Tapatalk 1 Quote Link to comment Share on other sites More sharing options...
StrmTRPR85[TK] Posted June 2, 2018 Report Share Posted June 2, 2018 My hyperfirm is a b grade and looks great. 1 Quote Link to comment Share on other sites More sharing options...
StrmTRPR85[TK] Posted June 2, 2018 Report Share Posted June 2, 2018 There are my pics of my B grade 1 Quote Link to comment Share on other sites More sharing options...
CoatHanger[TK] Posted June 10, 2018 Report Share Posted June 10, 2018 I'm building a AP ANH too, so gonna follow you along! I might be a touch farther along, but I've been chipping away for over a year, so there's a solid chance you'll finish first. (So maybe you can tackle that sniper knee and post how you made it work!) I love my HyperFirm B grade, but it's a StormTrooper Blaster that I get to play with, so I may be easy to please. I plasti-dipped my helmet. I like the dark look, harder to see your face in it. The hardest part is plugging the holes well enough so it doesn't seep onto the outside paint. (It was easy enough to remove for me, because I plasti-dipped before painting the frown, but I could see how that could be a PITA.) 1 Quote Link to comment Share on other sites More sharing options...
Twosolitudes[TK] Posted June 10, 2018 Report Share Posted June 10, 2018 Not sure if you’ve made your purchase yet, but another option for an E-11 is from QuestDesign: https://www.etsy.com/ca/listing/192791479/star-wars-stormtrooper-e-11-blaster-prop?ref=shop_home_feat_1 I'm pleased with mine. 1 Quote Link to comment Share on other sites More sharing options...
Ironmonk[TK] Posted June 10, 2018 Author Report Share Posted June 10, 2018 Thanks for the comments all! I’ve been out of town on business and am now on vacation so haven’t done any work on my TK in a while. Next week I’ll be back at it. Rainy weather has me wishing I’d brought my helmet and paints along....oh, well... Sent from my iPhone using Tapatalk 1 Quote Link to comment Share on other sites More sharing options...
ukswrath[Staff] Posted June 15, 2018 Report Share Posted June 15, 2018 Nice work so far Darrell 1 Quote Link to comment Share on other sites More sharing options...
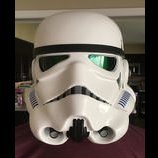
Ironmonk[TK] Posted June 21, 2018 Author Report Share Posted June 21, 2018 After two weeks of travel for business and pleasure, I'm back home and hoping to get some work done on my TK. Unfortunately, my wife is in China this week on business. So, in addition to my full-time job, I'm solo parenting two teens, a toddler, and two dogs! If you haven't guessed, June is a bit crazy for us this year. Regardless, I had a chance to do a little work this evening. My goal is to finish painting the helmet this week. Tonight I added black lining around the traps and tears and touched up the vocoder I messed up. Let me know what you think. Is my black lining too thin? Does the vocoder look centurion approvable? 3 Quote Link to comment Share on other sites More sharing options...
StrmTRPR85[TK] Posted June 21, 2018 Report Share Posted June 21, 2018 Love the hand painted look! Sharp and crisp! 1 Quote Link to comment Share on other sites More sharing options...
ukswrath[Staff] Posted June 21, 2018 Report Share Posted June 21, 2018 Coming along nicely Darrell 1 Quote Link to comment Share on other sites More sharing options...
TheSwede[TK] Posted June 21, 2018 Report Share Posted June 21, 2018 7 hours ago, Ironmonk said: Does the vocoder look centurion approvable? Yupp - looks great 1 Quote Link to comment Share on other sites More sharing options...
hollowbodies[501st] Posted June 21, 2018 Report Share Posted June 21, 2018 Vocoder looks really nice, as well as the rest of the paint. Good work! 1 Quote Link to comment Share on other sites More sharing options...
PhilBobTheFish Posted June 21, 2018 Report Share Posted June 21, 2018 Good job! 1 Quote Link to comment Share on other sites More sharing options...
Ironmonk[TK] Posted June 23, 2018 Author Report Share Posted June 23, 2018 A bit more progress on painting the helmet today... Right tear: Right trap: Left trap: Left tear: Can see on this one that I will need to do a little touch up with gray. But that is it as far as I'm concerned! I used the templates from TrooperBay and they worked very well. The left tear was most difficult to fit, but overall these worked excellently...unless you all say otherwise that is. I also finished the ears: Free handed and I'm completely satisfied with how they turned out. Now a question. My AP kit came with decals for the tube stripes. I also have a template from TrooperBay that I can use. The template I bought is very uniform and straight. The decal has a less uniform appearance. Here's a side-by-side: Decal on the left, template right. I'm interested in opinions on which is better. I'm building ANH Stunt, if that makes any difference. I'm leaning towards the template because I like the idea of having everything painted, but I welcome others opinions. Any difference as far as Centurion approval goes? 5 Quote Link to comment Share on other sites More sharing options...
CableGuy[Admin] Posted June 24, 2018 Report Share Posted June 24, 2018 You’ve done such a good job painting the rest, I’d definitely go templates. :-)Sent from my iPhone using Tapatalk 1 Quote Link to comment Share on other sites More sharing options...
TheSwede[TK] Posted June 24, 2018 Report Share Posted June 24, 2018 10 hours ago, Ironmonk said: Any difference as far as Centurion approval goes? Either way is fine 1 Quote Link to comment Share on other sites More sharing options...
wook1138[TK] Posted June 24, 2018 Report Share Posted June 24, 2018 Yep, go with the paint. Your stencil work on the traps and tears is great. 1 Quote Link to comment Share on other sites More sharing options...
lucnak[TK] Posted June 25, 2018 Report Share Posted June 25, 2018 Agreed, nice painting! 1 Quote Link to comment Share on other sites More sharing options...
PhilBobTheFish Posted June 25, 2018 Report Share Posted June 25, 2018 I concur with all above statements. Nice painting and go with the templates. 1 Quote Link to comment Share on other sites More sharing options...
hollowbodies[501st] Posted June 26, 2018 Report Share Posted June 26, 2018 Sure thing, go with the painting! You'll be glad you did it in the end! 1 Quote Link to comment Share on other sites More sharing options...
68Brick[TK] Posted June 26, 2018 Report Share Posted June 26, 2018 Looking Good Trooper! 1 Quote Link to comment Share on other sites More sharing options...
Ironmonk[TK] Posted June 27, 2018 Author Report Share Posted June 27, 2018 Decided to paint the inside of the helmet flat black. It was simple enough to mask everything off and spray the inside with some Krylon plastic paint. I may touch up around the eyes and teeth with some Humbrol black satin and a brush, but that would be more for my sense of perfectionism than anything else. Next I need to reassemble the helmet, paint the tube stripes, reinstall the mesh and lenses, and reinstall the mic tips. I think I'm going to buy one of those helmet padding kits from Amazon to get the fit correct. I'll deal with fans and electronics further down the road. It's possible the helmet could be (more-or-less) finished by this weekend! (I've a feeling "more-or-less finished" is going to be a general descriptor for this kit even when it's "done"!) So, no questions today; just sharing my progress. Thanks all for the comments and likes. I appreciate this community! It's helpful to have the encouragement and support. 6 Quote Link to comment Share on other sites More sharing options...
Ironmonk[TK] Posted July 2, 2018 Author Report Share Posted July 2, 2018 Slow but steady progress. Finished the paint on my helmet today: Obviously I need to go back and clean up the edges with thinner on the tube stripes, but I'm pleased with how it turned out. Trooperbay's stencils are quite good. I had a little trouble curving it to fit the shape of the helmet, but after cutting it in a few places along the bottom edge I got it to stick down more-or-less flat. You can see I also added a bit of gray for the 5th tooth on each side. I don't know if that was necessary but I noticed a number of AP ANH Stunt builders applying for Centurion with that part painted. I figure it can't hurt. I need to touch that up with some thinner also but it's not bad. I touched up the traps and tears since my last post too. Fiddly work, but having been a miniature painter for decades it wasn't very difficult. I also got the ab plates painted: I just free handed them. Hopefully they are good enough. Held at arms length they look fine to me. I don't think anyone is going to look at them as close as the above pic allows. : ) Oh, yeah! Lest I forget, you may notice I also did a little dry-brush with some white on the hovi mic tips. You can see it on the first pic if you zoom in. So, again, no questions really. Just checking in with my progress. Comments are welcome and encouraged. If you see any errors please don't hesitate to say so. I'm aiming for Centurion status so any helpful suggestions are most welcome. 5 Quote Link to comment Share on other sites More sharing options...
ukswrath[Staff] Posted July 2, 2018 Report Share Posted July 2, 2018 Looking nice Darrell, great job on the free hand paint work Note: remove ALL the return edge on the vertical ab button plate. Edit: 4 button plate to be exact 1 Quote Link to comment Share on other sites More sharing options...

Recommended Posts
Join the conversation
You can post now and register later. If you have an account, sign in now to post with your account.