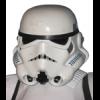
keith Posted April 24, 2010 Report Share Posted April 24, 2010 This is another hero helmet replica i've been working on every now and then over the last year. Its my second TM hero which is inted to look as close as possible to how the original would have looked back in 1976. So the mic tip weathering, vocoder weathering and the grey paint on the ears do not match how they look on the original now. I've done a bit of reshaping to match the little indents that are here and there on the original from mold damage, like around the frown, on the tears and traps. I've reworked the grey painted part of the ears to better match the orignal. I also used my own brow trim. There is still a LOT to do. Only the cap has had a tiny bit of weathering started, still much more weathering to add and the face has not been weathered at all yet, as i need to paint the tube stripes first. I spray painted the whole helmet, as i wanted to match the shade of white to the original as much as possible. Its impossible to tell its ever been painted, even with a very close inspection, as i used my wet sand and T-cut painting method. I masked off the inside on this one, so its bare white ABS inside. Painting the inside has been the only thing that gives away the fact that my older helmets have been painted. I've not matched the angles of my photos to the photos of the original very well. I will replace all these photos with better ones when i have finished the helmet. The following photos are in pairs, my replica and the original below it. Thanks for looking, Keith. Quote Link to comment Share on other sites More sharing options...
keith Posted April 24, 2010 Author Report Share Posted April 24, 2010 (edited) Some more... Its hard to tell if i have this label in the exact correct position, but it can always be moved. The following are just some random photos... I like my new brow trim! Keith. Edited April 25, 2010 by keith Quote Link to comment Share on other sites More sharing options...
SoloDallas Posted April 24, 2010 Report Share Posted April 24, 2010 Looks pretty, darn good!!! Quote Link to comment Share on other sites More sharing options...
firebladejedi[TK] Posted April 24, 2010 Report Share Posted April 24, 2010 Nice replica, I would say the ears need to be trimmed more and the angle of the faceplate could be steeper Quote Link to comment Share on other sites More sharing options...
keith Posted April 24, 2010 Author Report Share Posted April 24, 2010 (edited) Thanks! The ears are attached to match how they were back in 1976. The left on is a bit loose now on the original. I'll take a closer look though before final assembly. Cheers, Keith. Edited April 24, 2010 by keith Quote Link to comment Share on other sites More sharing options...
R2Dan[TK] Posted April 25, 2010 Report Share Posted April 25, 2010 sweet job! I'll be looking forward to the final finished pics Quote Link to comment Share on other sites More sharing options...
TK bondservnt[501st] Posted April 25, 2010 Report Share Posted April 25, 2010 now I know why I purchase mic tips from this man! Quote Link to comment Share on other sites More sharing options...
Turrican Posted April 25, 2010 Report Share Posted April 25, 2010 Great pics of the Promohelmet! Quote Link to comment Share on other sites More sharing options...
Verne Posted April 25, 2010 Report Share Posted April 25, 2010 Funny to see that you reproduced the orange peel effect (little holes) on the back and back!! Very accurate! Well done! I'm in hurry to see it finished! Quote Link to comment Share on other sites More sharing options...
ThayNerd[TK] Posted April 25, 2010 Report Share Posted April 25, 2010 That looks fantastic! Quote Link to comment Share on other sites More sharing options...
ObiHahn[TK] Posted April 26, 2010 Report Share Posted April 26, 2010 (edited) Very nice hero helmet replica. What's with the inside sticker on the original, was that on it during filming or was it added later? Edited April 26, 2010 by ObiHahn Quote Link to comment Share on other sites More sharing options...
troopermaster Posted April 26, 2010 Report Share Posted April 26, 2010 Great work Keith I'm looking forward to seeing this finished. Quote Link to comment Share on other sites More sharing options...
stukatrooper Posted April 26, 2010 Report Share Posted April 26, 2010 fantastic detailed pictures of the real deal,those alone would make a great thread,bonus content on your replica.Looking foward to the next stage. Quote Link to comment Share on other sites More sharing options...
AJCG Posted April 26, 2010 Report Share Posted April 26, 2010 Great replica and great job Keith ! Looking forward to see this helmet completed. Great atention to details, probably one of the best ANH heros out there! Cheers A Quote Link to comment Share on other sites More sharing options...
JoeR Posted April 27, 2010 Report Share Posted April 27, 2010 Amazing work Keith! The attention to detail is most impressive. This is why Keith will be assembling each JoeR ROTJ helmet by hand. Joe Quote Link to comment Share on other sites More sharing options...
Rolf[501st] Posted April 28, 2010 Report Share Posted April 28, 2010 WOW!!! A+ skills all over Keith, i love it. There are some creative hands on you, looks spot on. Congrats from here, whit your movie accurate helmet in your collection. Cheers mate Quote Link to comment Share on other sites More sharing options...
keith Posted September 10, 2010 Author Report Share Posted September 10, 2010 I should be getting back working on this helmet soon. Keith. Quote Link to comment Share on other sites More sharing options...
firebladejedi[TK] Posted September 10, 2010 Report Share Posted September 10, 2010 Cool I look forward to seeing the completed replica Quote Link to comment Share on other sites More sharing options...
kwdesigns[TK] Posted September 11, 2010 Report Share Posted September 11, 2010 The angles of each section getting trimmed out is right on. Very noticeable in the eye cut outs. Question... to get the small pin hole texture did you reverse the plastic? Or was it just over heating the plastic a bit? If you don't want to share your handy tricks no worries. but it is a nice added touch. Great job! Quote Link to comment Share on other sites More sharing options...
RogueTrooper[TK] Posted September 11, 2010 Report Share Posted September 11, 2010 Top notch job Keith Quote Link to comment Share on other sites More sharing options...
mods1965 Posted September 11, 2010 Report Share Posted September 11, 2010 Looks great! Quote Link to comment Share on other sites More sharing options...
keith Posted September 11, 2010 Author Report Share Posted September 11, 2010 Thanks! Kevin, i used a rotary tool for the dimples. Keith. Quote Link to comment Share on other sites More sharing options...
Stormy320 Posted September 18, 2010 Report Share Posted September 18, 2010 Thanks! Kevin, i used a rotary tool for the dimples. Keith. What was the process? Quote Link to comment Share on other sites More sharing options...
john danter Posted September 18, 2010 Report Share Posted September 18, 2010 Ah ok cool I'm glad you put them on there lol as holes in plastic like that normally comes when the plastic hss been cold and then heated up. The heat doesn't spread evenly as the plastic contains water can cause those dimples naturally (if you're referring to the surface imperfections I mean?) This is a different 'effect' to orange peel which is when its got too hot Manufactures (or me lol) can create that effect at will if you ask Stunning lid. Very very nice work dude. Love the way your frown paint is matching up nicely Break in late at night and swap them over Quote Link to comment Share on other sites More sharing options...

Recommended Posts
Join the conversation
You can post now and register later. If you have an account, sign in now to post with your account.