Search the Community
Showing results for 'quest designs'.
-
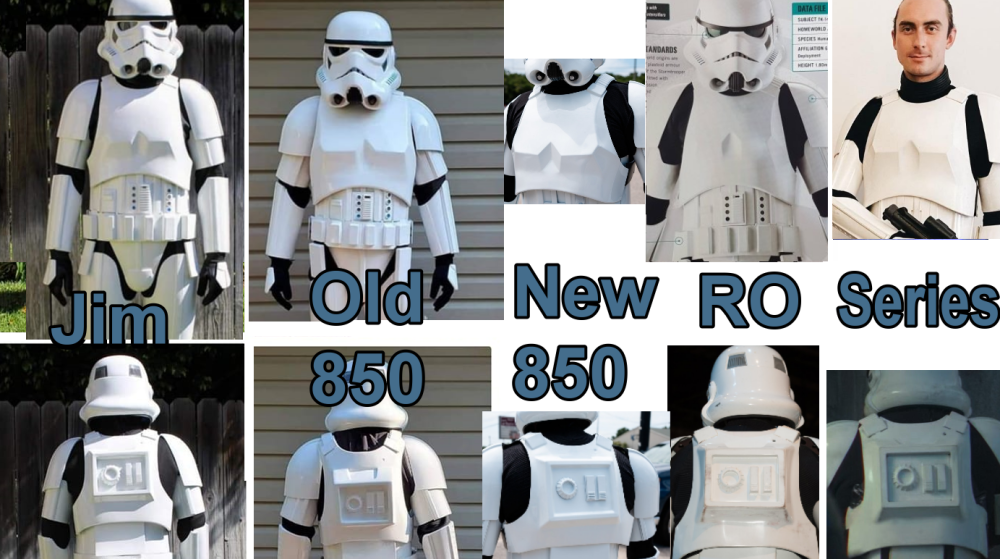
Rogue One TK Sources (updated 8-10-2020) Since I keep seeing these questions popping up from time to time, I figured I would make this simple for everyone. I do not have experience with some of these sources so if any of you do please chime in. Further, I am not pushing or supporting any of these sources, I am just providing you all the list and what they provide, and you choose who and what you want to go with. Lastly, If I do have experience with a specific source, I will note that and my overall experience with them. I am not pushing any sources, rather supplying you a list to work from if you are having a hard time finding stuff. Please feel free to add to this or provide "creative" comments. ROTK Sources Jimmiroquai Armor, Helmet, Under Suit jimmiroquai@yahoo.com Jim was the first source for ROTK armor and is considered very accurate. The armor is flexible fiberglass and requires painting. I have a full set or armor, helmet, and under suit from Jim and I like everything. 850 Armor Works Armor, Helmet, Under Suit https://850armorworks.com/ 850 AW is offering vacuum formed ROTK armor. They produce this armor in ABS and it looks accurate from the pictures I have seen. They also offer a resin helmet and undersuit now. Helmet Nico Henderson Helmet 3D print files https://www.facebook.com/nico.heath Etsy Nicolai DesertFareCosplay https://www.etsy.com/au/listing/784808040/rogue-one-stormtroopersolo-mimban Nico designs extremely accurate helmets, his Shoretrooper helmet is considered the most accurate available and now he has designed a ROTK helmet that is extremely accurate and all the greebles are separate so you can print and paint them before attaching them. You will need to message him on FB. I have his ROTK helmet files and find them to be outstanding. Suggested print orientations https://www.whitearmor.net/forum/topic/53519-recommended-printing-positions-for-nicos-tk-helmet/ Updated files TKModder421 https://www.whitearmor.net/forum/topic/53406-modifying-the-nico-helmet/ OxProps https://www.thingiverse.com/thing:4227844 Lenses Green Rogue One TK lenses to fit the Nico Henderson helmet Mr Paul's Shoretrooper Build https://www.facebook.com/totalgrunt Armor akira-yuming Armor 3D print files https://www.cgtrader.com/3d-print-models/art/other/star-wars-rogue-one-tk-first-imperial-stormtrooper-armor ( Build thread Jason @BigJasoni build thread https://www.whitearmor.net/forum/topic/49826-the-bigjasonis-rotk-3d-print-build-thread/ Updated 3D files Jason @BigJasoni updated kidney plate https://www.whitearmor.net/forum/topic/52974-rogue-one-new-generation-eib-centurion-kidney-plate/ Jason @BigJasoni updated belt boxes https://drive.google.com/drive/folders/19k-95YPTsiBJzHGIumsGLYQjQlx_S0p4 Jeff @11b30b4 updated ab greebles https://www.thingiverse.com/thing:3973969 Jeff @11b30b4 updated handplates https://www.thingiverse.com/thing:3910278 Hasbro Black Series Helmet Amazon and others Very nice helmet that will require significant alteration to be 501st approved. I have one and I am planning on altering it for use with my 850 AW armor. Build threads updating Jeff @11b30b4 updating Black Series helmet https://www.whitearmor.net/forum/topic/48054-11b30b4-tutorial-rotk-black-series-helmet-mod/ Colin @OddViking327 updating Black Series helmet https://www.whitearmor.net/forum/topic/52589-modifying-a-black-series-helmet-for-accuracy/ Updating Colin @OddViking327 vent/traps updated 3D files https://www.thingiverse.com/thing:5455582 Please Note HeadShotProps is temporarily suspended as a recommended vendor, until they are back to normal and gain positive feedback from our members. HeadShotProps Armor, Helmet https://www.etsy.com/listing/830810037/rogue-one-stormtrooper-armor-kit?ref=shop_home_feat_4 The armor is vacuum formed and looks very similar to 850AW, although the TD looks better in the pics than the 850AW TD. The helmet looks to be a nice pull, this helmet is roto cast with greebles Soft Goods Other than the previously noted sources many of the soft goods are available from these sources: Dark Side Closet Under Suit https://www.facebook.com/TheDarkSideCloset/ I have messaged them for pricing and shipping, and they are very responsive. Geeky Pink’s Gaskets Under Suit https://www.facebook.com/GeekyPinksPhantasticGaskets/ You will need to message here and provide specifications. Keep Trooping RO Boots, Gloves, Strapping https://keeptrooping.com/ I have a set of boots and gloves from IB. I love the boots, the gloves are not the highest quality. Endor Finders RO Gloves https://www.endorfinders.com/ I have a set of gloves from EF and I love them. Katarra8 RO Pauldrons https://www.etsy.com/listing/150178963/classic-star-wars-stormtrooper-shoulder?ref=shop_home_feat_3&frs=1 I have a RO Orange Pauldron from Katarra8 and I love it. Veeds Pauldrons RO Pauldrons https://www.facebook.com/pages/category/Product-Service/Veeds-Pauldrons-305552456469495/ I do not have any of Veeds’ Pauldrons but he is highly reviewed and respected. Sheev's Emporium RO Undersuit and Gaskets https://www.facebook.com/sheevsemporium I do not have any of Sheev's goods but I do know they have been very active in the Shoretrooper community and the quality seems to nearly screen accurate. Crow Props RO Boots https://crowprops.bigcartel.com/product/fo-r1-tk E-11s Bryan @trooper96 3D print files https://www.printables.com/model/155855-st-sterling-l2a1-aeg-and-rogue-one-e-11-conversion Sterling conversion https://www.printables.com/model/168104-rogue-one-e-11-conversion-kit-for-sterling-smg-mk4 Hyperfirm Weaponry (HFx Productions) GOING OUT OF BUSINESS, NOT TAKING ANY NEW ORDERS RO E-11 https://www.facebook.com/HFx-Productions-1669859386576227/ I have a B-Grade RO E-11 from Hyperfirm and love it. Praetorian Blasters RO E-11 https://www.facebook.com/BlasterMaker/ I do not own a PB RO E-11 but it looks awesome. S&T Full Metal Airsoft Sterling E-11 RO E-11 https://www.evike.com/products/61969/ While most of the E-11s used in RO were made using the S&T Full Metal airsoft Sterling, this E-11 is not very accurate for RO. The scope, counter, and power cylinders are all wrong and there is not a light rail or tactical light. DoopyDoo’s RO E-11 parts https://www.doopydoos.com/star-wars-props-31-c.asp It has been noted that some of the E-11s used in RO were equipped with a DoopyDoo cast of the M.H.R. Co. M38 Telescope from Sherman M4 Tank (1943 version with wide front foot). War Machine RO E-11 parts http://www.warmachinepaintball.com/online-store-replicas/ If you are looking to make a full “all metal” RO E-11, look no further. War Machine makes everything you would ever need. Bulldog Props RO E-11 parts https://www.facebook.com/BulldogPropsJapan/ Brian makes resin casts of the M.H.R. Co. M38 Telescope from Sherman M4 Tank (1943 version with wide front foot) that are completely accurate and disassemble-able. I own one and love it. I have done a full review of it on FISD. Shear Tech RO E-11, Rubber RO Handguards https://www.facebook.com/sheartech/ I am not real familiar with these guys but the E-11 looks nice and the rubber hand guards are nice as well. Picatinny Rail ROTK / FOTK E-11/F11D Picatinny Rail - (evike.com) - Link (purchase) E-11/F-11D Picatinny Rail - (justloseph63) - Link (purchase) E-11/F-11D Picatinny Rail - (m416gelblaster) - Link (purchase) F-11D Picatinny Rail - (themaninthesuitcase) - Link 3D files E-11 Picatinny Rail - (TK14082) -Link Part of Rogue One 3D files While there are a lot more sources out there this is a fairly good list for anyone to work from. I did not include sources like static burst communication kits or urethane rubber shoulder straps sources, but they are out there and if you are looking for that stuff you should be able to find them. I hope this helps those of you who are looking to embark on your ROTK journey. Rough comparison Chest / Back
-
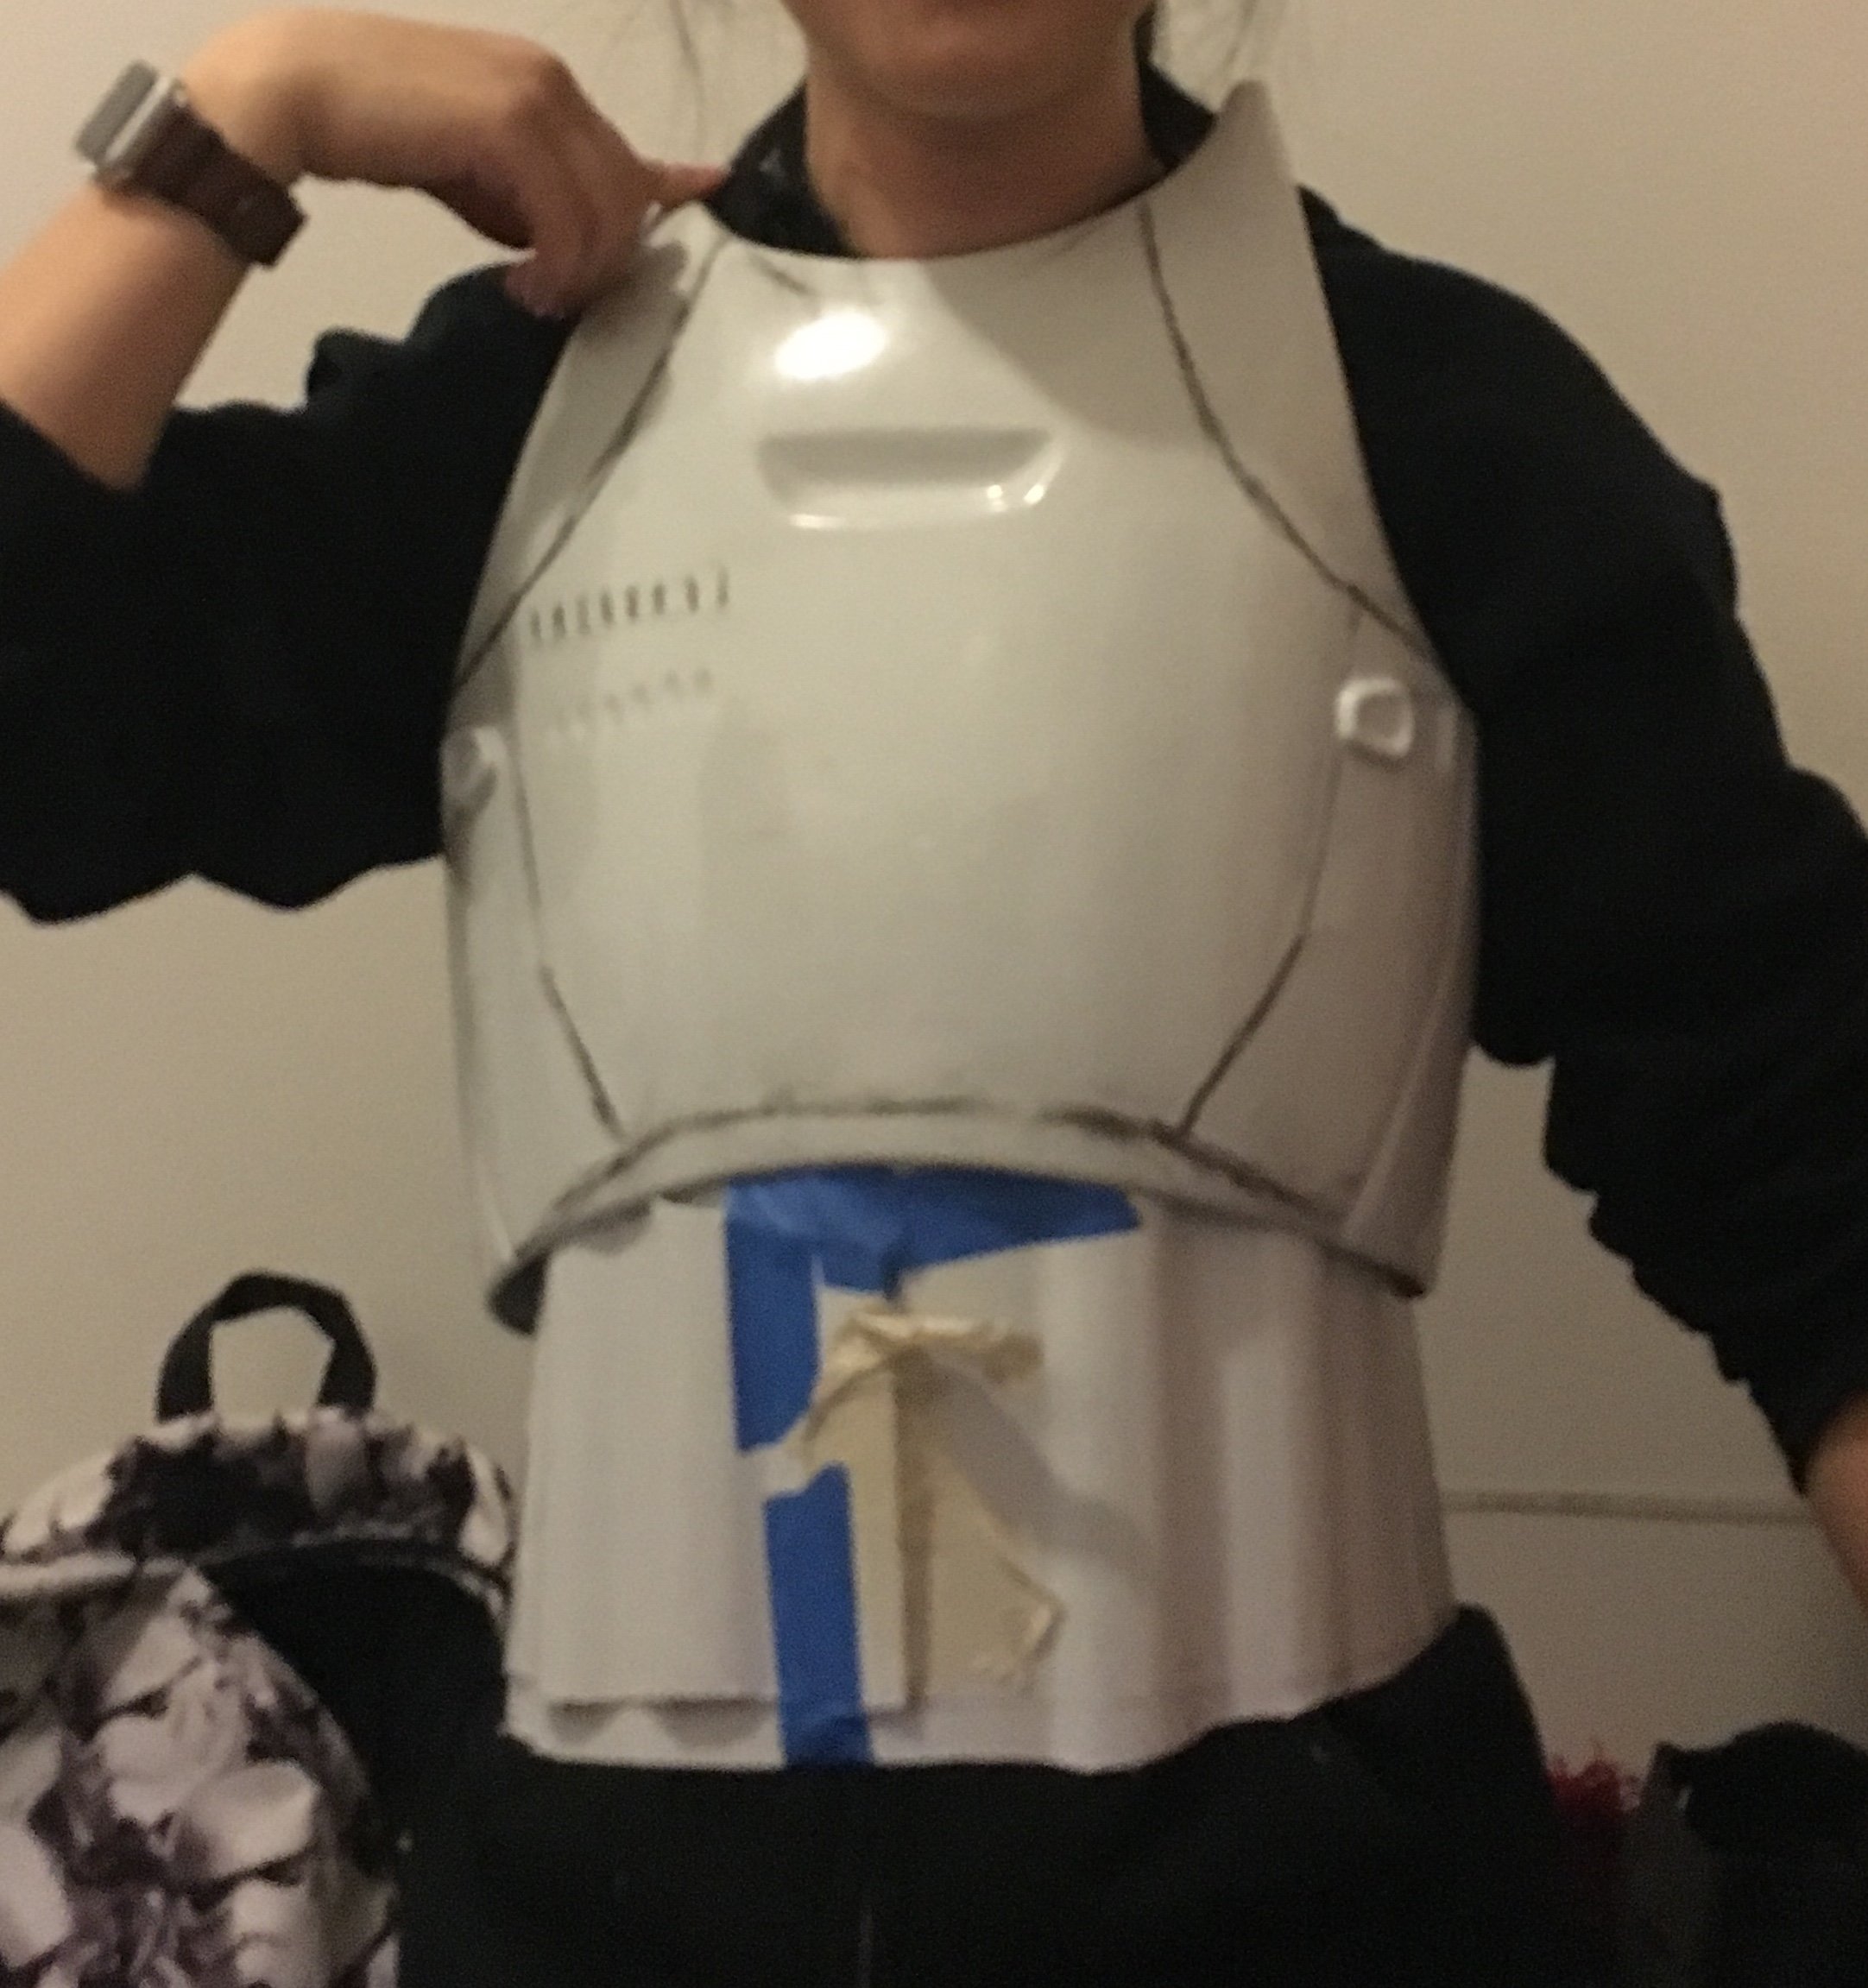
To be honest, I was one of those who were skeptical about the new TK design in Resistance. But it grew on me without knowing and when I saw the new backpack for FOTK, I immediately thought I should make one. I already had a FOTK kit that I got from someone but it wasn't in a great shape since the previous owner made a mistake on some parts, which was a reason why I got it for VERY cheap price. I am a very short and small so I had to make major modifications anyways. The problems were that I had to make modifications without touching important details, which is so much harder in FOTK than OTTK. But it seemed like making animation version armor would take about the same amount of work even though I would need to scratch build some of the parts. Making FOTK smaller: new 3D printed forearm, heat bending parts into shape, moving some detail parts to make them look proportionally placed, new 3D printed helmet to be proportional, etc... Making animation FOTk: same above, but without moving detail parts and instead, scratch building parts(probably 3D model them and print). I will try to model the new helmet and the forearm designs myself and see how it goes. I gathered some reference photos and this video shows the turnaround of Commander Pyle, whose armor is near identical to regular troops. And this image shows some good details of hard-to-see areas like inside of the forearm. Here are the photos of the current state. I will be cutting yoke down and make it to be streamlined with back and rebuild the ab piece from scratch.

-
 We now have a member who has completed his costume build, so now we begin the written construction of this new CRL. Nuts and bolts to be fleshed out as we develop the appropriate descriptive language. FIRST DRAFT Description: Imperial armored commando, The Mandalorian Prefix: TK Detachment: First Imperial Stormtrooper Detachment Context: Star Wars the Mandalorian Season 3 Episode 23 & 24 Under the leadership of Moff Gideon, a new class of elite soldier has been trained and equipped with advanced weaponry. Highly trained in the use of multiple lethal weapons and equipped with Beskar armor and Mandalorian weaponry, makes him a formidable adversary. Required Costume Components The following costume components are present and appear as described below. General Construction Notes All components should closely match the Imperial Armored Commando from the Mandalorian season 3 episodes 23 & 24. All Armor is constructed from a rigid material such as PLA, PETG, ABS, fiberglass, plastic, resin, Sintra, vacuum-formed ABS, firm rubber, metal, or similar, unless specified otherwise in section below Armor has the appearance of thickness and depth. Helmet Lens is smoky gray or black in color. The lens must be sufficiently dark enough to obscure the costumer's eyes Two black aerators are present on each mandible end, which are dark grey color Four recessed tube stripes are present on each side of the mandibles A diamond shape black greeblie is present in the recessed mouth section between aerators The nose section is black and separates the cheek plates. The nose section has a series of stripes and a single one that links the recess presents on each cheek The upper cheek is white and has a recess line running across the nose The lower cheek is recessed and has two sections that forms a V-shape. The upper portion is black, and the lower portion is dark grey. The brow is black, protrudes from the dome and extend to the ear caps The top of the helmet is dome shaped and white color A medium grey rectangular section runs along on each side of the dome and separate the front and the rear sections. A medium grey ear cap protrudes from the main rectangular section and contain a gloss white clip greeblie. The rear section is medium grey, starts below the dome shape and has a protruding band that joins the two middle rectangular sections. There is a trapezoidal shape that protrudes and ends at the lower corner end of the middle rectangular section. A white strap is attached to the rear section of the helmet. It has teeth and a flat section Temple section on each side is black and protrudes from the dome There is a white collar around the bottom of the helmet that hides the wearer’s head OPTIONAL Level two certification (if applicable): Protruding ear section is visibly a separate piece Clip greeblies and strap are visibly separate pieces Aerators and diamond greeblie are visibly separate pieces The collar has vent oblong holes on the rear section OPTIONAL Level three certification (if applicable): Neck Seal Flight Suit Flight suit is a medium gray, may have a tint of brown and is made of cotton/cotton-blend, plain-weave material. Alternatively, it can be made of a stretch fabric for the lower pants Topstitching is same color as material One or two-piece in construction, but joining of top and bottom must not be visible when all costume components are attached. Flight suit top shows no closure method when worn. A panel must cover the front zipper if present. Flight suit top as a mandarin style collar Flight Suit has double sleeves: long sleeves with short sleeves layered on top Short sleeves have horizontal quilted ribs Long sleeves have horizontal quilted ribs visible between the short sleeves and the gauntlets. Flight Suit does not have any visible pockets, zippers or logos when all costume components are attached. OPTIONAL Level two certification (if applicable): Flight suit is one piece construction OPTIONAL Level three certification (if applicable): Upper Arm piece Left The upper arm piece left is white and fixed to the suit without any visible means of attachment The upper arm piece left is rectangular and has the following features from top to bottom A large recessed rectangular shape with dark red color A raised white square at the lower right of the inside of the red colored rectangle A raised medium grey box matching the same color as the rest of the armor medium grey A recessed line OPTIONAL Level two certification (if applicable): The box has a rectangular recess at the back OPTIONAL Level three certification (if applicable): Upper Arm piece Right The upper arm piece right is white and fixed to the suit without any visible means of attachment The upper arm piece right is rectangular and has the following features from top to bottom A large recessed rectangular shape with dark red color A raised white square at the upper left of the inside of the red colored rectangle A raised medium grey box matching the same color as the rest of the armor medium grey A recessed line OPTIONAL Level two certification (if applicable): The box has a rectangular recess at the back running horizontally OPTIONAL Level three certification (if applicable): Forearm Gauntlet Left Gauntlet is white in color. various boxes on all sides are medium grey in color that matches the medium grey color of the armor Gauntlet is a clamshell-style without any visible closure methods and has seam line present on each side. The gauntlet can be divided into 4 sections: top, inner, bottom and outer sides. The top side of the gauntlet has the following features: - A white raised box with angled extremities with the following features as per references. - A trapezoidal shape with black color - A small black square shape near the wrist side - A square red shape toward the elbow extremity of the top box -Two cylinders silver color with rounded extremities - A rectangular grey box near the wristThe outer side of the gauntlet has the following feature: - A raised angled white box on which there are two medium grey shapes The inner/bottom sides are comprising: - A semi-circular shape on which multiple recessed trapezoidal shapes are present - A red square shape OPTIONAL Level two certification (if applicable): The two red colored square shapes are red illuminated The grey boxes are visibly separate parts OPTIONAL Level three certification (if applicable): Forearm Gauntlet Right Gauntlet is white in color. various boxes on all sides are medium grey in color that matches the medium grey color of the armor Gauntlet is a clamshell-style without any visible closure methods and has seam line present on each side. The gauntlet can be divided into 4 sections: top, inner, bottom and outer sides. The top of the gauntlet features three steps with the tallest at the beginning of the wearer’s elbow with the following features: - There is a red rectangle on the inner side the tallest step - A rounded Dart launcher sits in a rounded base atop of the tallest step. It is black and silver in color with a two-step cone with pointed tips. The main cone has holes representing the chambers for individual darts. - On the the edge of the second step, is a silver whipcord launcher greeblie - On the last step is a recessed display near the wearer’s wrist on which all buttons are medium grey color that matches the medium grey color of the armor. The outer side of the gauntlet has the following feature: - There is a large box on which 4 grey smaller boxes are attached - At the tip of this box, two circular ports of flame throwers are present and are silver color The inner and bottom sides are comprising: - a semi-circular shape on which multiple recessed trapezoidal shapes are present - A red square shape OPTIONAL Level two certification (if applicable): The two red colored shapes are red illuminated The outer side large white box and its grey box are visibly separate parts The whipcord launcher greeblie has a middle cylinder shape and dents on the top OPTIONAL Level three certification (if applicable): Hand Plates Hand plates are white and have three facets. Both left and right are symmetrical. A thick border is present all around the plate with a recessed rectangle in the middle section hand Plates are attached to the glove back. OPTIONAL Level two certification (if applicable): OPTIONAL Level three certification (if applicable): Gloves Gloves are made of plain soft black leather or similar material and worn tucked into the gauntlets. Logos, designs and any other non-canon details are not visible when worn. No visible stitches are present on the top of the gloves. OPTIONAL Level two certification (if applicable): Gloves are made of leather OPTIONAL Level three certification (if applicable): Chest Armor The chest armor is white and comprises of 4 distinct sections: - The lower section - The upper section - The left and right winglets The lower section extends down to overlap the abdomen armor and is attached to the upper section. It also extends to the rear under the arm pit, joining to the back section with a minimal vertical seam on each side There is a recessed medium grey section in the center of the lower section matching the medium grey color of the rest of the armor. A white raised rectangular shape with bevels is present in the middle of the grey recess A dark red oblong shape is present on the left side of the lower section A raised rectangular shape containing the ranking of the commando is present on the left side of the lower section and has the following characteristics: A raised white contour A medium grey ranking rectangle that matches the medium grey color of the armor, inside the white raised contour On the grey ranking rectangle, is present from top to bottom: A white rectangle 4 squares evenly spaced horizontally on a single row with these colors from left to right: black, dark red, light grey, dark grey 2 rectangles each having two circular shapes on them. The left rectangle has 2 large white circular shapes, the right rectangle has two smaller black circular shapes Under the ranking box is a red rectangle The upper section is a single piece with no visible seam and extend from the lower section to the back section There is V-shape in the front center of the upper section, on which is attached a raised v-shape white box On each side of the upper section are attached two raised shapes that gives the appearance of jetpack straps Over the wearer’s right jetpack strap is a rounded shape box. There is a medium grey grid at the front of the box that closely match the color of the rest of the medium grey of the armor. The left and right winglets are white and symmetrical. They are attached on each side of the upper section OPTIONAL Level two certification (if applicable): The 4 sections (lower section, upper section and 2 winglets) and shoulder box are visibly separate parts The ranking box components have thickness and are visibly separate parts The red light is functional under the ranking box The raised box over the right shoulder is visibly a separate part and has two semicircular recessed line on the outer side and a recessed on the inner side. The raised box grid has exactly 5 vertical rectangular grey shapes and is visibly a separate part OPTIONAL Level three certification (if applicable): Back Armor The back is white and attaches to the upper portion of the chest armor with minimal joint. It also attaches to the lower section of the chest armor under the arm pit forming a minimal vertical joint The back armor also attaches the jetpack to the armor with a removable mechanism The backplate extends down approximately to the height of the jetpack reactors tips. OPTIONAL Level two certification (if applicable): The jetpack has 3 attachment points that are visibly separate parts and are metallic finish. The two upper attachment points are circular T-shaped and anchored to the backplate with a circular plate The lower attachment point to the jetpack is cylindrical with a taper at the tip and is anchored to the backplate with a rectangular plate OPTIONAL Level three certification (if applicable): Jet Pack All grey parts on the jetpack should be medium grey color matching the medium grey of the rest of the armor. The jetpack has anchoring points to attach to the back armor and is removable The jetpack has a recess to wrap around the back armor and hide the anchoring points when viewed from the side The Jet pack consists of a main body and two side reactors all white color. The main body is thicker than the side reactors The main body comprises the following features from top to bottom: - A black intake with grills matching the outer shape of the main body. Inside the grill is a visible red shape - A rectangular grey shape with chamfered top and bottom edges centered on the main body and extending up to the start of the grills. - A cavity in which a grey and white plate is placed. Both the and white portions of the plates have two rectangular shapes present. - A white exhaust vent grill at the bottom The side reactors are symmetrical and have the following features from top to bottom: - An angled top - A large box with tapered top and 4 recessed cavities - 5 vertical cylinders attached atop of the large box - A small rectangular grey shape directly underneath the large box with two recesses, creating 3 sections - 2 small trapezoidal grey stabilizing fins located on the outside of each reactor - black directional thrusters, recessed into the bottom of the side reactors OPTIONAL Level two certification (if applicable): All grey and black components are visibly separate parts The top grill has a functional red lighting The bottom grill is visibly a separate part OPTIONAL Level three certification (if applicable): Abdomen Armor The abdomen armor is grey and span from the belt to the inside of the chest armor, hiding the wearers suit There is a seam on the right side of the wearer that closes the two parts without a visible gap. A seam can also be present on the left side but without any visible gap. There is the appearance of 4 straps seamlessly attached to the armor There is one raised shape at the back of the abdomen armor in between the 2 rear straps There are multiple raised boxes and shapes present on the front side of the armor OPTIONAL Level two certification (if applicable): The abdomen armor is made of flexible material Only one seam is present on the right side of the wearer’s side The 4 straps are all identical in width and geometry There is the appearance of a clip on the straps approximately at the middle of the abdomen armor OPTIONAL Level three certification (if applicable): Cod Plate The cod plate is white and is made of a triangular shape that curves inward in the lower extremity The main triangular section is completed by two small vertical sections curving inward on each side The cod plate has not visible attachment method and disappear under the belt and abdominal armor. There is no attachment of the lower portion of the cod to the suit OPTIONAL Level two certification (if applicable): There is a visible trapezoidal raised section on the top of main triangular section Belt Belt proper is made of white coton like material and has the appearance of being made with thick material stitched with 5 horizontal lines creating 4 wider section in the middle and two narrow ones at bottom and top The belt is attached to the abdomen armor with no visible mean of attachment, concealing the edge of the lower abdomen armor. The buckle of the belt is visibly two separate parts white in color. The male portion of the buckle has a visible link to the female buckle that is trapezoidal with metal color There are boxes on each side of the buckle attached to the belt strap. All boxes are white and are attached as per reference images. There are 7 identical rectangular boxes with a recess on the front vertical edges and a small chamfer on the top. 4 of these are attached to the wearer’s right and 3 on wearer’s left starting from the buckle. All are evenly spaced. There is a larger pouch on wearer’s left following the first 3 boxes. The pouch has the appearance of an overlapping rounded cover. The top cover has two horizontal chamfer on each side and the lower edges are chamfered vertically. There are two cylindrical boxes aligned with the abdominal rear straps on each side of the wearer’s back. The cylindrical boxes have an angled top and a fin protruding on the lower portion. OPTIONAL Level two certification (if applicable): The push release button of the female buckle is visibly a separate component There is a rectangular recessed line on the metal portion of the male buckle The metal portion of the male buckle is followed by a black section entering the female buckle Holster The holster is white and made from synthetic. A rigid frame may be used under this to give it the proper shape around the pistol but must not be visible. Features two retention straps with a snap button closure to secure the blaster pistol. The front loop attaches approximately under first box on the left side of the wearers. The back loop attaches approximately under the 4th boxes of the wearer’s left. The two loops joint together to form a singe v-shape above the holster. OPTIONAL Level two certification (if applicable): Thigh Armor Plates The thigh plates are white with a dark red insert and wrap around the wearer’s thigh with no visible mean of attachment. The left and right thigh plates are symmetrical. They have a top rectangular section that is aligned with wearer’s side. The thigh plates are curved to fit the leg shape and have rounded corners There is recessed shape that creates a contour along the periphery and leaves a rectangular shape in the center The red insert is trapezoidal OPTIONAL Level two certification (if applicable): The main section is asymmetric and is larger at the rear of the wearer’s thigh than at the front. The front top section is rectangular and the rear top section is at a downward angle OPTIONAL Level three certification (if applicable): Knee plates The knee plates are white and fitted over the wearer’s knee with no visible mean of attachment. The left and right knee plates are symmetrical and comprise 4 sections (top, inner, outer, lower) There is a recessed trapezoidal shape in the lower section There is a trapezoidal winglet attached on the outer section Greaves The greaves are white and have the spat seamlessly attached to it. The left and right greaves are symmetrical. There is a flat face at the front and at the rear running from the spat all the way up to the top of the greaves If seams are present, they must be minimal and be located on the edge of front and rear flat portions A raised lip is present around the top of the greave A rectangular box is seamlessly attached to the outer top side of the greave. The top and bottom of the box are angled A smaller box, aligned vertically with the top box is attached to the spat A rectangular box is attached at the rear of the spat and finishes at an angle on the greave OPTIONAL Level two certification (if applicable): The greave is a single piece construction with a seam only present at the rear which overlaps to the outside. The rear spat box has a recess edge on the outside creating a smaller shape. The spat overlaps the boot with minimal gap. OPTIONAL Level three certification (if applicable): Boots FO style boot Sole is black rubber with no visible heel There are no visible buckles or laces The instep has stiches that run across and creates multiple sections OPTIONAL Level two certification (if applicable): There are 3 stitches lines that run across the instep. The instep is made of thick material with the stiched lines creating raised sections. There is a vertical zipper on the inside that spans the height of the boot. OPTIONAL Level three certification (if applicable): OFFICER COMPONENTS Optional Accessories Blaster Pistol Pistol blaster may be scratch-built, or a modified commercial toy Imperial Armored commando pistol blaster Details to be painted black and metallic per reference photos. Rifle blaster Rifle may be scratch-built, or a modified commercial toy Imperial Armored commando rifle blaster Details to be painted black and metallic per reference photos.
 -
There are two camps on undersuit discussion. Some swear by a one-piece with both too and bottom, and if you go that route, try to find one with a dual zipper to make bathroom breaks more manageable. Others buy separate compression shirts and pants, which can provide a little added flexibility in sizing and dressing. I actually have both types, but have used the two piece setup more often. Regardless of which style you go with, be sure you get all black designs and that there are no visible logos that will show when donning armor. My shirt: https://a.co/d/g0iN2va My pants: https://a.co/d/6Z1OWH9 Sent from my iPhone using Tapatalk
-
Has anybody tried these in a TK helmet yet? not to expensive. mounting them I guess would be the real issue.
-
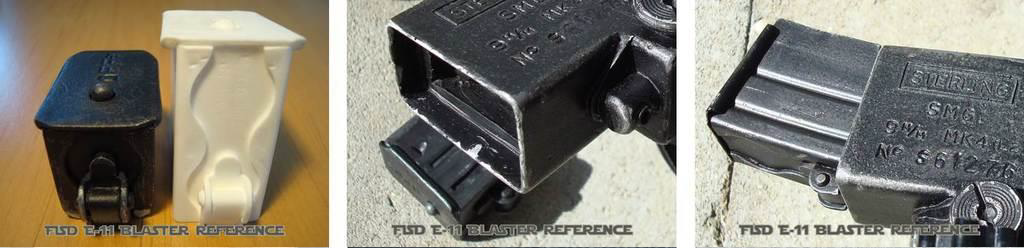
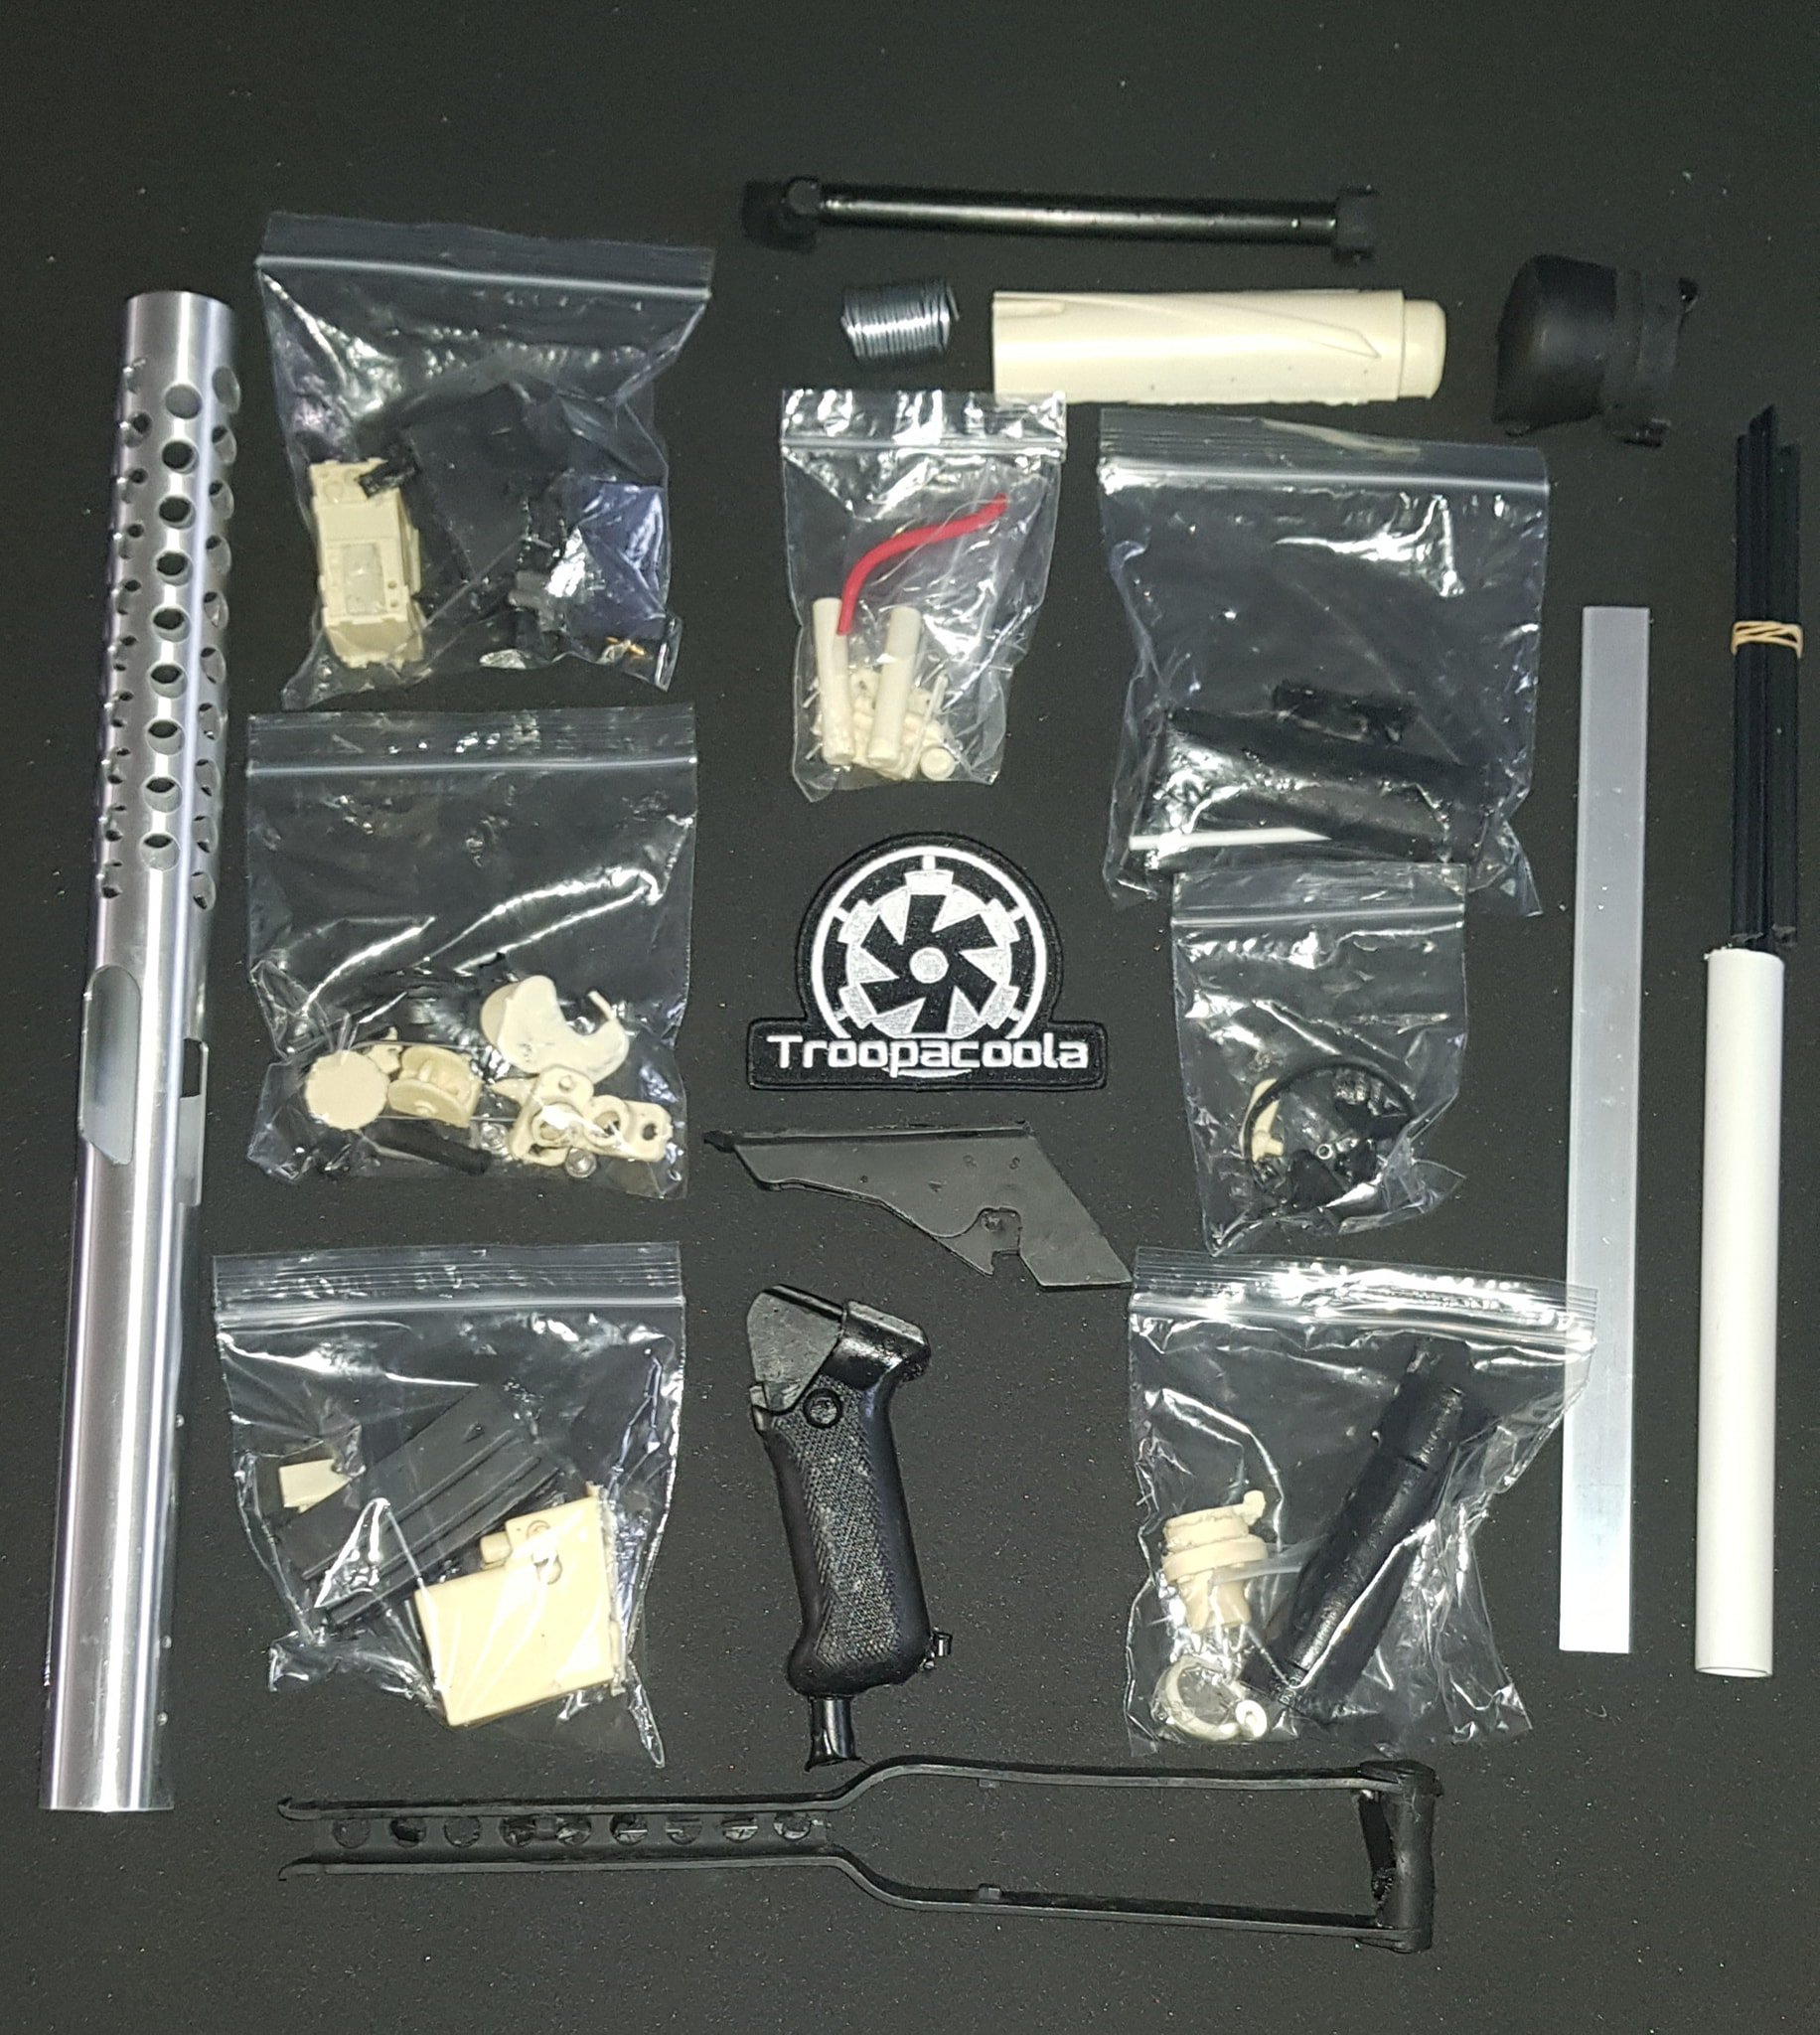
Santa hid a beautiful hunk of resin under the tree this year for me. I thought I'd do a build thread for this thing... whatever I end up doing to it. This is the blaster in it's stock gorgeous state from Quest Design Canada. It's just lovely. And that loveliness is the reason I'm a bit hesitant to hack it up. I mean, I will, but it's just so pretty out of the box. I asked for mine to be shipped as unbuilt as possible and Quest wasn't too happy about that request, but agreed to have the counter and rear cap not installed. Don't get me wrong, Quest Design was very nice to deal with, but they really didn't want to ship anything but a completed blaster. And complete it is. I'll detail how many of the parts on this are NOT resin using my patented Magnet Technique (tm). Metal grip screw 3 metal screws on the front scope (I don't believe the tiniest front screws are metal). And, of course, the included aluminum scope rail. Metal trigger guard. The screws holding it in place are also metal. The tiny screw behind the power cyls is metal. And there's a screw holding the aluminum rail in place. Did I mention the aluminum rail and the nice mount for the counter? So awesome. And here's all the goodies I have to upgrade this unsuspecting blaster with. To my knowledge, this is the last kit that @T-Jay had in stock. I received it late November and am still overjoyed to have it. SO. Many. Parts!!! Red lens monocular to hack up and install in the scope. Hollowed out Hengstler counter! A plethora of micro screws and nuts. Single LED for scale. The larger screws and goodies. And a set of greeblies from @justjoseph63 Now I just have to figure out what I want to change and what I'm happy with. The scope and counter are certainly getting some luv. The screws at the barrel front are also easy marks. Probably the grip lock screw as well. And I need to print that spring forming tool. If anyone has hacked up one of these, I'd love some suggestions.
-
 Hi, Here are proposal for other armor components, trying to list details that are referenced in the reference picture document available. Chest armor The chest armor is white and is comprised of 4 distinct sections: - The lower section - The upper section - The left and right winglets The lower section extends down to overlap the abdomen armor and is attached to the upper section. It also extends to the rear under the arm pit, joining to the back section with a minimal vertical seam on each side There is a recessed medium grey section in the center of the lower section matching the medium grey color of the rest of the armor. A white raised rectangular shape with bevels is present in the middle of the grey recess A dark red oblong shape is present on the left side of the lower section A raised rectangular shape containing the ranking of the commando is present on the left side of the lower section and has the following characteristics: - A raised white contour - A medium grey ranking rectangle that matches the medium grey color of the armor, inside the white raised contour - On the grey ranking rectangle, is present from top to bottom: - A white rectangle - 4 squares evenly spaced horizontally on a single row with these colors from left to right: black, dark red, light grey, dark grey - 2 rectangles each having two circular shapes on them. The left rectangle has 2 large white circular shapes, the right rectangle has two smaller black circular shapes under the ranking box is a red rectangle The upper section is a single piece with no visible seam and extend from the lower section to the back section There is V-shape in the front center of the upper section, on which is attached a raised v-shape white box On each side of the upper section are attached two raised shapes that gives the appearance of jetpack straps Over the wearer’s right jetpack strap is a rounded shape box. There is a medium grey grid at the front of the box that closely match the color of the rest of the medium grey of the armor. The left and right winglets are white and symmetrical. They are attached on each side of the upper section Level 2 The 4 sections (lower section, upper section and 2 winglets) and shoulder box are visibly separate parts The ranking box components have thickness and are visibly separate parts The red light is functional under the ranking box The raised box over the right shoulder is visibly a separate part and has two semi-circular recessed line on the outer side and a recessed on the inner side. The raised box grid has exactly 5 vertical rectangular grey shapes and is visibly a separate part Back armor The back is white and attaches to the upper portion of the chest armor with minimal joint. It also attaches to the lower section of the chest armor under the arm pit forming a minimal vertical joint The back armor also attaches the jetpack to the armor with a removable mechanism The back plate extends down approximately to the height of the jetpack reactors tips Level 2 The jetpack has 3 attachment points that are visibly separate parts and are metallic finish. The two upper attachment points are circular T-shaped and anchored to the back plate with a circular plate The lower attachment point to the jetpack is cylindrical with a taper at the tip and is anchored to the back plate with a rectangular plate Upper arm piece left The upper arm piece left is white and fixed to the suit without any visible means of attachment The upper arm piece left is rectangular and has the following features from top to bottom - A large recessed rectangular shape with dark red color - A raised white square at the lower right of the inside of the red colored rectangle - A raised medium grey box matching the same color as the rest of the armor medium grey - A recessed line Level 2 The box has a rectangular recess at the back Upper arm piece right The upper arm piece right is white and fixed to the suit without any visible means of attachment The upper arm piece right is rectangular and has the following features from top to bottom - A large recessed rectangular shape with dark red color - A raised white square at the upper left of the inside of the red colored rectangle - A raised medium grey box matching the same color as the rest of the armor medium grey - A recessed line Level 2 The box has a rectangular recess at the back running horizontally Gloves Gloves are made of plain soft black leather or similar material and worn tucked into the gauntlets. Logos, designs and any other non-canon details are not visible when worn. No visible stiches are present on the top of the gloves Level 2 Gloves are made of leather Glove armor Glove armor is white and has three facets. Left and right glove armor are symmetrical A thick border is present all around the glove armor with a recessed rectangle in the middle section The glove armor is attached to the glove back Abdomen armor The abdomen armor is grey and span from the belt to the inside of the chest armor, hiding the wearers suit There is a seam on the right side of the wearer that closes the two parts without a visible gap. A seam can also be present on the left side but without any visible gap. There is the appearance of 4 straps seamlessly attached to the armor There is one raised shape at the back of the abdomen armor in between the 2 rear straps There are multiple raised boxes and shapes present on the front side of the armor Level2 The abdomen armor is made of flexible material Only one seam is present on the right side of the wearer’s side The 4 straps are all identical in width and geometry There is the appearance of a clip on the straps approximately at the middle of the abdomen armor Belt Belt strap is made of white coton like material and has the appearance of being made with thick material stitched with 5 horizontal lines creating 4 wider section in the middle and two narrow ones at bottom and top The belt is attached to the abdomen armor with no visible mean of attachment and conceal the edge of the lower abdomen armor The buckle of the belt is visibly two separate parts white in color. The male portion of the buckle has a visible link to the female buckle that is trapezoidal with metal color There are boxes on each side of the buckle attached to the belt strap. All boxes are white and are attached as on reference pictures order There are 7 identical rectangular boxes with a visible recess on the front vertical edges and a small chamfer on the top 4 of the 7 boxes are attached to the wearer’s right and 3 on wearer’s left starting from the buckle and are evenly spaced There is a larger pouch on wearer’s left following the first 3 boxes. The pouch has the appearance of having an overlapping rounded cover. The top cover has two horizontal chamfer on each side and the lower edges are chamfered vertically. There are two cylindrical boxes aligned with the abdominal rear straps on each side of the wearer’s back. The cylindrical boxes have an angled top and a fin protruding on the lower portion Level 2 The push release button of the female buckle is visibly a separate component There is a rectangular recessed line on the metal portion of the male buckle The metal portion of the male buckle is followed by a black section entering the female buckle Cod plate The cod plate is white and is made of a triangular shape that curves inward in the lower extremity The main triangular section is completed by two small vertical sections curving inward on each side The cod plate has not visible attachment method and disappear under the belt and abdominal armor. There is no attachment of the lower portion of the cod to the suit Level 2 There is a visible trapezoidal raised section on the top of main triangular section Thigh plates The thigh plates are white with a dark red insert and wrap around the wearer’s thigh with no visible mean of attachmentThe left and right thigh plates are symmetrical. They have a top rectangular section that is aligned with wearer’s side. The thigh plates are curved to fit the leg shape and have rounded corners There is recessed shape that creates a contour along the periphery and leaves a rectangular shape in the center The red insert is trapezoidal Level 2 The main section is asymmetric and is larger at the rear of the wearer’s thigh than at the front. the front top section is rectangular and the rear top section is at a downward angle Knee plates The knee plates are white and fitted over the wearer’s knee with no visible mean of attachment The left and right knee plates are symmetrical and comprise 4 sections (top, inner, outer, lower) There is a recessed trapezoidal shape in the lower section There is a trapezoidal winglet attached on the outer section Greaves The greaves are white and have the spat seamlessly attached to it. The left and right greaves are symmetrical. There is a flat face at the front and at the rear the rear running from the spat all the way up to the top of the greaves If seams are present, they must be minimal and be located on the edge of front and rear flat portions A raised lip is present around the top of the greave A rectangular box is seamlessly attached to the outer top side of the greave. The top and bottom of the box are angled A smaller box, aligned vertically with the top box is attached to the spat A rectangular box is attached at the rear of the spat and finishes at an angle on the greave Level 2 The greave is a single piece construction with a seam only present at the rear and overlaps to the inside of the greave The rear spat box has a recess edge on the outside creating a smaller shape The spat overlaps the boot with minimal gap Boots FO style boot Sole is black rubber with no visible heel No visible buckles or laces The instep has stiches that run across and creates multiple sections Level 2 There are 3 stitches lines that run across the instep The instep is made of thick material and the stitches create obvious raised sections There is a vertical zipper on the inside that spans the height of the boot Hope this will be helpful!
 -
 I agree on the pants, seen a few images showing the same color as the undershirt Uniformity across CRL's is a good idea Gloves I would suggest it be the same as L2 of the ROTK CRL Gloves Black in color, made of Nomex, leather, or leather-like material, with no visible straps or logos/designs. The fingers are enclosed, non-textured. Rubber ANH style gloves are not permitted. OPTIONAL Level two certification (if applicable): The base material of the gloves will be a black synthetic material similar to Lycra, Spandex, Elastane, or Nylon. Palms of gloves shall be shiny black fabric or leather or leather-like material. On the index finger shall be a stitched piece of fabric made from the same material as the hand's underside that while stitched to the finger has one cutout towards the end of the finger that reveals the netted material underneath. Gloves shall have the correct leather pattern along the fingers/palm. Hot Toys glove reference
 -
Thanks for the feedback! Ok, so after doing a SithTrooper build from scratch ( completed and approved for the 501st) I was excited to diveo into the Imperial Commando. Did a LOT of research since there is no CRL and the resources/info even back in December were very minimal. I gathered the online reference and added a lot more for my own benefit, as I intend to be 501st approved once it's completed. I the absence of a CRL, I wanted to be screen accurate. Yu can find the whole screen capture reference I have made in the reference section of the imperial commando ( external document link). So first was clearing out the toughest parts of the build, the parts that are outside of my skill set . So I ordered the soft parts as follow, based on the research I have made to be as close as possible to screen reference: - Boots from Crowprops. The imperial commando as basically FOTK boots with added sewing. (Keeptrooping has them as well). I did ask Giovanni to add more foam to the top sections, which he did a fantastic job - Gloves from Crowprops ( only shop that has them, but from picture reference, these are easy to procure, as they are leather gloves with long sleeve, like some of the mando). Long sleeves are crucial so that they do not come out when trooping (from experience). - Suit from Keeptrooping. The suit is generic, not tailored like Sheev’s but I wanted to have one readily available. I did order one from Sheev’s... it will take longer to arrive but with better fit. My girlfriend did have to make adjustments to make it fit properly, along with moving/adding velcros at the right place to fit my buddy. Up to you, a bit cheaper and quicker with Keeptrooping, but expect to go to the tailor to get it right. - Belt and holster by me (my girlfriend). Belt is made out of white cotton with low density filler inside. The screen accurate material is thick white leather for holster/holster straps. The belt is cotton stitched with 5 rows. I found both the cotton and filler at a local fabric store, nothing fancy. - ABS are made out of urethane foam rubber, as it is visible that the part is flexible in the screen reference and it was later confirmed on the build FB page that this is indeed the material they now used. I used Smooth-on TUFF STUFF 15, as it is very robust and made for cosplay/props. - 3D printed parts are made out of PLA+ material and printed on either of my 3 Anycubic printers (2 are Kobra Max 2, 1 is a viper). I would highly recommend a large printer to do the big parts in one step, otherwise you will spend way too much time trying to cut parts and bond them afterward. For trooping, you will need to reinforce them substantially. Anycubic Kobra 2 Max is cheap and does a perfect job for all the parts. My general setting were 20% grid inflill, 3 layers, 0.2mm layers (0.1 for detailed tinny parts) Paints and coatings - Paints, I used mostly rustoleum paints, you can see them on the picture. Use ONLY flat paint when possible, NEVER use gloss paint when planning on having a gloss finish over it…you're running into trouble. So flat white and white primer under it (not shown). Grey primer for most of the parts, charcoal grey for the helmet front and one of the square on the chest plate. I used airbrush Vallejo game color 72.012 scarlet red for the red parts. Flat black for all black parts. -Airbrush paints. For metallic parts, I used Vallejo aluminum (silver like parts) and dark aluminum (steel like parts- gun base coat). For gun top paint and weathering, I used the Vallejo model air black. I took a picture of the other stuff required to airbrush easily. - Clear coats. I used rustoleum satin finish for grey/black/red parts (finish is good enough for these. For the gloss white, I used high end SprayMax 2K clear glamor, more expensive but you get car finish quality. This is one area you don’t want to cheap on… so easy to ruin a part with runout and orange peel finish. This one does a perfect gloss with some practice. I used 3 cans for the armor. Finishing My technique for finishing the 3D print is the one most people will use (everyone has his own recipe, but this one I found is the most efficient and bringing you perfect finish, so are my other teammates… after doing a Sith trooper gloss armor from top to bottom, I have several hundred hours of finishing :). So Sand the raw print with 60 grit/200grit to remove all protruding plastic and bringing to only depressions on the surface. Then Bondo+acetone (3:1 ratio) with paint brush. Then sand down with 200 grit almost to plastic, then the depressions are all filled. Then Rustoleum filler primer, sand down with 400 grit. A second pass is normally needed for gloss sections. Then paint . For gloss sections, a quick 1000 grit+water to remove paint build ups , then clear coat. 3D modeling For the armor, I reviewed several sources and ended up procuring both Galactic armory and Big Fred's custom designs. I started with galactic armory without too much attention to details, but after printing the helmet, I realized it was not as accurate as I would like to (see side by side pictures of the two printed helmets) I decided to switch to Big Fred's (grey one). I printed all the parts in all the pieces separately when required for screen accuracy and ease of printing with details. I chatted with Zach from Big Fred's and he knows his models are not perfect, but at this time he has not been able to find time to adjust them. So I decided to do it on my own. Honestly, the helmet is perfect, no change there. For the other parts, I will note when I made tweaks. So, I used ArmorSmith, 3Dbuilder, Blender, Solidworks to scale/ edit / create modified parts based on Big Fred's files. Scaling is of course necessary, not only to be comfortable, but also to maintain the screen relative reference Armorsmith is a must, I did my first build without it and ended up redoing the armor more than 2x… worth the 30$ believe me. Below a snapshot of the parts on my avatar (not that chubby, it’s the sizing with the suit on me 😊 ) Jetpack design and adjustment/ fitting to the back armor The biggest one I have seen is the jetpack, the details are all there, but proportions were not screen accurate ( to my interpretation of it). Most of it is just scaling the jetpack components to make the details thicker and increasing the central portion to protrude from the side components. Below is one of the 3D model available on the market fitted on the armor. The current 3D models do not hide the attachment mechanism, due to the curved armor back and the flat jetpack rear. Typical Mandalorian jetpack have a curve or staggering of the jetpack in some instances. In the screen reference, the jetpack has a visible recessed to hide/ embed the attachment points and bring the jetpack in close contact with the armor. A recessed area must be present to have the general screen accuracy. With this recess, this enables the back to be in close proximity as per the movie reference. Below is a modified version and better fit to armor. So to do this, I had to redo large portions of the jetpack 3D model, to include a recess portion, while maintaining the internal cavity for lighting. It was a long iterative process on solidworks/3Dbuilder, but result was much nicer and screen accurate. The jetpack should also be scaled so that the reactors do not exceed the bottom of the chest armor per reference and the top of the jetpack does not exceed the wearer’s top of collar armor. The width of the jetpack should be approximately the same size as the width of the chest armor, although it is seen sometimes larger in the screen reference. So I scaled it properly to fit correctly, but this screws up with attachment points on the back, So I had to redo all of these, downloading files from JJ industries to correct. I made new 3D models to be able to 3D print, as the jj industries are designed to be metal. I used 70% fill PETG for these attachments. As for the jetpack itself, the details on it need to be to scaled and adjusted. For Big Fred, I had to do several modifications on it to be correctly proportional. The central reactor had to be increased in size (originally the same thickness as the side reactors). Also, all the features on the main side were not thick enough. Same for the wing tip, they are way too thin and fragile to be used for trooping. I made them thicker and re-enforced them with a 90deg plate from the inside. To make sure that the jetpack will fit to the main chest armor, I also made another part, on the internal side that can be customized for proper spacing of the anchoring points ( otherwise the jetpack need to be scaled with the chest armor and nothing will fit anymore, not even the JJ industries anchoring. Talking of JJ industries, they have very good material. On my side, I didn’t to pay a 100$ for the anchoring, so I made some custom ones, that are size compatible with the JJ, because the chest armor is designed for them, so you’re kind of stuck with them. I painted those with dark aluminum finish. I printed the jetpack in one piece (except for all the grey and black parts that are separate components from screen reference (also way easier to paint). I added magnets on bottom reactor to be able to access easily the electronics. Top reactor is snug fit enough not requiring additional fixturing. For the top red light, I used transparent PETG. I redesigned it as it was too thick to be able to 3D print with clarity with 3-4 layers 100% density. Needed a lot of sanding down to a 1000, then a clearcoat over the top surface. I left the interior raw printed and clearcoat to have the diffusion effect on the LEDs. Will continue later with other parts!
-
 This list is for Original Trilogy (OT) builds. ANH, ESB and ROTJ) For those who are about to embark on a TK build, in addition to the kit itself and the supplies you will need** to do that we are often asked about other items to complete the ensemble and get approved. These are known as "soft parts", and include the holster, under suit, boots, gloves, neck seal and canvas belt. Be aware that some armorers may include one or more of these items with their kit, but some do not. Also be aware that just because the seller includes them it does not always mean that they are the correct type/style and are eligible for approval (especially at higher levels). When in doubt, always ask your armorer which items are part of the package or feel free to ask here if you have doubts/questions. We are here to help! If there is a particular soft part you need, below is a list of "tried and true" vendors who have an excellent reputation, as well as suggestions for where to get other pieces or even make your own! NOTE: If you are a vendor and would like to add your sales thread here or you have a tutorial on how to make your own please PM me before posting here. **https://www.whitearmor.net/forum/topic/31404-supply-list-for-your-tk-build/page/11/ White Canvas Belt: NOTE: not all belts are created equal! The belts used in the films were firm and sturdy with no creasing or sagging. Vendor- Rob Kittel https://www.whitearmor.net/forum/topic/19803-fs-white-canvas-belts/ Soulart https://www.whitearmor.net/forum/topic/40849-geeky-pinks-phantastic-gaskets-and-so-much-more/ Trooperbay- https://trooperbay.com/stormtrooper-sandtrooper-white-canvas-belt Make your own: https://www.whitearmor.net/forum/topic/665-howto-a-guide-to-making-a-canvas-bel Neck Seal: Vendor: Darman https://www.whitearmor.net/forum/topic/21385-darmans-neck-seals/ Soulart https://www.whitearmor.net/forum/topic/40849-geeky-pinks-phantastic-gaskets-and-so-much-more/ Trooperbay- https://trooperbay.com/costuming-accessories/headgear-neck-seals/stormtrooper-neck-seal Make your own: https://www.whitearmor.net/forum/topic/34548-10-diy-neck-seal-v1/ Holster: NOTE: Holster straps differ for various costumes. Please see the CRL for your particular style here: http://databank.501st.com/databank/Costuming:FISD_CRL Vendor- Darman https://www.whitearmor.net/forum/topic/16744-leather-e-11-holsters-35/ Trooperbay https://trooperbay.com/costuming-accessories/ammo-pouches/stormtrooper-genuine-leather-blaster-holster Make your own: https://www.whitearmor.net/forum/topic/23643-making-a-holster-for-anh-stunt/ Boots: Vendor: Imperial Boots https://www.imperialboots.com/product/421/ NOTE: Imperial boots are 100% approvable at every level, but they only open once a month for orders. They can run a bit small, so I suggest ordering a half size larger than what you normally wear. Make your own: https://www.whitearmor.net/forum/topic/27565-how-i-did-my-boots-tkboots-alternative/ Under Suit: Under suits can be purchased from many sources, and you have the choice of one or two piece types. I have found Amazon to be among the least expensive sources. The easiest thing to do is visit that site and search for it, for instance "Mens compression suit top black long sleeve". Examples: Mens compression suit top black long sleeve- https://www.amazon.com/s?k=mens+compression+suit+top+black+long+sleeve&ref=nb_sb_noss Mens compression suit pants black- https://www.amazon.com/s?k=mens+compression+suit+pants+black&ref=nb_sb_noss Vendor Trooperbay https://trooperbay.com/star-wars-stormtrooper-sandtrooper-black-undersuit NOTE: While some prefer the one-piece type, the two piece tends to be better when you have to... uhhh, let's just say "answer nature's call". IMPORTANT! When ordering an under suit, be aware that many have printed logos, white stitching etc. These can not be visible while wearing your armor. Hand guards (Flexible) Vendor: justjoseph63 - https://www.whitearmor.net/forum/topic/35702-fs-flexible-hand-guards-for-centurion-level/ Vendor: Trooperbay- https://trooperbay.com/flexible-hand-guards-in-white-black-or-plain Gloves: NOTE: As per the CRL for Basic 501st OT TK approval, gloves must be all black with no visible straps/logos/designs and can be rubber, Nomex, leather or a leather-like material. For Level 2 (Expert Infantry) and Level 3 (Centurion) they must be made of rubber or a rubber-like material. I highly suggest finding ones with a long wrist, which prevents it from sliding out from underneath your forearm armor. Vendor: Trooperbay- https://trooperbay.com/accurate-trooper-black-latex-gloves Vendor: justjoseph63- https://www.whitearmor.net/forum/topic/49156-fs-rubber-gloves-for-expert-infantrycenturion-level/ eBay is also an alternative. Just search Black Nomex (or leather, rubber etc.) gloves. Be sure when ordering the rubber type from eBay that you are purchasing the heavier duty type and not the disposable kind. Thigh Garter system: Vendor: Pencap510 https://www.whitearmor.net/forum/topic/29991-thigh-garter-system/ NOTE: These are not a requirement, but they are AWESOME! Pauldrons- (For Heavy Weapons Troopers) Vendor: Soulart https://www.whitearmor.net/forum/topic/40849-geeky-pinks-phantastic-gaskets-and-so-much-more/
 -
E-11 PVC Pipe Build Templates (Imperial and Metric)
gmrhodes13 replied to usaeatt2's topic in ANH BlasTech E11
You could reach out to your local garrison and enquire if anyone is offer 3d printing. Files for the E-11 are here https://www.thingiverse.com/tk14082/designs Length would need shortening
-
 Below is an amended Nightrooper/R1 CRL. Items known to not be on the costume, such as cod and posterior, have been committed. Please remember this is a work in progress and is not final. Required Costume Components The following costume components are present and appear as described below. General Construction Notes All costume elements are painted and weathered to match the specific visual references for this costume. At basic level, level 2 gold or gold colored leaf is not required. At basic level cracks can be painted on, but must be engraved to obtain EIB (Level 2). All Armor is constructed from a durable material such as Metal, Fiberglass, Resin, Sintra, HIPS, PVC, PLA, Vac-formed ABS, or similar. EVA foam & Similar materials are not appropriate. 3D printed components must have no visible print lines or joins. Armor is scaled proportionately to the wearer. Please Note: All damage must be 100% screen accurate if individual wishes to obtain EIB (Level 2) approval from Detachment. Helmet Helmet is based on the Rogue One/Anthology style stormtrooper helmet. The face plate is gold in color Vocoder (vertically ribbed chin detail) is painted black. Lenses are black or grey in color. Lenses sufficiently dark enough to obscure the costumer's eyes. There are two cheek tubes that extend from the ears. Two vent greeblies are present in the end of each cheek tube at the bottom front of the helmet. Trapezoids on dome and tears on the cheeks of helmets are grey. Rear traps and tears have vertical black lines. There are 2 red imperial cogs on the front dome of the helmet. The cogs are positioned symmetrically, one on each side. The cogs have light weathering. The cogs are rotated as per references. Light to medium weathering as per references. Cracking as per references. Cracks may be painted on surface in metallic gold paint. Gray and gold color patches as per references. Note: The helmet is accurate in detail and proportion to official references. OPTIONAL Level two certification (if applicable): Eye Lenses are domed in shape. Cracks are engraved into the surface. Ear screws must not have a visible slot mark and be flush to the ear. Any gap between the ears and helmet will only appear to be a seam, not any bigger. OPTIONAL Level three certification (if applicable): Face plate and gold patches are covered with gold colored leaf. Cracks are filled with gold colored leaf. Vocoder is tubular in nature with 7 vertical tubes. A visible gap must be present between the Vocoder and the helmet. The inside of each rear trap will be a raised area that is grey, with 13 engraved black vertical lines, hand painted lines like ANH are not permitted. The inside of each side trap will be a raised area that is grey. Neck Seal Black with horizontal ribs, fitted to the wearer, and extending from the base of the neck to conceal the entire neck. Under Suit Dark Burgundy, non-textured material, either one-piece or two-piece construction with no visible zippers or logos/designs. OPTIONAL Level two certification (if applicable): Where visible shall be fully ribbed with all horizontal ribbing on the arms, legs, and back. The centre of chest and back may be mesh as long as it is covered by armor. OPTIONAL Level three certification (if applicable): All ribbing on knees, arms, chest, and back must be proportion to official references. Where visible around the neck the under suit is black. Shoulder Straps They may be affixed with Velcro or adhesive. Light to medium weathering as per references. OPTIONAL Level two certification (if applicable): OPTIONAL Level three certification (if applicable): These shall be inserted behind the chest tabs and into slots of the backplate. Shoulder Armor One on each shoulder. The shoulders are considered effectively symmetrical; but are not interchangeable. Left shoulder must be gold colored. Right shoulder must have 1 gold colored area per references. Light to medium weathering as per references. Cracking as per references. Cracks may be painted on surface in metallic gold paint. OPTIONAL Level two certification (if applicable): Cracks are engraved into the surface. OPTIONAL Level three certification (if applicable): There is no swoop on the shoulder bell raised area. There is no elastic strap that wraps around the inside of the bicep. Gold sections are covered with gold colored leaf. Cracks are filled with gold colored leaf. Upper Arm Armor The front strip is bevelled and approximately ⅛" thick that does not extend beyond the bicep, and has a smaller cover strip layered thereon. Light to medium weathering as per references. Cracking as per references. Cracks may be painted on surface in metallic gold paint. Left side is approximately 3/4 grey as per references. Right side has 1 grey area that wraps the part as per references. OPTIONAL Level two certification (if applicable): Cracks are engraved into the surface. OPTIONAL Level three certification (if applicable): Cover strips will cover both the front and back joints. Biceps are loosely held closed in the back with elastic, shock cord (bungee cord) or white Velcro and are designed to remain flexible. Cracks are filled with gold colored leaf. Forearm Armor The front strip is bevelled and approximately ⅛" thick that does not extend beyond the bicep, and has a smaller cover strip layered thereon. Light to medium weathering as per references. Cracking as per references. Cracks may be painted on surface in metallic gold paint. OPTIONAL Level two certification (if applicable): OPTIONAL Level three certification (if applicable): Forearms are loosely held closed in the back with elastic, shock cord (bungee cord) or white Velcro and are designed to remain flexible. Cover strips will cover both the top and bottom joints. Gold sections are covered with gold colored leaf. Cracks are filled with gold colored leaf. Hand Plates Roughly pentagonal in shape, the hand plates are mounted securely over the back of the glove. As an alternative to plastic, these may be made out of latex or latex-like material. Light to medium weathering as per references. Cracking as per references. Cracks may be painted on surface in metallic gold paint. Left handplate is gold colored. OPTIONAL Level two certification (if applicable): Hand guards shall be made of plastic. Cracks are engraved into the surface. OPTIONAL Level three certification (if applicable): Hand guards should follow the correct RO shape, ANH hand guards are not acceptable. A small indent in the front of the hand plate shall be present. Cracks are filled with gold colored leaf. Left handplate is covered with gold colored leaf. Gloves Dark Burgundy, leather or leather-like, enclosed fingered, non-textured, (normal leather grain/texture/lines are acceptable) fitted style. No buckles, straps, or decorative stitching. OPTIONAL Level two certification (if applicable): OPTIONAL Level three certification (if applicable): Chest Armor Chest plate overlaps the abdominal plate. Light to medium weathering as per references. Cracking as per references. Cracks may be painted on surface in metallic gold paint. Right side must have 1 gold colored area per references. OPTIONAL Level two certification (if applicable): Cracks are engraved into the surface. There are raised trapezoids at the top of the shoulder section beneath which the straps insert. The chest and back sides shall be connected by black extensions pieces. OPTIONAL Level three certification (if applicable): Top pectoral out lines swoop correctly outward. Gold sections are covered with gold colored leaf. Cracks are filled with gold colored leaf. Back Armor There are raised trapezoids at the top of the backplate section beneath which the shoulder straps insert. The backplate continues past these trapezoids towards the top of the shoulder Right side There is a black square shaped greeblie with a circular gold recess detail Left Side There is a rectangular raised section. There is a black colored rectangular frame. There is a gray section on the left. There are 2 raised vertical bars that are gold in color. Lower section There is a black square greeblie below the right greeblie. There is a small vertical rectangle to the right of the black square greeblie. There is a small rectangular greeblie with rounded ends below the right side black greeblie. Light to medium weathering as per references. Cracking as per references. Cracks may be painted on surface in metallic gold paint. There is a gold colored section along the bottom of the armor as per references. OPTIONAL Level two certification (if applicable): Cracks are engraved into the surface. Top of box wall has a trapezoidal indentation. OPTIONAL Level three certification (if applicable): Bottom of backplate is curved and extends past abdominal back cover plate. Gold sections are covered with gold colored leaf. Cracks are filled with gold colored leaf. Abdomen Armor The abdominal armor consists of a one-piece corset design with a vertical opening centered on the back. The back opening is covered by a rectangular cover plate that is worn under the back armor. There are 3 vertical ribs centered on the front of the abdomen and two (one left and one right) ribs further spaced to each side of the center. There are two (one left and one right) angled (approximately 70 degrees) ribs on each side of the abdominal armor. There are two (one left and one right) angled (approximately 70 degrees) recessed ribs on each side of the abdominal armor behind the raised angled ribs that are black Any side shims added are to be added to the white areas of the armor. The center front detail consists of a raised rectangular panel. On the right half of the panel, there is a vertical column of 4 buttons approximately ⁷⁄₁₆" (11mm) in diameter. The bottom button is blue while the other three are grey. On the left half of the panel, there is a vertical column of raised evenly spaced horizontal gear teeth with a recessed trapezoid at the top of the column. The rectangular inside bottom of the trapezoid is black. The left front detail consists of a raised rectangular panel with an angled top. There is a vertical column of 4 buttons approximately ⁷⁄₁₆" (11mm) in diameter. The right front detail consists of a primary raised rectangular panel with an additional secondary raised rectangular panel covering the top ⅓ of the primary panel. There is a column of three thin horizontal evenly spaced raised lines across the top ½ of the secondary panel. The abdominal armor is accurate in detail and proportion to official references. Light to medium weathering as per references. Cracking as per references. Cracks may be painted on surface in metalic gold paint. The armor is gold in color. OPTIONAL Level two certification (if applicable): Cracks are engraved into the surface. The right front detail panel is centered between the two outer vertical right ribs. The left front detail panel is centered between the two outer vertical left ribs. OPTIONAL Level three certification (if applicable): The abdomen armour is covered with gold colored leaf. The abdomen armor has two horizontal recessed rectangles centered above the center front detail panel and on each side of the center rib. All 8 Button details are recessed and bordered with a thin edge, only the recessed portion is painted. The center front panel column of raised gear teeth has only 9 teeth. There is a recessed edge (approximately ⅛" 3mm wide) along all four sides around the face of the center front panel The right front detail panel is centered between the two outer vertical right ribs. The left front detail panel is centered between the two outer vertical left ribs. There is a recessed edge (approximately ⅛" 3mm wide) along the sides and top around the face of the left front detail pane The abdominal armor back cover plate has two protruding tabs along the bottom that rest inside the back hard belt. Over Skirt There is a red leather or leather like waist band approx 2.5-3x the width of the belt. The top of the band is level with the bottom of the 3rd button down on the abdomen. There are 2 padded panels at the font, these panels are not rectangular and have a slight trapezoid shape. The body of the panel is leather or leather like. The front panels end approximately at the knee. There is a fabric panel behind the padded front panels. The bottom is pointed at approx 110° The panel ends mid thigh. Made from the same material as the rear skirt. There is a thin red border on the bottom edge. There are two trapezoidal quilted hip panels, these panels end mid thigh. The quilting forms a vertical diamond pattern. There are two rear fabric panels that form a half skirt. The panels are same length as the front panels. The panels do not wrap past the front of the hip. The panels over lap at the rear, left over right. The left panel is pleated to form a raised section over the overlap. All panels have a border and backing that matches the waist fabric. Kama is lightly weathered. Belt Is made from black leather, or leather like material. Sits in the middle of the fabric band of the Kama. There is a front rectangular section slightly taller than the belt and is rounded on the right side. There is a raised section on the left side which is pointed on the right end. A thinner top strip runs the length of the belt and over laps the front section, with a pointed ends, forming the detail on the front of the rectangular section. Is closed at the rear. There is a single popper shortly before the holster. Staps There are two straps that loop down from the belt. The straps are approx 2/3rd the width of the main belt Mount to a short strap at the rear that hangs vertically on each side, and is looped over the belt. There is a single belt loop to the left of the rectangular section, level with the strap. Holster Is made from black leather, or leather like material. Is worn on the right hip Hangs from a single wide loop. Has 2 black poppers just under the belt loop. Thigh Armor The thigh armor is mirrored for each leg and not interchangeable. The cover strips are beveled and approximately ⅛" thick that does not extend beyond the thigh and has a smaller cover strip layered thereon. The top edge of the thigh armor is unadorned, and the bottom edge has a raised detail that fallows the bottom edge contour. Light to medium weathering as per references Cracking as per references. Cracks may be painted on surface in metalic gold paint. Right Side The thigh is predominantly gray There is a gold colored section at the bottom of the thigh There is a white colored section at the bottom of the thigh The small ammo belt consists of 5 evenly spaced rectangle ammunition boxes and is installed on the bottom of the right thigh, there are no visible screws or rivets. The ammo belt it gold in color Left Side White in color There is a gold colored section on the outside of the thigh at the bottom. OPTIONAL Level two certification (if applicable): Cracks are engraved into the surface. Thighs are loosely held closed in the back with elastic, shock cord (bungee cord) or white Velcro and are designed to remain flexible. Cover strips will cover both the front and rear joints. OPTIONAL Level three certification (if applicable): The bottom outside edges of the small ammunition belt are angled at approximately 45 degrees. Thigh armor is suspended by a black strap approximately 1" 25mm in width with a plastic side release buckle that is covered by black webbing or elastic that runs down the side seam of the leg. Gold sections are covered with gold colored leaf. Cracks are filled with gold colored leaf. Lower Leg Armor The greaves are mirrored for each leg and are not interchangeable. The top edge of the greaves has a raised detail that fallows the top edge contour. The bottom edge of the greaves flairs out to cover the top of the ankle and boots. The cover strips are beveled and approximately ⅛" thick that does not extend beyond the greave and has a smaller cover strip layered thereon. Greaves are loosely held closed in the back with elastic, shock cord (bungee cord) or white Velcro and are designed to remain flexible. Cover strips will cover both the front and rear joints. The trapezoid knee plate (sniper knee plate) is affixed to the top of the left greave and there are no visible screws or rivets. Sniper knee plate must be aligned with the vertical cover strip and the top raised edge detail on the greave and is accurate in detail and proportion to official reference. Light to medium weathering as per references. Cracking as per references. Cracks may be painted on surface in metallic gold paint. OPTIONAL Level two certification (if applicable): Cracks are engraved into the surface. The sniper knee plate has raised detail that fallows the top edge contour. The sniper knee plate has 3 trapezoidal lugs on each side and 2 on the center bottom edge (totalling 8) of the knee plate. OPTIONAL Level three certification (if applicable): Gold sections are covered with gold colored leaf. Cracks are filled with gold colored leaf. Boots Boots are above ankle height and the same style as the First Order TK. Chelsea type boots in the style of OT TK are not acceptable. Boots are all white and made of leather or leather-like material Flat black soles without a heel. Patent leather or high gloss is not permitted. Light to medium weathering as per references OPTIONAL Level two certification (if applicable): There is no seam present on the front of the boot. The wearer's inner side of the boots have zippers and no side elastic. OPTIONAL Level three certification (if applicable): Optional Accessories Items below are optional costume accessories. These items are not required for approval, but if present appear as described below. If adding in an accessory after initial approval, the item still needs to be submitted to local GML for approval before use. Captain Enoch SE-14 Blaster The blaster has an extended cone shaped barrel. There are 3 gold colored rings on the blaster 1 on the extended barrel 1 at the start of the barrel 1 at the rear of the blaster There is a narrow scope that runs approximately from the rear of the blaster to the top front sight. The scope is flared out at the rear Hand grips are gold in color.
 -
Alright, here we go! I'm excited to begin a thread for my build on Captain Enoch, I'm notoriously bad at updates on build threads, but my goal is to try and document as much as I can for this build while keeping an eye on the CRL as it progresses as well. Currently, I have most of what may be needed for this build ordered, with the exception of the chest, back, and blaster. I'll toss in some links to what I've been looking at so others can use them if desired. Helmet: Walsh3D File and to be printed in resin/ABS. There are a few helmet files out there so far, but this seems to be pretty darn close. Found here: Enoch Night Trooper Helmet - 3D Print Model – Wireframe (wirefram3d.com) Working on getting this printed now, and hope to start on it in the next week or so. Neck Seal: References show a black neck seal, similar to what other R1 style TKs have been using. On order from Sheev's Emporium. Found here: Sheev's Emporium - Facebook Undersuit: Enoch has a burgundy/dark red color to his undersuit, with the ribbing, so a custom one is on order from Sheev's Emporium also. Belt/Kama/Holster: David at Sheev's and I have been working on getting the designs for the Kama, Tassets, Belts, and Holster researched. Lots of great progress and he's been sharing some of his designs on his page and the Enoch/Night Trooper Facebook groups so far. Chest/Back: General thoughts are that the chest is customized to fit the actor, along with a custom back. Galactic Armory has said that they're going to do the armor, so fingers crossed it's high up on his list to get to. GA's site can be found here: https://galacticarmory.net/ Arms/Legs/Abd: Since this is mostly likely some R1 armor, going to go with 850 Armorworks for the pieces that haven't been customized. Found here: Rogue One Stormtrooper costume armor kit Mimban Solo Anthology TK (850armorworks.com) Gloves: David at Sheev's Emporium and I have been discussing this a bit, and we're hoping that these tough gloves are a close fit. Currently on order from Amazon, should be in this week. They're "chestnut" in color, but I've seen a few reviews on Amazon mentioning they have a bit of purple and tend to darken with use. Hoping to use that as is, or some leather paint to match the references seen so far. Found here: Amazon.com: Tough Gloves Marksman-X Ultra Thin Leather Gloves, TD 215 Chestnut Handguards: Thinking that they are the same as the R1 suits, just with the custom coloring. Included with the 850 armor. Boots: Standard R1 boots like the other R1 suits I believe, on order from KeepTrooping. Found here: (keeptrooping.com) Blaster: One of the only times we've seen it out of the holster is the standee that was recently published. I hope someone tackles this as a 3D file soon for printing. Excited to get started, and like many of you I prefer to get it right! Welcome to thoughts and feedback as the build progresses!
-

Newbie questions from Seattle
MaskedVengeance replied to BlackDogRob's topic in New Member Introductions
As you can see, Rob, we have a great many troopers at the ready waiting to help you on your quest to become a STORMTROOPER! Don't ever feel afraid to ask questions; there are never too many, and the only dumb ones are those unspoken. -
 An ROTJ bucket is also listed. This reportedly IS screen used. https://propstoreauction.com/lot-details/index/catalog/386/lot/126479?url=%2Fauctions%2Fcatalog%2Fid%2F386%3Fpage%3D1%26view%3Dgrid%26cat%3D4141%26catm%3Dany%26order%3Dorder_num%26xclosed%3Dno%26featured%3Dno%26items%3D100 Our expert’s notes Bidding for this lot will end on Tuesday, March 12th. The auction will begin at 9:00AM PDT and lots are sold sequentially via live auctioneer; tune in to the live streaming broadcast on auction day to follow the pace. Note other lots in the auction may close on Wednesday, March 13th or Thursday, March 14th. An Imperial stormtrooper helmet from Richard Marquand's Star Wars: Return of the Jedi. Imperial stormtroopers wore their standard-issue helmets throughout the film as they served the Galactic Empire, notably during the climactic Battle of Endor. Stormtroopers now rank among the most recognizable movie characters of all time. It is estimated that only around 50 helmets were produced for Return of the Jedi, with slight modifications and a somewhat more flattened appearance than the designs seen in the previous two films. All elements on the helmet are original and unaltered. The main body of the helmet is constructed from vacuum-formed ABS plastic. Several striped decals are applied to the helmet's cheeks and temple. The chin and mouth vent are finished in black paint, and a black rubber trim runs along the brow and around the neck opening. The eyes are green acrylic. The helmet's interior features an elastic chinstrap and a plastic headband with foam applied for comfort. "Alan H" is handwritten in blue ink in the interior. This could be Alan Harris, who was an uncredited stormtrooper in Jedi and had small, uncredited roles in both A New Hope and Empire Strikes Back. The helmet interior also features a piece of paper taped to the dome, upon which the Yuma, Arizona, address for the "Blue Harvest" production offices is printed. "Blue Harvest" was the film's working title and was chosen to hide the fact that the third Star Wars movie was filming from fans and locals while on location. Yuma served as the location for the scenes at the Great Pit of Carkoon - scenes which do not feature stormtroopers. This is one of the best examples of a stormtrooper helmet in private hands. The helmet exhibits yellowing both inside and outside, and the chinstrap has frayed due to age. There exhibit scuffs, scratches, and paint wear on the exterior of the helmet, and one of the faux microphones on the front is missing its wire mesh. Estimate: $150,000 - 300,000
 -
 Name: Kris Belardinelli ID: TK-15129 Username: Kris B. Garrison: Midwest Garrison Armor Maker: Walt’s Trooper Factory Helmet Maker: Walt’s Trooper Factory Blaster Maker: Quest Design Canada Height/Weight: 5 foot 4” 125lbs Boot Maker: Imperial Boots (keeptropping) Canvas Belt Supplier: Self made Neck Seal: Anovos Hand Guard: Trooperbay Holster Maker: Darman props
 -
TK ANH Stunt by CloseTheBlastDoor
MaskedVengeance replied to CloseTheBlastDoor's topic in ANH Build Threads
The arc length of the control panel isn't as important or visible as other dimensions of the TD. In my experience, I've almost always trimmed the control panels to tax size in respect to the measurement shown as 95mm in the photo that Mario posted. Different makers have slight variances in the designs of the molds. WTF is one of the "brands" of TDs that I haven't yet acquired, so I don't know what the raw measurement would be. One thing to note about the width of the control panel is that I trim mine to ensure that the two black clip screws are perfectly in alignment with the edges of the control panel. So here's my order of operations: Trim end caps to 20mm wide Fit end caps onto the tube then trim tube so the total width is 7.25-7.5" wide Place metal clips against end caps then measure distance between the screws to determine panel width. By the way, all these TD details are because I'm OBSESSED with TDs. The average trooper won't spend the time it takes to read all these responses on their TD. So don't worry about spending too much time on the tiny details. I'm the outlier with my technique. -
Looks MUCH better, sir! Design Quest makes an awesome blaster, no doubt, but If I may make a few small suggestions: 1. The Hengstler counter- Ideally it should sit a bit lower and more toward the rear. This can be easily remedied with a drill and about 10minutes of your time. Note in the reference images how it does not sit perfectly level but actually follows the angle of the folding stock. The process involves removing 3 screws- the first being the one that holds the scope rail on at the rear (pic 1). After you remove the rail, you will be able to access the plate on the rail that the Hengstler mounts to (pic 2). Just remove the screws, reposition it, drill a couple of new holes and re-attach the screws. Done! The second item is that there is no recoil spring. This is another thing that should take about 10 minutes. The inside diameter of QD's inner shroud prevents using a "standard" diameter spring, but it can be done! I believe the end cap of the QD is removable, and Adam @revlimiter did a superb job (second pic) in his fantastic build thread for the QD. The way he did it can be found in this post (you have to scroll down a bit to see it). The Hengstler position is not the biggest of deals and the D.O.s may not mention it, but the missing spring may be an issue. Again, fantastic job jumping on the previous suggestions! I can definitely see an EI badge under your name soon, and then it's on to Centurion!
-
Below is an amended R1 TK CRL, I have ommitted items like the batton and Pauldron and some blasters that were not seen in use in the Ahsoka series . Required Costume Components The following costume components are present and appear as described below. Helmet Traps (trapezoids on dome of helmet) and tears (area beneath the corners of eye lenses) are gray. Rear traps and tears have engraved vertical black lines. Lenses can be flat material, green in color, sufficiently dark enough to obscure the costumer's eyes. The “ear” bars are gray or painted gray, with the largest bar oval cutout painted black. Frown is painted gray and does not leave the teeth area. The space between the 8 teeth is hollow and backed with Black or Dark grey wire screen mesh. Tube stripes are medium blue, numbering 12 per side. The stipes are straight, not curved like ANH. Vocoder (vertically ribbed chin detail) is painted black. Aerators/Hovi mix tips (cylinders on either side of the vocoder) have a black exterior and silver in color screen mesh. Tears and traps may not be hand-painted. Tube stripes are recessed, and the recessed section painted blue or backed by blue mesh. Note: The helmet is accurate in detail and proportion to official references. Many commercially available helmets or those considered disproportionate in size or shape are ineligible. The Black Series helmet is approvable if modified to meet the level 1 CRLs. Light to medium weathering as per reference images. Cracks may be painted on surface in metalic gold paint. OPTIONAL Level two certification (if applicable): Lenses have a very slight curve and are convex in style. Flat lenses and ANH style bubble lenses are not permissible. Rank bar area on ear must be of the correct RO style and pattern, no ANH style ear bumps allowed. Head opening has black trim running all along the edge. Brow trim should be positioned ¼" above the eyes. Ear screws must not have a visible slot mark and be flush to the ear. Any gap between the ears and helmet will only appear to be a seam, not any bigger. Correct 'Hovi mic' aerator tips. Chin section has a well defined seam from the angles of the mouth. Light to medium weathering as per references Cracks must be dremmelled or engraved into helmet. Cracks may be painted in metalic gold paint OPTIONAL Level three certification (if applicable): The Tube stripes are completely hollowed out with a blue section underneath. Vocoder is tubular in nature with 7 vertical tubes. A visible gap must be present between the Vocoder and the helmet. The inside of each tear will be a raised area that is grey, with 8 engraved black lines, hand painted lines like ANH are not permitted. The frown shall be recessed to the proper depth, unlike standard ANH. The inside of each rear trap will be a raised area that is grey, with 13 engraved black vertical lines, hand painted lines like ANH are not permitted. The inside of each side trap will be a raised area that is grey. There is a small bump in the right eye socket (when worn) under the lens as an intended flaw to pay tribute to the original trilogy designers. Green LED that can be switched on and off representing both living and the reserected Night trooper shall be fitted behind the lenses. TK anh stunt neckseal.jpeg Neck Seal Black with horizontal ribs, fitted to the wearer, and extending from the base of the neck to conceal the entire neck. Cracks must be dremmelled or engraved into helmet. Cracks must be gold leaf, gold paint is not permitted. Under Suit Black non-textured material, either one-piece or two-piece construction with no visible zippers or logos/designs. OPTIONAL Level two certification (if applicable): Top, where visible shall be fully ribbed with all horizontal ribbing on the arms, chest, and back. The centre of chest and back may be mesh as long as it is covered by armor. Pants shall be black non-textured material and have horizontal ribbing at the knees only. Knee gaskets are allowed as long as they correctly match top ribbing material, spacing and color. The hip section shall not have ribs. OPTIONAL Level three certification (if applicable): All ribbing on knees, arms, chest, and back must be stitched between each rib in detail and proportion to official references. The armpit area shall have the correct hexagonal mesh detail Shoulder Straps They may be affixed with Velcro or adhesive. Light to medium weathering as per references Cracks may be painted on surface in metalic gold paint. Weathering details, Gold and gray adorntments etc to be added. OPTIONAL Level two certification (if applicable): OPTIONAL Level three certification (if applicable): These shall be inserted behind the chest tabs and into slots of the backplate. Shoulder Armor One on each shoulder. The shoulders are considered effectively symmetrical; they may be worn interchangeably on the left and right shoulders and may have a black elastic strap that wraps around the inside of the bicep. Light to medium weathering as per references Cracks may be painted on surface in metalic gold paint. Weathering details, Gold and gray adorntments etc to be added. OPTIONAL Level two certification (if applicable): OPTIONAL Level three certification (if applicable): There is no swoop on the shoulder bell raised area. There is no elastic strap that wraps around the inside of the bicep. Weathering details, Gold and gray adorntments etc to be added. Upper Arm Armor Both biceps are symmetrical and interchangeable. The front strip is bevelled and approximately ⅛" thick that does not extend beyond the bicep, and has a smaller cover strip layered thereon. Light to medium weathering as per references Cracks may be painted on surface in metalic gold paint. OPTIONAL Level two certification (if applicable): OPTIONAL Level three certification (if applicable): Cover strips will cover both the front and back joints. Biceps are loosely held closed in the back with elastic, shock cord (bungee cord) or white Velcro and are designed to remain flexible. Weathering details, Gold and gray adorntments etc to be added. Forearm Armor The front strip is bevelled and approximately ⅛" thick that does not extend beyond the bicep, and has a smaller cover strip layered thereon. Light to medium weathering as per references Cracks may be painted on surface in metalic gold paint. Weathering details, Gold and gray adorntments etc to be added. OPTIONAL Level two certification (if applicable): OPTIONAL Level three certification (if applicable): Forearms are loosely held closed in the back with elastic, shock cord (bungee cord) or white Velcro and are designed to remain flexible. Cover strips will cover both the top and bottom joints. Weathering details, Gold and gray adorntments etc to be added. Hand Plates Roughly pentagonal in shape, the hand plates are mounted securely over the back of the glove. As an alternative to plastic, these may be made out of latex or latex-like material. Light to medium weathering as per references Cracks may be painted on surface in metalic gold paint. Weathering details, Gold and gray adorntments etc to be added. OPTIONAL Level two certification (if applicable): Hand guards shall be made of plastic. Weathering details, Gold and gray adorntments etc to be added. OPTIONAL Level three certification (if applicable): Hand guards should follow the correct RO shape, ANH hand guards are not acceptable. A small indent in the front of the hand plate shall be present. Weathering details, Gold and gray adorntments etc to be added. Gloves Black in color, made of Nomex, leather, or leather-like material, with no visible straps or logos/designs. The fingers are enclosed, non-textured. Rubber ANH style gloves are not permitted. Weathering details, Gold and gray adorntments etc to be added. OPTIONAL Level two certification (if applicable): The base material of the gloves will be a black synthetic material similar to Lycra, Spandex, Elastane, or Nylon. Palms of gloves shall be shiny black fabric or leather or leather-like material. On the index finger shall be a stitched piece of fabric made from the same material as the hand's underside that while stitched to the finger has one cutout towards the end of the finger that reveals the netted material underneath. Gloves shall have the correct leather pattern along the fingers/palm. Weathering details, Gold and gray adorntments etc to be added. OPTIONAL Level three certification (if applicable): Chest Armor Chest plate overlaps the abdominal plate Light to medium weathering as per references Cracks may be painted on surface in metalic gold paint. Weathering details, Gold and gray adorntments etc to be added. OPTIONAL Level two certification (if applicable): There are raised trapezoids at the top of the shoulder section beneath which the straps insert. The chest and back sides shall be connected by black extensions pieces. Weathering details, Gold and gray adorntments etc to be added. OPTIONAL Level three certification (if applicable): Top pectoral out lines swoop correctly outward. Bottom of ribcage flares correctly outward. Weathering details, Gold and gray adorntments etc to be added. Back Armor Back plate contains an "O II" design. There are raised trapezoids at the top of the backplate section beneath which the shoulder straps insert. The backplate continues past these trapezoids towards the top of the shoulder Light to medium weathering as per references Cracks may be painted on surface in metalic gold paint. Weathering details, Gold and gray adorntments etc to be added. OPTIONAL Level two certification (if applicable): Top of box wall has a trapezoidal indentation. There is a roughly 8mm circular indent near the right top corner of the backplate. Weathering details, Gold and gray adorntments etc to be added. OPTIONAL Level three certification (if applicable): Bottom of backplate is curved and extends past abdominal back cover plate. The O cog shall have 16 spines. The 11 bars have 5 horizontal evenly spaced raised bars on the bottom of the face. There is a rectangular tab protruding from the bottom of each of the two raised trapezoids at the top of the backplate. Weathering details, Gold and gray adorntments etc to be added. Abdomen Armor The abdominal armor consists of a one-piece corset design with a vertical opening centered on the back. The back opening is covered by a rectangular cover plate that is worn under the back armor. There are 3 vertical ribs centered on the front of the abdomen and two (one left and one right) ribs further spaced to each side of the center. There are two (one left and one right) angled (approximately 70 degrees) ribs on each side of the abdominal armor. There are two (one left and one right) angled (approximately 70 degrees) recessed ribs on each side of the abdominal armor behind the raised angled ribs that are black Any side shims added are to be added to the white areas of the armor. The center front detail consists of a raised rectangular panel. On the right half of the panel, there is a vertical column of 4 buttons approximately ⁷⁄₁₆" (11mm) in diameter. The bottom button is blue while the other three are grey. On the left half of the panel, there is a vertical column of raised evenly spaced horizontal gear teeth with a recessed trapezoid at the top of the column. The rectangular inside bottom of the trapezoid is black. The left front detail consists of a raised rectangular panel with an angled top. There is a vertical column of 4 buttons approximately ⁷⁄₁₆" (11mm) in diameter. The bottom button is blue while the other three are grey. The right front detail consists of a primary raised rectangular panel with an additional secondary raised rectangular panel covering the top ⅓ of the primary panel. There is a column of three thin horizontal evenly spaced raised lines across the top ½ of the secondary panel. The abdominal armor is accurate in detail and proportion to official references. Light to medium weathering as per references Cracks may be painted on surface in metalic gold paint. Weathering details, Gold and gray adorntments etc to be added. OPTIONAL Level two certification (if applicable): The cod armor is separate from the abdominal armor. The right front detail panel is centered between the two outer vertical right ribs. The left front detail panel is centered between the two outer vertical left ribs. Weathering details, Gold and gray adorntments etc to be added. OPTIONAL Level three certification (if applicable): The abdomen armor has two horizontal recessed rectangles centered above the center front detail panel and on each side of the center rib. All 8 Button details are recessed and bordered with a thin edge, only the recessed portion is painted. The center front panel column of raised gear teeth has only 9 teeth. There is a recessed edge (approximately ⅛" 3mm wide) along all four sides around the face of the center front panel The right front detail panel is centered between the two outer vertical right ribs. The left front detail panel is centered between the two outer vertical left ribs. There is a recessed edge (approximately ⅛" 3mm wide) along the sides and top around the face of the left front detail pane The abdominal armor back cover plate has two protruding tabs along the bottom that rest inside the back hard belt. Weathering details, Gold and gray adorntments etc to be added. Cod Armor The cod armor consists of a body shape formed triangular plate with a raised center rib and raised lower portion and is accurate in detail and proportion to official references. Light to medium weathering as per references Cracks may be painted on surface in metalic gold paint. Weathering details, Gold and gray adorntments etc to be added. OPTIONAL Level two certification (if applicable): The cod shall be a separate piece from the abdominal plate. Weathering details, Gold and gray adorntments etc to be added. OPTIONAL Level three certification (if applicable): Kidney Armor The kidney armor is separated in the back and covered by a rectangular plate. The rectangular plate is separate from the posterior armor. Light to medium weathering as per references Cracks may be painted on surface in metalic gold paint. Weathering details, Gold and gray adorntments etc to be added. OPTIONAL Level two certification (if applicable): OPTIONAL Level three certification (if applicable): Posterior Armor The posterior armor shall be a separate piece from the abdominal armor Light to medium weathering as per references Cracks may be painted on surface in metalic gold paint. Weathering details, Gold and gray adorntments etc to be added. OPTIONAL Level two certification (if applicable): OPTIONAL Level three certification (if applicable): Belt The Ammunition belt consists of a hard belt made of the same or similar material as the armor in two separate parts front and back (with overlap). The back belt overlaps the front belt on the sides. There are 6 ammunition boxes mounted to the belt. There are 2 (one left and one right) drop boxes suspended by black webbing approximately 2" (50mm) wide. Drop boxes must be accurate in detail and proportion to official references. The ammunition belt is accurate in detail and proportion to official references. Light to medium weathering as per references Cracks may be painted on surface in metalic gold paint. Weathering details, Gold and gray adorntments etc to be added. OPTIONAL Level two certification (if applicable): The only detail visible on the front belt is the mounted ammunition boxes unlike the squares present on ANH belts. The top edge of the front belt has protruding teeth that nest inside gaps between the ribs and detail panels of the abdominal armor. The two center ammunition boxes are thinner than the other mounted ammunition boxes. The second and fifth mounted ammunition boxes are slightly wider than the two center ammunition boxes. The two outermost ammunition boxes are almost square. The two drop boxes are rectangular and as wide as the mounted square boxes. Weathering details, Gold and gray adorntments etc to be added. OPTIONAL Level three certification (if applicable): The ammo boxes across the front are all made separately from the main belt and are secured to it The two drop boxes hang no more than 1" 25mm below the front belt and the black strap is visible. The second and fifth mounted ammunition boxes have trapezoid detail on the top of each ammunition box. The front belt protrudes past all mounted ammunition boxes above and below by approximately ⅛"–¼" 3–6mm. All ammunition boxes have slightly beveled edges on the face of each box. Weathering details, Gold and gray adorntments etc to be added. Thermal Detonator The thermal detonator consists of a grey tube approximately 3" 76mm in diameter and 8" 203mm long approximately. There are two white endcaps and a white control panel. The white control panel has a horizontal row of white rectangles along the bottom of the control panel and a grey “D” shaped recessed on the left side of the horizontal row. There is an oval greeble that protrudes from the control near the top right side. The thermal detonator is mounted to the rear hard belt and there are no visible screws or clips and is accurate in detail and proportion to official references. Light to medium weathering as per references Cracks may be painted on surface in metalic gold paint. Weathering details, Gold and gray adorntments etc to be added. OPTIONAL Level two certification (if applicable): The thermal detonator mount should be fully enclosed with solid walls on all four sides. The center of both end caps is gray. Weathering details, Gold and gray adorntments etc to be added. OPTIONAL Level three certification (if applicable): The control panel bottom detail is a raised panel with 7 raised rectangles, all are evenly spaced except the right most rectangle. There is a panel line approximately ¼" 6mm from the edge around the control panel. There is a panel line approximately ⅛" 3mm from the edge of each endcap. The inside edge of both endcaps is beveled. The oval greeble consists of an oval tube protrusion with the top edge slightly extending past the tube wall thickness and is visually similar to the Deathtrooper chin greeble. Weathering details, Gold and gray adorntments etc to be added. Thigh Armor The thigh armor is mirrored for each leg and not interchangeable. The cover strips are beveled and approximately ⅛" thick that does not extend beyond the thigh and has a smaller cover strip layered thereon. The top edge of the thigh armor is unadorned, and the bottom edge has a raised detail that fallows the bottom edge contour. The small ammo belt consists of 5 evenly spaced rectangle ammunition boxes and is installed on the bottom of the right thigh, there are no visible screws or rivets. Light to medium weathering as per references Cracks may be painted on surface in metalic gold paint. Weathering details, Gold and gray adorntments etc to be added. OPTIONAL Level two certification (if applicable): Thighs are loosely held closed in the back with elastic, shock cord (bungee cord) or white Velcro and are designed to remain flexible. Cover strips will cover both the front and rear joints. Weathering details, Gold and gray adorntments etc to be added. OPTIONAL Level three certification (if applicable): The bottom outside edges of the small ammunition belt are angled at approximately 45 degrees. Thigh armor is suspended by a black strap approximately 1" 25mm in width with a plastic side release buckle that is covered by black webbing or elastic that runs down the side seam of the leg. Weathering details, Gold and gray adorntments etc to be added. Lower Leg Armor The greaves are mirrored for each leg and are not interchangeable. The top edge of the greaves has a raised detail that fallows the top edge contour. The bottom edge of the greaves flairs out to cover the top of the ankle and boots. The cover strips are beveled and approximately ⅛" thick that does not extend beyond the greave and has a smaller cover strip layered thereon. Greaves are loosely held closed in the back with elastic, shock cord (bungee cord) or white Velcro and are designed to remain flexible. Cover strips will cover both the front and rear joints. The trapezoid knee plate (sniper knee plate) is affixed to the top of the left greave and there are no visible screws or rivets. Sniper knee plate must be aligned with the vertical cover strip and the top raised edge detail on the greave and is accurate in detail and proportion to official reference. Light to medium weathering as per references Cracks may be painted on surface in metalic gold paint. Weathering details, Gold and gray adorntments etc to be added. OPTIONAL Level two certification (if applicable): The sniper knee plate has raised detail that fallows the top edge contour. The sniper knee plate has 3 trapezoidal lugs on each side and 2 on the center bottom edge (totalling 8) of the knee plate. Weathering details, Gold and gray adorntments etc to be added. OPTIONAL Level three certification (if applicable): Boots Boots are above ankle height and the same style as the First Order TK. Chelsea type boots in the style of OT TK are not acceptable. Boots are all white and made of leather or leather-like material Flat black soles without a heel. Patent leather or high gloss is not permitted. Light to medium weathering as per references Cracks may be painted on surface in metalic gold paint. Weathering details, Gold and gray adorntments etc to be added. OPTIONAL Level two certification (if applicable): There is no seam present on the front of the boot. The wearer's inner side of the boots have zippers and no side elastic. Weathering details, Gold and gray adorntments etc to be added. OPTIONAL Level three certification (if applicable): Optional Accessories Items below are optional costume accessories. These items are not required for approval, but if present appear as described below. If adding in an accessory after initial approval, the item still needs to be submitted to local GML for approval before use. E-11 Blaster Manufactured by BlasTech Industries, the E-11 is standard-issue for many Imperial troops. Light, compact yet powerful, the E-11 blaster is always in high demand throughout the galaxy. "Note, the E-11 holster as seen in the Original Trilogy movies is not an authorized accessory for rogue One armor". Based on a real or replica Sterling Airsoft Gun, Sterling Sub-Machine Gun, scratch-built, or a modified commercial toy Stormtrooper blaster. A small flashlight can be mounted on the right side of the blaster centred over the T-Tracks. OPTIONAL Level two certification (if applicable): Blaster shall be based on a real or replica S&T Sterling L2A1 AEG Airsoft Gun. (Folding Stock does not need to function) D-Ring shall be present on the rear end cap. Scope shall be a real or replica M.H.R. (Minneapolis Honeywell Regulator Co.) M38 Telescope. 1943 model is preferred. Counter shall be a real or replica Hengstler 400 Series counter. Eagle logo is preferred. Power Cylinders shall be mounted on top of the magazine well. R1 style power cylinders are preferred over ANH style. 6 rows of T-Tracks cover the Sterling receiver holes except for the lower left row with the bayonet lug. Flashlight if fitted shall be a real or replica Element M300A Mini Scout Light. 3D printed blasters can not contain visible print lines and must be sanded smooth for a more realistic appearance. OPTIONAL Level three certification (if applicable): Scope shall be a real or replica 1943 M.H.R. Co. M38 Telescope, 1942 model is not allowed. Counter shall be a real or replica Hengstler 400 Series counter with Small eagle logo. Large eagle logo is not allowed. Power Cylinders shall be R1 style, ANH style is not allowed.
-
If you wish to you could also help with the CRL text, ROTK copied below, adjust to suit the Night Troopers, copy/paste from below then edit, strike through what needs removing and add in green for new text. If aiming to be the CRL model you would also need to provide all CRL images required, I would suggest using a contrasting background, makes photo editing a little easier. Required Costume Components The following costume components are present and appear as described below. Helmet Traps (trapezoids on dome of helmet) and tears (area beneath the corners of eye lenses) are gray. Rear traps and tears have engraved vertical black lines. Lenses can be flat material, green in color, sufficiently dark enough to obscure the costumer's eyes. The “ear” bars are gray or painted gray, with the largest bar oval cutout painted black. Frown is painted gray and does not leave the teeth area. The space between the 8 teeth is hollow and backed with Black or Dark grey wire screen mesh. Tube stripes are medium blue, numbering 12 per side. The stipes are straight, not curved like ANH. Vocoder (vertically ribbed chin detail) is painted black. Aerators/Hovi mix tips (cylinders on either side of the vocoder) have a black exterior and silver in color screen mesh. Tears and traps may not be hand-painted. Tube stripes are recessed, and the recessed section painted blue or backed by blue mesh. Note: The helmet is accurate in detail and proportion to official references. Many commercially available helmets or those considered disproportionate in size or shape are ineligible. The Black Series helmet is approvable if modified to meet the level 1 CRLs. OPTIONAL Level two certification (if applicable): Lenses have a very slight curve and are convex in style. Flat lenses and ANH style bubble lenses are not permissible. Rank bar area on ear must be of the correct RO style and pattern, no ANH style ear bumps allowed. Head opening has black trim running all along the edge. Brow trim should be positioned ¼" above the eyes. Ear screws must not have a visible slot mark and be flush to the ear. Any gap between the ears and helmet will only appear to be a seam, not any bigger. Correct 'Hovi mic' aerator tips. Chin section has a well defined seam from the angles of the mouth. OPTIONAL Level three certification (if applicable): The Tube stripes are completely hollowed out with a blue section underneath. Vocoder is tubular in nature with 7 vertical tubes. A visible gap must be present between the Vocoder and the helmet. The inside of each tear will be a raised area that is grey, with 8 engraved black lines, hand painted lines like ANH are not permitted. The frown shall be recessed to the proper depth, unlike standard ANH. The inside of each rear trap will be a raised area that is grey, with 13 engraved black vertical lines, hand painted lines like ANH are not permitted. The inside of each side trap will be a raised area that is grey. There is a small bump in the right eye socket (when worn) under the lens as an intended flaw to pay tribute to the original trilogy designers. TK anh stunt neckseal.jpeg Neck Seal Black with horizontal ribs, fitted to the wearer, and extending from the base of the neck to conceal the entire neck. Under Suit Black non-textured material, either one-piece or two-piece construction with no visible zippers or logos/designs. OPTIONAL Level two certification (if applicable): Top, where visible shall be fully ribbed with all horizontal ribbing on the arms, chest, and back. The centre of chest and back may be mesh as long as it is covered by armor. Pants shall be black non-textured material and have horizontal ribbing at the knees only. Knee gaskets are allowed as long as they correctly match top ribbing material, spacing and color. The hip section shall not have ribs. OPTIONAL Level three certification (if applicable): All ribbing on knees, arms, chest, and back must be stitched between each rib in detail and proportion to official references. The armpit area shall have the correct hexagonal mesh detail Shoulder Straps They may be affixed with Velcro or adhesive. OPTIONAL Level two certification (if applicable): OPTIONAL Level three certification (if applicable): These shall be inserted behind the chest tabs and into slots of the backplate. Shoulder Armor One on each shoulder. The shoulders are considered effectively symmetrical; they may be worn interchangeably on the left and right shoulders and may have a black elastic strap that wraps around the inside of the bicep. OPTIONAL Level two certification (if applicable): OPTIONAL Level three certification (if applicable): There is no swoop on the shoulder bell raised area. There is no elastic strap that wraps around the inside of the bicep. Upper Arm Armor Both biceps are symmetrical and interchangeable. The front strip is bevelled and approximately ⅛" thick that does not extend beyond the bicep, and has a smaller cover strip layered thereon. OPTIONAL Level two certification (if applicable): OPTIONAL Level three certification (if applicable): Cover strips will cover both the front and back joints. Biceps are loosely held closed in the back with elastic, shock cord (bungee cord) or white Velcro and are designed to remain flexible. Forearm Armor The front strip is bevelled and approximately ⅛" thick that does not extend beyond the bicep, and has a smaller cover strip layered thereon. OPTIONAL Level two certification (if applicable): OPTIONAL Level three certification (if applicable): Forearms are loosely held closed in the back with elastic, shock cord (bungee cord) or white Velcro and are designed to remain flexible. Cover strips will cover both the top and bottom joints. Hand Plates Roughly pentagonal in shape, the hand plates are mounted securely over the back of the glove. As an alternative to plastic, these may be made out of latex or latex-like material. OPTIONAL Level two certification (if applicable): Hand guards shall be made of plastic. OPTIONAL Level three certification (if applicable): Hand guards should follow the correct RO shape, ANH hand guards are not acceptable. A small indent in the front of the hand plate shall be present. Gloves Black in color, made of Nomex, leather, or leather-like material, with no visible straps or logos/designs. The fingers are enclosed, non-textured. Rubber ANH style gloves are not permitted. OPTIONAL Level two certification (if applicable): The base material of the gloves will be a black synthetic material similar to Lycra, Spandex, Elastane, or Nylon. Palms of gloves shall be shiny black fabric or leather or leather-like material. On the index finger shall be a stitched piece of fabric made from the same material as the hand's underside that while stitched to the finger has one cutout towards the end of the finger that reveals the netted material underneath. Gloves shall have the correct leather pattern along the fingers/palm. OPTIONAL Level three certification (if applicable): Chest Armor Chest plate overlaps the abdominal plate OPTIONAL Level two certification (if applicable): There are raised trapezoids at the top of the shoulder section beneath which the straps insert. The chest and back sides shall be connected by black extensions pieces. OPTIONAL Level three certification (if applicable): Top pectoral out lines swoop correctly outward. Bottom of ribcage flares correctly outward. Back Armor Back plate contains an "O II" design. There are raised trapezoids at the top of the backplate section beneath which the shoulder straps insert. The backplate continues past these trapezoids towards the top of the shoulder OPTIONAL Level two certification (if applicable): Top of box wall has a trapezoidal indentation. There is a roughly 8mm circular indent near the right top corner of the backplate. OPTIONAL Level three certification (if applicable): Bottom of backplate is curved and extends past abdominal back cover plate. The O cog shall have 16 spines. The 11 bars have 5 horizontal evenly spaced raised bars on the bottom of the face. There is a rectangular tab protruding from the bottom of each of the two raised trapezoids at the top of the backplate. Abdomen Armor The abdominal armor consists of a one-piece corset design with a vertical opening centered on the back. The back opening is covered by a rectangular cover plate that is worn under the back armor. There are 3 vertical ribs centered on the front of the abdomen and two (one left and one right) ribs further spaced to each side of the center. There are two (one left and one right) angled (approximately 70 degrees) ribs on each side of the abdominal armor. There are two (one left and one right) angled (approximately 70 degrees) recessed ribs on each side of the abdominal armor behind the raised angled ribs that are black Any side shims added are to be added to the white areas of the armor. The center front detail consists of a raised rectangular panel. On the right half of the panel, there is a vertical column of 4 buttons approximately ⁷⁄₁₆" (11mm) in diameter. The bottom button is blue while the other three are grey. On the left half of the panel, there is a vertical column of raised evenly spaced horizontal gear teeth with a recessed trapezoid at the top of the column. The rectangular inside bottom of the trapezoid is black. The left front detail consists of a raised rectangular panel with an angled top. There is a vertical column of 4 buttons approximately ⁷⁄₁₆" (11mm) in diameter. The bottom button is blue while the other three are grey. The right front detail consists of a primary raised rectangular panel with an additional secondary raised rectangular panel covering the top ⅓ of the primary panel. There is a column of three thin horizontal evenly spaced raised lines across the top ½ of the secondary panel. The abdominal armor is accurate in detail and proportion to official references. OPTIONAL Level two certification (if applicable): The cod armor is separate from the abdominal armor. The right front detail panel is centered between the two outer vertical right ribs. The left front detail panel is centered between the two outer vertical left ribs. OPTIONAL Level three certification (if applicable): The abdomen armor has two horizontal recessed rectangles centered above the center front detail panel and on each side of the center rib. All 8 Button details are recessed and bordered with a thin edge, only the recessed portion is painted. The center front panel column of raised gear teeth has only 9 teeth. There is a recessed edge (approximately ⅛" 3mm wide) along all four sides around the face of the center front panel The right front detail panel is centered between the two outer vertical right ribs. The left front detail panel is centered between the two outer vertical left ribs. There is a recessed edge (approximately ⅛" 3mm wide) along the sides and top around the face of the left front detail pane The abdominal armor back cover plate has two protruding tabs along the bottom that rest inside the back hard belt. Cod Armor The cod armor consists of a body shape formed triangular plate with a raised center rib and raised lower portion and is accurate in detail and proportion to official references. OPTIONAL Level two certification (if applicable): The cod shall be a separate piece from the abdominal plate. OPTIONAL Level three certification (if applicable): Kidney Armor The kidney armor is separated in the back and covered by a rectangular plate. The rectangular plate is separate from the posterior armor. OPTIONAL Level two certification (if applicable): OPTIONAL Level three certification (if applicable): Posterior Armor The posterior armor shall be a separate piece from the abdominal armor OPTIONAL Level two certification (if applicable): OPTIONAL Level three certification (if applicable): Belt The Ammunition belt consists of a hard belt made of the same or similar material as the armor in two separate parts front and back (with overlap). The back belt overlaps the front belt on the sides. There are 6 ammunition boxes mounted to the belt. There are 2 (one left and one right) drop boxes suspended by black webbing approximately 2" (50mm) wide. Drop boxes must be accurate in detail and proportion to official references. The ammunition belt is accurate in detail and proportion to official references. OPTIONAL Level two certification (if applicable): The only detail visible on the front belt is the mounted ammunition boxes unlike the squares present on ANH belts. The top edge of the front belt has protruding teeth that nest inside gaps between the ribs and detail panels of the abdominal armor. The two center ammunition boxes are thinner than the other mounted ammunition boxes. The second and fifth mounted ammunition boxes are slightly wider than the two center ammunition boxes. The two outermost ammunition boxes are almost square. The two drop boxes are rectangular and as wide as the mounted square boxes. OPTIONAL Level three certification (if applicable): The ammo boxes across the front are all made separately from the main belt and are secured to it The two drop boxes hang no more than 1" 25mm below the front belt and the black strap is visible. The second and fifth mounted ammunition boxes have trapezoid detail on the top of each ammunition box. The front belt protrudes past all mounted ammunition boxes above and below by approximately ⅛"–¼" 3–6mm. All ammunition boxes have slightly beveled edges on the face of each box. Thermal Detonator The thermal detonator consists of a grey tube approximately 3" 76mm in diameter and 8" 203mm long approximately. There are two white endcaps and a white control panel. The white control panel has a horizontal row of white rectangles along the bottom of the control panel and a grey “D” shaped recessed on the left side of the horizontal row. There is an oval greeble that protrudes from the control near the top right side. The thermal detonator is mounted to the rear hard belt and there are no visible screws or clips and is accurate in detail and proportion to official references. OPTIONAL Level two certification (if applicable): The thermal detonator mount should be fully enclosed with solid walls on all four sides. The center of both end caps is gray. OPTIONAL Level three certification (if applicable): The control panel bottom detail is a raised panel with 7 raised rectangles, all are evenly spaced except the right most rectangle. There is a panel line approximately ¼" 6mm from the edge around the control panel. There is a panel line approximately ⅛" 3mm from the edge of each endcap. The inside edge of both endcaps is beveled. The oval greeble consists of an oval tube protrusion with the top edge slightly extending past the tube wall thickness and is visually similar to the Deathtrooper chin greeble. Thigh Armor The thigh armor is mirrored for each leg and not interchangeable. The cover strips are beveled and approximately ⅛" thick that does not extend beyond the thigh and has a smaller cover strip layered thereon. The top edge of the thigh armor is unadorned, and the bottom edge has a raised detail that fallows the bottom edge contour. The small ammo belt consists of 5 evenly spaced rectangle ammunition boxes and is installed on the bottom of the right thigh, there are no visible screws or rivets. OPTIONAL Level two certification (if applicable): Thighs are loosely held closed in the back with elastic, shock cord (bungee cord) or white Velcro and are designed to remain flexible. Cover strips will cover both the front and rear joints. OPTIONAL Level three certification (if applicable): The bottom outside edges of the small ammunition belt are angled at approximately 45 degrees. Thigh armor is suspended by a black strap approximately 1" 25mm in width with a plastic side release buckle that is covered by black webbing or elastic that runs down the side seam of the leg. Lower Leg Armor The greaves are mirrored for each leg and are not interchangeable. The top edge of the greaves has a raised detail that fallows the top edge contour. The bottom edge of the greaves flairs out to cover the top of the ankle and boots. The cover strips are beveled and approximately ⅛" thick that does not extend beyond the greave and has a smaller cover strip layered thereon. Greaves are loosely held closed in the back with elastic, shock cord (bungee cord) or white Velcro and are designed to remain flexible. Cover strips will cover both the front and rear joints. The trapezoid knee plate (sniper knee plate) is affixed to the top of the left greave and there are no visible screws or rivets. Sniper knee plate must be aligned with the vertical cover strip and the top raised edge detail on the greave and is accurate in detail and proportion to official reference. OPTIONAL Level two certification (if applicable): The sniper knee plate has raised detail that fallows the top edge contour. The sniper knee plate has 3 trapezoidal lugs on each side and 2 on the center bottom edge (totalling 8) of the knee plate. OPTIONAL Level three certification (if applicable): Boots Boots are above ankle height and the same style as the First Order TK. Chelsea type boots in the style of OT TK are not acceptable. Boots are all white and made of leather or leather-like material Flat black soles without a heel. Patent leather or high gloss is not permitted. OPTIONAL Level two certification (if applicable): There is no seam present on the front of the boot. The wearer's inner side of the boots have zippers and no side elastic. OPTIONAL Level three certification (if applicable): Optional Accessories Items below are optional costume accessories. These items are not required for approval, but if present appear as described below. If adding in an accessory after initial approval, the item still needs to be submitted to local GML for approval before use. E-11 Blaster Manufactured by BlasTech Industries, the E-11 is standard-issue for many Imperial troops. Light, compact yet powerful, the E-11 blaster is always in high demand throughout the galaxy. "Note, the E-11 holster as seen in the Original Trilogy movies is not an authorized accessory for rogue One armor". Based on a real or replica Sterling Airsoft Gun, Sterling Sub-Machine Gun, scratch-built, or a modified commercial toy Stormtrooper blaster. A small flashlight shall can be mounted on the right side of the blaster centred over the T-Tracks. OPTIONAL Level two certification (if applicable): Blaster shall be based on a real or replica S&T Sterling L2A1 AEG Airsoft Gun. (Folding Stock does not need to function) D-Ring shall be present on the rear end cap. Scope shall be a real or replica M.H.R. (Minneapolis Honeywell Regulator Co.) M38 Telescope. 1943 model is preferred. Counter shall be a real or replica Hengstler 400 Series counter. Eagle logo is preferred. Power Cylinders shall be mounted on top of the magazine well. R1 style power cylinders are preferred over ANH style. 6 rows of T-Tracks cover the Sterling receiver holes except for the lower left row with the bayonet lug. Flashlight if fitted shall be a real or replica Element M300A Mini Scout Light. 3D printed blasters can not contain visible print lines and must be sanded smooth for a more realistic appearance. OPTIONAL Level three certification (if applicable): Scope shall be a real or replica 1943 M.H.R. Co. M38 Telescope, 1942 model is not allowed. Counter shall be a real or replica Hengstler 400 Series counter with Small eagle logo. Large eagle logo is not allowed. Power Cylinders shall be R1 style, ANH style is not allowed. BlasTech DLT-19 Heavy Blaster Rifle Based on a real or replica MG-34 machine. OPTIONAL Level two certification (if applicable): A DLT-19 is an MG-34 with T-tracks on the barrel, ejection port cover added, and a small disk on left side. 3D printed blasters can not contain visible print lines and must be sanded smooth for a more realistic appearance. OPTIONAL Level three certification (if applicable): A small flashlight shall can be mounted on the right side of the blaster forward the front sight. BlasTech T-21 Light Repeating Blaster Rifle Based on a real or replica Lewis Mark I machine gun. For this prop the magazine disk and bipod of the original gun are left off. Rubber or rubber-like tubing is wrapped around the barrel shroud covering about ½ the length of the shroud. A small flashlight shall be mounted on the right side of the blaster forward the front sight. OPTIONAL Level two certification (if applicable): A black nylon 2-point sling shall be attached. Front sight shall be present on top of forward most large barrel ring. 3D printed blasters can not contain visible print lines and must be sanded smooth for a more realistic appearance. OPTIONAL Level three certification (if applicable): Three large barrel shroud rings are present, two before the rubber tubbing and one prior to the shroud transition. Small barrel ring is present at end of the barrel. Charging handle is mounted on right side of the blaster. Gas Key Adjustment Lever greeble is mounted on the bottom of barrel shroud before forward most large barrel ring. Oil Cleaning Brush greebles are mounted on stock. Sling is mounted to blaster and stock and not wrapped around either. Flashlight shall be a real or replica Element M300A Mini Scout Light. Baton and holster Flat or matte black in color, free of adornment or decoration. Is composed of three sections that extend outward when in use. When not in use, it appears as one cylinder. Is approximately 14" long when collapsed and 1" in diameter. The baton hangs off of the left rear belt, on a black holster. It is be attached at two points on the holster: one at the top, and one at the bottom. The baton should not swing when holstered. The holster is made from leather or leather-like material. OPTIONAL Level two certification (if applicable): 3D printed blasters and any approvable accessories can not contain visible print lines and must be sanded smooth for a more realistic appearance. Imperial Binders Imperial binders accurate in detail and proportion to official references is an authorized accessory. OPTIONAL Level two certification (if applicable): 3D printed blasters and any approvable accessories can not contain visible print lines and must be sanded smooth for a more realistic appearance. Tk rogue one pauldron.jpg Pauldron Rogue One Pauldrons denote rank or mission specialization. The Rogue One Pauldron is specific to Rogue One and differs from the original trilogy in color and stitching. Original trilogy Pauldrons are not an authorized accessory for Rogue One armor. An Orange, white, or black ornament made of leather plastic or leather-like material, worn over the right shoulder. The Orange is specific to Rogue One and a different shade from the original trilogy. The colored panel is divided into three sections by color matched stitching to conform to the wearers shoulder and has black piping around the outside edge. The remainder of the Pauldron is black and divided by black stitching into 10 segments. The neck closure is black and has two black snaps visible. There is a black elastic strap that runs from back to front and is worn under the bicep to hold the Pauldron in place. The strap is conned to the Pauldron on top by two black snaps inlayed in black “D” shaped leather or leather-like ends. The underside of the Pauldron is white regardless of top color and is divided with white stitching into 13 segments. The entire outside edge is finished with black piping and the underside of the neck closure is black. Comlink A comlink may be worn on the belt
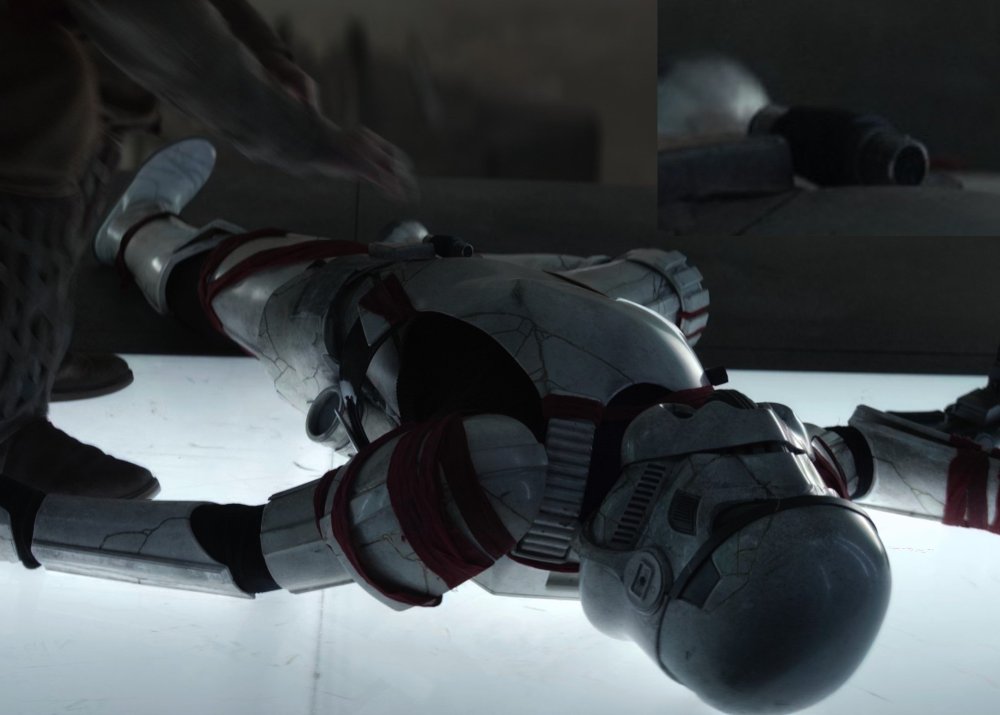
-
-- EDIT 08/31/2022-- Future Jason here, I just wanted to provide this colorful edit to help explain how I'm going to handle additions to this original post. Initially, I was striking out verbiage as it was written, then adding new text, but it was getting messy. I will continue using strike through text whenever I remove something from the existing CRL, but will follow that up with red text indicating the agreed upon change. Of note, I will try not to make any of these changes unless it's captured in this conversation, but I am receiving input from detachment leadership in addition to what's captured here. If anything ever appears in the CRL text below that a person does not recall discussing, please let us know so the discussion can continue. What I absolutely refuse to do is create ambiguous text, or what I refer to as a "moving target CRL." Any edits to my original post will be written in yellow so you can follow the changes easier; I will also date any revision/ edit. So again, CRL changes/ additions in red instructions/ original post edits in yellow. Thanks, TK-51923 Fellow TKs. After several discussions regarding the inclusion of Remnant Stormtroopers, as seen in The Mandalorian seasons 1 and 2 into the Databank, we have decided to move forward with the creation of a CRL. The goal in developing this thread is to create a CRL specific to the heavily weathered Remnants serving Werner Herzog's "The Client" as well as those seen in Season 2 episode 7 The Believer, working in the rhydonium refinery on the planet Morak. For previous discussion on this topic, please see the following thread: https://www.whitearmor.net/forum/topic/48305-new-anthology-tk-crl/ Additionally, for reference, please see the following picture: Additionally, since we have several new references to draw from since the creation of the original Rogue One TK CRL and it's subsequent revision in 2020, this thread will also serve to address revisions to the current ROTK CRL and the potential creation of a separate CRL for the New Generation/ Anthology TK. Discussions are ongoing regarding how to handle this generation of TK armor that has become synonymous with the Anthology films and various Disney+ series. This includes the existing ROTK, which could be renamed, receive additional variations, remain unchanged, or none of the above. However, one item that has been emphasized to me from detachment staff is that we have to clearly show that this is a unique set of armor without stating "it's dirty." Additionally, we have found several instances in which items were either missing, broken, or taped together by the costume department for the respective productions; these discrepancies will not be included in any new CRL or revisions to existing CRLs. The goal of this thread is to identify the unique attributes of the costume that are uniform throughout all of it's appearances in Anthology films and Disney+ productions, not to capture broken or missing items. Things that will not be considered: broken thigh armor, drop boxes tucked into the thighs or missing altogether, missing TDs, and "$#1++y wardrobe dressing or stunt men with gaffer tape." I'm not going to say who's quote that was. With that said, we obviously have an ANH OT bucket resting atop Rogue One style armor. These are on prominent display, but there's other unique characteristics as well. This is our opportunity to post them up and start hashing out the details. Please take a look at the aforementioned thread, but I also intend on posting several of the pictures here. To get started, I will post the verbiage from our current ROTK CRL, and include the wording from the ANH Stunt helmet. I will continue updating everything as we go along and highlight any changes in red. Additionally, even though this isn't a New Generation/ Anthology CRL, we need to capture anything in the New Generation gear that hasn't been covered previously. If there's new things that have been discovered, please post them. Let's get started: Helmet Moderate to heavily weathered 8/24/2022 Traps (trapezoids on dome of helmet) and tears (area beneath the corners of eye lenses) are gray. Rear traps and tears have vertical black lines. Lenses are flat material, green in color, sufficiently dark enough to obscure the costumer's eyes. The “ear” bars have three or four bumps and are gray or painted gray, with a black outline. Painting the bumps with rank stripes (highlighted) in black is optional. Frown is painted gray and does not leave the teeth area. A total of 8 cut outs in the teeth area of the frown are present. Tube stripes are medium blue, numbering between 9 and 16 per side with the curve bends extending backwards. Vocoder (vertically ribbed chin detail) is painted black. Aerators/Hovi-MIX tips (cylinders on either side of the vocoder) are black or painted black. Tears, traps, and tube stripes may be hand painted, decals, or decals that replicate hand painted. Mesh may be used behind the frown to obscure the face of the wearer. Note: The helmet is accurate in detail and proportion to official references. Many commercially available helmets or those considered disproportionate in size or shape are ineligible. OPTIONAL Level two certification (if applicable): Ears shall have three screws per side, one above and one below the ear bar and one at the base of the helmet. Ear bars have four bumps only. Not three. Traps/tears and tube stripes shall have the correct ANH TK details. Ideally, the tube stripes are positioned approximately a pencil width from the side of the cheek. Fall of tube stripe tops ideally lean toward the front. Correct Aerators/Hovi-MIX tips are present. Screens used shall be of a wide type mesh, with the rim of the mic and the inside white or painted white. OPTIONAL Level three certification (if applicable): Ear bars shall have only one bump painted in black (rank stripes). Ideally, placement of ears (and screws) should closely follow the rear angle of the trap above them Neck trim shall be of an s-type profile rather than a u-type profile. Tears/traps shall be hand painted or use decals that emulate hand painted (with correct ANH TK details). Ear screws shall be slotted, flat topped, countersunk and painted white. The vocoder must be integrated into the helmet, and not a separate piece. Neck Seal Moderate to heavily weathered 8/24/2022 Black with horizontal ribs, fitted to the wearer, and extending from the base of the neck to conceal the entire neck Under Suit Moderate to heavily weathered 8/24/2022 Black non-textured material, either one-piece or two-piece construction with no visible zippers or logos/designs. OPTIONAL Level two certification (if applicable): Top, where visible shall be fully ribbed with all horizontal ribbing on the arms, chest, and back. The centre of chest and back may be mesh as long as it is covered by armor. Pants shall be black non-textured material and have horizontal ribbing at the knees only. Knee gaskets are allowed as long as they correctly match top ribbing material, spacing and color. The hip section shall not have ribs. OPTIONAL Level three certification (if applicable): All ribbing on knees, arms, chest, and back must be stitched between each rib in detail and proportion to official references. The armpit area shall have the correct hexagonal mesh detail Shoulder Straps Moderate to heavily weathered 8/24/2022 They may be affixed with Velcro or adhesive. OPTIONAL Level two certification (if applicable): OPTIONAL Level three certification (if applicable): These shall be inserted behind the chest tabs and into slots of the backplate. Shoulder Armor Moderate to heavily weathered 8/24/2022 One on each shoulder. The shoulders are considered effectively symmetrical; they may be worn interchangeably on the left and right shoulders and may have a black elastic strap that wraps around the inside of the bicep. OPTIONAL Level two certification (if applicable): OPTIONAL Level three certification (if applicable): There is no swoop on the shoulder bell raised area. There is no elastic strap that wraps around the inside of the bicep. Upper Arm (Bicep) Armor 8/31/2022 Moderate to heavily weathered 8/24/2022 Both biceps are symmetrical and interchangeable. The front strip is bevelled and approximately 1/8" thick that does not extend beyond the bicep, and has a smaller cover strip layered thereon. OPTIONAL Level two certification (if applicable): OPTIONAL Level three certification (if applicable): Cover strips will cover both the front and back joints. Biceps are loosely held closed in the back with elastic, shock cord (bungee cord) or white Velcro and are designed to remain flexible. The biceps are suspended from the shoulder armor via shock cord (bungee/ framilon cordage) via "J hooks" at the top of the biceps per the screen references. 8/31/2022 A separate piece of white 1" webbing or elastic, extends from the shoulder armor, through a slot in the bicep per the screen references. 8/31/2022 Forearm Armor Moderate to heavily weathered 8/24/2022 The front strip is bevelled and approximately 1/8" thick that does not extend beyond the bicep, and has a smaller cover strip layered thereon. OPTIONAL Level two certification (if applicable): OPTIONAL Level three certification (if applicable): Forearms are loosely held closed in the back with elastic, shock cord (bungee cord) or white Velcro and are designed to remain flexible. Cover strips will cover both the top and bottom joints. Hand Plates Moderate to heavily weathered 8/24/2022 Roughly pentagonal in shape, the hand plates are mounted securely over the back of the glove. As an alternative to plastic, these may be made out of latex or latex-like material. OPTIONAL Level two certification (if applicable): Hand guards shall be made of plastic. OPTIONAL Level three certification (if applicable): Hand guards should follow the correct RO shape, ANH hand guards are not acceptable. A small indent in the front of the hand plate shall be present. Gloves Moderate to heavily weathered 8/24/2022 Black in color, made of either rubber, Nomex, leather, or leather-like material, with no visible straps or logos/designs. The fingers are enclosed, non-textured. OPTIONAL Level two certification (if applicable): Gloves shall not be made of rubber. OPTIONAL Level three certification (if applicable): The base material of the gloves will be a black synthetic material similar to Lycra, Spandex, Elastane, or Nylon. Palms of gloves shall be shiny black fabric or leather or leather-like material. On the index finger shall be a stitched piece of fabric made from the same material as the hand's underside that while stitched to the finger has one cutout towards the end of the finger that reveals the netted material underneath. Gloves shall have the correct leather pattern along the fingers/palm. Chest Armor Moderate to heavily weathered 8/24/2022 Chest plate overlaps the abdominal plate OPTIONAL Level two certification (if applicable): There are raised trapezoids at the top of the shoulder section beneath which the straps insert. The chest and back sides shall be connected by black extensions pieces. OPTIONAL Level three certification (if applicable): Top pectoral out lines swoop correctly outward. Bottom of ribcage flares correctly outward. Back Armor Moderate to heavily weathered 8/24/2022 Back plate contains an "O II" design. There are raised trapezoids at the top of the backplate section beneath which the shoulder straps insert. The backplate continues past these trapezoids towards the top of the shoulder OPTIONAL Level two certification (if applicable): Top of box wall has a trapezoidal indentation. There is a roughly 8mm circular indent near the right top corner of the backplate. OPTIONAL Level three certification (if applicable): Bottom of backplate is curved and extends past abdominal back cover plate. The O cog shall have 16 spines. The 11 bars have 5 horizontal evenly spaced raised bars on the bottom of the face. There is a rectangular tab protruding from the bottom of each of the two raised trapezoids at the top of the backplate. Abdomen Armor Moderate to heavily weathered 8/24/2022 The abdominal armor consists of a one-piece corset design with a vertical opening centred on the back. The back opening is covered by a rectangular cover plate that is worn under the back armor. There are 3 vertical ribs centered on the front of the abdomen and two (one left and one right) ribs further spaced to each side of the center. There are two (one left and one right) angled (approximately 70 degrees) ribs on each side of the abdominal armor. There are two (one left and one right) angled (approximately 70 degrees) recessed ribs on each side of the abdominal armor behind the raised angled ribs that are black Any side shims added are to be added to the white areas of the armor. The center front detail consists of a raised rectangular panel. On the right half of the panel, there is a vertical column of 4 buttons approximately 7/16” (11mm) in diameter. The bottom button is blue while the other three are grey. On the left half of the panel, there is a vertical column of raised evenly spaced horizontal gear teeth with a recessed trapezoid at the top of the column. The rectangular inside bottom of the trapezoid is black. The left front detail consists of a raised rectangular panel with an angled top. There is a vertical column of 4 buttons approximately 7/16” (11mm) in diameter. The bottom button is blue while the other three are grey. The right front detail consists of a primary raised rectangular panel with an additional secondary raised rectangular panel covering the top 1/3 of the primary panel. There is a column of three thin horizontal evenly spaced raised lines across the top ½ of the secondary panel. The abdominal armor is accurate in detail and proportion to official references. OPTIONAL Level two certification (if applicable): The cod armor is separate from the abdominal armour. The right front detail panel is centered between the two outer vertical right ribs. The left front detail panel is centered between the two outer vertical left ribs. OPTIONAL Level three certification (if applicable): The abdomen armor has two horizontal recessed rectangles centred above the center front detail panel and on each side of the center rib. All 8 Button details are recessed and bordered with a thin edge, only the recessed portion is painted. The center front panel column of raised gear teeth has only 9 teeth. There is a recessed edge (approximately 1/8” 3mm wide) along all four sides around the face of the center front panel The right front detail panel is centered between the two outer vertical right ribs. The left front detail panel is centered between the two outer vertical left ribs. There is a recessed edge (approximately 1/8” 3mm wide) along the sides and top around the face of the left front detail pane The abdominal armor back cover plate has two protruding tabs along the bottom that rest inside the back hard belt. Move to "kidney armor" section. Cod Armor Moderate to heavily weathered 8/24/2022 The cod armor consists of a body shape formed triangular plate with a raised center rib and raised lower portion and is accurate in detail and proportion to official references. The cod shall be a separate piece from the abdominal plate 8/31/2022 Removed from Level Two certification. Having this as a level 2 requirement instead of basic may lead people to use OT amor in constructing their kits or create abdominal/ cod pieces that are not accurate to any available references for this costume. OPTIONAL Level two certification (if applicable): The cod shall be a separate piece from the abdominal plate. OPTIONAL Level three certification (if applicable): Kidney Armor Moderate to heavily weathered 8/24/2022 The kidney armor is separated in the back and covered by a rectangular kidney/ trauma plate. 8/31/2022 The rectangular plate is separate from the posterior armor and sits above the rear hard belt. 8/31/2022 OPTIONAL Level two certification (if applicable): The kidney/ trauma plate is large enough to cover the entire gap present in the rear of the abdominal armor and extends up underneath the back armor. 8/31/2022 OPTIONAL Level three certification (if applicable): The kidney armor cover plate has two protruding tabs along the bottom that rest inside the back hard belt. Posterior Armor Moderate to heavily weathered 8/24/2022 The posterior armor shall be a separate piece from the abdominal armor OPTIONAL Level two certification (if applicable): Belt Moderate to heavily weathered 8/24/2022 The Ammunition belt consists of a hard belt made of the same or similar material as the armor in two separate parts front and back (with overlap). The back front belt overlaps the front rear belt on the sides. 8/31/2022 There are 6 ammunition boxes mounted to the belt. There are 2 (one left and one right) drop boxes suspended by black webbing approximately 2" (50mm) wide. Drop boxes must be accurate in detail and proportion to official references. The ammunition belt is accurate in detail and proportion to official references. OPTIONAL Level two certification (if applicable): The only detail visible on the front belt is the mounted ammunition boxes unlike the squares present on ANH belts. The top edge of the front belt has protruding teeth that nest inside gaps between the ribs and detail panels of the abdominal armor. The two center ammunition boxes are thinner than the other mounted ammunition boxes. The second and fifth mounted ammunition boxes are slightly wider than the two center ammunition boxes. The two outermost ammunition boxes are almost square. The two drop boxes are rectangular and as wide as the mounted square boxes. OPTIONAL Level three certification (if applicable): The ammo boxes across the front are all made separately from the main belt and are secured to it The two drop boxes hang no more than 1” 25mm below the front belt and the black strap is visible. The second and fifth mounted ammunition boxes have a trapezoid detail on the top of each ammunition box. The trapezoid detail is a triangular prism that has no rounded edges. 8/31/2022 The front belt protrudes past above all mounted ammunition boxes above and below by approximately 1/8”-1/4” 3-6mm. The front belt protrudes approximately 1/2" below the front 4 ammo boxes in a trapezoidal shape that extends from the center of both medium sized ammo boxes where it tapers to 1/8"-1/4" (3-6mm) below the ammo boxes across the remaining span of the belt per the official references. 8/31/2022 All ammunition boxes, including the drop boxes, have slightly bevelled chamfered edges on the face of each box. 8/31/2022 Thermal Detonator Moderate to heavily weathered 8/24/2022 The thermal detonator consists of a grey tube approximately 3” 76mm in diameter and 8” 203mm long approximately. There are two white endcaps and a white control panel. The white control panel has a horizontal row of white rectangles along the bottom of the control panel and a grey “D” shaped recessed on the left side of the horizontal row. There is an oval greeble that protrudes from the control near the top right side. The thermal detonator is mounted to the rear hard belt and there are no visible screws or clips and is accurate in detail and proportion to official references. OPTIONAL Level two certification (if applicable): The thermal detonator mount should be fully enclosed with solid walls on all four sides. The center of both end caps is gray. OPTIONAL Level three certification (if applicable): The control panel bottom detail is a raised panel with 7 raised rectangles, all are evenly spaced except the right most rectangle. There is a panel line approximately ¼” 6mm from the edge around the control panel. There is a panel line approximately 1/8” 3mm from the edge of each endcap. The inside edge of both endcaps is bevelled. The oval greeble consists of an oval tube protrusion with the top edge slightly extending past the tube wall thickness and is visually similar to the Deathtrooper chin greeble. The thermal detonator is made separate from the mount and secured to it. 8/31/2022 I added this due to the number of instances in which we've seen the TD disconnected from it's mount or missing on screen. Similar to the belt boxes, the TD should be separate, but fixed to the mount appropriately as per the screen references. Thigh Armor Moderate to heavily weathered 8/24/2022 The thigh armor is mirrored for each leg and not interchangeable. The cover strips are bevelled and approximately 1/8" thick that does not extend beyond the thigh and has a smaller cover strip layered thereon. The top edge of the thigh armor is unadorned, and the bottom edge has a raised detail that fallows the bottom edge contour. The small ammo belt consists of 5 evenly spaced rectangle ammunition boxes and is installed on the bottom of the right thigh, there are no visible screws or rivets. OPTIONAL Level two certification (if applicable): Thighs are loosely held closed in the back with elastic, shock cord (bungee cord) or white Velcro and are designed to remain flexible. 8/31/2022 Thigh armor has been seen several times separated (flexible) in the rear, but never worn in the same manner as the arms (bungee cords/ framilon cordage). Cover strips will cover both the front and rear joints. Rear cover strips will close outside over inside, i.e. left over right for the left thigh and Right over Left for the right thigh. 8/31/2022 OPTIONAL Level three certification (if applicable): The bottom outside edges of the small ammunition belt are angled chamfered at approximately 45 degrees. Thigh armor is suspended by a black strap approximately 1” 25mm in width with a plastic side release buckle tri-glide buckle that is covered by black webbing fabric or elastic that runs down the side seam of the leg. 8/31/2022 Lower Leg Armor Moderate to heavily weathered 8/24/2022 The greaves are mirrored for each leg and are not interchangeable. The top edge of the greaves has a raised detail that fallows the top edge contour. The bottom edge of the greaves flairs out to cover the top of the ankle and boots. The cover strips are bevelled and approximately 1/8" thick that does not extend beyond the greave and has a smaller cover strip layered thereon. Greaves are loosely held closed in the back with elastic, shock cord (bungee cord) or white Velcro and are designed to remain flexible. Cover strips will cover both the front and rear joints. The trapezoid knee plate (sniper knee plate) is affixed to the top of the left greave and there are no visible screws or rivets. Sniper knee plate must be aligned with the vertical cover strip and the top raised edge detail on the greave and is accurate in detail and proportion to official reference. OPTIONAL Level two certification (if applicable): The sniper knee plate has raised detail that fallows the top edge contour. The sniper knee plate has 3 trapezoidal lugs on each side and 2 on the center bottom edge (totalling 8) of the knee plate. OPTIONAL Level three certification (if applicable): Boots Moderate to heavily weathered 8/24/2022 Boots are above ankle height and the same style as the First Order TK. Chelsea type boots in the style of OT TK are not acceptable. Boots are all white and made of leather or leather-like material Flat black soles without a heel. Patent leather or high gloss is not permitted. OPTIONAL Level two certification (if applicable): There is no seam present on the front of the boot. The wearer's inner side of the boots have zippers and no side elastic. OPTIONAL Level three certification (if applicable): Optional Accessories Items below are optional costume accessories. These items are not required for approval, but if present appear as described below. If adding in an accessory after initial approval, the item still needs to be submitted to local GML for approval before use. E-11 Blaster Weathering is optional 8/24/2022 Manufactured by BlasTech Industries, the E-11 is standard-issue for many Imperial troops. Light, compact yet powerful, the E-11 blaster is always in high demand throughout the galaxy. "Note, the E-11 holster as seen in the Original Trilogy movies is not an authorized accessory for rogue One armor". Based on a real or replica Sterling Airsoft Gun, Sterling Sub-Machine Gun, scratch-built, or a modified commercial toy Stormtrooper blaster. A small flashlight shall be mounted on the right side of the blaster centred over the T-Tracks. OPTIONAL Level two certification (if applicable): Blaster shall be based on a real or replica S&T Sterling L2A1 AEG Airsoft Gun. (Folding Stock does not need to function) D-Ring shall be present on the rear end cap. Scope shall be a real or replica M.H.R. (Minneapolis Honeywell Regulator Co.) M38 Telescope. 1943 model is preferred. Counter shall be a real or replica Hengstler 400 Series counter. Eagle logo is preferred. Power Cylinders shall be mounted on top of the magazine well. R1 style power cylinders are preferred over ANH style. 6 rows of T-Tracks cover the Sterling receiver holes except for the lower left row with the bayonet lug. Flashlight shall be a real or replica Element M300A Mini Scout Light. 3D printed blasters can not contain visible print lines and must be sanded smooth for a more realistic appearance. OPTIONAL Level three certification (if applicable): Scope shall be a real or replica 1943 M.H.R. Co. M38 Telescope, 1942 model is not allowed. Counter shall be a real or replica Hengstler 400 Series counter with Small eagle logo. Large eagle logo is not allowed. Power Cylinders shall be R1 style, ANH style is not allowed. SE-14r Light Repeating Blaster Weathering is optional 8/24/2022 SE-14r Light Repeating Blaster. The barrel detailing is evident with the cocking lever and slider in place. The ejection port is also evident. The scope mount looks similar to the magazine but smaller in size. OPTIONAL Level two certification (if applicable): E-22 Blaster Weathering is optional 8/24/2022 Based on a real or replica Sterling sub-machine gun, scratch-built, cast, 3D print or a modified commercial toy Stormtrooper blaster. It has a extended stock attached at the rear and a extended front housing with second lower barrel. Tactical flashlight (Surefire scout M300 or replica) mounted on right side of barrel. Magazine is extended length. Power cylinder is larger with 2 outer cylinders and 2 smaller central cylinders Scope is a M38 1943 version Scope rail is fitted onto rail blocks, one inside the rear sight and the other at the front end of the rail. There are 3 swivel studs fitted, one on the rear stock and one each side of the front barrel housing. Sling is 25mm webbing strap that is adjustable using a silver 25mm 3 fixed bar webbing buckle (optional). Sling is fitted with Talon quick release 25mm swivel or replica (optional). Red lights fitted on both sides of the rear housing, Hengstler fitted with a red light for the 3 forward tubes and 2 small red lights fitted into the rear barrel housing under the torch, the lights are permanent and are non flashing or pulsed (optional hero version only). OPTIONAL Level two certification (if applicable): Base is based on S&T Airsoft sterling with closed working parts (no spring) Screws used are M4 x 25mm Allen screw/bolts and sunken Allen screws for power cylinders Sling is fitted with Talon quick release 25mm swivel. Pauldron Rogue One Pauldrons denote rank or mission specialization. The Rogue One Pauldron is specific to Rogue One and differs from the original trilogy in color and stitching. Original trilogy Pauldrons are not an authorized accessory for Rogue One armor. An Orange, white, or black ornament made of leather plastic or leather-like material, worn over the right shoulder. The Orange is specific to Rogue One and a different shade from the original trilogy. A red pauldron as seen in The Mandalorian Chapter 14, may be worn as part of the New Generation TK costume, but not as a Rogue One stormtrooper. 8/31/2022 The colored panel is divided into three sections by color matched stitching to conform to the wearers shoulder and has black piping around the outside edge. The remainder of the Pauldron is black and divided by black stitching into 10 segments. The neck closure is black and has two black snaps visible. There is a black elastic strap that runs from back to front and is worn under the bicep to hold the Pauldron in place. The strap is conned to the Pauldron on top by two black snaps inlayed in black “D” shaped leather or leather-like ends. The underside of the Pauldron is white regardless of top color and is divided with white stitching into 13 segments. The entire outside edge is finished with black piping and the underside of the neck closure is black. OPTIONAL Level two certification (if applicable): OPTIONAL Level three certification (if applicable):
-
 Armor maker: AP commissioned build Helmet maker: AP commissioned build Blaster maker: Quest Design Bart Busse https://www.501st.com/members/displaymember.php?userID=36154&costumeID=124 5'10" 155 lbs Boot maker: Imperial Boots Canvas belt supplier: AP Handguard supplier: AP Holster maker: AP Photos: Front/Back: Left/Right: Left/Right arms raised: Action shots (don't have the hang of that yet, take your pick): Ab button close up: Cod & posterior connection: Interior strapping: Wrist openings: Helmet left/right/front/back: Backlit helmet lens: Hovi tip close up: Neck seal: TD front and back: Holster and belt (riveted to ab plate from AP): Boots: Gloves: Blaster left/right/back: Additional photos: If there is anything missing please let me know. Thank you for your consideration. Bart
 -
E-11 Suppliers 2021 Been a while since we've had an updated list, no doubt there are other suppliers so feel free to post any info Troopercoola https://www.facebook.com/Troopercoola JMC E-11 kit casted from sterling parts. Fieldmarshall - Aluminium http://www.warmachinepaintball.com/online-store-replicas/ http://blasterfactory.com/e-11-blaster-kits/ Imperial Warfighters - Rubber (NOT CURRENTLY TAKING ORDERS 20-6-2023) https://www.facebook.com/Imperial-Warfighters-280604068972001 RS Props - Rubber https://www.rspropmasters.com/store/sandtrooper/sandtrooper-blasters/blaster-e-11-new-hope/ Shear Tech - Rubber https://www.facebook.com/sheartech Imperial Supply Drop - Rubber https://www.whitearmor.net/forum/topic/52035-rubber-e11-blaster-run-x5/ FB: https://www.facebook.com/Imperial-supply-drop-112852407999265 Quest Designs - Resin https://www.questdesigncanada.com/ Imperial Arms - 3D Print https://www.etsy.com/ca/listing/702800849/e-11-max-edition-v4-star-wars-custom?variation0=1096533255 TK-14082’s - 3D Print https://www.whitearmor.net/forum/topic/51047-tk-14082s-3d-printed-e-11-kits-and-completed-blasters/ WILSON PRECISION 360 KITS - 3D print https://www.whitearmor.net/forum/topic/52766-v20-3d-printed-e-11-blasters-anh-wfree-shipping-3-kits-to-choose-from/
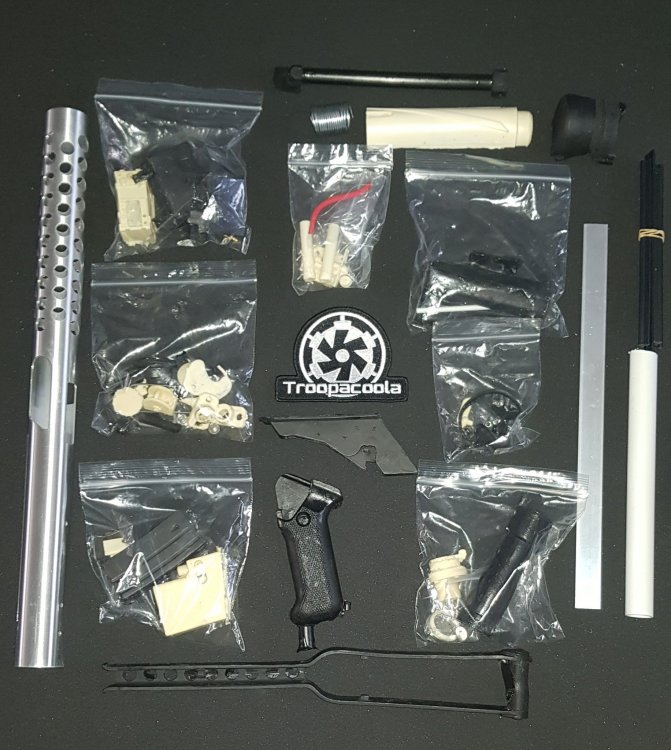
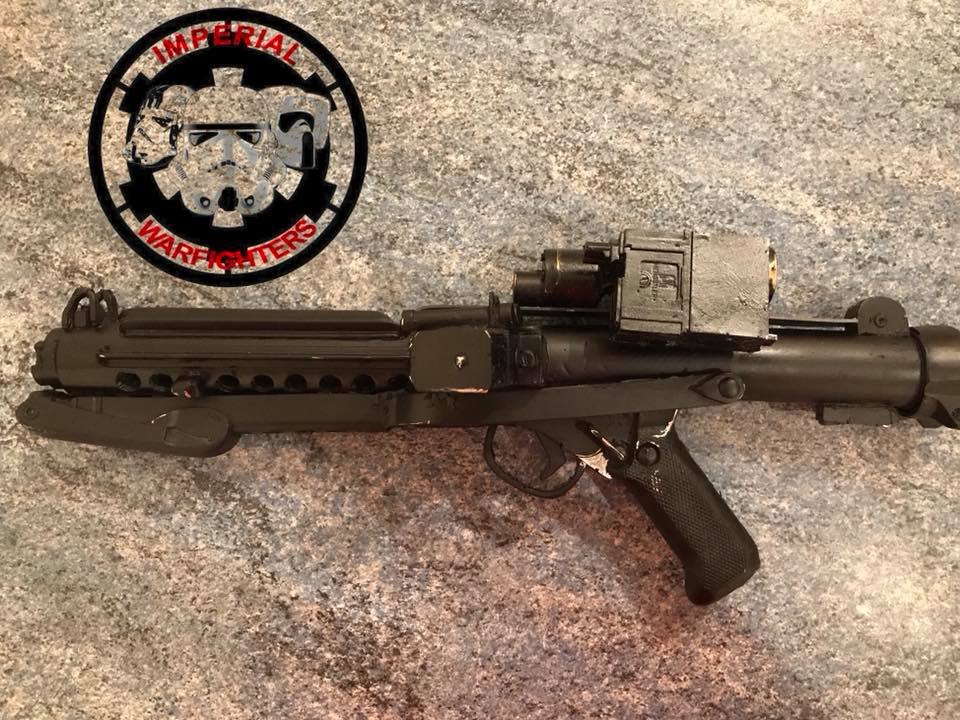
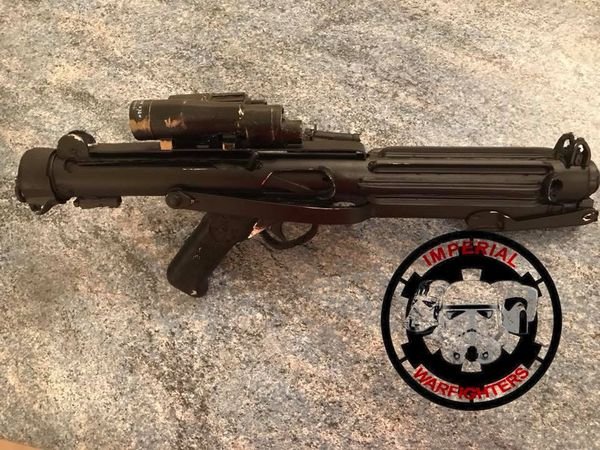
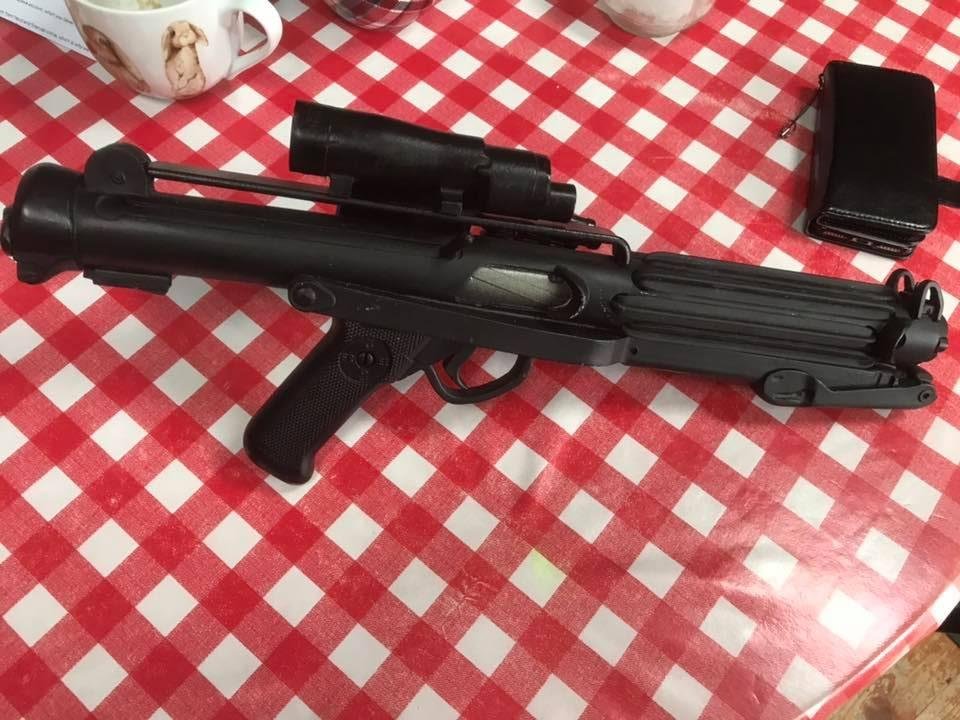
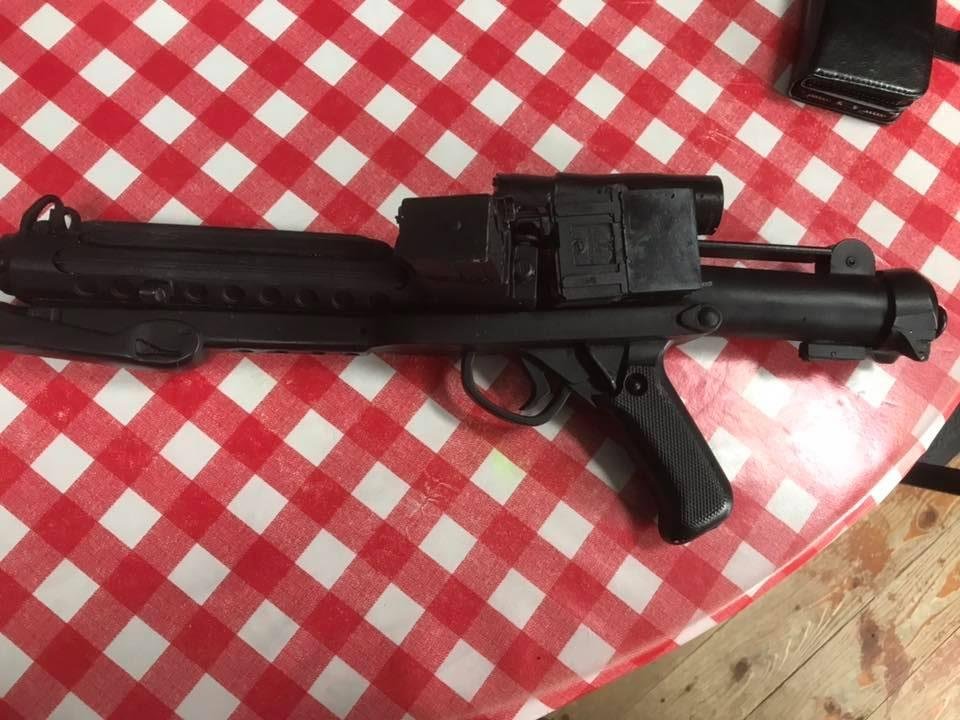
- 3 replies
-
- 12
-

-
I would while waiting for the Deployment Officers to review, the gloves came up on another EIB application recently GLOVES: Black in color, made of either rubber, nomex, leather, or leather-like material, with no visible straps or logos/designs. A touch up of black on your vocoder should be an easy task Watch out for dressing issues too, shoulder strap under backplate, a full length mirror can be a great help if you don't have a camera person who knows the costume well.
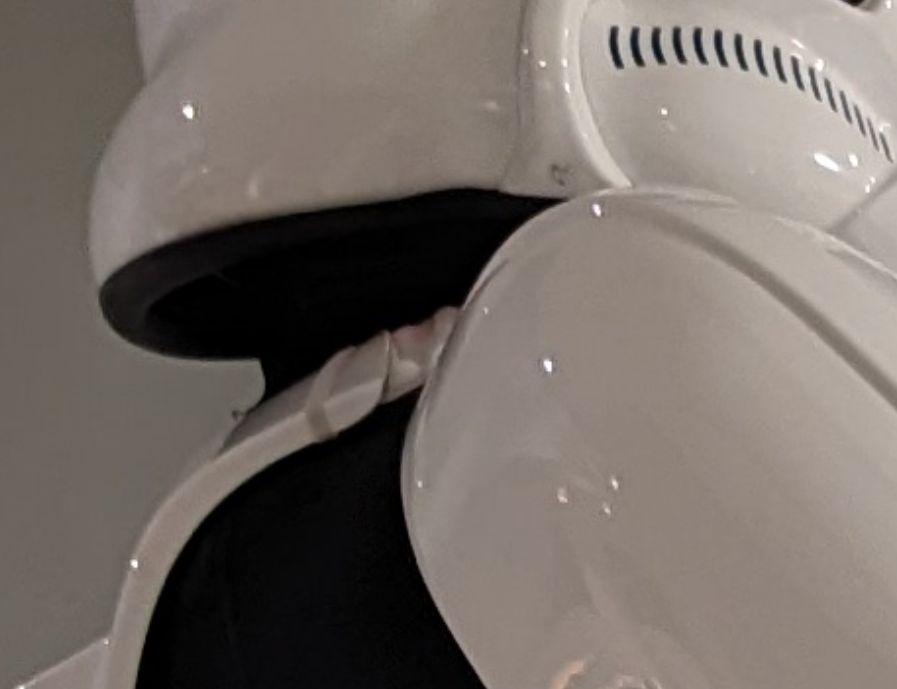
-
Hey everyone! So a few years back I built an AP that ended up being a sandy because frankly Im a big guy. I ended up selling it because it just flat out hurt to wear it. I'm 6'1" and about 260lbs and it just dug in in 100 places. I ended up building an AT-ST driver to wear instead. SO fast forward to now, I regret selling it because I miss the smiles from the kids when they see a Stormtrooper. No one but us cares about the AT-ST driver costumes lol. The way I explained it to my wife was that this is a bit of an addiction and the only one of the drugs strong enough is a TK or TD. So I got the wife permission to spend some money! Okay so I contacted Darkside Dave to get an AM. I have sent both deposit and payment now. Took 5.5 months between the two but that is fine with me. It looks like I now am building an extra helmet on top of my own. I'll be including all building activities on this page so hopefully it will help someone else down the road. TK-73337s Building service is open for business lol Here's the list of parts I have ordered or am in the process of ordering. Armour: -AM 5.0 ANH Stunt (Payment sent, waiting for BBB day) Soft Parts: -Undersuit (Have Old Undersuit) -Neck Seal (Contacted Pinkys) -Canvas belt (Contacted Pinkys) -Harness (Contacted Pinkys) -Holster (Bought Darmans off etsy) -Boots (Bought random boots from guy in California lol) -Gloves (Provided by dave) -Handplates (Provided by dave) Weapon: -E-11 (Bought Quest Design Canada E-11 off etsy) -Stand (Bought Quest Design Canada E-11 stand off etsy) Electronics: -Fans (I build my own 5v setup) I'm Basically doing a list from memory so if you see anything missing let me know. Build threads for me to learn from: