gmrhodes13
-
Posts
31,219 -
Joined
-
Last visited
-
Days Won
1,070
Content Type
Profiles
Forums
Gallery
Articles
Everything posted by gmrhodes13
-

ESB TK WIP - UKG - first build - hoping for centurian
gmrhodes13 replied to CallMeMrTibbles's topic in ESB Build Threads
That came out great, nice work. One thing to watch once you get suited up is make sure you have some of the O detail showing from the back, many forget this when assembling their TD's -
Xus Kenobi · ATA Works · ANH Stunt build
gmrhodes13 replied to Xus Kenobi's topic in ANH Build Threads
Backplate can come up, also looks like you need an elastic strap between the butt plate and cod, that should pull them together nicely -
BlueBoxFromSpace ATA ANH Stunt (first build)
gmrhodes13 replied to BlueBoxFromSpace's topic in ANH Build Threads
I would just trim your corners to meet the belt and see how that looks, there is no actual size for the corners One thing which may get a knock back at higher levels is the width of your sewing, having the double V stitch looks quite wide compared to original belts, but that is entirely up to the deployment officers -
TK Monkus' RS Prop Masters ANH-S Build Thread (first build)
gmrhodes13 replied to TK Monkus's topic in ANH Build Threads
On my RS set I had to add some pieces of foam inside to help keep them central, you don't want to make them too narrow or they will look odd against the rest of the armor -
Tat2trooper TX Anovos build thread
gmrhodes13 replied to tat2trooper's topic in Other 501st Costumes
I run mine up over the neck then down the arm no need for making any holes. Depends on the troop, most of the time I don't use the PTT, you just have to be a little more careful what words you use -
TK Monkus' RS Prop Masters ANH-S Build Thread (first build)
gmrhodes13 replied to TK Monkus's topic in ANH Build Threads
Some choose to leave some return edge, some remove all, I have thin arms so the extra return helps hold them in place and not wobble. Here is a great thread on return edges -
TK Monkus' RS Prop Masters ANH-S Build Thread (first build)
gmrhodes13 replied to TK Monkus's topic in ANH Build Threads
Nothing better than BBB's. 1. Most build threads are pretty much the same when building, Tony's has a very in-depth Anovos thread https://www.whitearmor.net/forum/topic/35086-ukswraths-anovos-tk-build-stunt/ 2. The large piece of plastic is for your cover strips 3. Yes some pieces are differently sized, lots of references available in the Gallery Sections https://www.whitearmor.net/forum/gallery/category/24-anh-tk-reference/ Here is a very in-depth thread of resources, lots of info to help your build there https://www.whitearmor.net/forum/topic/49412-all-in-one-tk-anh-stunt-index-of-resources-by-maskedvengeance/ You've started off well, if you don't know something ask, measure twice and cut once. Good luck with the build -
Finally ordered my first set of armor! RS ANH-S in ABS
gmrhodes13 replied to TK Monkus's topic in ANH (Stunt and Hero)
Very exciting times, good luck with the build -
Congratulations trooper and welcome to the ranks
-
I had the hard hat type plastic in mine and found it dug into my head after a long troop so promptly removed it and add some velcro and soft foam, a ring of foam goes around the temple and a thin piece of foam inside the top, pretty inexpensive upgrade but a lot more comfortable, for me anyway.
-
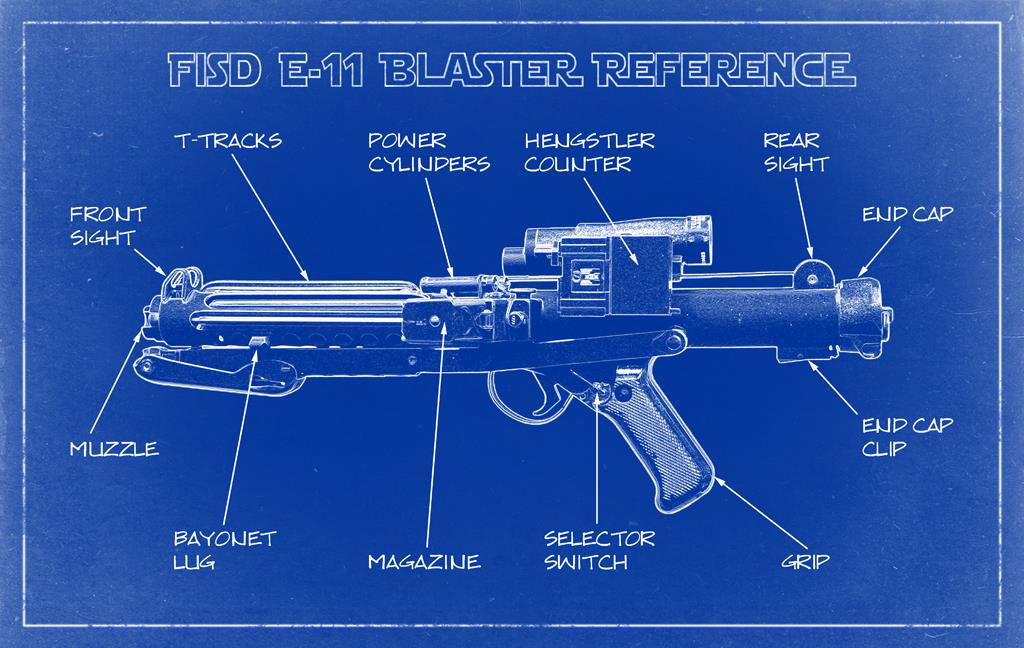
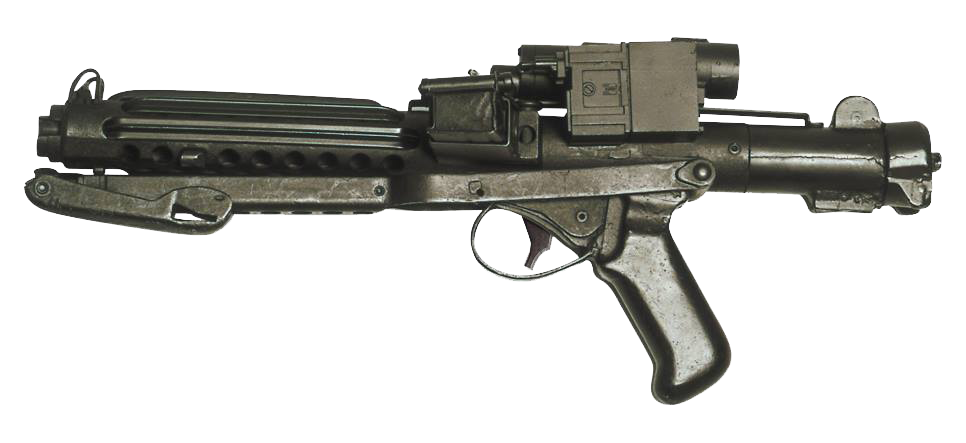
Looks ok, there are some issues of castings remains which would need to be removed and a few holes you cold fill. The counter should be further forward and a little lower

- 1 reply
-
- 1
-

-
Hello and welcome to the forum, there are a few things which will need upgrading from a standards SDS set of armor, especially for higher levels, a couple of useful links I posted a review in this thread also here Updates made in this thread and now Level 3 Centurion approved
-
ESB TK WIP - UKG - first build - hoping for centurian
gmrhodes13 replied to CallMeMrTibbles's topic in ESB Build Threads
Depends on the armor maker, some are a little easier than others, I used magnets, clamps and masking tape to get it to sit just right, I also didn't take off any of the clamps for 72 hours, the longer you leave the E6000 to dry the better. -
CableGuy renovates RS Prop Masters ANH Stunt
gmrhodes13 replied to CableGuy's topic in ANH Build Threads
Came out a treat, nice work Dan -
Looking forward to seeing this build
-
BlueBoxFromSpace ATA ANH Stunt (first build)
gmrhodes13 replied to BlueBoxFromSpace's topic in ANH Build Threads
Yes painted area is slightly smaller than the width of the button, reference: Note: For Level 3 the paint does not extend to the bottom of the actual raised button. -
Perhaps check out some of the R1 build threads to see how others began https://www.whitearmor.net/forum/forum/196-rogue-one-build-threads/ Make sure you build as closely as you can to reference material, especially being a new CRL the finished product with be scrutinised more. And of course measure twice and cut once
-
TK-91882 Requesting ANH Stunt EIB Status (1021)
gmrhodes13 replied to semperfi108's topic in Request Expert Infantry Status
Congratulations trooper -
EVA foam stormtrooper armor build
gmrhodes13 replied to Cheeseballs's topic in Other Non-Approved Star Wars Costumes
The chest/ab straps look as if they could be reduced a little as they are quite long which may help, but side straps would definitely do the trick -
There are also these images, 3D files are available for this too also here
-
EVA foam stormtrooper armor build
gmrhodes13 replied to Cheeseballs's topic in Other Non-Approved Star Wars Costumes
On plastic armor straps from the ab to the chest are usually enough but the may not be enough for foam so side straps may need to be added. Fantastic job
-
EVA foam stormtrooper armor build
gmrhodes13 replied to Cheeseballs's topic in Other Non-Approved Star Wars Costumes
Sizing is looking better, you just need to get the bottom of the chest to move backwards more towards the ab plate, the chest is sticking out quite a bit there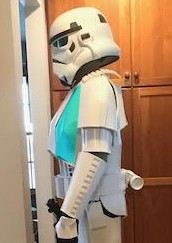
-
ESB TK WIP - UKG - first build - hoping for centurian
gmrhodes13 replied to CallMeMrTibbles's topic in ESB Build Threads
Looks much nicer -
Congratulations trooper and welcome to the Centurion ranks
-
Welcome aboard, you will find some great info here