gmrhodes13
-
Posts
31,206 -
Joined
-
Last visited
-
Days Won
1,069
Content Type
Profiles
Forums
Gallery
Articles
Everything posted by gmrhodes13
-

Tilheyra's FEM7 Build
gmrhodes13 replied to Tilheyra's topic in Other Non-Approved Star Wars Costumes
Sorry forgot you aren't going for approval. Dry brush would be the way to go, think of how a blaster mark would look if it grazed the armor, here's a nice video on the technique -
Tilheyra's FEM7 Build
gmrhodes13 replied to Tilheyra's topic in Other Non-Approved Star Wars Costumes
It doesn't list weathering as an option in the CRL however if you can provide references of weathering present I'm sure your GML would take that into account. As always if you are unsure have a chat with your GML about adding scuffs/weathering. There are so many ways to do weathering depending on the look you are after, I find with scuffs to use a dry brush and waterbased acrylic paints, can rub off easily if you apply too much but does dry nicely. -
Legacy FemTK Backplate - Version B
gmrhodes13 replied to Eleanor's topic in Legacy Stormtrooper (Joker Squad)
I think the issue you would have with the boots that you have is the side elastic, it's not visible on either A or B, the heel looks a little low for version A. Remember which ever backplate you want to use you will have to have the accompanying boots. I would confer with your GML, after all they will be the ones looking after base approval, some are a little stricter than others. -
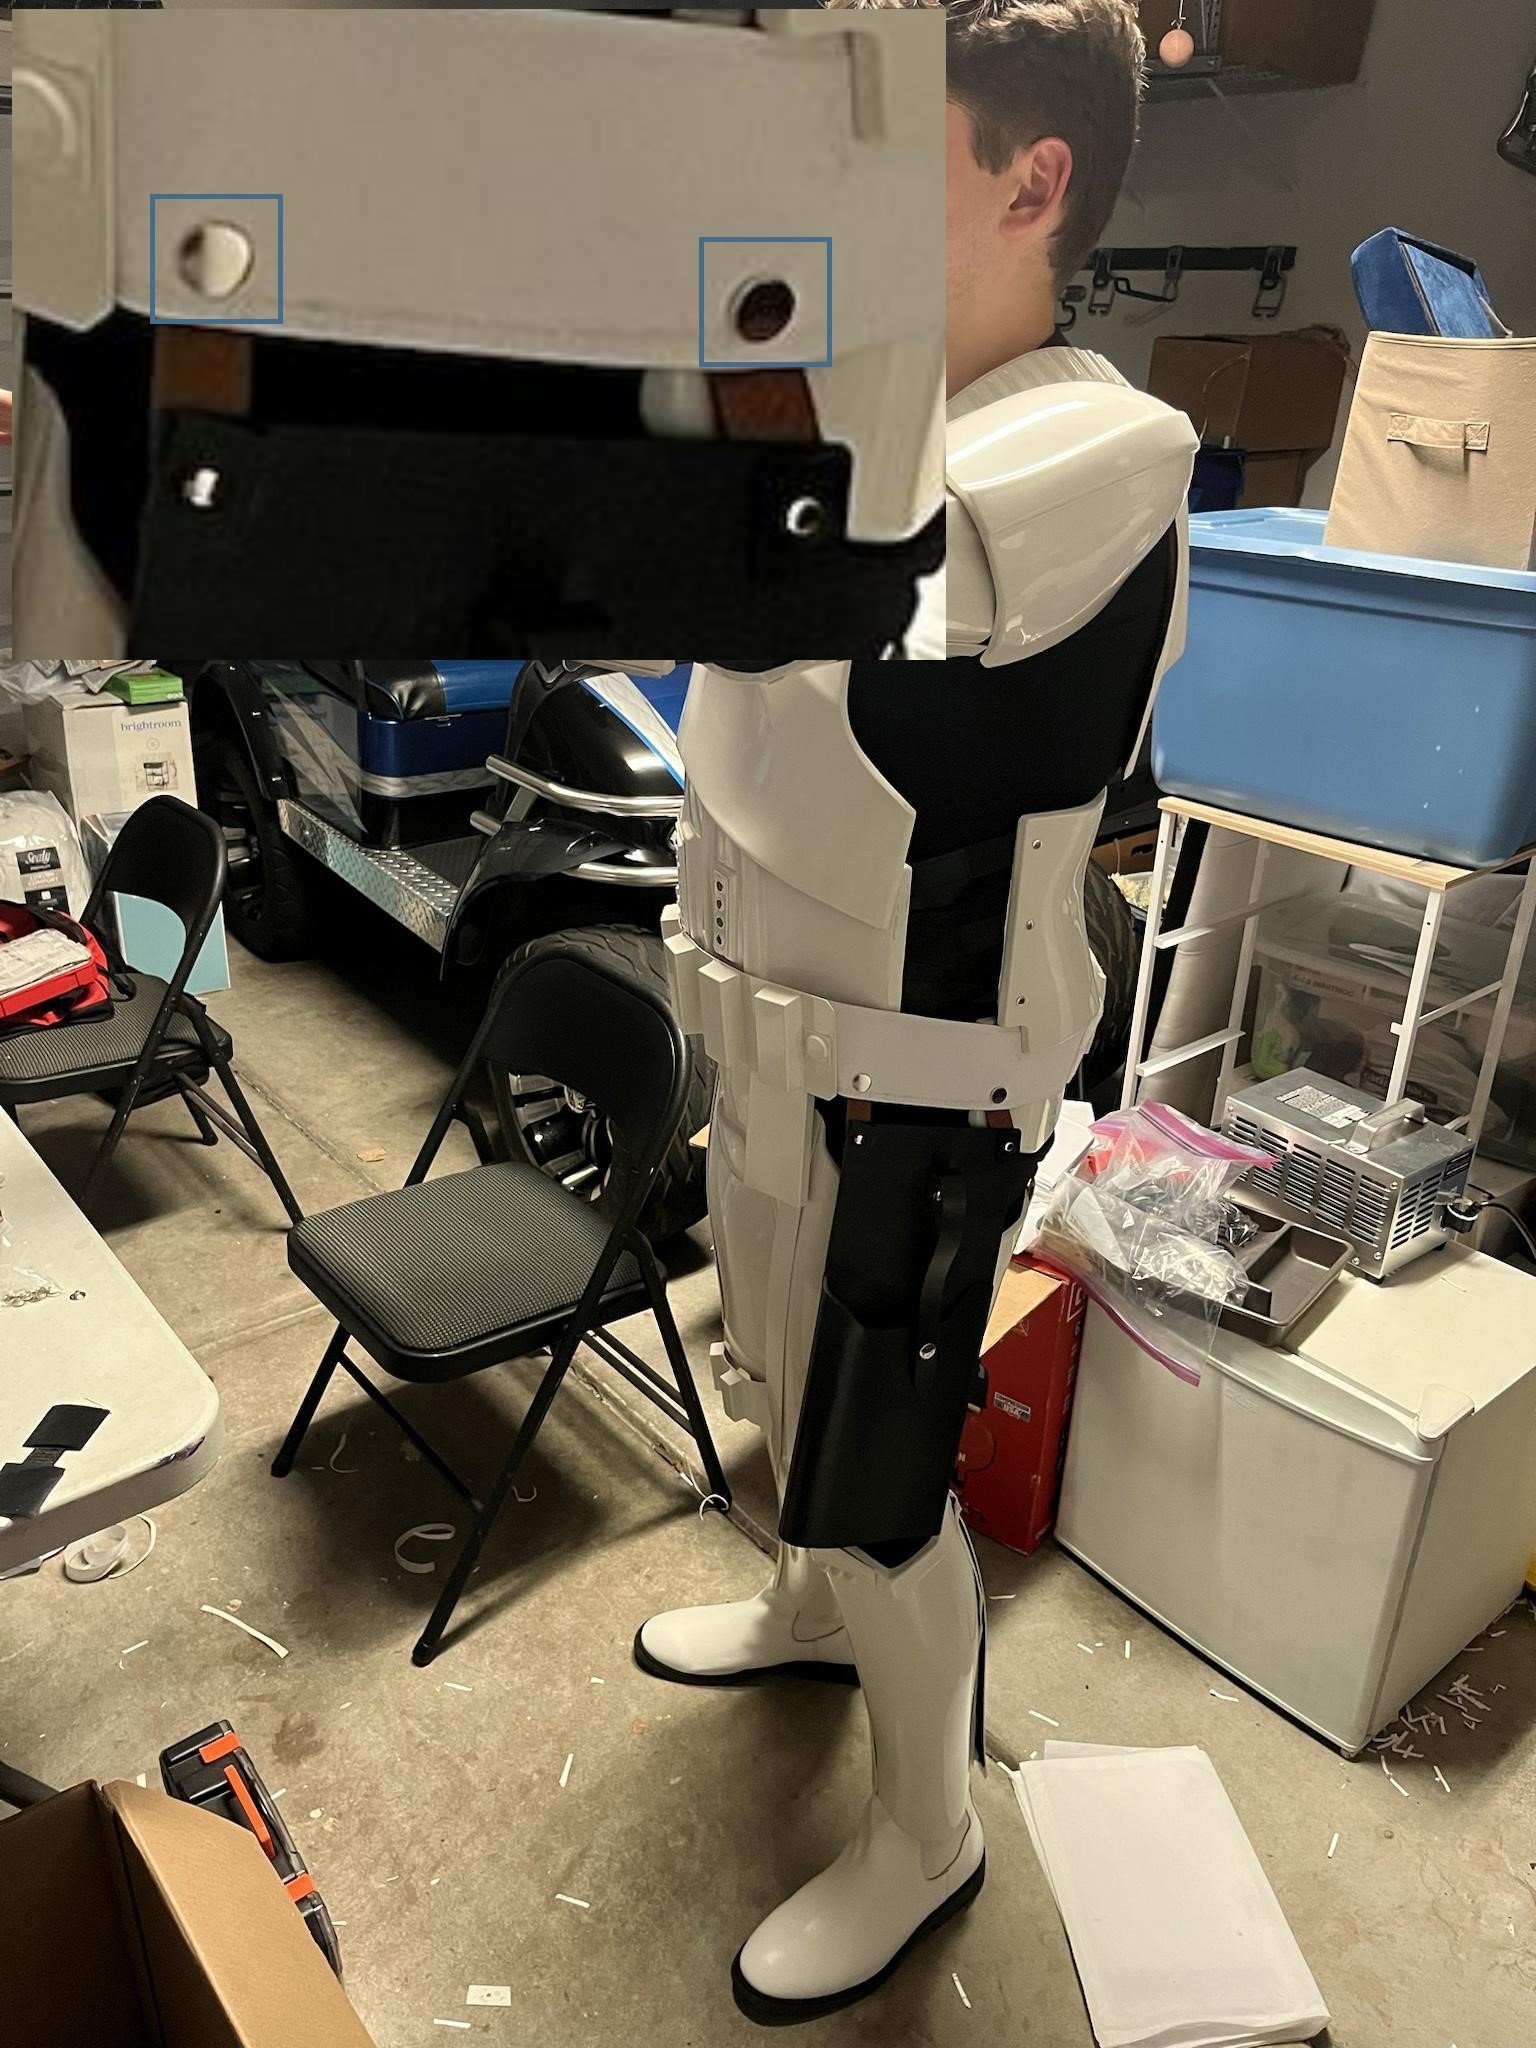
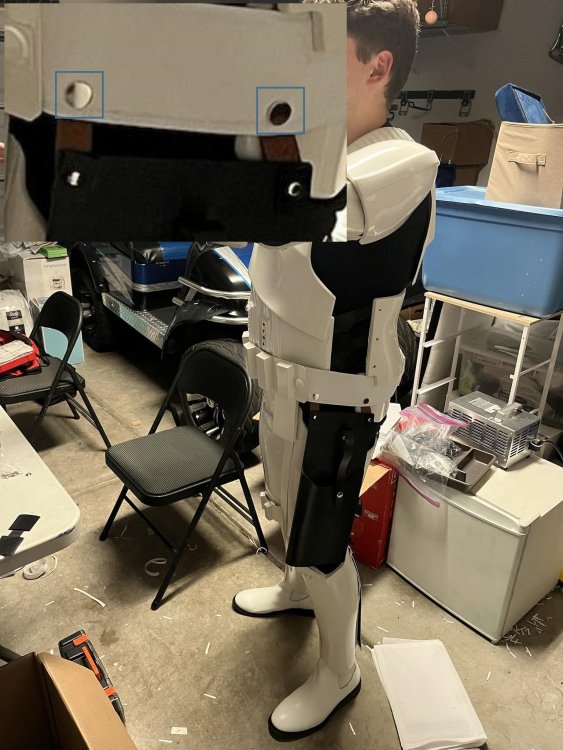
Having your snaps a little closer to the front helps to bring the shoulder bells inwards when you move your arms
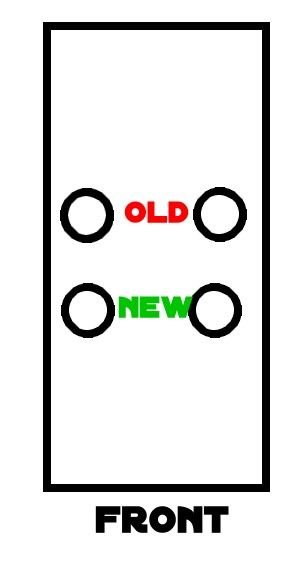
-
Do you mean between the posterior and kidney or between the abdomen and kidney? The V tabs I came up with some years ago to stop the posterior pushing away from the kidney. Normally you only need one at each end of the kidney/posterior. Some add extra ones The tabs between abdomen and kidney help them to stay in alignment and not put sidesways when closed. There are many ways to do this.
-
Not one with the same power source that I'm aware. Many use the Icomm and Aker behind the chest and run the mic up to your head, use a separate power source for your fans. I know some have added a lot of electronics to the helmet but it can be very tight on space if you include and aker and icomm in there I do like using seperate power sources as they run longer that way, no worries about running out at a long day convention, but each to their own.
-
Should get you all the way to L3 From the DO's reference thread: The "ideal" ear placement is as seen below, where the screws line up with the rear angle of the trap right above it. Because some armorers design their helmets differently or send them pre-assembled this is not always possible to achieve, but it is suggested that you try to get as close as you can. Note: Top ear screws should ideally be located directly below the rear of the trap. And from the CRL: Ideally, the placement of ears (and screws) should closely follow the rear angle of the trap above them. The word "ideally" does not mean "must" it's a suggestion, even some of their references aren't aligned this way :0 p.
-
DON'T USE PAINT THINNER it will melt the plastic (thinners and scrap plastic is how we make ABS paste ). Normally a toothpick and mineral spirits does the job for me, any stubborn areas I cut a pieces of scrap plastic so it has a sharp edge then use that to scrape off the excess, some times you do need to use some polish to remove any smudge.
-
Nice work trooper. Just before the DO's get here you may want to do a once over on your blaster, end cap can see print lines. 3-D printed blasters can not contain visible print lines, and must be sanded smooth for a more realistic appearance. Also note the barrel T-tracks shouldn't be weathered as they were black plastic strips
-
"I am the law"
-
Looks much better now, nice work
-
Hi you will find it will fit better once it sits over the kidney and abdomen. The backplate and chest will also lock together on the sides and hold everything nicely over the ab and kidney. Many of us use Imgur for posting images as you don't have to go off forum then and they will show in your post
-
Correct some images show a lot more gap. Not sure if you have read this thread I posted earlier, it's adding a step to the top of the ear so it sits closer to the helmet. Sanding spots which are touching will allow areas with gaps to come closer.
-
You will have to provide official images as your reference material for the LMO's not game mods. I would suggest speaking with Andrew and he can discuss with the LMO's if the Black Series is a better reference than the book. Personally I would think the cape would be the same as Phasma just with the different color border as that design she copied from Cardinal, but that's me, the LMO's may decide differently
-
I use velcro from aliexpress, it's not industrial but works just fine https://www.aliexpress.com/item/1005003949944454.html?spm=a2g0o.productlist.main.9.143e17f6RadC6R&algo_pvid=0b9c6444-dc1e-43ce-a42c-31afa706ab0b&aem_p4p_detail=2023081514014955539016865100006455912&algo_exp_id=0b9c6444-dc1e-43ce-a42c-31afa706ab0b-4&pdp_npi=4%40dis!AUD!22.34!11.17!!!14.28!!%40210318b916921333089595702e0f6f!12000027543425889!sea!AU!178098435!&curPageLogUid=Fx9jYAzFjhJq&search_p4p_id=2023081514014955539016865100006455912_1
-
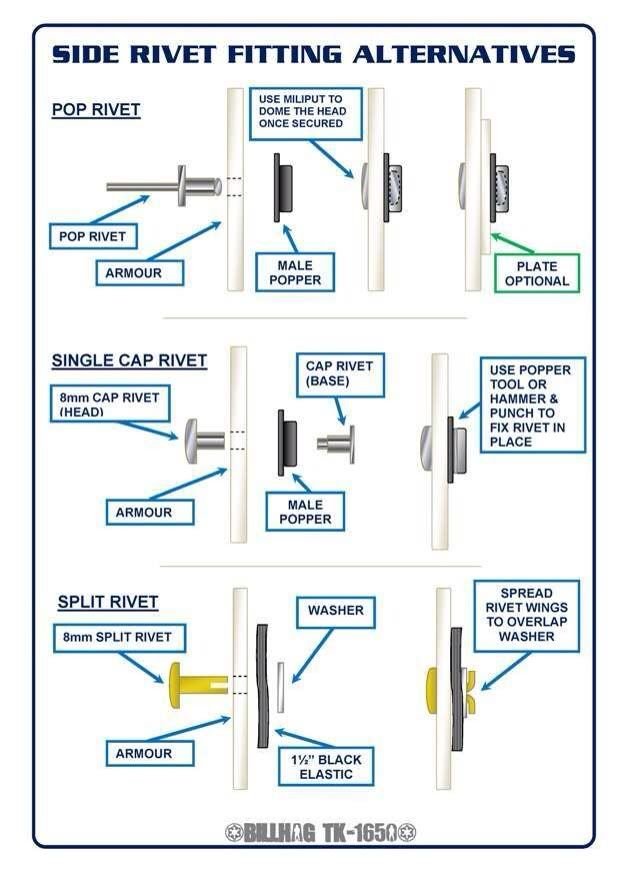
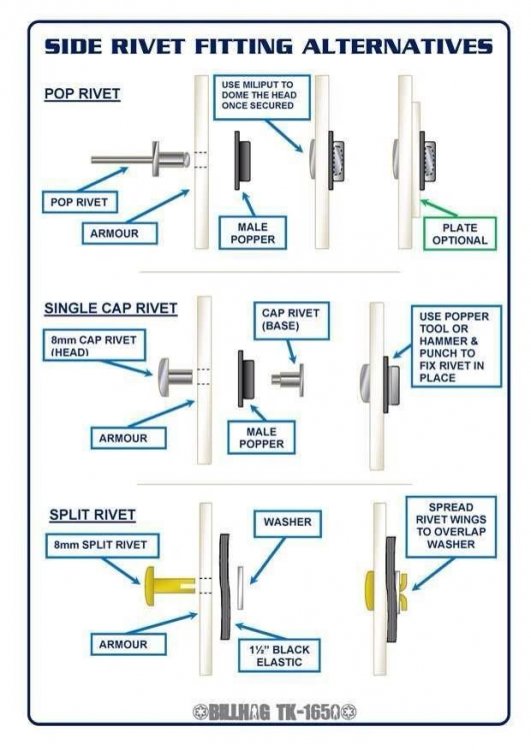
Using elastic allows some give and can be more advantageous than using nylon. Using a snap guide can help get the snaps in the right spot each time. A plate of plastic cut to the width of the elastic/nylon, then add two holes for snap placement in the middle, then use a color marking pen to mark the holes, as you can see below they are all pretty much in the same position I use adjusters on my ab/chest plates makes it easy to make corrections. If your straps are too long can can add extra snaps, as it appears was down in Caleb's image
-
Hello and welcome to the forum, good luck with the research
-
Many post updates to their build threads so I'd post it there
-
Where, What and Whom To Avoid When Buying
gmrhodes13 replied to RogueTrooper's topic in Getting Started - Read this First!
Anovos TK kits have been approved in the past BUT it really depends on how it was trimmed and how it would fit you, if you have any concerns reach out to your GML (garrison membership liaison) as they would ultimately be looking after your costume approval. Plenty of Anovos builds to have a look at here https://www.whitearmor.net/forum/forum/80-anh-build-threads/ -
If you wanted to get really picky you could bring the hengstler up a touch comparison
-
Also noticed you have some big connectors on your holster strap to belt Should be @8mm
-
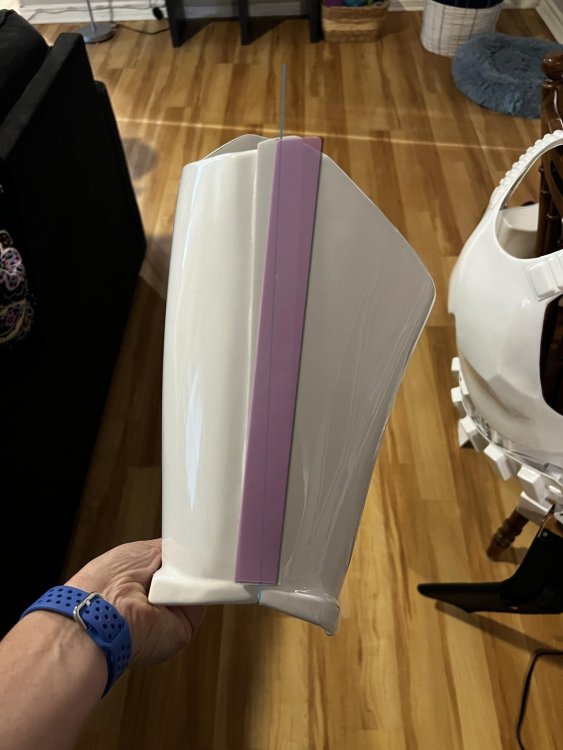
You will have to change over the coverstrips if that is your left and right shins, they have to close outside over inside, yours are opposite at the moment.
-
Helmet Padding: could be the way the photos have been taken, notice your helmet looks a little squished which can happen with low taken photos. Thigh Piece: personally I would remove the cover strip and replace it angled over the thigh connection, it should look a little straighter. At the end of the day it is entirely up to your GML whether they will pick up on it or not, you could just submit and see what is said.
-
Very nice, you would have to be pleased with that
-
Looking to Build an Approvable TK
gmrhodes13 replied to Tilheyra's topic in New Member Introductions
Looking forward to seeing some BBB photos soon