gmrhodes13
-
Posts
31,206 -
Joined
-
Last visited
-
Days Won
1,069
Content Type
Profiles
Forums
Gallery
Articles
Everything posted by gmrhodes13
-
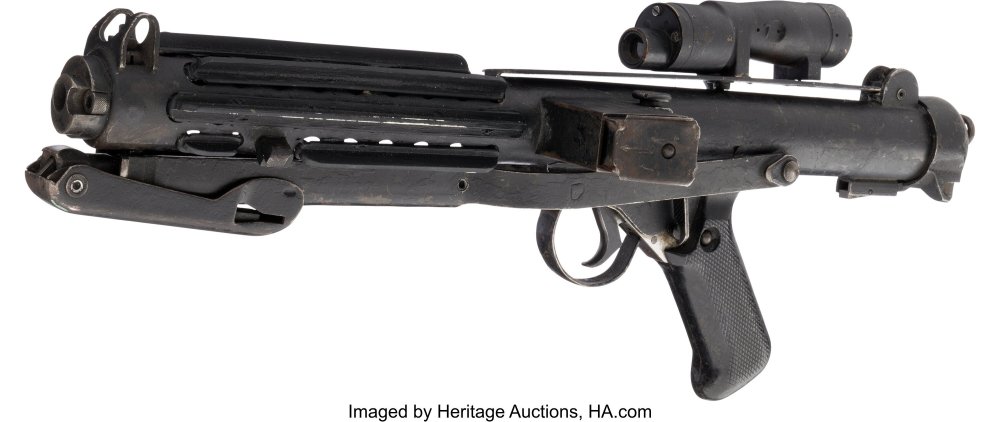
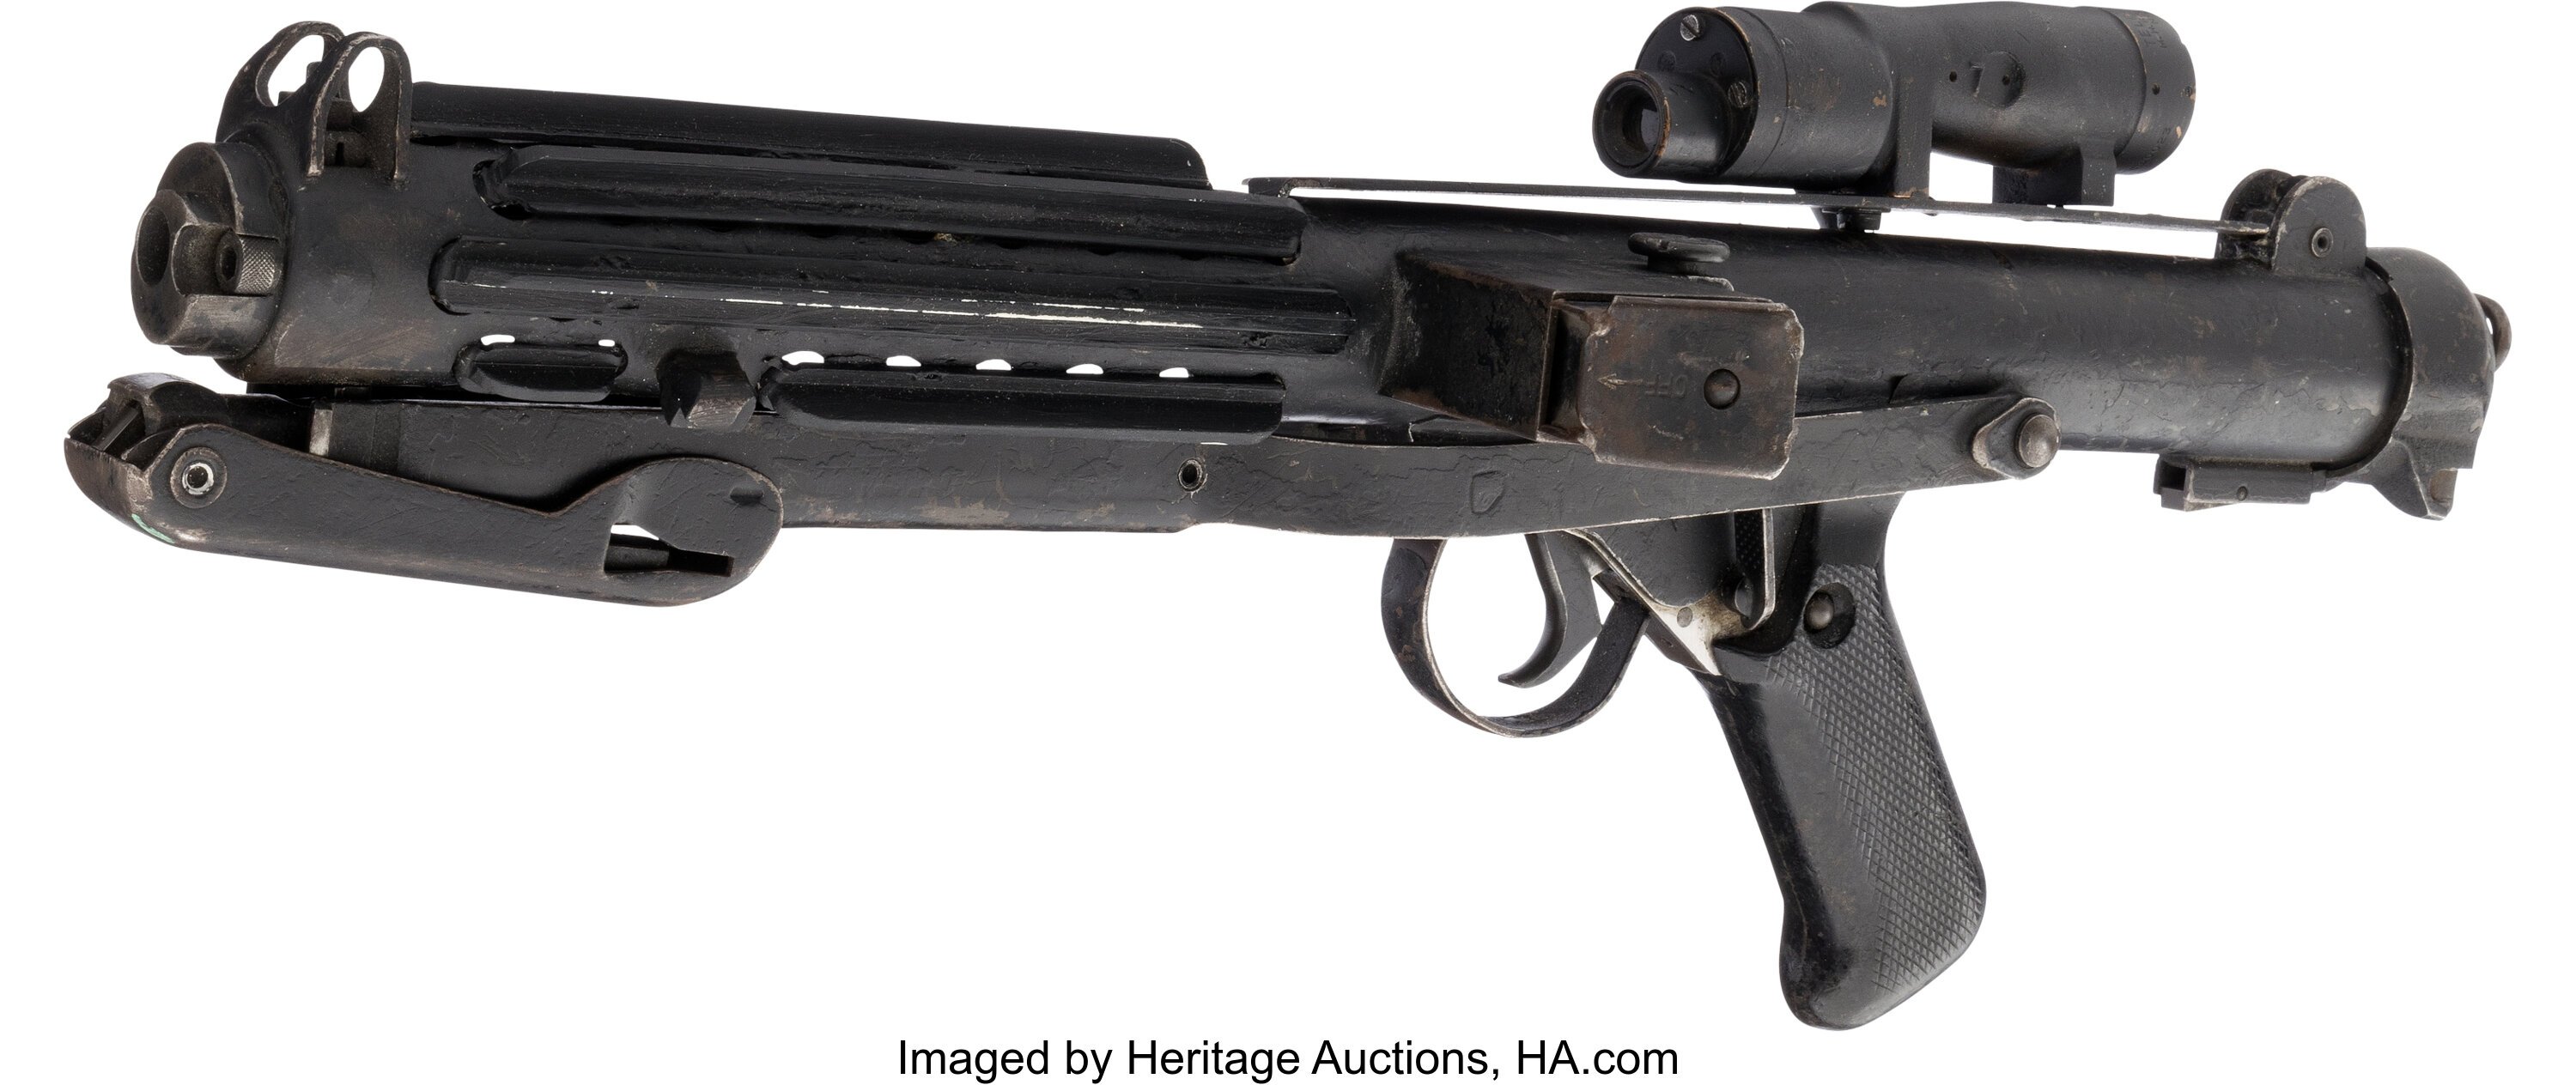
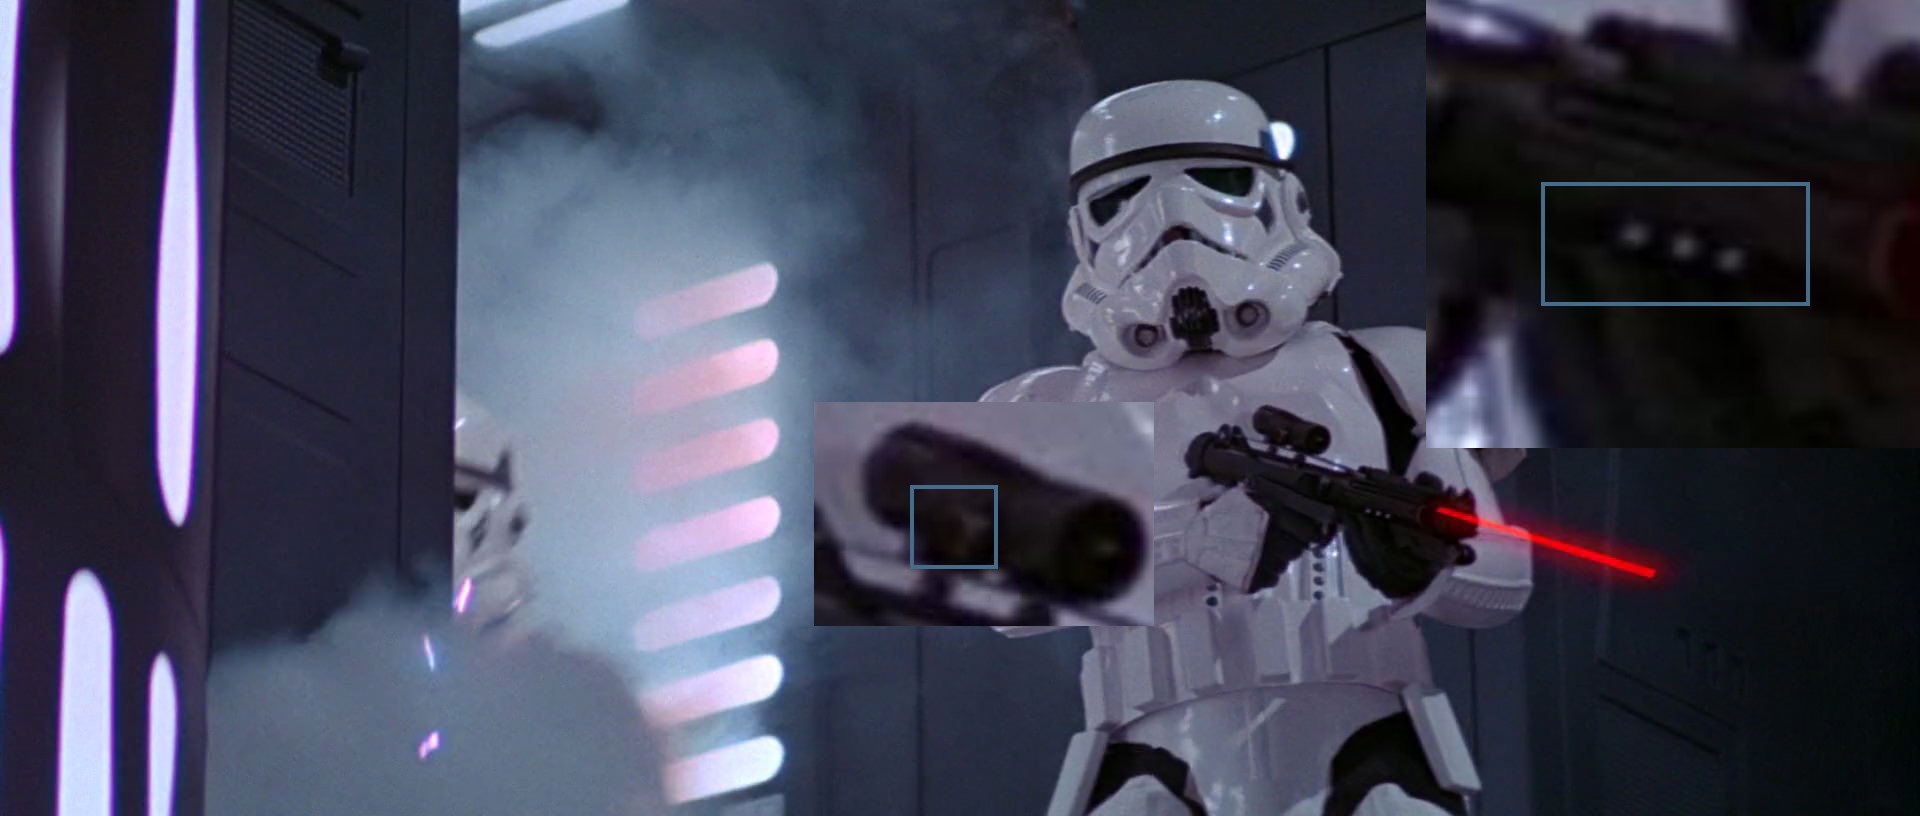
Just when you think you've seen everything, down another rabbit hole, here's an odd E-11, this Hero "Live" version has a missing T-track on the right side of the barrel and added T-track pieces to the left side around the lug. Does appear there is missing paint on the right side were the T-track would have been glued. I could imagine this mod may have been carried out so when it was fired it would expel barrel flash on the outside of the wearer (if holding right handed) but who knows. T-tracks and grip also have some weathering, these had been known as plastic so shouldn't of had any weathering. Comes with a letter of authenticity. Description Imperial Stormtrooper Hero E-11 Blaster from Star Wars: Episode IV - A New Hope with Signed LOA from Producer Gary Kurtz (TCF, 1977). This screen used blaster is one of the "live" weapons used during the filming of Star Wars. Bapty & Co., the legendary British movie weapon makers/suppliers, based this weapon on a British Sterling submachine gun which was dressed for the studio. Loaded with blank ammunition during filming, it produced realistic smoke and recoil effects when fired, making the actors look as though they were actually firing laser bolts. Included with the Blaster is a signed LOA from Star Wars producer Gary Kurtz stating (in part): "This is to confirm that the Stormtrooper blaster prop you have purchased is from my film archive. This was one of the 'live' weapons used during filming of Star Wars. Once filming had finished the guns were returned to the weapons hire company which had loaned them to the production. All extraneous parts and dressings added for the filming were removed and the guns went back into the company's armoury. This gun is the original Sterling sub machine gun used in Star Wars, and the additional dressing (sight, grips, cut down cartridge casing, etc.) are also all original film used pieces. The only replacement piece is the metal bracket holding the scope to the body of the gun. This gun has been deactivated and restored to its original screen used condition as seen in Star Wars. This Stormtrooper Sterling machine gun is one of those guns (now deactivated to conform to British firearms regulations), bought back by the Kurtz / Joiner archive in 2003..." Measures 19.5 in. long. Exhibits production use with scuffing to black paint with some oxidation to exposed metal parts. Comes with the original deactivation certificate issued to Bapty when the weapon was rendered non-firing. Provenance: Profiles in History Hollywood Auction 22, July 29, 2005, Lot 171.5 Comes with a COA from Heritage Auctions. Auction link I had thought this could possibly be the actual blaster as you can see light on the right side of the barrel so it appears to be missing a T-track BUT it has a different scope (lug on right side of scope) A small amount of barrel light here too so appears this blaster is also missing a T-track If anyone does have any images of this "Live" version blaster please do share them. 46 years on and we are still finding details.
.thumb.jpg.f5f39184aaacad212d8ee72f8e417fc1.jpg)
.thumb.jpg.79fd5831cc29d32c5f36ba680f3a6f33.jpg)
.thumb.jpg.4d97934ac3910cc0f6807082022c09b3.jpg)
.thumb.jpg.b36c3a4bf92e85f4ac942b6c27d8643a.jpg)
.thumb.jpg.e150e1f05a91adba0230c30a64382fce.jpg)

.thumb.jpg.6e3e58720320b5105feeda7a9d412f10.jpg)
-
I don't tend to tell jokes, I prefer to stay in character.
-
Painting is what most of us do, although a few have covered the insides
-
Hello and welcome, good luck with your research
-
A couple more threads:
-
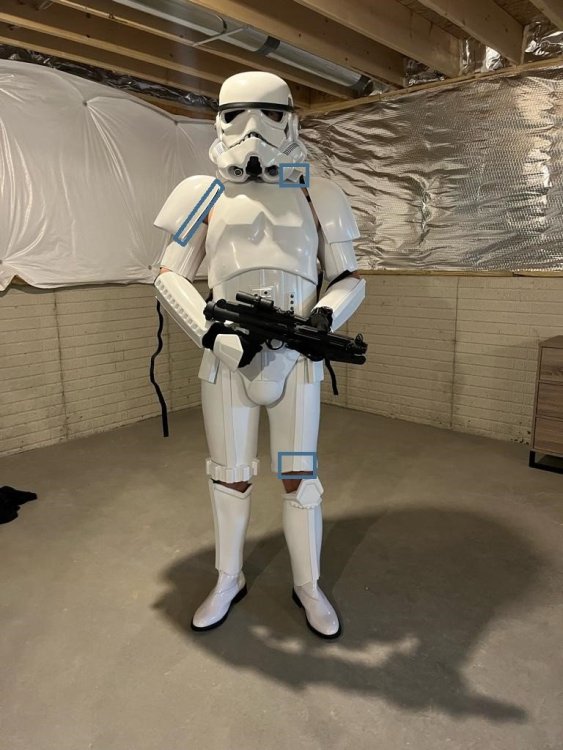
A couple of tweaks you could make, thigh coverstrips should stop at the top of the bottom ridge. Shoulder straps appear not to be fixed in the front. Belt can could come up a little. Also note you have some return edge on the shoulder bells which you could trim off, screen armor had the sides of the shoulder bells curved. AP does have one of the smallest helmets out there, if you have any issues putting it on don't forget to put it on sideways then twist straight
-
It is an old thread from back in 2010 which has been archived due to some missing images and broken links, FX armor was quite common in FISD early days but few build these now. Here's some of the text from that thread: HOWTO: Make your FX armor Expert Infantry I get this question asked a lot so figured now was a prime time to write it up. Obviously the helmet has to go in toto, but since that's an all-out replacement and usually taken care of in one fell swoop, and the fact that most already have swapped out their helmet, Id like to focus solely on the armor. Despite what people may say, making your FX armor EIB acceptable actually takes little effort, money, and time. You can pretty much buy everything you need for $60 and an hours worth of work, or if you have time can do it for about $20 and an afternoon. Lets break it down! 1. Replace the ab plate buttons The ab plate buttons that came with the FX kits are the wrong size and color and need to be replaced. Fortunately this is pretty easy on the FX kit and you have several routes you can choose from: 1. Easiest way buy them completed. You could contact other armor makers and buy pieces seperately 2. Next Easiest - buy plain buttons and use decals You can buy plain buttons from Tandy. They need to be 7/16" in diameter. You can then buy decals from TK-4510 instead of painting them for $3 Button Decals : https://trooperbay.com/trooper-abdominal-plate-decals 3. Least Easiest - buy plain buttons and paint yourself As above, you can buy a set of 9 buttons from Tandy and paint them yourself. Painting guide: http://whitearmor.net/forum/index.php?showtopic=8117 Where to buy paints: trooperbay https://trooperbay.com/costuming-supplies/painting/humbrol Maximum cost : $20 Effort : 10 minutes to 30, depending if you buy or build 2. Replace the plastic belt Like the ab plate buttons, this is a pretty straightforward fix if you buy a belt or you can save some money and make your own. Making a Belt HOWTO: A guide to making a canvas belt : http://whitearmor.net/forum/index.php?showtopic=665 Maximum cost : $40 Effort : 20 minutes or more, depending if you buy or build 3. Correctly mounting your holster While most holsters have full straps, in A New Hope (which most troopers do) the belts are actually fastened from behind using rivets. This is a very cheap mod and you there are many ways to achieve this look. If you are doing an ESB trooper, simply wear it on the right instead of the left ($0 cost and time). If you are doing an A New Hope trooper this look can be achieved by simply cutting off the outside strap (free, 5 minutes) and then fastening the holster to the belt like shown in the picture below as a guide: You can use rivets, Chicago screws, or even snaps. The rivets need only be seen on the outside, and you can even use velcro if you wish on the inside to make it more secure. Maximum cost : < $5 in materials Effort : 10 minutes or less Pretty easy so far So far it's been pretty easy and the above steps will instantly make any FX based stormtrooper look more accurate and impressive. Some choose to stop there, but there are two more mods that will need to be done to make that FX kit Expert Infantry. 4. Cutting the butt plate While the cheapest mod to do, this is really the only one people hesitate on and it often takes two people to get it to hang correctly. While there is a seam line on the back of the FX back plate, it's too high and the cut should actually be lower down, about 1/4 to 1/2" below the belt. You can see this in several shots. While the pictures above only show the strapping for the kidney to the butt plate, some people (including myself) also use a strap that goes around the front of the waist to keep the sides from flaring out. Ideally one could use a heat gun to properly shape it, but a strap works well too. Also depending on your body type you may have to put a little bit if padding in the butt plate to get it to sit correctly (OK, maybe just me and my small butt :-)). Regardless of whichever route you go, this is an inexpensive mod in that the cost is just those pieces of velcro or strapping that you use to secure it. The time is the biggest factor, as while cutting it only takes 5 minutes it can take up to 30 to get it to sit correctly. 5. Shimming the side gaps Of all the armor makes, the FX has the largest gap between the ab plate and the back plate. Fortunately this is pretty easy to solve with some extra plastic sheets. While clones advocate a seamless join, FISD is not so picky and simply using a plastic shim is acceptable. There are several routes that people use: 1. Buy spare ABS/HIPS from whomever made their kit (guaranteed to match the armor) 2. Buy spare ABS/HIPS from a plastics store (perhaps cheaper) 3. Use spare ABS/HIPS that they have laying around. The plastic belt that gets replaced by using a fabric belt is often an ideal candidate for this. 4. Buy a cheap plastic sign from a home improvement store and paint it to match Here is a simple fix that a person used as a starting point. Remember it just needs to look good from the outside though it's always a good idea to make these changes more robust as time and budget allow. Conclusion And that's it! It may seem a lot at first, but after going through it you'll wonder what all the fuss was about. Whether you decide to buy everything you need or create all the pieces from scratch, these changes will really make your FX armor kit pop and breath new life in to it, allowing for many more years of enjoyable trooping to come. Where to go next I'd like to encourage those that haven't taken the plunge to make these changes to do so. Making your FX Expert Infantryman qualified actually is relatively inexpensive and not that hard. Not enough you say? Yes, there is even *more* you can do to pimp out that FX kit, from adding side snaps on the ab/kidney to adding return edges to the chest and other parts, but these aren't required for EIB. What do you think? Everyone - we on FISD staff would love to hear what you think of the above. Was it easy to follow? Did you like the changes once done? Let us know!
-

ANH mobility cuts on the shins
gmrhodes13 replied to TI25674's topic in Assembly, Mods, and Painting
If you need some references -
Looks much better. I think this was discussed when the CRL was first assembled, it is listed as a requirement for base approval The trapezoid knee section (sniper knee plate) is affixed to the left greave and may have two visible brads or rivets securing it to the greave. DO's @Deployment Officer Team would have to chime in for higher level requirements
-
Ultimately it's your GML who will decide what will be acceptable, going off the CRL the main image is different to some of the armor piece images so there is a bit of leeway. Main Parts I went through most (if not all) of the build threads and based mine on what others have done previously
-
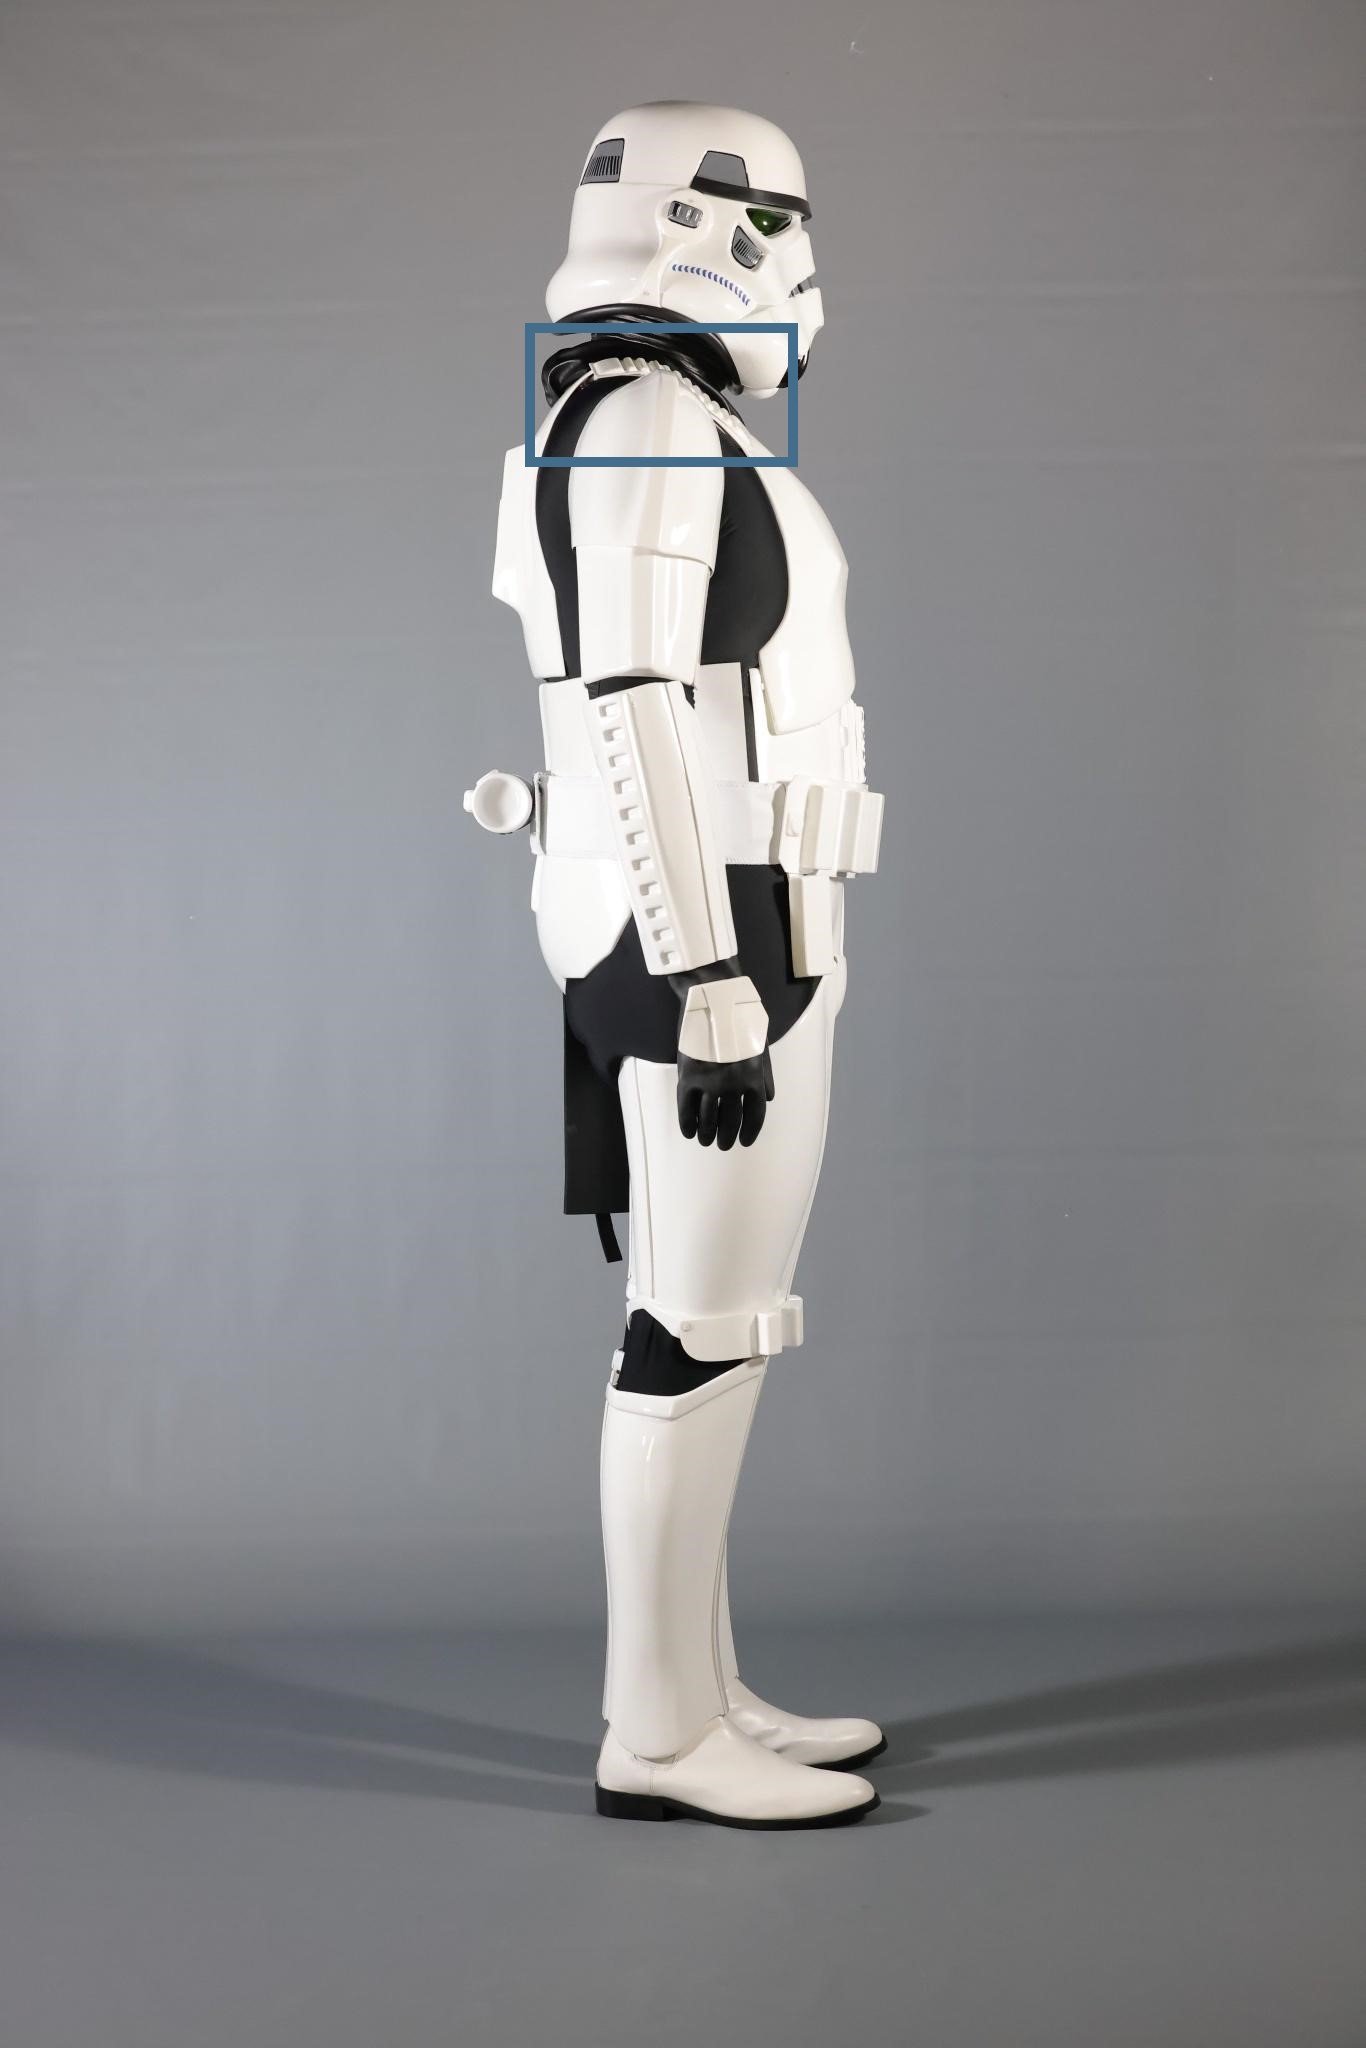
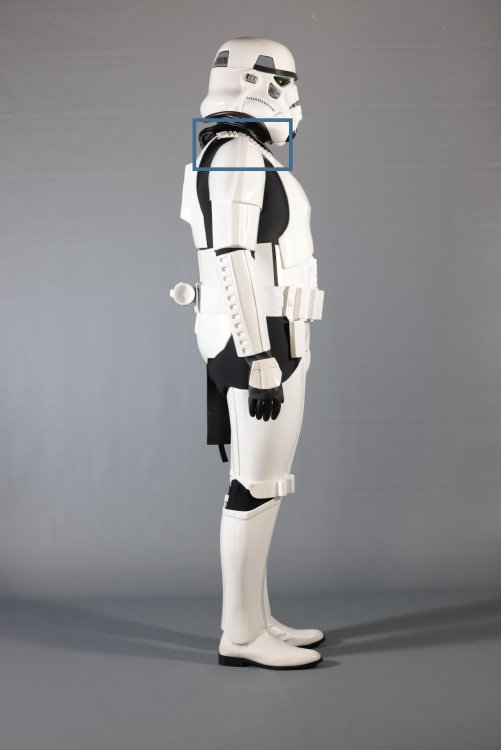
I think it's just how they have been positioned. When I attach them I do with both chest and backplate strapped over a box as if they are being worn and glue them so they sit directly over the backplate. I know some try a little heat to twist them but if it was me I'd remove and re-glue.
-
Personally I wouldn't use too much grey, most of the references show a lot of white/cream and green/yellow. Albeit the game is a little darker
-
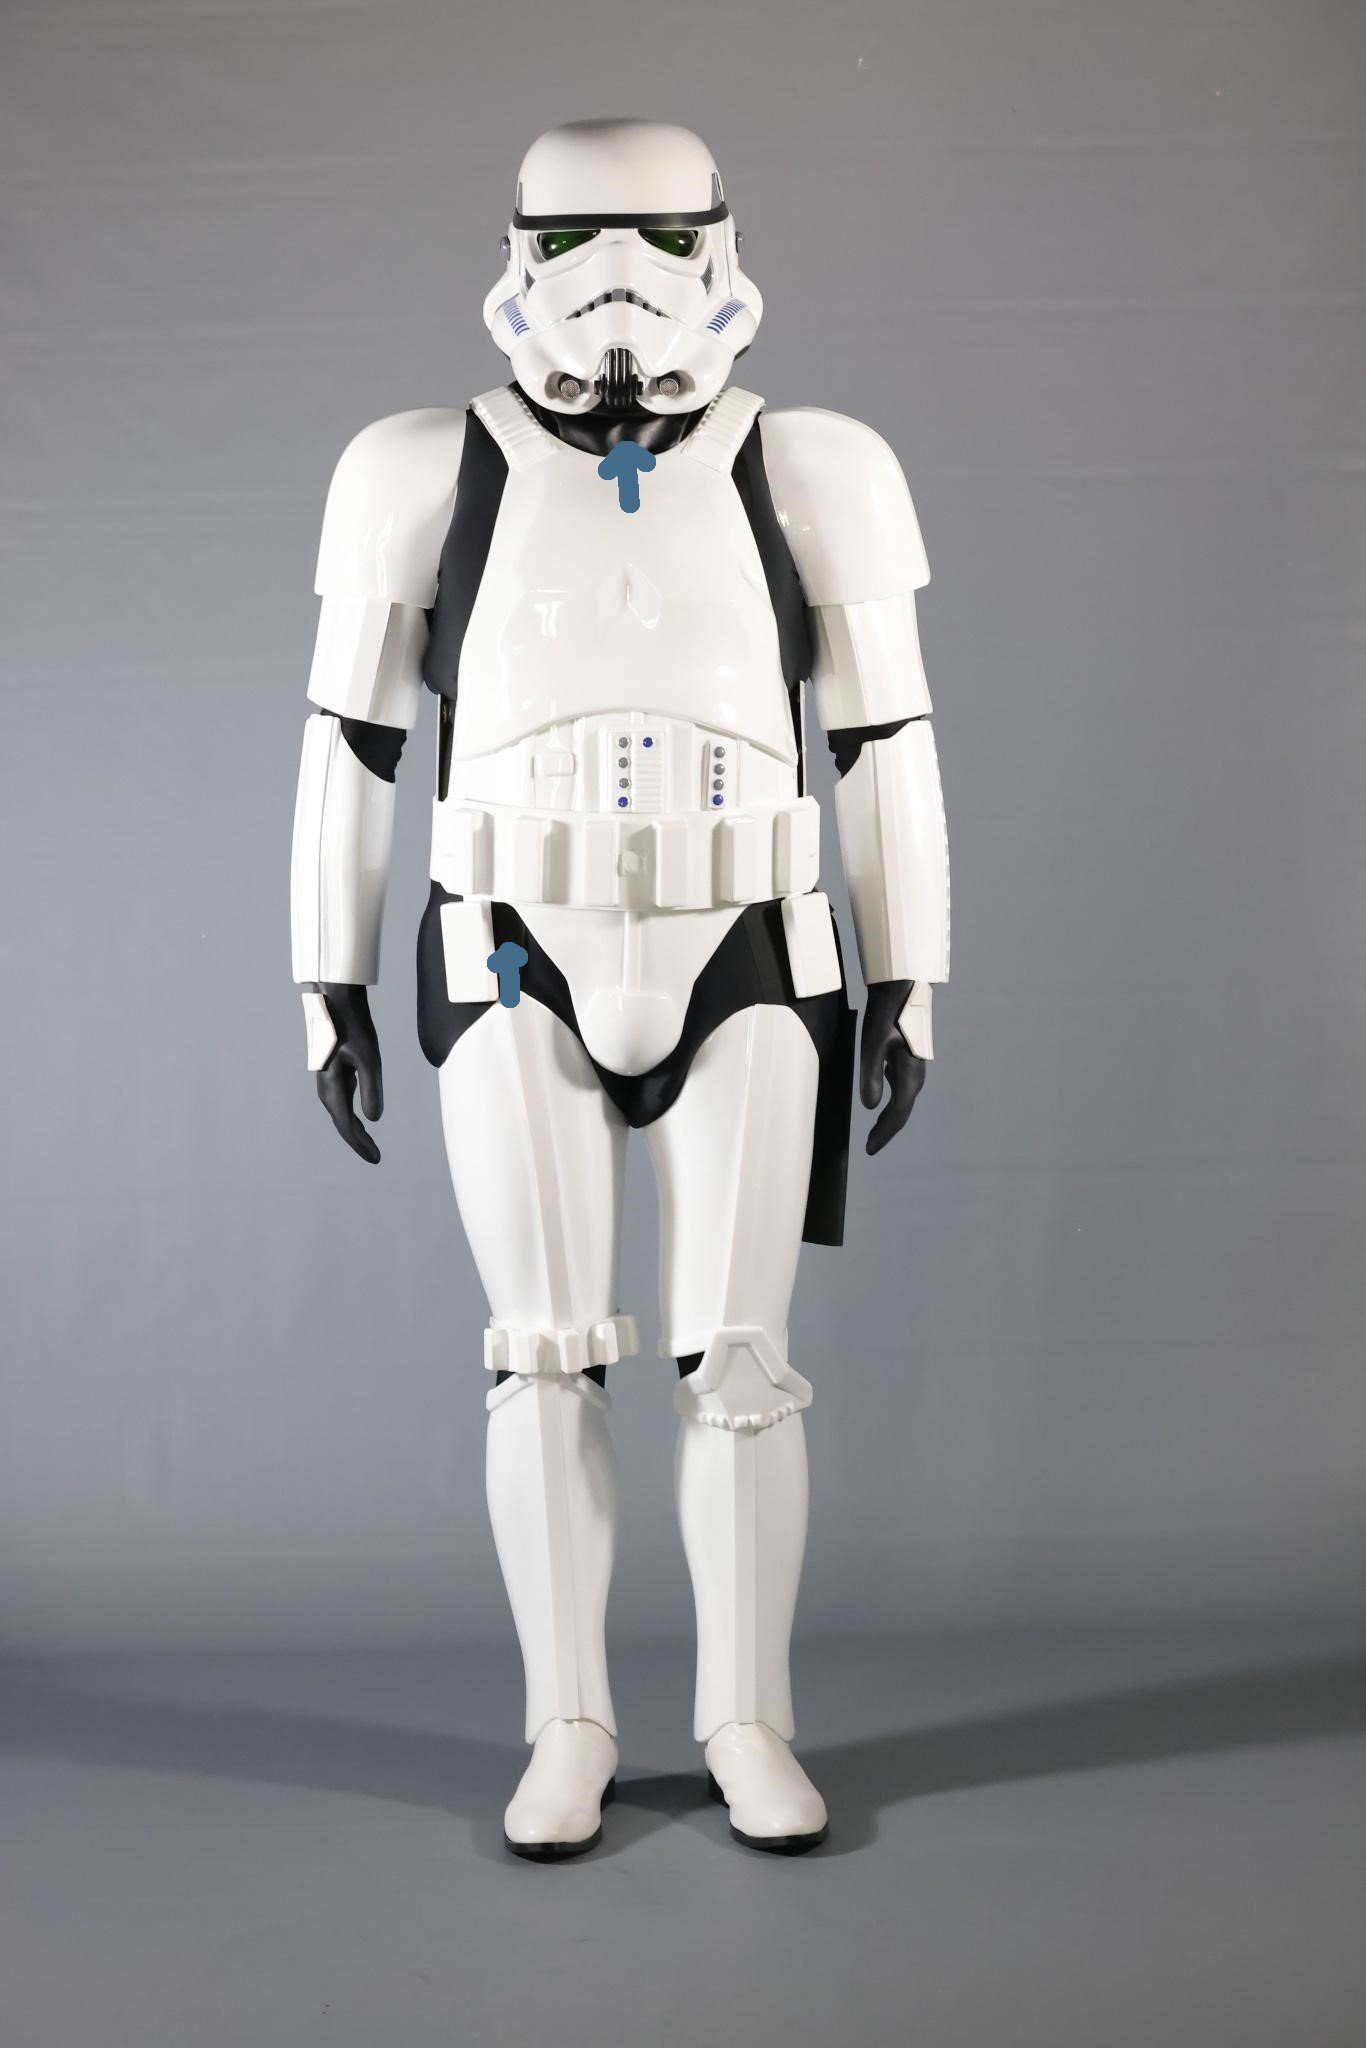
Spacing looks a lot better on the chest/abdomen, personally I think the thighs should come up a little more but at the end of the day your GML is the one that looks after base approval so entirely up to him/her. You may want to look at the shoulder straps on the rear, they are not positioned central to the backplate.
-
Hello and welcome, that's certainly a long build, looking forward to seeing you approved soon
-
Unfortunately I didn't do a build thread for this one but it was the last centurion approved death trooper
-
Darkalex ANH stunt build thread - RS Prop Master
gmrhodes13 replied to Darkalex's topic in ANH Build Threads
You could use a drill, just have to make sure you hold the leather tightly, or perhaps a sharp knife, just take care not to have too much pressure or you may rip the leather rather than making a hole. -
Legacy FemTK Build Thread
gmrhodes13 replied to Eleanor's topic in Legacy Stormtrooper Build Threads
Yes the front stripe falls/leans outwards from the top but you can also see other stripes are positioned or angled a touch differently to others, some are also different widths, this is to give the impression that they are hand painted. -
TK 22311 reporting for duty
gmrhodes13 replied to Marcel_Trooper's topic in Newly Approved Members - Sound Off!
Congratulations and welcome to the ranks trooper -
WOW they are some pretty rusty washers. I guess it may be a reaction from sweating.
-
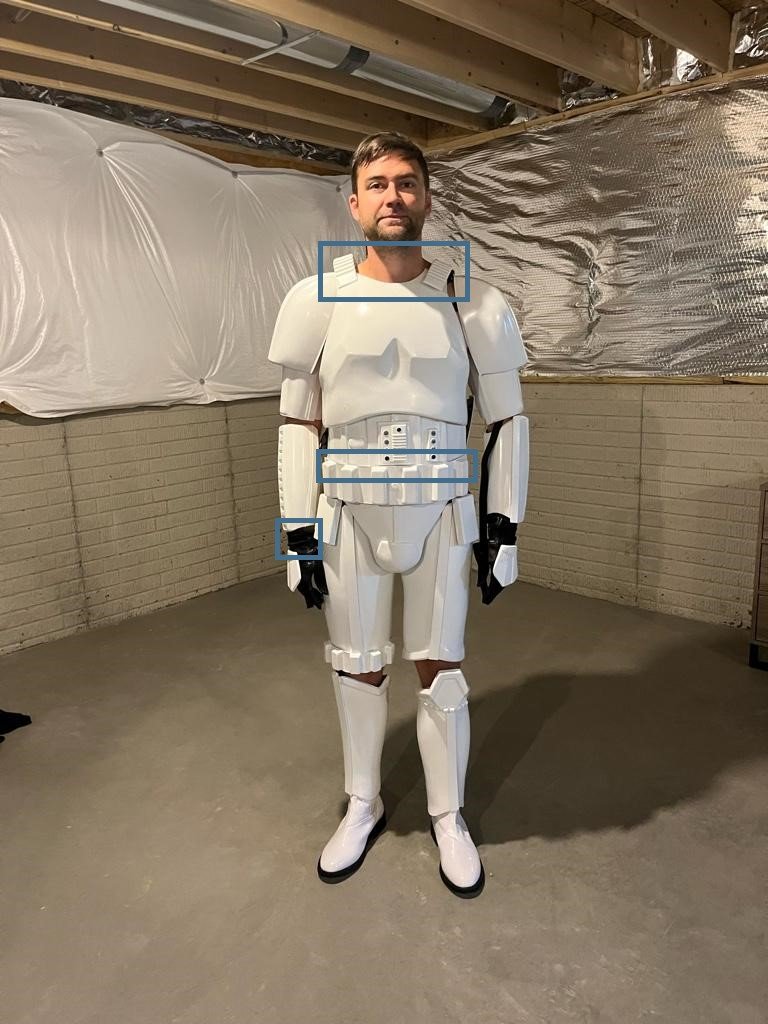
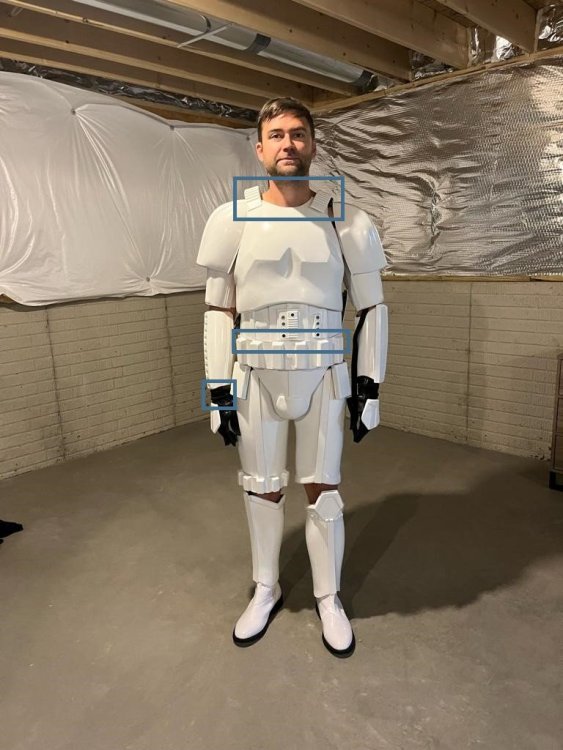
Does get hot just standing, walking around air gets in between the armor and keeps you cooler. You do have a few issues with gaps and position of armor, your chest should come up it is sitting too low, you notice this more on the side image, note how far down on the front the chest is when you compare to the backplate. A comparison from another trooper, note the gap between the large ab plate and chest. Yours they are almost touching. I would say you are just on the edge of sizing on this armor so some modifications may need to be made so it fits you a little better. Thighs are pretty low I would suggest adding either larger cover strips on the rear so they can come upwards more or you may even need to add some shims. Compare with troopers in this image and you should see what I mean. A few threads adding shims to thighs
-
Note also that with coverstrips not all have to be straight, they can be angled Not sure if it's been mentioned but make sure you rough both surfaces with coarse sandpaper prior to fixing with glue, helps the glue to grip too. For those coverstrips that don't lay completely flat squashing the pieces down and wrapping masking tape around tightly can help and any pieces under strain leave to dry for at least 48 to 72 hours.
-
Tim’s first time build (RS Prop Masters ESB TK)
gmrhodes13 replied to TrickyT81's topic in ESB Build Threads
You glue the bottom tab on the posterior, the top tab is free and sits behind the kidney and stops the posterior pushing backwards stopping gaps. You should be able to keep your strapping as it is and have the v tabs next to them, it should be enough to stop the posterior pushing backwards. If you have clamps or magnets try a test first to make sure. -
Yes trim those down, you don't want those sticking into you, armor bites get a bit tiresome on a long troop
-
Took @ 2 years to update all the missing and watermarked photobucket photos, unfortunately some just couldn't be recovered due to closed/missing accounts. Back in the day (11 years ago) the forum had a whole section of basics on how to build armor which was pretty easy to find, be nice to get that back up and running.
-
This thread can be helpful in case you haven't seen it
.jpg.2cee7f5e1bf38e1a8b4e8c748a491c3f.jpg)
.jpg.658f73a17d3b7cca363d53d6e78ad264.jpg)
.jpg.07e13728f99c745305078d9e5a3b2e6b.jpg)
.jpg.3e73305b58a4b5bc3b8b56d950270ef0.jpg)
.jpg.5ba7728a2d3f30ac31ee4ec7f9752eef.jpg)
.jpg.1cc23969d22ec40febf4adccbcf45c92.jpg)