

FunkyTrigger
-
Posts
961 -
Joined
-
Last visited
Content Type
Profiles
Forums
Gallery
Articles
Everything posted by FunkyTrigger
-
Mini TK ANH Stunt (*NS)
FunkyTrigger replied to FunkyTrigger's topic in Build Threads Requireing Maintenance
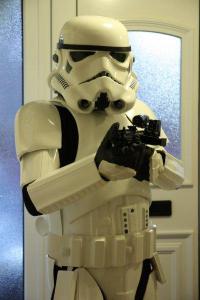
Here are my first trial fit pictures, mostly held together with white Gaffa tape. Missing a blue AB button here. -
Mini TK ANH Stunt (*NS)
FunkyTrigger replied to FunkyTrigger's topic in Build Threads Requireing Maintenance
The chest plate arrived very flat and I have gently heated and bent it to give it more of a curve. -
Mini TK ANH Stunt (*NS)
FunkyTrigger replied to FunkyTrigger's topic in Build Threads Requireing Maintenance
As you can see, I have an off white canvas belt there. I am missing mini shoulder ribs. And a mini TD at present. -
Mini TK ANH Stunt (*NS)
FunkyTrigger replied to FunkyTrigger's topic in Build Threads Requireing Maintenance
Here are the parts laid out. I have laid the parts over a two piece under suit. I love the mini details such as in the forearms ridges, the mini ANH hand plates, the thigh ammo pack and the knee plate. I am planning to add the required curve to the thigh ammo pack. -
I have started building a Mini TK for my 7 year old. Height 110cm 26kg I have purchased an old and rare TK kit sculpted, and Vac Formed by a UKG god N.Smith in the UK. I'm planning to enrol him in the Galactic Academy and have him troop on the Child Friendly troops with the grown ups as he has come along to see me many times. Lets start with the obligatory brown box shot. As my son is a "mini" I had to use a... Rubies helmet as a base. The helmet in its standard form is pretty awful with bulging eyes, a narrow face and an awful paint job. I started to reheat the helmet and changed the face shape to a more wider fronted look. I removed the tube stripes, as they were too small and too low down, and the wrong colour. I also removed the grey teeth paint. I removed the vocoder paint job. I then proceeded to cut out the teeth holes as none were there. I have also changed the eye shape. I hand painted the Teeth and ear bumps using Humbrol grey no 5. I hand painted the tube stripes with humbrol blue 14. I repainted the vocoder shape, the aerators, the brow, the ear rank stripe and ear bump surround. Here is a picture of the mini helmet against my regular sized TM Helmet. I am planning to add frown mesh, the 3 ear screws and to dry paint the vocoder mesh silver.
-
TK-54548 Requesting ANH Stunt EIB Status [RT][294]
FunkyTrigger replied to TieRacer's topic in Request Expert Infantry Status
Congratulations Trooper. Well done -
TK-54548 Requesting ANH Stunt EIB Status [RT][294]
FunkyTrigger replied to TieRacer's topic in Request Expert Infantry Status
I've had a look again at your main AB belt. I believe on RT mod the button covers are already indented on the belt, is that right? The length on it looks fair in proportion to your size and height. It's just the 45 degree corners that look a touch small. Your drop boxes appear to be in the right place when looking at your pictures as the belt is a bit longer that the average troopers. -
TK-54548 Requesting ANH Stunt EIB Status [RT][294]
FunkyTrigger replied to TieRacer's topic in Request Expert Infantry Status
Nice looking build on you Sam! Also ... Thigh ammo pack riveted to high up on your leg, especially for a 6'2" trooper. Thigh ammo pack radius. Radius can be addressed. It's simple to adjust the ammo pack position as fill a small hole. The other comments above are also fair from gmrhodes13. You have placed the rivets to attach your holster to the belt a touch to high, but these may not affect your EIB application, I need the DO's verdict on this as that's not an easy fix to cover up. -
TK-4737 Requesting ROTJ Centurion Status [CFO*][74]
FunkyTrigger replied to tigresa's topic in Request Centurion Status
@gmrhodes I don't often comment on ROTJ applications as I'm not an expert on the spec. The ROTJ tube stripes may be different to the ANH and ESB ones. I know you were pulled up on your ANH tube stripes but don't automatically assume its the same for ROTJ. Merry Christmas. -
Congratulations on your Centurion award. Merry Christmas!
-
Congrats Travis.
-
Genuinely much better Travis.
-
Hi Travis, I like the whole look of your build. It's again well fitted to you. I also keep being drawn to the overly wide brown holster straps. As you have already trimmed your Darmann holster which is usually too long, this would be an easy mod to ammend. Good luck trooper!
-
I like the like the look of your Armour on you for size and fit. I admire you for making your own holster and inner drop boxes. My only critique would be your choice of fitment hardware to attach the holster to the belt. I am also interested in learning more about your TD panel detail. Good build, well done.
-
Superb. I love the dual blaster pic.
-
Regular cut stickers won't clear for centurion. They need to be painted or non uniform stickers that simulate painted tube stripes.
-
Hi Glen, this is a superb EIB application. A great detailed text description, followed by great detailed pictures. Indeed you have also hit the requirements running for centurion. The armour is very well form fitted for you, and indeed you look like a stormtrooper! My only pull up note would be the tube stripes on your helmet and their distance away from the cheeks is a tad far. It's a close call if the DO will allow this for the Centurion app. Good luck there Trooper
-
SIMpixels 2mm TM ANH Stunt Build
FunkyTrigger replied to SIMpixels's topic in Build Threads Requireing Maintenance
Mathias. We need you to see and approve Billhags single cap rivet so that the old split rivet isn't the only approved Centurion rivet. There are many UKG builds and including my own that use the single cap. It's a better system than to permanently fuse a clamshell with elastics and split rivets with washers. What can we do to convince you? -
SIMpixels 2mm TM ANH Stunt Build
FunkyTrigger replied to SIMpixels's topic in Build Threads Requireing Maintenance
That's brilliant Si. Can you post some pics about this on your UKG build thread about how you achieved it? Did you shorten the split rivet and use a tool of some sort to bend it? Is the snap totally still or does it move slightly? -
SIMpixels 2mm TM ANH Stunt Build
FunkyTrigger replied to SIMpixels's topic in Build Threads Requireing Maintenance
Hey Si have you managed to fit a split rivet into a male snap? Looks like it in one pic there? -
Armor Making question for a Noob
FunkyTrigger replied to thrgk's topic in Hard Armor (General Discussion)
Where in the world are you? -
Humbrol are the little model tin pots of paints used by AA in the late 70's
-
I don't know what you guys are on about. It's just French blue humbrol 14 or the testors equivalent to use. And the grey humbrol number 5 or the testors equivalent. TK 1650 Bilhags tutorial is correct, It's the same one in the tutorial section and same one that I posted above.
-
There is a tutorial on the paint codes in the tutorials section. It shows what colour to use and where. And the humbrol and equivalent testors brand paint codes. This is the guide
-
TK-3480 Requesting ANH Stunt EIB Status [AP][289]
FunkyTrigger replied to Sersanara's topic in Request Expert Infantry Status
This is an excellent submission and complete with the EIB mods in comment form. The build looks great, as do you in your Armour. Well done there trooper.