gazmosis
-
Posts
4,043 -
Joined
-
Last visited
-
Days Won
23
Content Type
Profiles
Forums
Gallery
Articles
Everything posted by gazmosis
-
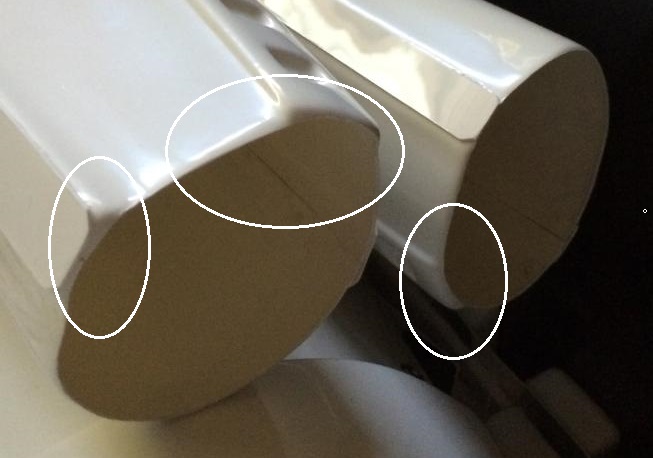
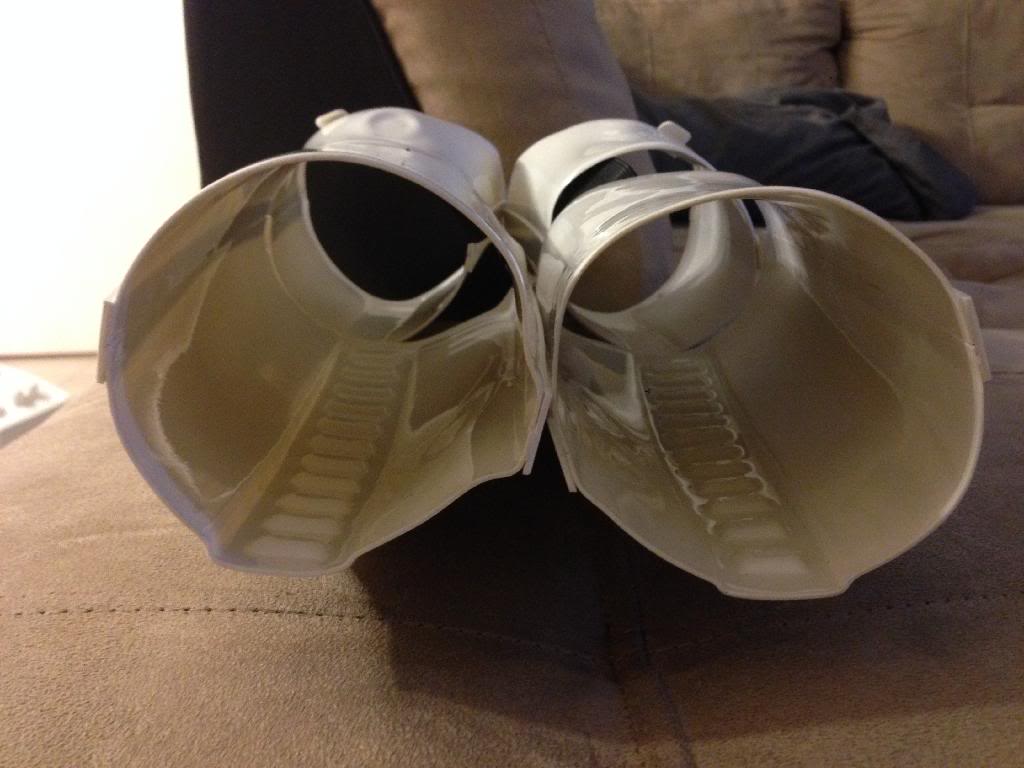
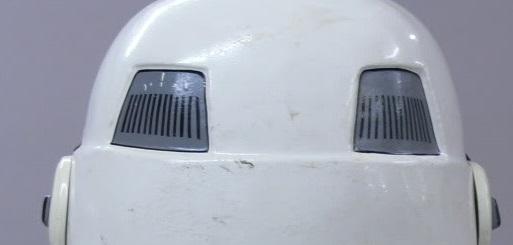
23mm across the base, 10mm from the base to the vent, 13 or so mm from vent tip, inside diameter of the tip is 16mm
-
What does this little beauty weigh in pounds and dollars???
-
Any delivery date on those, Vern?
-
Looks like AP to me with a desperate need to have the biceps and forearms resized
-
Marco buckets has huge eyes
-
If the armor is any indication of its future content, RUN AWAY!!!!!!!! It is recast FX armor with an even worse helmet...if that's possible.
-
Who did you buy them from? Are those AM shins? If they are, an experienced AM builder will chime in. They look the same to me but I have never assembled that kit before.
-

TK-51878 requesting ANH Hero EIB status [RT][411]
gazmosis replied to Dark CMF's topic in Request Expert Infantry Status
Tim, shoot me a PM when you get a chance. -
On the helmet there really isn't too much to be concerned about sanding. I have always used 220 for everything. It smoothes down without being too aggressive and removing too much material. Just make sure whatever you cut out you mark and follow that line.
-
I personally have never paid much attention to those but you can research them by maker.
-
TK-51878 requesting ANH Hero EIB status [RT][411]
gazmosis replied to Dark CMF's topic in Request Expert Infantry Status
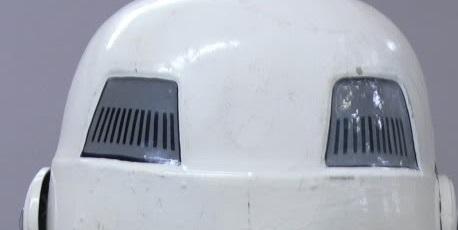
Well, Tim! You journey has been both long and resourceful. I am glad we are finally here and we had the pleasure of witnessing your dented boxes and disheveled packaging to see you get to this point. Let's look at your armor!! CRL and EIB Application Requirements: All required submission photos have been posted. Although one of the hardware on the butt plate is not present, this hardware is clearly visible on the "interior strapping" shot. I am pleased to say that your armor contains all requirements for EIB. With that, I would like to congratulate and welcome you to Expert Infantry!!! Other-Armor Fit/Assembly: I am sure Darth Aloha(Eric) is drooling!!! We don;t see too many RT-Mod kits but when we do, they should look like this. Your attention to detail has paid off to the point that this spot which is normally reserved for comments from both your fellow troopers and myself will remain mostly empty. If someone was to put a blaster to my head, my only comment would be tops of your thighs seem a bit over roomy. I think that an adjustment here would really sleek out the overall look of your armor. Great work with that sniper knee!! But your blaster.......meh. Just average. There I go trying to be funny again! We all know the lengths you went through to make that as special as your armor is. Centurion Suggestions: Germain had beat me to the punch. The wrist openings need to have ALL return edge removed including into the square indent ridge. A very easy correction. The only other issue is something else he brought up. You will need a rank bar on your ear. Now...Since RT assembles his helmets, we almost never get to see an RT Mod helmet build thread. Unless the details are mechanically perfect painting, they look like decals. IF in fact they are, they will need to be replaced with hand painting or "hand painted look" decals. Even if they are painted, I have an issue with the rear traps. The vent lines here are all vertical and parallel to each other. This was never the case on the originals. As you see, all vent line were painted in the shape of the trapezoid with the lines angling as they headed to the outer edge. The kidney notch will need some discussion, though, Other than that, unless your complete Centurion picture set reveals something not seen here, it looks like little will stand in your way of Centurion! Great work, Tim!!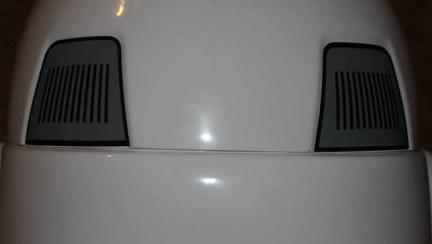
-
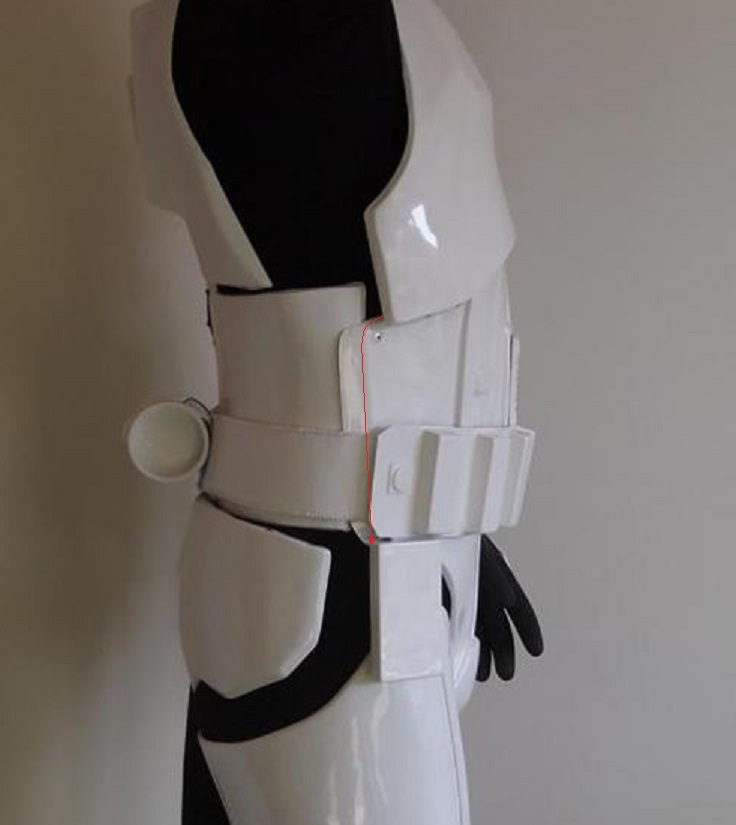
Hey Germain! You Centurion application is finally here. These pics should be in the collection of "how your AP armor can look"! Brilliant. Let's look at your application and your armor! CRL and Centurion Application Requirements: All required submission photos have been posted. We expected nothing less, but you armor contains all elements required for Centurion acceptance. With that, I would like to congratulate you for earning your Centurion badge!!! Other-Armor Fit/Assembly: This section is reserved for suggestion from troopers and myself to improve the overall look of your armor. It is great when this area is left mostly blank! But again...we expected nothing less! I really want to commend you on the painted details on your helmet. Just brilliant! "Note: I was personally opposed in doing the notches on the AP kydney plate because they wouldn't be on the right position, but i have given it more thoughs afterwards. The AP kydney plate is not really accurate from the beginning, so hurting it a little bit more isn't too bad. Moreover, if these notches are indeed a noticeable feature on accurate kydney plates, they are not on the AP kyney plate. The AP kydney plate being too short, these notches will always be hidden under the belt even if the belt is rightly set on the abdominal plate, making no difference if you have them or not". I know your feelings on this. But I also know that now that you have done this, you are happier with your armor and will show this point to the others in your Garrison. Despite how you feel about this, it looks like the armor was made with the notch. Again, an example of how it CAN look!! I would consider at some point getting a holster that doesn't have so much stitching, but we went over that in your EIB application and affects nothing here. Congratulations again!!
-
Hey Joey!!!! Thank you so much for your Centurion application!! Armor building seems to be getting second hand for you! Your work shows it!! Let's take a look! CRL and Centurion Application Requirements: All required submission photos have been posted. Thank you!! Although a cross section shot of the "S" trim of the neck opening is not here, the neck trim itself is pictured and is evident that "S" trim was used. You have an incredible set of armor made possible by an incredible build. I would like you to take 5 minutes and make a slight adjustment to the wrist openings on your forearms. ALL return edge must be removed in this area. This includes into the ridge with the square indents. This often seems like a nit picky aspect, but it's a fix that takes so little time, and really completes your hard work. Here are yours with the areas that need to be trimmed back slightly. Here is what they should look like in case you are looking for a reference. Make that small adjustment and you are there!! Other-Armor Fit/Assembly: Thank you for posting the other pictures of your helmet. With the "Hero" helmet requiring specifics different from the "Stunt",(bubble lenses, 3 bump ears, 2 total ear screws) I need to be sure that those specifics are followed up. Thanks again! This section is typically reserved for suggestions by troopers and myself to improve the overall look of your armor. I am pleased to say that not a whole bunch can be added here!! Thanks for all your hard work! Please fix that wrist opening request and your approval to yet another Centurion accomplishment will be granted.

-
Cleaning kits are over rated in my experience. If I am using enamels like Humbrols or Testors, I just pour mineral spirits in a bowl and use a pipe cleaner and squeeze bulb for paint. (It's like a long eye dropper sold right next to the model paint supplies). For water based, I just use.......water. And a pipe cleaner.
-
I would seriously consider assembling your suit with straps. I promise with Velcro you will have an armor malfunction at some point. I am not saying that I have never had a snap come undone, but it is a rare occasion. Usually, the only place Velcro is seen on the armor is on the calf closures. The belt doesn't count
-
There are pros and cons about the Hyperfirm. They do have a tendency to over weather them, the scope rail is not accurate, but it is ready out of the box and no bumps on the heads of kids who sneak in under the vision line and go ahead and drop it. No repairs is always a good thing!
-
Airbrushes are priced by function and precision. You could spend between $70 and $400 depending on what you want to accomplish. Spray cans dispense an amount of paint that cannot under any circumstance be precisely controlled. Airbrushes have that capability. As with anything, there are pros and cons. I have always relied on the Paasche VL. This a double action airbrush that has settings that allow you to dial in exactly how much paint comes out at the press of the release button. It is VERY affordable. At around $125, you get the whole kit which includes bottles, hose, and some replacement parts. You can buy just the brush at about $80, but why not get everything? Now, you also need a compressor. These can be obtained afford ably. Your paint will almost always need to be thinned unless your paint specifically says "Airbrush ready". If you are not ready to thoroughly clean your airbrush after EVERY use, don;t buy one. I have been using the same airbrush for 35 years. because I clean the hell out of it after every use. You will need some practice with both paint thinning and air pressure. IF your paint is not thin enough the paint pattern will spit chunks, if it's too thin or the air pressure is too high, your pattern will look like an octopus or spider ...far from even. But once you get all these things dialed in, you will never go back. I have used mine from TK's to cake decorating to applying Darth Maul make-up for a Garrison mate.
-
The groove is the right line to cut
-
You can buy the nylon at any fabric store or I look for it on any old backpack or gym bag. It's surprising how much is out there if you look for it. As for the snaps, http://www.tandyleatherfactory.com/en-usd/home/department/hardware/snaps/1263-045.aspx there is a link. But you can always look at your fabric store but they will not have the quantity you will need.
-
To have anyone assemble a kit is going to cost money. RS props is near the top of the list when it comes to how much a base suit will cost. But it is also the most accurate. For the exception of AM armor, any armor sold here will be accepted at any level of accuracy here. You also get the confidence that the sellers here are trustworthy, their product comes recommended, and there are dozens of threads here, showing examples of how they are built. If you have committed to the decision to have your suit built for you, RS and TM are the only two offering the service. There are others that can be hired to build your suit for you ( see Vern). Hope that helps
-
Red_2's NE ANH TK build ...
gazmosis replied to Red_2's topic in Build Threads Requireing Maintenance
Make sure your cover strips are cut to length. Don't take the chance of damaging your armor by trimming them after they are glued. Also, If you used a razor knife to cut your cover strips, you WILL have a little raised edge on the cut line. Make sure you remove this or the cover strip will not sit flush on the surface of your parts. -
I must ask.....why do you think that a pipe kit can't be made into an accurate blaster??
-
http://www.reynoldsam.com This is a place which will be your last stop for anything molding or casting. Word of warning:$$$$$$$$$$$$$$$ Unless you plan on doing a run of several of anything, it's not worth the money to do just one. More than likely, platinum silicone was used to take the molds and urethane rubber is used to make the pulls.
-
Can you please post two additional pics, Joe? I need a shot of the wrist openings on your forearms for no return edge, and a shot of the right side of your helmet. Thank you!
-
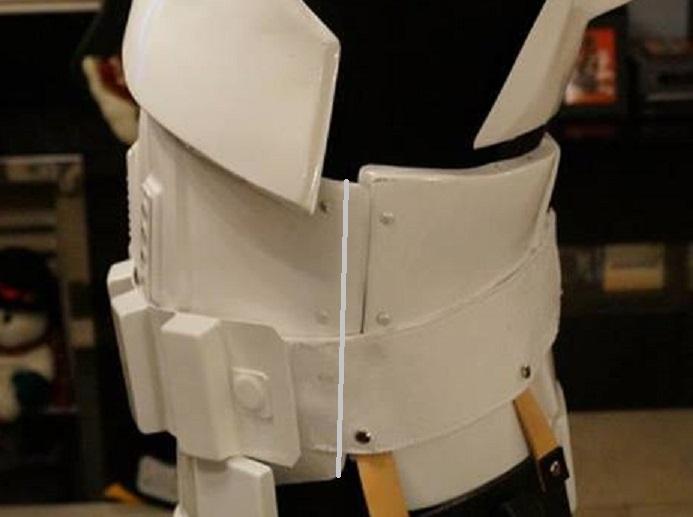
Wow, Fred....time has passed! Glad you stuck with it and followed up! Like I said, your ab buttons look TONS better. Tons! And great job getting hold of the proper "D" ring and charging handle. I think, however, that you may have installed the charging handle backwards. The charging handle has a slight curve to it that should curve towards the front of the blaster: This will not stand in your way for achieving EIB, though. Congratulations and welcome to Expert Infantry!!!! Centurion Suggestions: Just to recap some previous comments regarding items that I'd like to see on your Centurion application should you decide to pursue that. If, in fact, that charging handle is backwards, it should be proper on the blaster. Make sure when taking your Centurion photos that your drop boxes properly align with the vertical end of the belt. Lastly is the excessive overlap of your sides. RS always leaves this extra material and it creates more issues than if it was trimmed properly. Although this is another troopers right side, it is exactly like yours and you can see where I marked the trim line: Here is YOUR left side and the trim line mark: You will notice an immediate improvement in comfort and overall appearance as well as correct the positions of the male snap and rivet placements. Congrats again on EIB!!!!!