gazmosis
-
Posts
4,043 -
Joined
-
Last visited
-
Days Won
23
Content Type
Profiles
Forums
Gallery
Articles
Everything posted by gazmosis
-
Learn from here young man!
-
yes
-

ATA helmet has arrived and Im.....
gazmosis replied to Polar's topic in Build Threads Requireing Maintenance
You're not doing anything wrong. Helmets, unfortunately, are not puzzle pieces. Take a look at the build thread I provided above. It will answer your questions with pics better than I can describe it. -
[email protected] Here is their email
-
Currently there are no 100% Centurion, out of the box, blasters. Though Sci-Fire(Hyperfirm) is most complete, it still needs a "D" ring. Unless that has changed.
-
ATA helmet has arrived and Im.....
gazmosis replied to Polar's topic in Build Threads Requireing Maintenance
It looks like you still have a bit to trim out of the eyes. There is a mold line that you look like you have marked. Trim up to that line. -
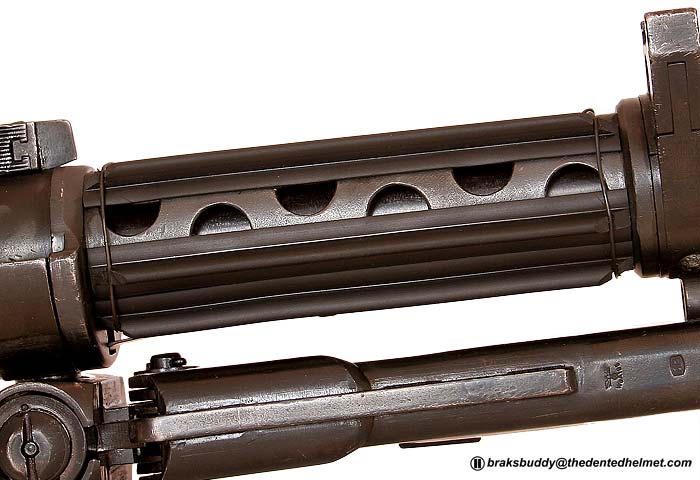
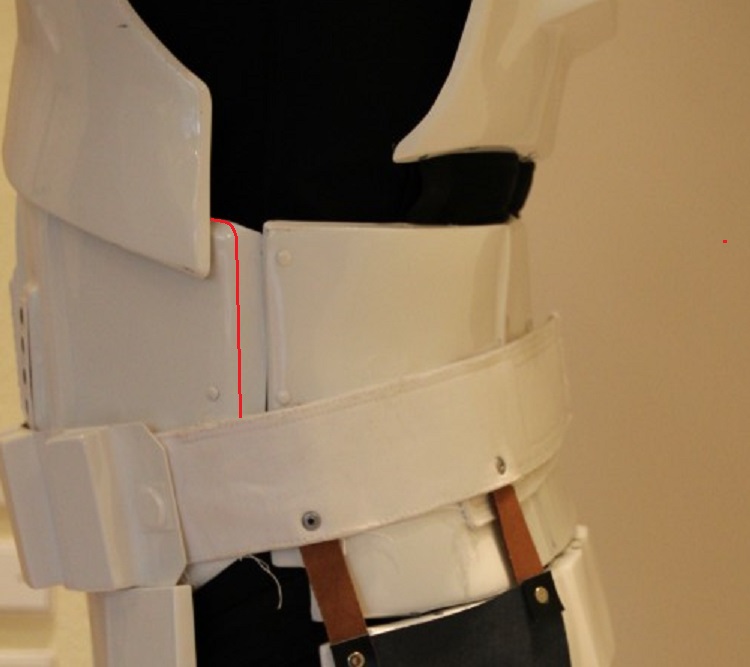
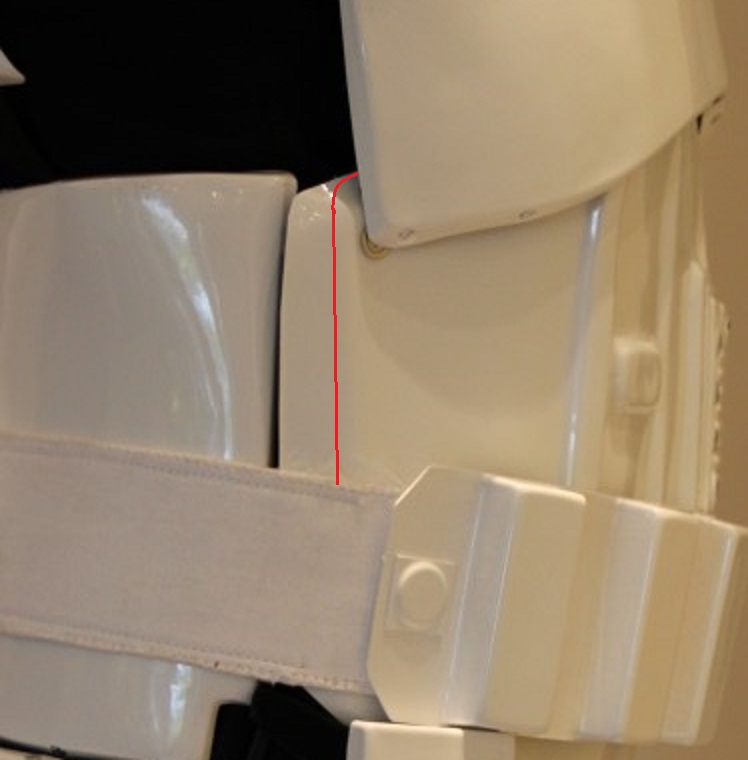
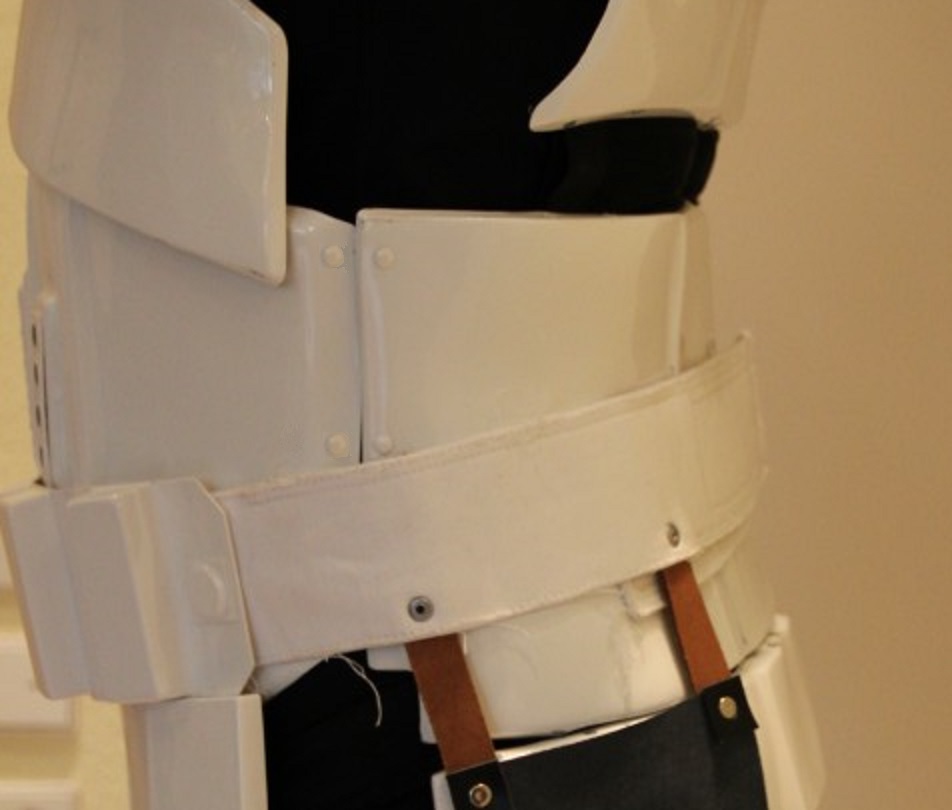
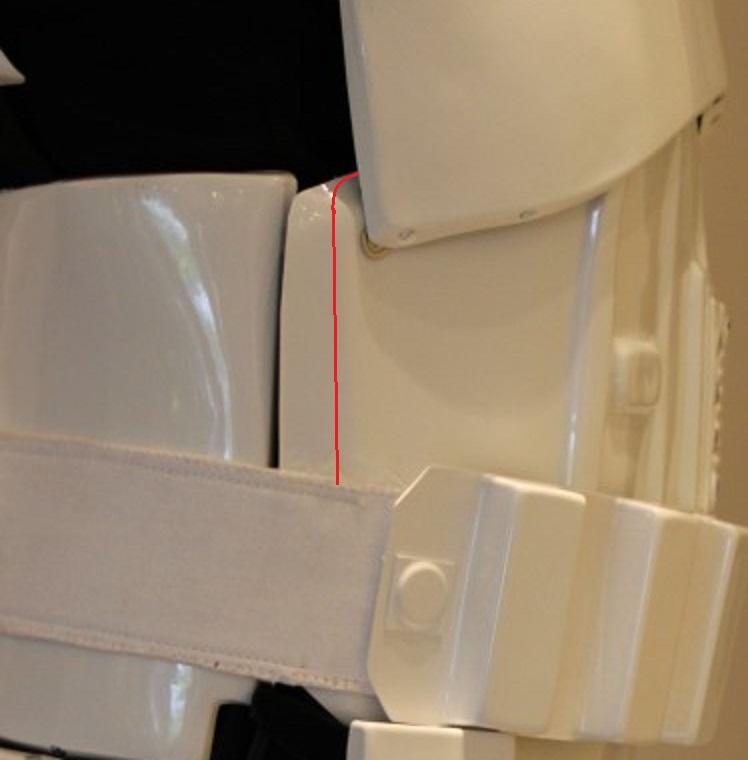
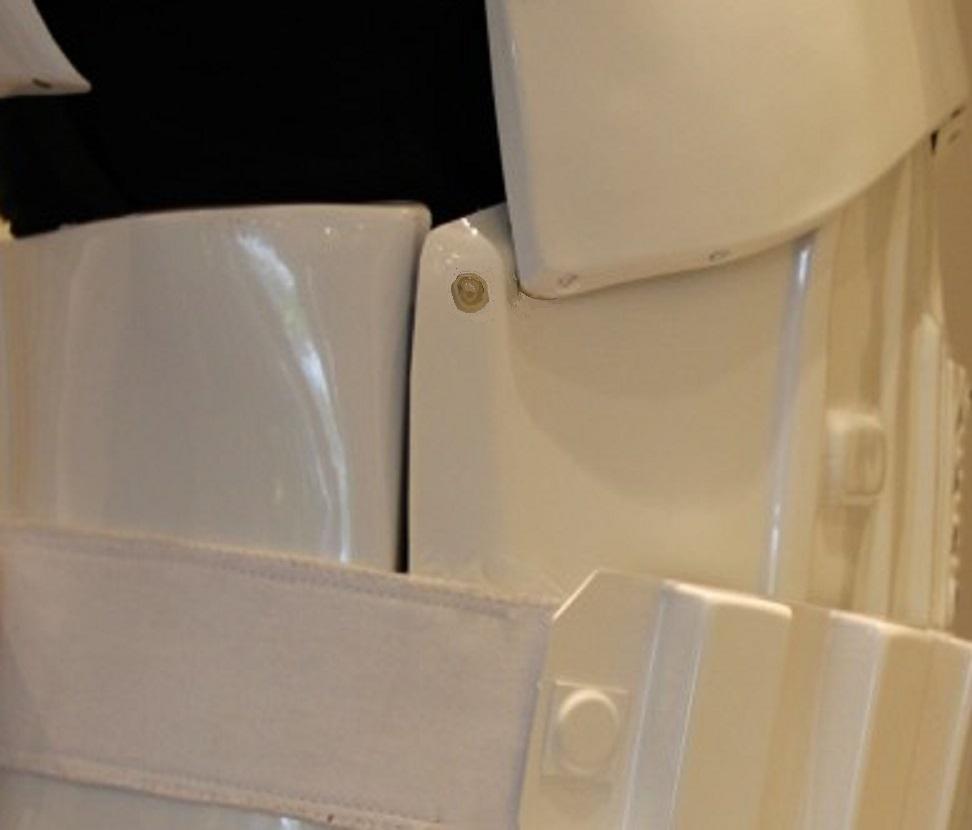
Hey Sven: As has already been mentioned, you have an impressive collection of weapons. It is always a pleasure to see another set of RS armor. So let's take a look at yours!! CRL and EIB Application Requirements: All required photos have been posted. Thank you also for sharing your trooping adventures! It's nice to see a set of armor in action!! Very well constructed and a fine overall job! Your armor meets all the requirements so with that I would like to welcome you to Expert Infantry!!! Note: Sven's original pictures show his suit with much more than the required 1/2 inch maximum gap on the side seams which is something not allowed by EIB standards. However, he also posted pics lower in the thread showing his weight loss and the improved look of the armor on him. Other-Armor Fit/Assembly: This is the section where your fellow troopers and myself give suggestions to improve the overall look/accuracy of your armor. These are just suggestions that do not have an effect on your applications. First off, I want to congratulate you on your weight loss! This was an incredible accomplishment that completely changed the overall look of your armor on you. Well done!!! You have done a great job so I don;t have too much to mention other than dabbing some white paint on the bracket screws and maybe changing out the "cross head" screws for black slotted screws on your thermal detonator. Another suggestion is to get some thin, black wires for the t-tracks on your DLT-19 as seen here: Centurion Suggestions: The first thing that will need to be fixed is the gap between your kidney and your back plate. The gap here should be close to nothing. Second, the straps on your holster seem a little long. They should be right around 25mm between the belt and the holster. Third is an issue that comes up here a lot. Your weight loss needs to be celebrated and if you decide to continue to lose more this will be easy! I am talking about the hardware locations on your side seams. The left side rivets and right side male snap should be close to 10 MM in from the seam itself. If you decide to continue your weight loss, you just need to trim the extra plastic here: on your left, and here: on your right. However, if you are not planning on this, I would like to see the hardware in the proper locations on your left here: and on your right here: Congratulations again on your accomplishments!!! You should be proud!!! \


-
Frown Mesh - Material and Method
gazmosis replied to Koyaanisqatsi's topic in Assembly, Mods, and Painting
You can use general vinyl screen door mesh or a heavier pet resistant mesh. Either one can be permanently bonded with strategic drops of superglue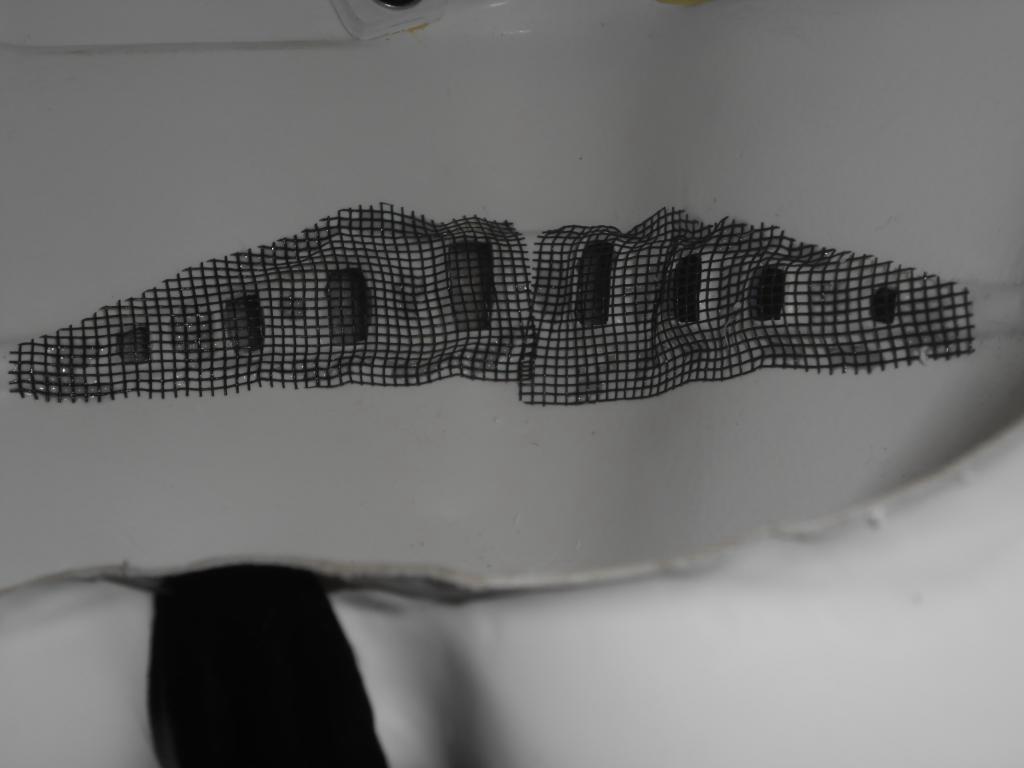
-
ATA helmet has arrived and Im.....
gazmosis replied to Polar's topic in Build Threads Requireing Maintenance
http://www.whitearmor.net/forum/topic/28633-howto-ata-helmet-build-hand-painted-details-pic-heavy/ This is a recommended thread as well -
I wouldn't necessarily rush too be armor maker just because they offer a pre assembled helmet. Every single person here was in your shoes. In my opinion, the ones who jumped in feet first and built their suit from top to bottom are far more satisfied. You can look in the mirror and say...."I did that!" "I built this!" The information to accomplish that is here. Hundreds gave done this before you. We have your back. As for specifics....for your body, RT would indeed get too big. AP, TM, RS Props would look best on you in my opinion.
-
ATA helmet has arrived and Im.....
gazmosis replied to Polar's topic in Build Threads Requireing Maintenance
Take your time and have fun! -
Made a full Rubber E11 with Ali scope rail
gazmosis replied to Truimphmark's topic in Build Threads Requireing Maintenance
Very, very, cool! -
Making armor TEMPORARILY bloody
gazmosis replied to Sir Tomasu's topic in Hard Armor (General Discussion)
Dry erase marker? -
Pete TK2890's 2mm TM Build
gazmosis replied to TK2890's topic in Build Threads Requireing Maintenance
I can't wait to build one of these! Some day! Maybe it's just me, but the black outlines of the tears and trapezoids on the originals were not thick. I would thin these out just a bit. The vent stripes on the rear traps should be in the same trapezoid formation as the trap itself. Not all parallel. You are doing an awesome job so far!! Can't wait to see the rest. -
http://www.whitearmor.net/forum/topic/26677-doopy-dos-replacement-e-11-magazine-run-4-now-open/Thank you guys. The run is always up.
-
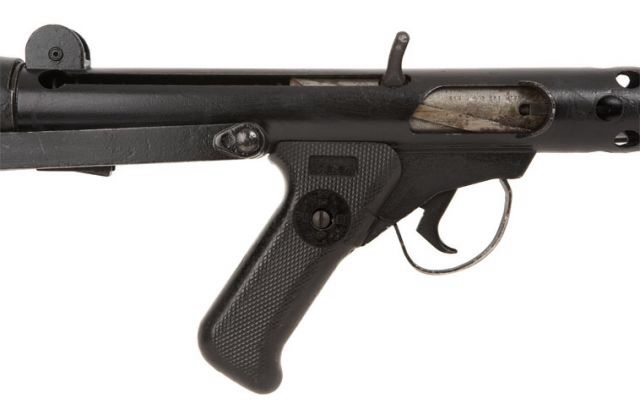
I think you might have that butt cap on a little far. The locking track ridge usually shows just slightly from under the butt cap

-
Split Rivets on McMaster Carr
gazmosis replied to LaserBrain99's topic in Assembly, Mods, and Painting
I already have two drawers full of them -
Which Neck Seal Do I Buy?
gazmosis replied to Seth Hendrix's topic in Boots, Soft Parts, and other Accessories
Neck seals are mostly up to the individual. Any neck seal with original sheen look you are going to pay a little more for. Trooperbays wait time(a couple weeks) is nothing. Remember that these items are not made by abig company. -
Split Rivets on McMaster Carr
gazmosis replied to LaserBrain99's topic in Assembly, Mods, and Painting
Actually, the fasteners that hold the thigh pack on are two piece speed rivets. They also have a slightly smaller diameter to the head. -
http://www.whitearmor.net/forum/topic/22604-expert-infantry-application-photo-checklist/ Hey there, Trooper!!! Please review the photo checklist from the link above. Match the photo with the point on the list and this will ensure all required photos are present.
-
DF92 ATA Armor Build
gazmosis replied to Darth Fader 92's topic in Build Threads Requireing Maintenance
PICS!!! -
Walt's kids armor project.
gazmosis replied to gazmosis's topic in Build Threads Requireing Maintenance
DO IT!!!! IT is so worth it, Andy! -
Walt's kids armor project.
gazmosis replied to gazmosis's topic in Build Threads Requireing Maintenance
Sorry it has been a while, but forward progress has been made. Having never dealt with having to immerse parts in boiling water before, I assumed that if you over fold them, it would flex back out to the desired location. WRONG!!! It will stay exactly where you tie it off. As a result, I had to RE- immerse the parts to stretch them back out. Once all this goofing around was done, things went together well. I ended up deciding on 10MM cover strips for the arms, 15MM cover strips for the leg fronts, and 20MM for the leg backs.Assembly table maddness!!! The shoulder bridges needed to be trimmed right to the edges and immersed in hot water to be bent. I superglued a few small scraps of ABS under the front ribs to increase the gluing surface and E6000'ed them into place.The sniper plate was a challenge. Thank goodness for the heat iron! It finally went into place, though.I decided to do bicep hooks. I had to mount the one slightly off center due to the thumbprint and the return edge. There was no flat area that allowed it to be centered. I wanted to get back to the torso. I broke out the cloth belt and the waist belt. I put a slight curve on the plastic belt first, then went back and installed the snaps that hold it to the torso.I popped the belt back off, riveted the plastic belt into place, hung the two sided drop boxes, and installed the new rivet covers. This belt looks incredible!!I was working on another project that required me to have the ab colors out, so I went ahead and painted the ab buttons. All together and looking good!In finishing up the legs, I did come across something I thought might be looked into at a later time. The ammo or thigh pack did not wrap all the way around. as a result, it sits at a rather extreme upward angle. Maybe a change for future suits?The rest of the pics are just random armor parts. The shins splayed open in the back quite a bit when glued up. I tied and set them into a garbage can and poured to pots of boiling water over them. Learning from my first experience, they ended up sitting perfect. I am not even going to install retention straps or velcro unless it is really needed.All the strapping is in and all we are waiting on are the shoes from the UK and the neck seal from Darman. The next pics will be of this young man suited up!!! -
The one on the left is unacceptable. These are boots known as CABoots. They are a very shiny boot (and lovely smelling) But you can see the seam that runs from the top, front loop to the one that comes off the "U" shaped elastic on the side. The other boot is from TK boots. No seams anywhere on the boot front=acceptable
-
Hey Chris: You have been a "trooper" in all the sense of the word! You have stuck with this, did your homework and applied it. Your efforts are to be applauded! I would like to welcome you to Centurion!! Congratulations!!