gazmosis
-
Posts
4,043 -
Joined
-
Last visited
-
Days Won
23
Content Type
Profiles
Forums
Gallery
Articles
Everything posted by gazmosis
-
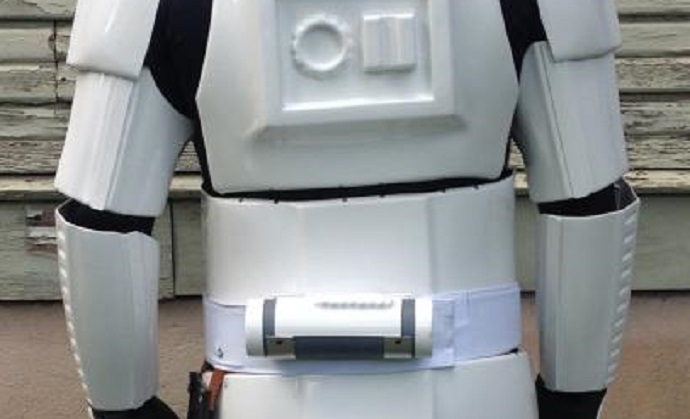
 Alright Jason! Great to see your application! Let's get to it! CRL and Centurion Application Requirements: All required submission photos have been posted. With pleasure I can say that your armor contains all necessary elements for Centurion and should be on the "how ATA is supposed to look" list. Well done, Sir! Nice incorporation of the original strapping brackets! Other-Armor Fit/Assembly: This is the section where suggestions are made to further improve the overall look of your armor. These are suggestions that do not affect your application. Just want to add how much better your blaster looks with the added details and weathering! I would still squeeze down those thermal detonator belt clips for security purposes. It looks like the strapping bracket screws could use a little dab of white paint. It will still allow them to be visible just knock down how much they show. NOTE: Jason's application came in before the discussion and application of the kidney notch Congratulations and welcome to Centurion!!!
-
TK-31870 requesting Centurion Status[RS][135]
gazmosis replied to teet's topic in Request Centurion Status
Your male (right) side rivet is MUCH closer to where it needs to be. Your rivet (left) side is now balanced. I can't wait to hear when you tried this on and saw both how much better it will feel and how much sleeker it looks. You thigh pack attachment is right on the money. Thank you so much for sticking with this! Your hard work paid off. Your armor thanks you and I can finally congratulate and welcome you to Centurion!!!! -
Totally agree.....and I have been hit with ab buttons and it's not pretty. I would rather keep things looking good a proportionate to reference photos than bust out the ruler.
-
Are you gonna add some kind of skull or something to the helmet???
-
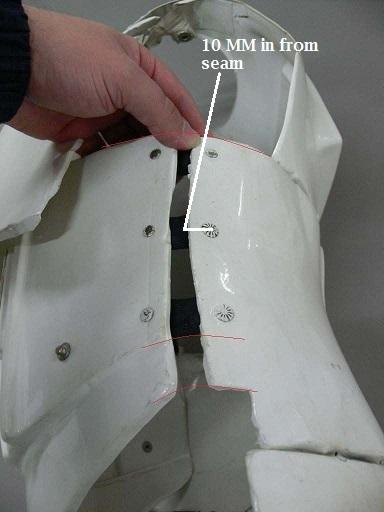
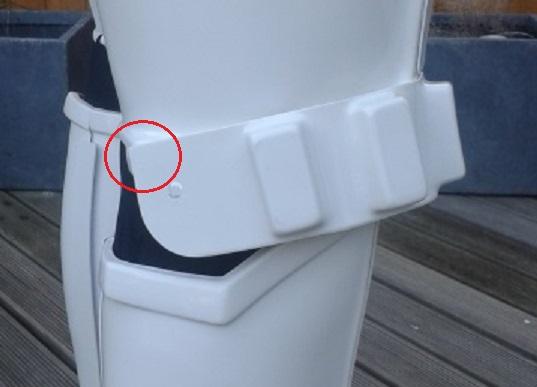
First of....That is perfect, Ron! As for measurements, of the rivet placements, aside from the 10 MM in from the seam I don;t know thatI want to get into something that specific. Someone building a kit should be able to find this pic: and compare it to their armor side by side the photo and mark off locations that are deemed acceptable. We don't want this: or this:, or this: As for the male snap (right) side, This should be reference enough to get acceptably close: We just don;t want this: That is just too far away from that corner location. For you, Andy, those alignment lines were something totally different for another trooper. But as for the notch, yes that will be applicable to Centurion armor and will be looked at on a case by case application. It should, however, fall close to the measurements provided in the CRL. But again, if it is balanced and looks good but falls out of the measurement range by a MM or two I am not gonna tell you to throw away your armor and start over.


-
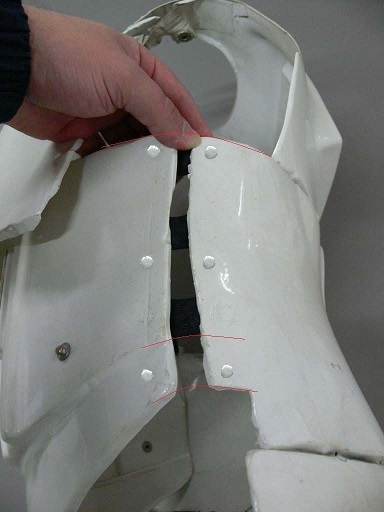
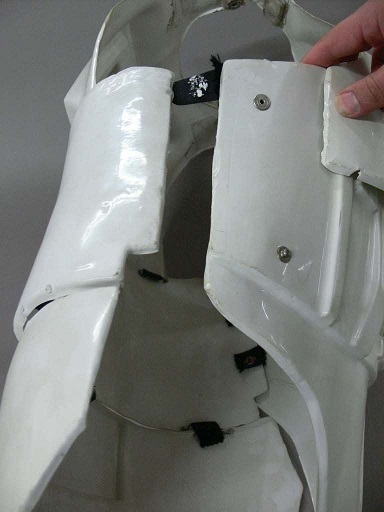
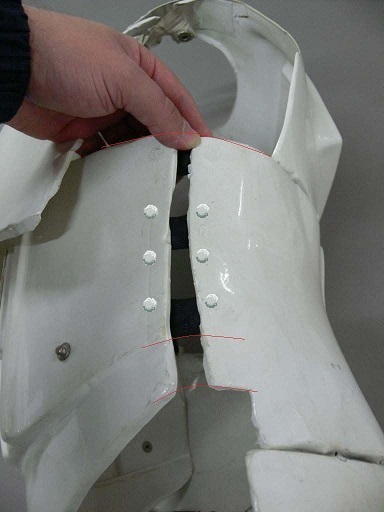
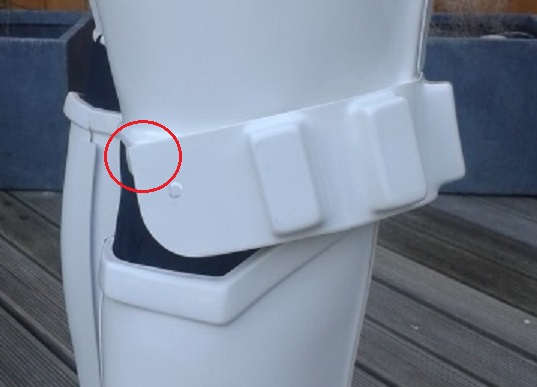
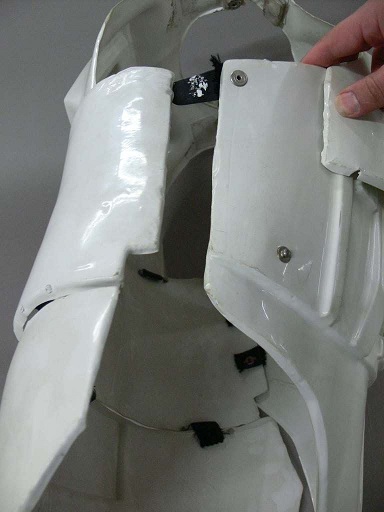
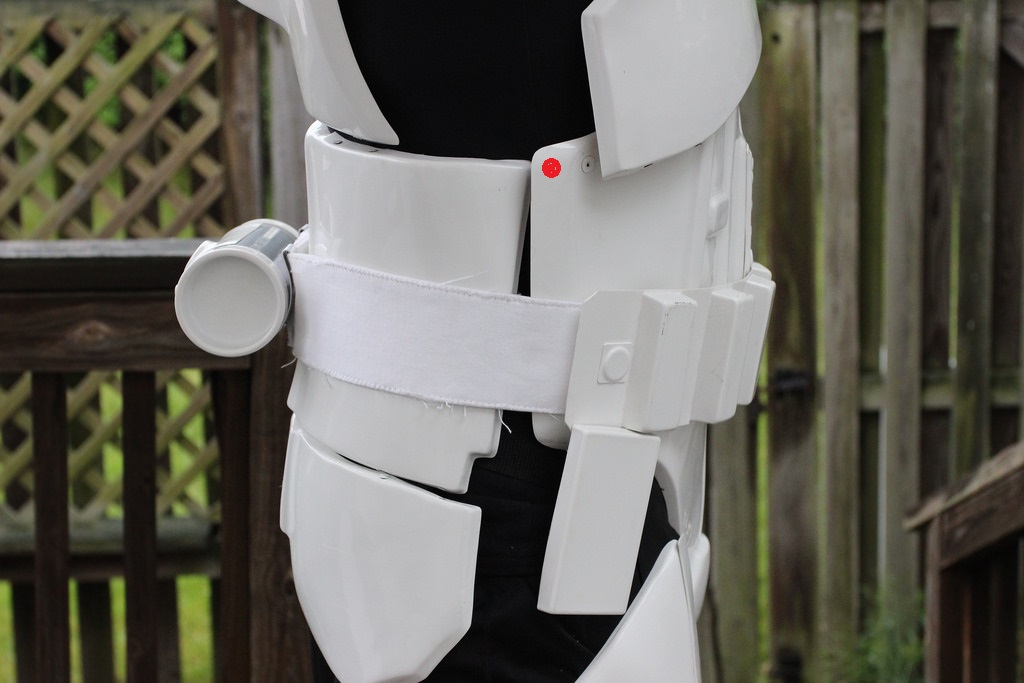
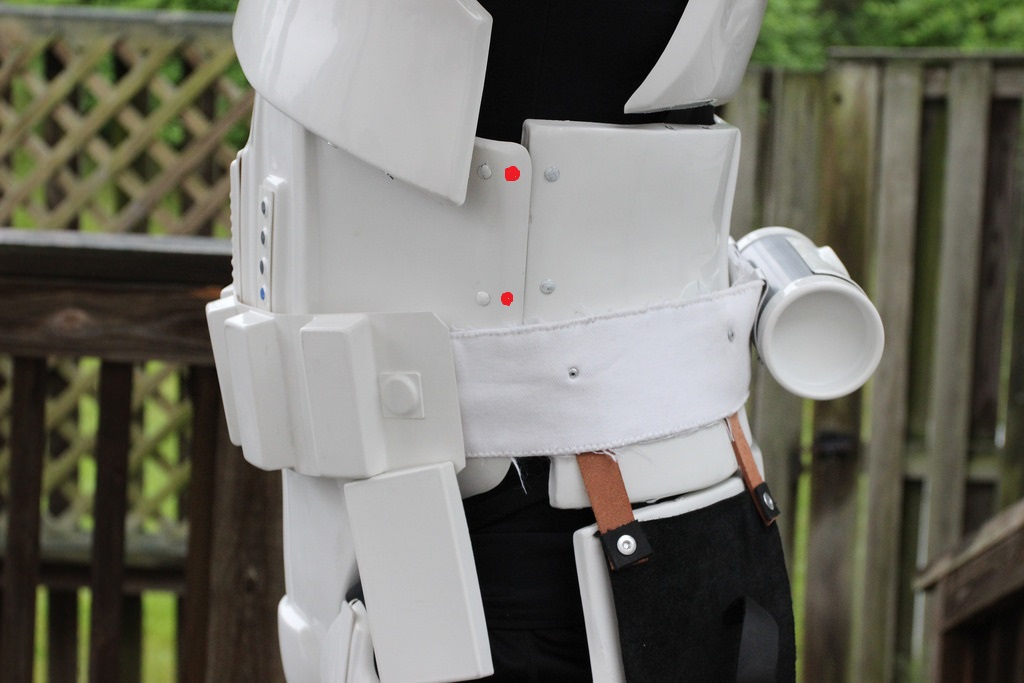
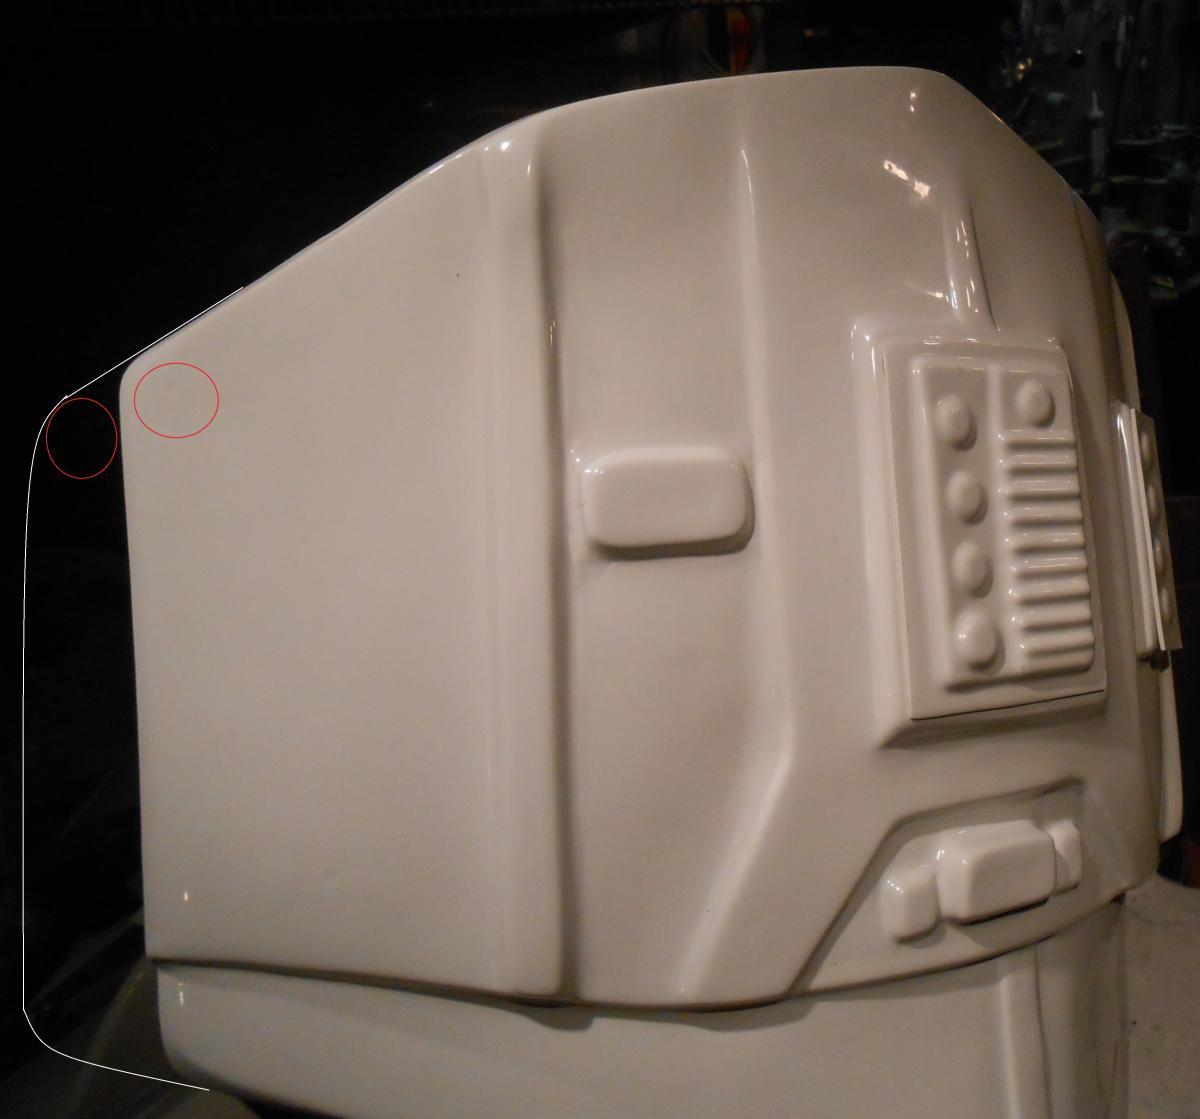
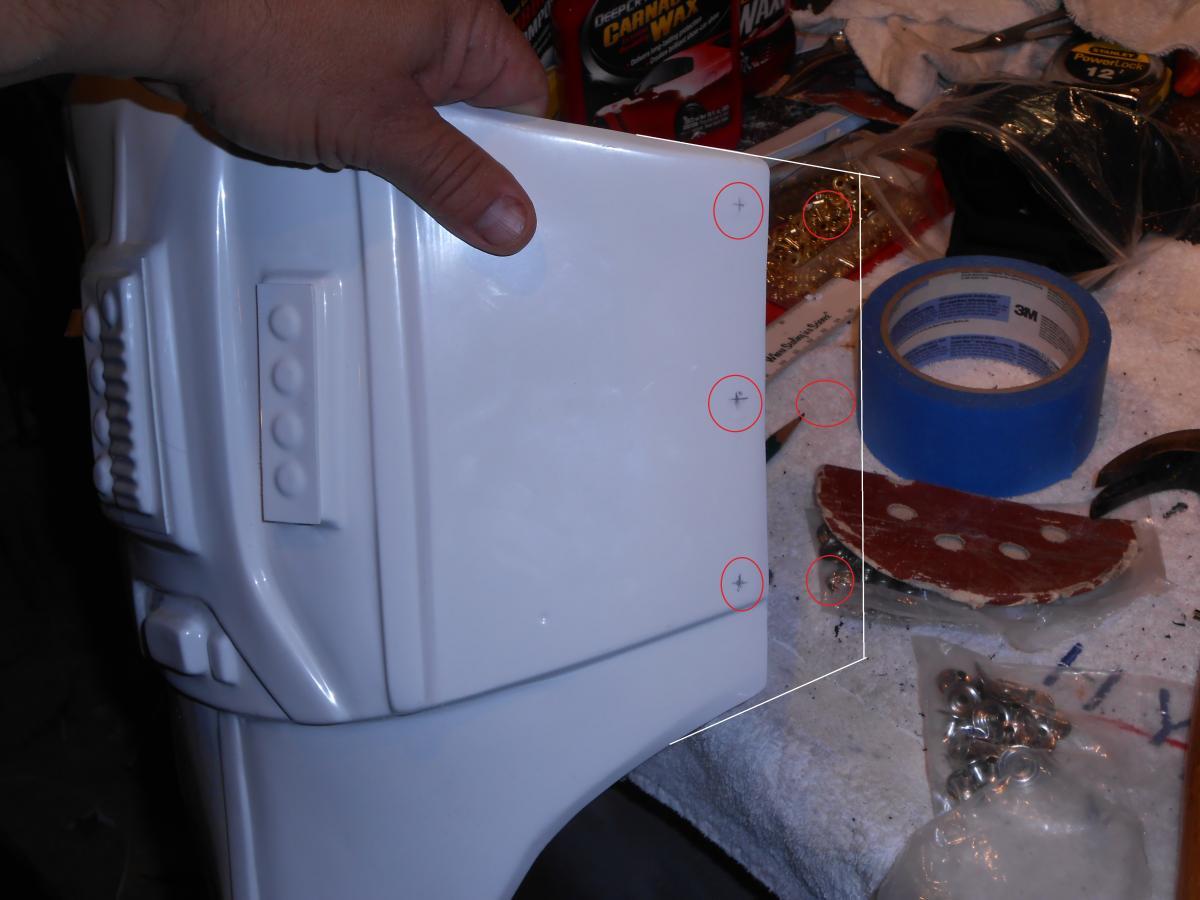
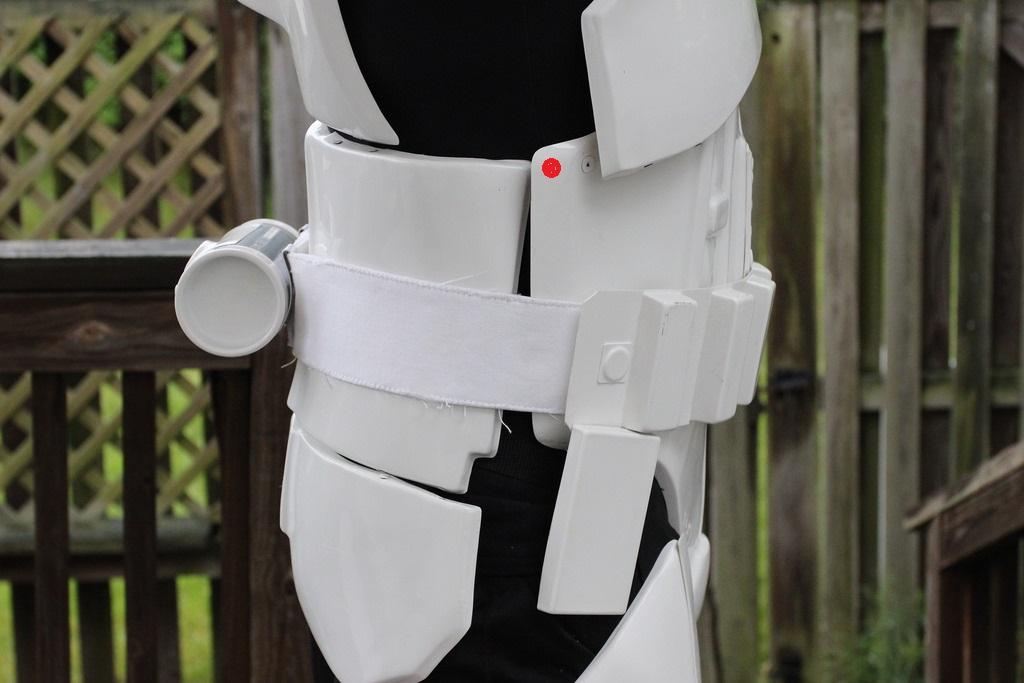
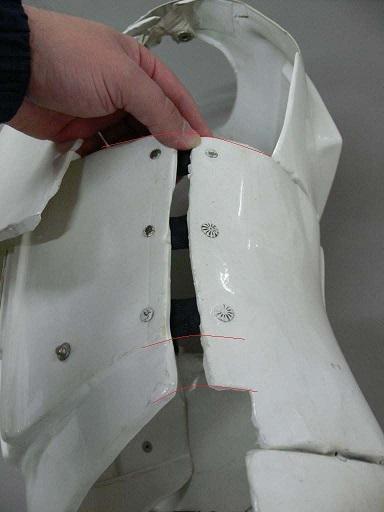
Hey Troopers!!! Most things in regards to armor building are fairly straight forward here. With a million build threads, and both screen used and member photos to reference, the tools are present for people to build their suits the best they can. There does seem to be a re-occurring theme that in is coming up with greater frequency. This has to do with the side seams on the RS Props armor and the extra material that is very often left to accommodate extra room. It is both an honor and a privilege to be able to be a daily witness to the talent contained within this Detachment . Few things give me gray hairs. But nothing makes me age quicker than to have to tell a trooper that a repair needs to be done on something they have worked very hard to achieve. However, EIB and Centurion awards focus on details that go above basic approval. The photo references are there and standards must remain. This doesn't mean that the "armor-Nazi" is quickly approaching. I know not everyone is perfect however I would hope that with the ample reference photos and other reference material that others have worked very hard to provide, that we would be able to come very close. Our "Pew Pew" world has been greatly improved by the presence of RS Props armor. RS has helped the builder out by providing reference points to where certain rivets and snaps should be installed. However, these points need to be approached as suggestions and not law. EVERY set of armor needs to be built according to its owner's frame. This can pose an issue for those ordering their suits pre-assembled by RS. I hope that this thread will make people aware to head off this issue before something gets installed that would require repair later. Here are the archive shots of the screen used suits showing the hardware locations: Here is an ab from an RS build I did. This was before they started adding the extra material on the sides. I drew the extended material and circled the original snap location and where it should be if the extra material is to remain. I did the same with the rivet side. If someone mounted their knee pack on their thigh with the rivet in this position (I circled the correct position): they would be asked to make the repair. Why should ab hardware be any different?? If an RS suit is presented with the desire the keep the side extensions, then the male snap should be located in the marked area: . The same goes for the rivet side: There have been hundreds of builds featuring ATA, AP, TM, T/MC, CAP, TM, etc....Not once did I see someone install rivets or a snap improperly because they planned ahead for gaining weight. They were installed right the first time. This is a simple matter of communication. If you are ordering from RS and the extra material is to remain, discuss with them the proper hardware location or have them leave it off all together and YOU decide what's best for YOUR armor.


-
TK-31870 requesting Centurion Status[RS][135]
gazmosis replied to teet's topic in Request Centurion Status
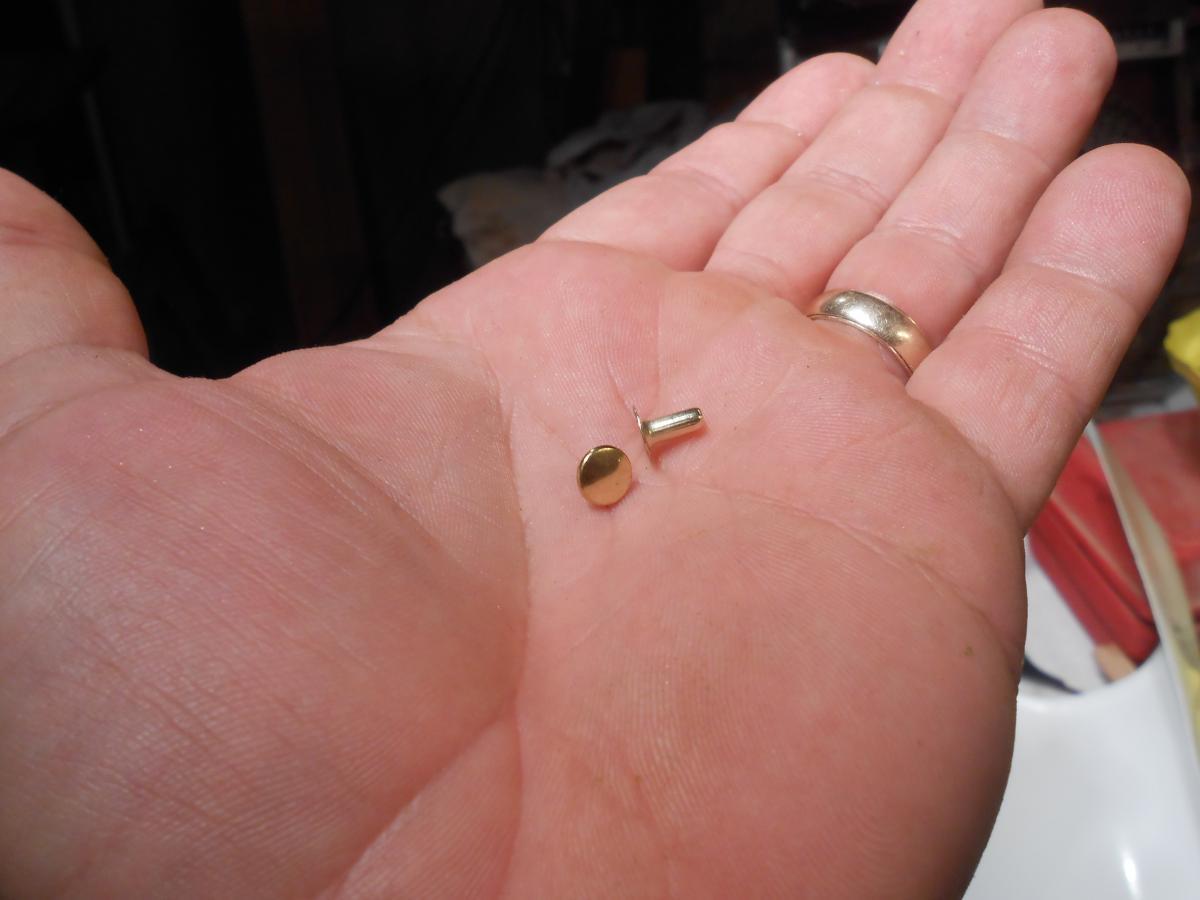
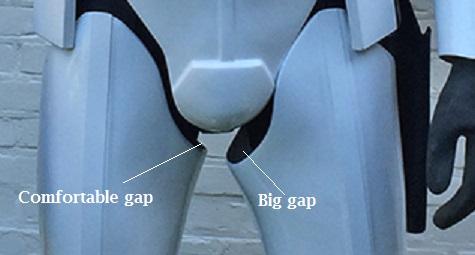
Alright, Teet, thanks for that pic and thanks for the clarification on how to pronounce your name. Truthfully, I never even thought about the "milk delivery system" until now. Thank you, Twan Anyway, thank you for your Centurion application. Making this Legion a better looking place is what we are all about. You did a wonderful job on the construction of your suit. I assume the you built this because of the adjustment at the top of your right thigh. Nice work. I like to see this fixed. Anyway, Let's look at your armor more closely. Keep in mind that Centurion photos look at your armor in greater detail than EIB. Items may come up here that did not in EIB. CRL and Centurion Application Requirements: All required submission photos have been posted. This is so close I can taste it. A couple minor adjustments and 1 clarification and you are there. First is the thigh pack attachment on your right thigh. Germain had brought up correctly the fact that a pop rivet was used on the installation of this. A solid head rivet, either split (or preferably) a cap rivet like this should be used. The rivet in your latest picture looks really flat and almost plastic. Can you post a pic or tow showing this attachment in greater detail? The next item is your side seams. I have read all the comments in regards to this. I have personally built several RS suits and for this reason, I specifically request RS NOT to install any hardare on the AB plate until I fit it to the owner. You, Teet, are currently 1. 84M tall and 75 KG. I have built an RS suit for a trooper EXACTLY your height and 86 KG without the extra material on the sides. I am aware that everyone carries their weight differently. But you have so much overlap on your sides, it will take quite some time for you to blow out the sides. But this decision is more about the proper location of the ab hardware in its relation to the center seam. There is no comparison to the exceptional look when these halves are properly aligned. Your fit and look will improve as well. I am in no way saying that your armor's look is poor. But you will see how much it will improve when it is properly fit to your midsection. Thanks for the pic, Germain....saved me a little work. Other-Armor Fit/Assembly: The only thing that I would have to suggest here is the possibility of taking in your left thigh a little at the top. Around your knee area, both are a perfect fit. If you took that left one in at the top, your mobility would improve as well as balance the overall look of your armor. I would not suggest this if there was just a fingers worth of extra space in your thigh. This would be called "comfort" and your right thigh is an example of this. The room in your left seems excessive. Is is always a pleasure to see a nicely built set of RS your included. I can't wait to stamp Centurion on yours!!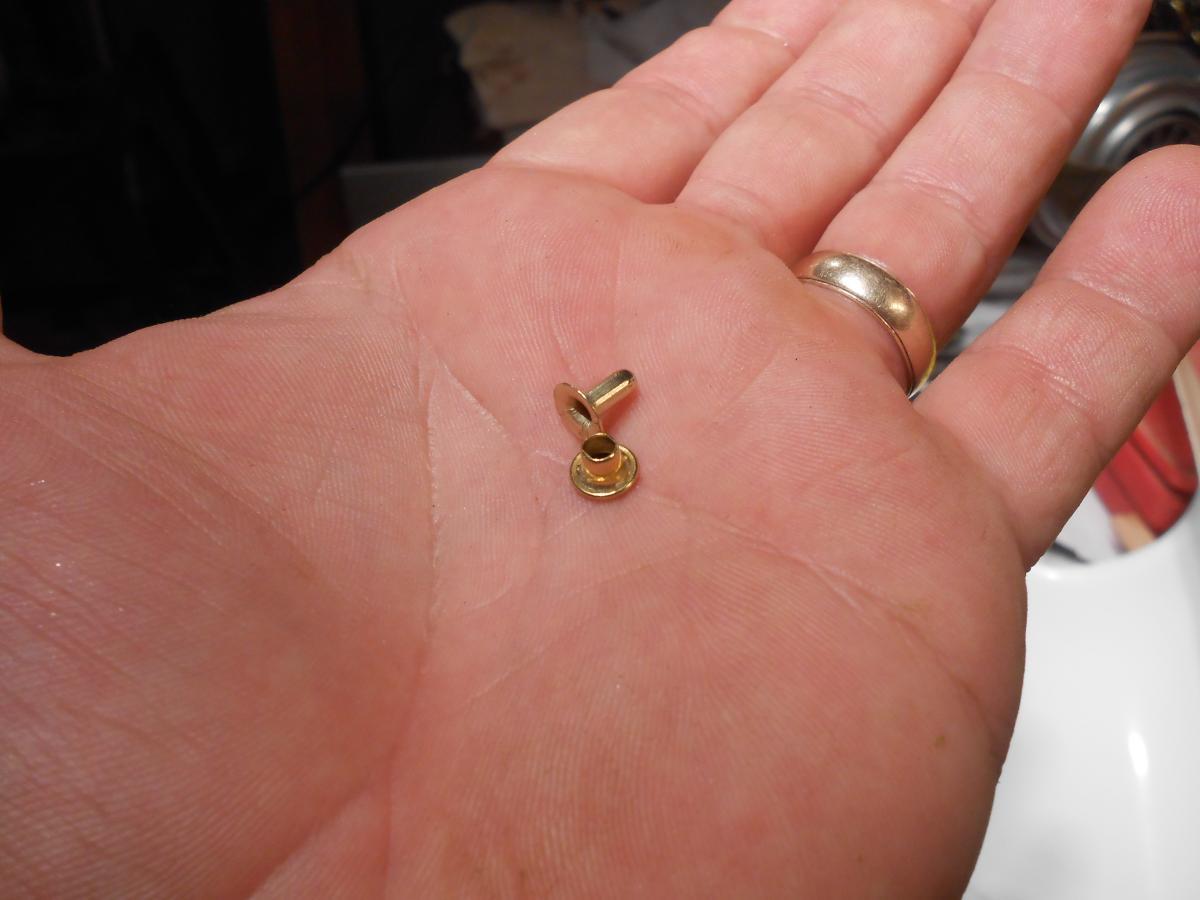
-
TK-31870 requesting Centurion Status[RS][135]
gazmosis replied to teet's topic in Request Centurion Status
Thank you sir! -
TK-31870 requesting Centurion Status[RS][135]
gazmosis replied to teet's topic in Request Centurion Status
Teet, do me one favor before I fully review this, you are missing a shot of your wrist openings of your forearms. It's a required CRL point that needs a pic to be proven. Thank you. -
TK-27101 Requesting Centurion Status [RS]
gazmosis replied to Espaider's topic in Request Centurion Status
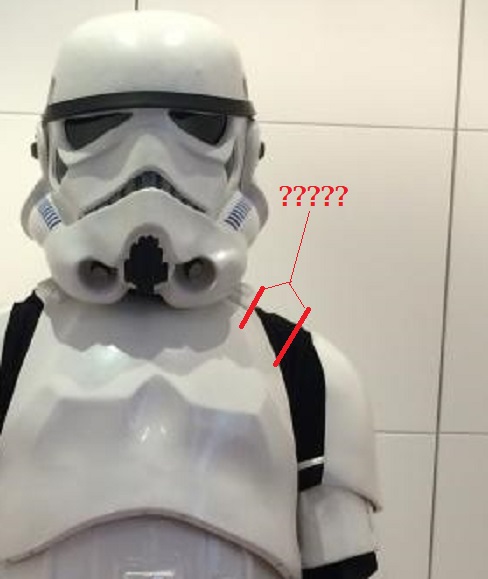
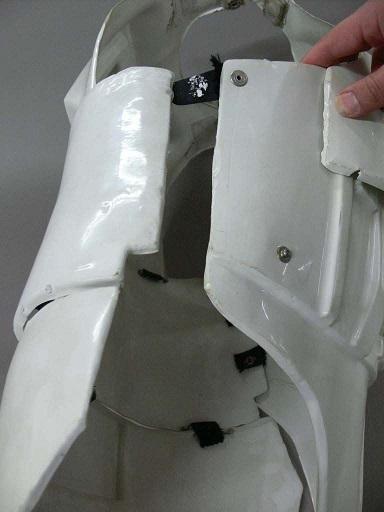
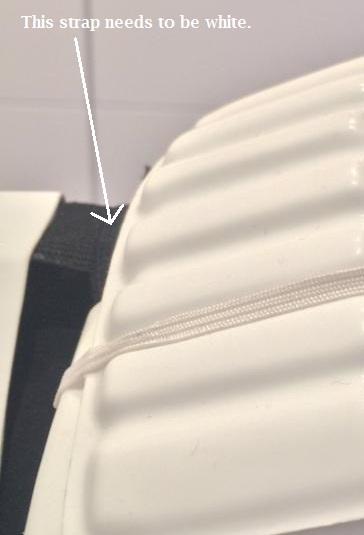
Hey Rafa!!! Thank you for your Centurion application! It is great to see that you have applied. No let's take a look at your application and your awesome armor! CRL and Centurion Application Requirements: Centurion applications are much more specific than EIB. More photos are required of specific areas that may not have been seen on your EIB application. Before we can move forward, a complete set of photo requirements needs to be present on the application. You are missing a pic of the butt plate/kidney joint, the inside chest plate to back plate connection strap, a close up of the thigh pack connection and the return edge on the forearms at the wrist opening. Although the last one is not on the photo checklist, it is a required feature on Centurion armor that can only be proven by a photo. Next thing I want to discuss are the gaps between your shoulder bells and the ribbed shoulder bridges. These two items should be pretty close to touching. Your left side could be brought up slightly and be good but your right side is what really concerns me. This is definitely going to need to be addressed. I have another concern regarding a different Centurion requirement. Since a full interior shot of your armor was not present on either your EIB or Centurion application, I could not see the strap that connects your chest and back. This strap needs to be white. Will you need to change this?? It seems like these straps in your pics are black. Keep in mind that the straps that connect to your shoulder bells are black. But the chest to back straps need to be white. The next adjustment I will ask you to make has to do with your sniper knee plate. Although it was seen in the film in a similar position on one trooper, it is something that is looked at as an anomaly or mistake. The ridge on the sniper knee should be lined up as closely with the ridge on the top of the shin itself like on Josh's shin shown here. RS is notorious for being difficult to wrestle into position, but it can be done. Other-Armor Fit/Assembly: This is not just finding out about what is wrong with your armor. It is about making your armor look its best. You have already begun that process. The seams on your legs and arms are awesome. I jumped for joy to see that you made the improvement of trimming the excess material to make your side seams sooooo much better. Thank you for your work on your thermal detonator by moving those clips up and replacing the cross head screws with the correct black slotted ones. Good work on removing the pain on your crotch hardware as well. Now that you have your arms figured out, that even looks better. Check on those shoulder bells, though These are a couple small steps that will make a big difference. Please don't hesitate to contact me should you have any questions.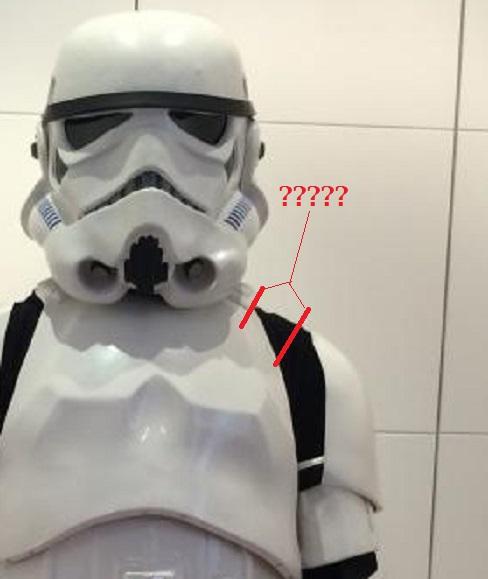

-
You are doing a great job so far! I am confident you will conquer that sniper. Once trimmed out, set it in place dry with clamps until you have it just where you want it. Make marks with a pencil so when gluing, you can place it right back in the same location. It's no secret that the sniper sucks for gluing surface. A little trick I have used if you are nervous about heat bending the sniper to meet the shin surface, is to heat the shin and push it out to meet the sniper. This will create more shin to sniper gluing surface without warping the look of the sniper plate Do the same dry fit/mark so you don't go beyond those marks. All will be hidden by the sniper. A good guide for your belt corners is to trim the corners so that the vertical outer edge of your belt is roughly the same as your belt width top to bottom. I would also reserve your trimming of your cover strips for BEFORE you glue them in place. Tape up the seams and make your measurements. Trim at your leisure safely away from the armor surface. Note: if you used a razor knife to cut your cover strips, you WILL have a slight raised lip along the cut line. If not removed, this does affect how close your cover strip fits to the armor surface. Draw the sharp edge of your razor knife along the edge to remove this. You will see how much flatter it sits on the armor surface.
-
We are always watching........muhahahah!
-
At this point, we don't even know for sure that J J is gonna eliminate the TK from the film. I would hope that JJ will listen to the pulse of the fans and give us his vision yet stay slightly iconic.
-
RS PVC Kit / ANH TK Stunt Build / Bulldog44
gazmosis replied to Bulldog44's topic in Build Threads Requireing Maintenance
Outstanding work on those TD clips!!! You are rocking this build -
Or you can become really flexible and not bend your knees.
-
Helmet & Ab paint detail reference guide
gazmosis replied to Billhag's topic in Assembly, Mods, and Painting
Way to go, Mark! Just a note, if you can't find matte black, mix gloss and flat together -
Hey Kyle! Thank you so much for your application for Expert Infantry!! Let's take a look at your application and your armor!!! CRL and EIB Requirements: All required submission photos have been posted. You did a wonderful job with your build. Nice clean assembly lines. You should be proud. Your armor contains all necessary requirements for EIB. With that I would like to congratulate and welcome you to Expert Infantry!!! Other-Armor Fit/Assembly: This is the section where both myself and other troopers look over your build and provide suggestions for improvement towards the overall look of your armor. These are suggestions that do not affect your application. The first item I would like to bring up is your drop boxes. Typically, the drop boxes are positioned right up against the waist belt. I have always stated that a pencil width is as much as I would allow and you are there. I'd like to see them closer, but yours I will accept. I do want to mention the beautiful fit around your middle and the great alignment of your side seams. I wanted to touch on your thighs. They seem very roomy to me. Thighs are something that can really make a difference in walking and trooping comfortably. Too much room can make you seem "wonky". I know that you have brought down the thighs to limits of the raised cover strip ridges both on the front and back. It almost seems like you have enough room to actually trim off the ridges and glue the strip right to the flat surface of the thigh back. This is the reason I am pleading with armor makers to make this adjustment. The original armor did not have this ridge on the thigh or shin backs.Eliminating this ridge would be the solution to every fit issue that comes up and would allow perfect custom fitting to every set of armor. Back to your armor.....take a measurement around the largest part of your thigh. Note this location inside your thigh armor and measure there. If this measurement is larger than the ridge on the back, you might want to consider a trim. If not, no biggie. I would look into perhaps raising them up just a bit. The look of your armor is very important but your comfort ranks pretty high on the list as well. You mentioned that you clear coated your armor. It makes for an awesome shiny look but most clear coats are meant to protect a surface and make it more durable. Watch for yellowing and cracking. Aside from those points, I have little to comment on. Nice job!!!! Centurion Suggestions: You have gone through many steps on your details that lead me to believe we will see a Centurion application in time. There are a couple things you will need to do prior to applying. First, I would like to see your shoulder bells up a little closer to your shoulder bridges. I have seen this on other troopers in the past with stretched elastic which tells me they were just being pulled down. Flexibility is what the elastic is for. Yours, however, seem to just be laying off your shoulder bridge. If an adjustment here is necessary, I am sure you can handle it. You have the correct gloves but will need to obtain flexible handguards. You already have mentioned your plans for a Doopy build and that will address your blaster..... Nice work and congratulations again!
-
Another First Time Doopy Build
gazmosis replied to cm325i's topic in Build Threads Requireing Maintenance
I wouldn;t worry about it too much. This blaster looks incredible!!! You did a bang up job and should be proud!!! -
We'd really like to hear how they have handled this
-
Nice progress so far!,
-
That is gorgeous! Just round the sharp corners off the t-tracks and it will be fine. It will probably make it much more comfortable to hold. Those are heavy
-
I will take a closer look at your application when I get home today. Looks great so far! Nice and shiny!!!!
-
My 2mm TM Hero helmet build 8/2014
gazmosis replied to DarSec's topic in Build Threads Requireing Maintenance
Oh gack -
Diana's RS Props Build- ANH Stunt
gazmosis replied to AsBlondeAsLuke's topic in Build Threads Requireing Maintenance
"Behind" ......cod talk.......thank goodness there is no possibility of any of us growing up. Awesome! -
My 2mm TM Hero helmet build 8/2014
gazmosis replied to DarSec's topic in Build Threads Requireing Maintenance
Are twinkies even made anymore?