gazmosis
-
Posts
4,043 -
Joined
-
Last visited
-
Days Won
23
Content Type
Profiles
Forums
Gallery
Articles
Everything posted by gazmosis
-

MTK Build - ANH Stunt
gazmosis replied to I'm Batman's topic in Build Threads Requireing Maintenance
I have always been a big supporter of MTK armor. This is one of the "smaller" armorers we have (not even on the list yet) yet he is risking the time to upgrade the look of his armor making it more accurate with little changes that make a big difference.....obviously! Keep it up, Mike! -
TK-12436 Requesting Centurion Status[RS][134]
gazmosis replied to roguewedge's topic in Request Centurion Status
Thanks for clearing up the "who built it" mystery. Well done on the build and I know your improvements can only make it better! -
Small brown box arrived (MTK bucket content)
gazmosis replied to cm325i's topic in Build Threads Requireing Maintenance
Woo hoo! Small, big, all brown boxes have exciting things in them! You will love this helmet when you are done! -
TK-12436 Requesting Centurion Status[RS][134]
gazmosis replied to roguewedge's topic in Request Centurion Status
I fully expected to see this application. Great set of RS, Twan!! CRL and Centurion Application Requirements: All required submission photos have been posted. Thank you for obtaining that charging handle for your blaster! Looks great! I have to say that you did some masterful trimming to make your sides look just remarkable. The way they should look. Nice work. Your armor meets all requirements for Centurion. Congratulations on your Centurion quality armor!!! Other-Armor Fit/Assembly: There were two things that I was on the fence about that I ended up just deciding to mention here as a suggestion to look into. First was your shoulder bells. The elastic seems to be stretching away, Some pics show them in the proper place, other show them away from the bridges a bit. But they seem to be stretched away from your bridges to me rather than just incorrectly built. The other thing was the point at the top of your right thigh. I know what you were going for here trying to angle the cover strip to blend in the misalignment of the two halves. The point, however is a bit much. This should be taken down just a touch. It was brought up regarding the drop in your thighs. In your EIB application, your thighs were up nice and close to the cod. But your shins were raised. Now your shins are down nice but you dropped your thighs. I think you are trying to keep the knee gap to a minimum but if the thighs were more comfortable up higher, by all means keep them there. The location of the outer rivet cover on your belt being closest to the outer edge is an ultra accuracy feature. I still don;t know if RS built your suit, but if they did, the rivet covers were installed with super glue not E6000. I have had little success removing a superglued rivet cover without breaking it. Unless you have replacements, I would vote against trying this. Welcome to Centurion , Sir!! Keep those shoulder bells up! -
TK-31870 requesting ANH Stunt EIB Status[RS][406]
gazmosis replied to teet's topic in Request Expert Infantry Status
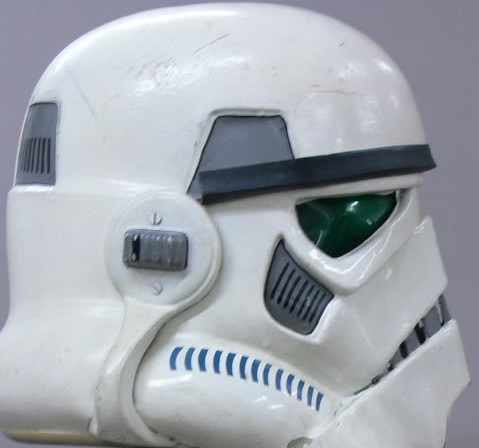
Hey there, Thierry!! Thank you for your application for Expert infantry. There are never too many sets of nicely built RS suits. Yours is yet another! CRL and EIB Application Requirements: All required submission photos have been posted. Your armor meets all requirements for Expert Infantry. With that, I would like to congratulate and welcome you to EIB!!! Other-Armor Fit/Assembly: This is the section where your fellow troopers and myself give suggestions to further improve the look of your armor. These suggestions will not affect your applications. A lot was covered here. All were good points. You have done a great job addressing many things right away. The strap to keep down your shins to the top of your shoes is a good idea. Please see "Centurion Suggestions" to see where I will mention this further. Your paintwork on your helmet is dynamite! I agree that you could shape the ends of your frown to a point. It would really make that frown pop. As for Ron's suggestions regarding the front and rear trap being a bit small.....perhaps they could be slightly enlarged to meet the edges of the indents but it would be so slight that I won't make an issue of yours. It was a good observation, though. Did you make the folding stock on your blaster functional?? If so, NICE! IF you wanted to, you could replace the phillips (criss cross) head screws for slotted ones for more accuracy. Centurion Suggestions: I would suspect with such a nice set of armor that you intend on shooting for Centurion. I know that you have already addressed several issues that were brought up like the drop box alignment, raised shins, and painted crotch rivets. Make sure that any Centurion application pics are re-taken if they show any of these points. I would like to see the clips on your thermal detonator adjusted to touch the control panel. As for the topic of your shoulder bridges, it would be a difficult task to heat bend them with them glued in place. I wouldn;t worry about them. However, if it bugs you, you can always glue the 1/4 inch white elastic to the underside of the back plate near the shoulder. This will keep it from moving and hold down those bridges snug. Very nice work on your armor and congratulations again!! -
TK-24336 Requesting ESB EIB Status [MTK][405]
gazmosis replied to toybiz's topic in Request Expert Infantry Status
Alright Adam!!! You made it back!! I have to say, you have done some outstanding followup and put forth an incredible effort to make your armor everything it can be. Let's take a good look!!! CRL and EIB Application Requirements: All required submission photos have been posted. The only real issue with EIB before were the lack of bicep straps in the shoulder bells. With your upgrade, your armor meets all requirements for Expert Infantry!! Congratulations and welcome to EIB!!! Other-Armor Fit/Assembly: This is the section where myself and your fellow troopers give suggestions to better the overall look of your armor. You have already addressed all of these suggestions with open arms and made them great! I have nothing further to add here. Centurion Suggestions: I only have one thing that you should be aware of. If you are going to continue the use of the fabric gloves and decide to apply for Centurion, make sure you install the correct 5 star, double stitch pattern on each glove. One set of stitches in front along the knuckle line and two on each side. You can see three of the five on this trooper's glove. Congrats again!!!!! -
TK-14169 requesting ANH Stunt EIB Status [FX][404]
gazmosis replied to haui's topic in Request Expert Infantry Status
Hey Markus!! Sorry for the delayed response here. It was for no other reason than my real life got in the way and work called me away from home without the proper time to sit down with your application. I am sorry!! You have done some marvelous work with your FX armor here! You have some real talent and attention to detail. Perhaps if you decide to make an upgrade in the future, I am certain with your talents, your armor will look stellar. So let's look at your armor and your application!! CRL and EIB Application Requirements: Your application was perfect. All required submission photos have been posted! You armor meets all necessary requirements for EIB. Congratulations and welcome to Expert Infantry!!! Other-Armor Fit/Assembly: This is the section where myself and your fellow troopers make suggestions to better improve your armor. These are suggestions and do not affect your application. Like I mentioned earlier, you have made some nice upgrades to improve this FX set. New ab buttons, an AWESOME helmet, nice belt, bicep hooks, ab to kidney hardware, nice holster with good placement to name a few. Make sure that your biceps are turned a little further inward. The molded ridge on the bicep should match the one on the shoulder bell. I would also look into placing a bit of foam into your shins to keep them from rotating on you. A tighter undersuit shirt will prevent the gathering of material at your elbows and will look sleeker. Laslt, great job with the scratch build on your blaster!! I would find a way to black out the wires coming out of your counter. It looks like you have electronics in your blaster so replacing them is probably not an option. I would also black out the nut/screw combination on your folding stock so that isn't so noticeable. I am not sure what the silver lever is on the underside of the blaster near the butt cap???? If I was to suggest changes, it would be to lower your scope rail a bit and to trim back the T-track so the track and the scope rail do not end in the same vent hole. Look at this blaster below. Centurion Suggestions: ​Due to the nature of the FX armor, it is unfortunately not eligible for Centurion. But that doesn;t mean you shouldn't be out there making people smile and making your Garrison proud. I would troop beside you any day!! Congratulations on EIB!! -
Is this stuff good for making belts?
gazmosis replied to zeroskillz's topic in Hard Armor (General Discussion)
plus its too wide for ROTJ belts -
Who did you buy your armor from?
-
It should not be excessive. Depending on what armor you have, you may not have a choice. Let's start there. What armor do you have?
-
Steve, please edit the first post of this thread to reflect the changes, when you have the time. I recommend the strike for marking the old text obsolete. Done
-
Here here, Andrew. I pains me to think something like this would hit so close to home.
-
HIPS or ABS which is easiest to work with
gazmosis replied to nineyearsoul's topic in Hard Armor (General Discussion)
ABS for the sole reason you will most likely need to paint the HIPS. ABS you can leave as is and it is gorgeous OR polish to a glorious sheen -
The only real black and white ratios that are considered fixable is thigh to cod/ab and bicep to forearm. Shoulder bells drooping away from the shoulder bridges should be noted here, too If you are super tall, there's not much that can be done about a little extra space between leg parts unless you want to go to other armor makers with larger parts. TM also has shins for taller troopers
-
Contact CFO. His armor is R oTJ specific
-
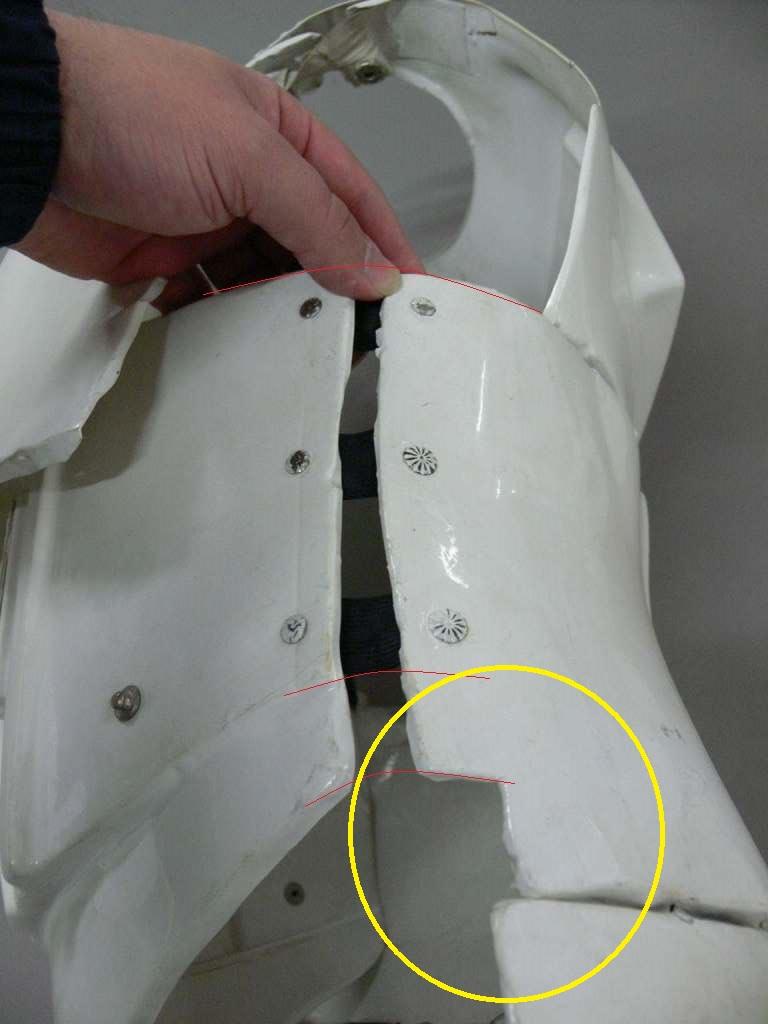
The notch out on RS armor is 20 mm across the top and around 27 mm on the vertical.
-
I have always done all cutting and fitting prior to painting. It is much easier to paint the armor with the halves apart. Glue your cover strips to one half of your biceps, forearms, shins, and thighs. Mask off all other gluing surfaces. Paint the armor then assemble. Make sure if you ante priming the parts to have patience and let the primer completely cure. I am talking like 7 days. This will assure that the primer is bonded to the plastic and won't lift when your top coat is applied. Make sure you have enough paint and do all your top coating at the same time. 15 min between coats
-
These little details are what makes a good set of armor great. There are a lot of things that are already required that we don't see; drop box backs, bottom left side rivet, white strap under shoulder bridges.....but they are still required. This will be no different and will be a FAR easier mod than fixing a bad hole with ABS paste. But people still get it done. I don't have the time to copy everyone's quotes, but aside from TM and RS ( even RS can be improved) all armors sold here can be improved to be more accurate. God forbid someone should make a change in their armor molds to be more accurate or make assembly easier. Too much emotion here for something this trivial. MOVE ALONG!
-
The "white powder" is actually muzzle flash. There are differences between standard blanks and "movie rounds". Regular gun powder contained in standard bullets produces very little muzzle flash. Movie rounds contain extra material to enhance the flash for a more dramatic effect.
-
http://www.501st.com/databank/Costuming:TK_anh_stunt OK Kids!!! On September 1st, the new EIB requirement of the squared notch at the bottom of the kidney will go into effect. Please take note of the measurements for this notch and its location.(roughly 22 MM in from the seam and 22 MM tall) See the CRL if there is any question regarding this or contact FISD staff.
-
TK-95020 Requesting Centurion Status[RS][133]
gazmosis replied to AsBlondeAsLuke's topic in Request Centurion Status
Me too!!! Pink doesn't look good on me anyway. Except for my thon...........never mind -
TK-95020 Requesting Centurion Status[RS][133]
gazmosis replied to AsBlondeAsLuke's topic in Request Centurion Status
MUHAHAHAHAHAHAHAHAH!!!!!!! ANYWAY!!! YES! We can still have fun. Welcome Diana! Your journey has been a learning experience and an inspiration to many. I will admit that I had my doubts. Knowing the RS suit as well as I do and knowing how much you were going to trim off had me growing gray hairs. But you did it and now here you are! Thank you for your Centurion application. Let's look at your armor!!! CRL and Centurion Application Requirements: All required submission photos have been posted. With all the adjustments and changes you have made, your armor now meets all the standards required for Centurion. Congratulations and Welcome!!! Especially with Centurion, the little details make the difference: new side rivet locations, adjusted kidney plate, proper cod rivet, proper length on cover strip on lower right thigh, and corrected frown paint (no paint between teeth) brought this to the next level. Nice work! Other-Armor Fit/Assembly: This is the section where myself and your fellow troopers provide further suggestion to improve your armor even more. These are suggestions that do not affect your application. I applaud anyone who ventures out of their comfort zone into the zone of hand painting their details. I know you enjoyed this, Diana. Sometime in the future when you get the chance, take your gray paint and thin out the black outlines especially on your right side of the helmet. on the originals, these outlines were pinstripes at best: The paint on your right side could have these outlines reduced just a bit. While we are on the subject of your helmet, I would give those ear screws on your left side a few extra turns. This will probably cinch that ear a little more snug. Steve had brought this up regarding the clips on your thermal detonator. I agree that they should be pretty much touching the control panel.These can easily be moved as the clips will hide the old holes. The only other thing I would adjust is the enthusiastic gold color on your blaster's scope. A little acrylic paint and it's done! Way to go, young lady! You join a small yet elite group of lady Centurions! Congratulations again!!!!
-
HIPS, did I mess up buying this?
gazmosis replied to Tk2372's topic in Hard Armor (General Discussion)
Who is thus "guy"? -
MTK has made improvements in certain parts of the armor to make his kits more accurate. Greatquality, great customer service.....the whole package.
-
Working on mine as well!!!