gazmosis
-
Posts
4,043 -
Joined
-
Last visited
-
Days Won
23
Content Type
Profiles
Forums
Gallery
Articles
Everything posted by gazmosis
-

DF92 ATA Armor Build
gazmosis replied to Darth Fader 92's topic in Build Threads Requireing Maintenance
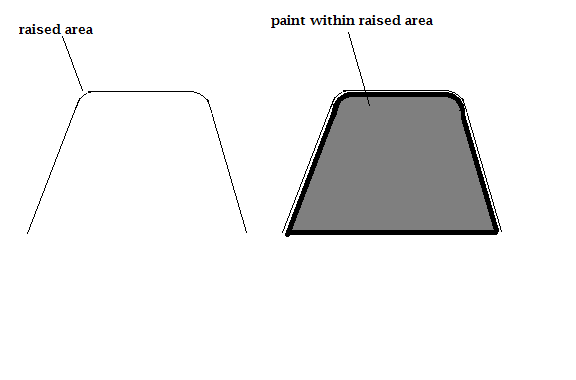
Congrats on your ATA kit, Christian!!! You seem to be scooting right along. Please keep in mind that there is not a sour soul in the FISD. We are here to provide guidance and suggestions to help EVERYONE in their quest for an incredible set of armor. However, sometimes guidance is given what to do, sometimes..it's what not to do. You have to see it as positive criticism. Helmet painting is a daunting task no matter who you are. I applaud you for giving it a go as you did. However, I know a few eyebrows were raised when you revealed your choice of materials. This is the first time I have seen acrylics used to paint the details on a helmet. Every helmet I have seen uses some brand of enamel model paints either Humbrol or Testors, or Model Masters, or Tamiya( I think that's how you spell it). Anyway, the finish should be a somewhat even and glossy result. To be honest, your finished areas look a little like tissue with almost no gloss whatsoever. Have a look at this thread:http://www.whitearmor.net/forum/topic/8117-helmet-ab-paint-detail-reference-guide/ This will give you a reference guide to the proper paints that are most commonly used to achieve the right look. This here is what is most difficult to say. There is a difference between "hand painted look" and very choppy. the term "handpainted look" refers to lines that are slightly uneven, not laser straight. Paintwork with a little "character". The black outlines of your painted areas are in need of a little assistance. But first I would work on getting the correct paints. there are a couple approaches you could use in paintwork. You could place the templates you have onto the helmet and outline them with a pencil. Then cut your masking tape into small strips that you will be able to carefully place along the template lines. You will need to be creative when placing the upper corners because they have a curve. I have always placed tape across the corners and carefully trimmed this out with an exacto knife. When the gray dries, position new strips just outside the gray for your black outlines. This is more difficult in the tears because they are recessed. You can approach it the same way you did it as well, but the outer black lines need to be MUCH less choppy. If this is something too daunting (for many it is) you can outline/mask each area then paint it like you did. The tears and frown are something that is freehanded a lot. I would consider giving this another go. It's just paint. Thankfully, it is something that can be corrected without the fear of damaging the helmet. The last thing to remember is that the paintwork should be place within the recessed areas. Your temple trapezoid paint work on the left side (as you are looking at the helmet) looks like it goes beyond the raised area. Take your time with this. The helmet is the crown jewel and the focal point of what everyone looks at. We are here to help. Please remember that.
-
Well done! Unless it is a ROTJ suit or ANH hero, the lenses must be flat. Nice lid. Can't wait yo see pics of the rest!
-
I have nothing against spray painting if I am using my airbrush. With a can, there is no way to control the amount of paint that comes out with each push of the button. If you want to give it a go, by all means have at it! Just make sure you mask everything very well
-
Testors gloss gray in the bottle is 1138. What it is in the can I don't know. It's much less a pain to brush it than spray. You can still mask it.
-
It's right under your name...501st ID. Do not put it in 'Legion ID". That's different
-
great work so far, man!
-
TK 24218 Requesting ANH Stunt EIB status [AM][415]
gazmosis replied to fuumantroop's topic in Request Expert Infantry Status
-
TK 25577 Requesting ANH Stunt EIB status [TM]
gazmosis replied to Sheik Yerbouti's topic in Request Expert Infantry Status
Hey Brent: A very interesting combination pairing TM armor with an RS lid. Hey...best of both worlds, I guess!!! Anyway, thank you for your application for Expert infantry, Let's take a look at your armor. CRL and EIB Application Requirements: There is only one photo that is missing from the list and that is a close-up of your hovi tips. I know that RS doesn't supply bad tips but it's part of the process so if you can take and add that to the helmet section of your application it would be great. Thank you!. That, however, is not my concern. What IS my concern is the sniper plate on your left shin. Although a challenge, sniper knees are able to be wrestled into their proper position which is to follow the ridge t the top of the shin like this:Your seems to be leaning way far forward off the ridge but maybe it's just the camera angle but more than that, it seems to be attached with a rivet to the shin. Please provide a close-up shot of the top of your left shin to confirm or deny this. If in fact it is attached by a rivet, the rivet will need to be removed, the hole repaired with ABS paste, and the sniper glued into it's proper position. Other-Armor Fit/Assembly: This section is for suggestions that work toward the overall final appearance of your armor. Unless specifically stated, these suggestions will not affect your applications. I want to say that you have a great build here. You have a great general fit, your cover strips are proper, and it is built well. If I was to comment on anything, it would be that your forearms look a little big to me. TM forearms can be built to almost a second skin they are that well made. A bit of an opening needs to be left at the wrist for your hand, but even this can be reduced to a squeeze. It makes for a sleek, refined look of your arms. The other thing I noticed was the droop in the front of your belt. Your belt should fit tight against the ab and sit at the bottom of or even slightly overlapping the button plates. In this shot: It actually looks like it has come detached from your canvas belt. This is something I'd look into tightening up. Centurion Suggestions: If a Centurion application is in your future, There is a bit of work that will need to be done before that can be submitted. I'd best start from the top and work down: 1. Move the shoulder bells up slightly to come near if not touch the ribbed shoulder bridges 2. Although your placements are correct, the pop rivets on your left side need to be changed out for domed head split rivets and painted white. 3. You will need to provide a close-up photo to confirm or deny the use of seperate buttons on your ab plate. With the buttons molded into the ab button plate already, separate buttons are never necessary. These haven't been used since the days of the FX armor. 4. There should be a single split rivet on the bottom of the cod portion of your ab plate as well as two, inner facing male snaps on the crotch area of the butt plate. You can see both clearly on this archive picture. 5. As seen in this archive pic:The control panel of your thermal detonator should touch the tops of the metal belt clips. Your positioning on the main body is perfect, they just need to be moved a bit. If you wanted to add slot head. black screws for accuracy here, you could. 6. Your thigh pack on the lower, right thigh has two issues: First, it needs to be trimmed down above and below the boxes. There should be a minimal amount of belt showing above and below the boxes. Also, the attachment point needs to be in the upper corner of the belt. not the center. This picture will explain both points:The cap or speed rivet used should be painted white after installation. A split rivet can also be used here but NOT A POP RIVET!! Lastly, is your sniper plate on the knee but we will look at that when you post the pic for the above section. Every set of armor is a work of art in progress. With a little work, yours will be a masterpiece as well!!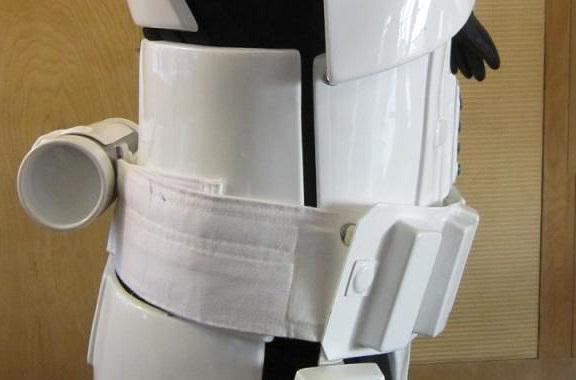
-
TK 24218 Requesting ANH Stunt EIB status [AM][415]
gazmosis replied to fuumantroop's topic in Request Expert Infantry Status
Hey Andrew! Thank you for your application for EIB!! Let's take a look at your armor! CRL and EIB Application Requirements: All required submission photos have been posted. Your armor contains all elements necessary to achieve Expert Infantry. With that said, I would like to congratulate and welcome you to EIB!!!! Other-Armor Fit/Assembly: This section is used by myself and your fellow troopers for suggestions to improve the overall look of your armor, Unless specifically stated, these suggestions will not affect any application. There haven't been too many suggestions given because there aren't too many to give! You have a solid, detail oriented build that will serve you well into your trooping future. Care was taken to fit this to you. AM can be a very large armor on someone of your frame. You made it work well for you. Tim had mentioned your forearms and I think the tubular appearance was due to camera angle and not construction. The full body shots of your armor show a fine shape to your forearms so I wouldn't change anything here. I am sure you are pleased with your belt upgrade!! If you want, you could dab a little black paint on those thermal detonator screws but that's up to you. Centurion Suggestions: You have done many of the details that a person who intended on applying for Centurion would do. However, AM armor in this form cannot qualify for use in the Centurion program. Both the chest and back plates will need to be replaced before an application can be submitted. Hopefully you will follow up on this and we will see an application from you in the future. When you do make the upgrade, make sure you re-attach your shoulder bells so that they sit darn near touching the ribbed shoulder bridges. The next element that will need changing is the blaster. Your weapon must be totally based on the Sterling SMG and not the Hasbro toy (although your upgrade was cool!!) Hyperfirm, DVH, and Doopy Dos full and pipe kits are good places to start. Lastly, you will need to upgrade your handplates to painted rubber or flexible white handplates affixed to the back of your rubber gloves. Congratulations again on this fantastic armor! We hope to see your upgrades!! -
If you like the overall appearance of your helmet the way you had it, I see there is already a hole you have drilled out. Just align the holes you already have and drill aconnecting hole between them. Like MArk said, there should already be this hole marked on the cap and face.
-
Great progress so far!!! There's light at the end of the tunnel!! The details on your helmet concern me. It looks like you used flat rather than gloss for the gray and black. If this is going to be an ANH helmet, you will need to only have 1 rank bar on the ear and it moved to the back of the rank area.
-
Which one is the right boot?
gazmosis replied to Vidakovic Igor's topic in Boots, Soft Parts, and other Accessories
For the exception of 1&2, which look short, most look good. 4 is the one to defiantly avoid due to the side snap -
Walt's kids armor project.
gazmosis replied to gazmosis's topic in Build Threads Requireing Maintenance
They are properly sized. They do end up a little thick on the outside curve, but it's all good in the end -
Not always true
-
Brilliant!
-
Maybe it's just the pic but that gray looks really dark.
-
TK-77077 Requesting ANH Stunt Centurion Status[RS Props][142]
gazmosis replied to Vadier's topic in Request Centurion Status
Hey Sven: Thank you for your Centurion application and what an application it was!!! Note: Any Centurion application should follow the photo checklist on the PDF file found here:http://www.whitearmor.net/forum/topic/22605-centurion-application-photo-checklist/ This makes the application complete and easy to both follow and review. Centurion applications should show the armor in its CENTURION form. I know, Sven, and appreciate what you were trying to do by showing the upgrades that you made and that was fantastic. However, too many photos of the armor in the pre-Centurion form can get confusing to newer members. A brief description of the change you made is usually enough. Anyway..........GREAT WORK!!! I am blown away by your weight loss and being able to trim the armor sides down. This really brought your armor from awesome to exceptional!!! Let's take a look! CRL and Centurion Application Requirements: I think the application thing was covered. The only missing pictures I see were a close-up of the hovis and the crotch rivet. We can see the crotch rivet in your torso shot and I am sure that RS didn't provide you with bad hovis. If you can add these close up pics, that would be great. You can do that when your new thermal detonator screw arrive? Your armor contains all required elements for Centurion. Both you and your Garrison should be proud! Congratulations and welcome to Centurion, Sven!!! Other-Armor Fit/Assembly: Take care of those weapons! They are incredible!! The only thing that seemed to be brought up as a concern are the rank markings on your ears. I agree that they should be consistent on both sides of your helmet. I know that Sven was emulating a helmet that is seen in our photo gallery plus this is not a violation of the CRL. It would be nicer to have them the same, but it would be nicer to have black, slotted thermal detonator screw for everyone as well. But until that happens.......... This next suggestion has nothing to do with your armor's appearance. Only with it's future. You are getting quite a bit of fraying on your waist belt and your interior elastic. Although the belt fraying was accurate, for our purposes, too much fraying can lead to a compromise in belt structure if it gets to the stitching. I have always suggested to trim the longer frays and brush the belt edges with diluted fabric or other water based white glue. As for your interior elastic, you can seal the edge by pulling a hot nail or other heated metal object slowly across the edge. Great work, Trooper!! Stay well!! -
Your weathering is fantastic! Very metallic and authentic looking. The pistol grip should not be weathered, however. Even with very heavy use, the plastic grips on the real weapons still remained dark,glossy black.
-
TK-10466 Requesting ANH Stunt EIB Status [MTK][414]
gazmosis replied to starsaber25's topic in Request Expert Infantry Status
Shoulder bells bells bells! Sorry, I meant shoulder bells! I edited the post -
How many drop boxes?
gazmosis replied to ShavedWookie's topic in Build Threads Requireing Maintenance
Seems like that is the case with that original belt pic -
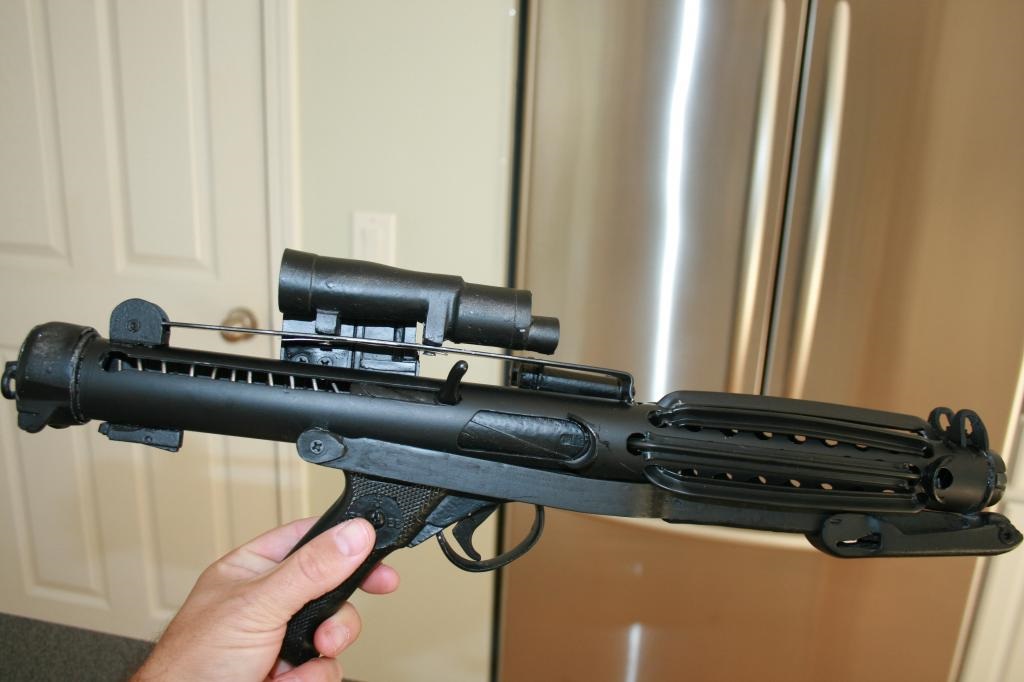
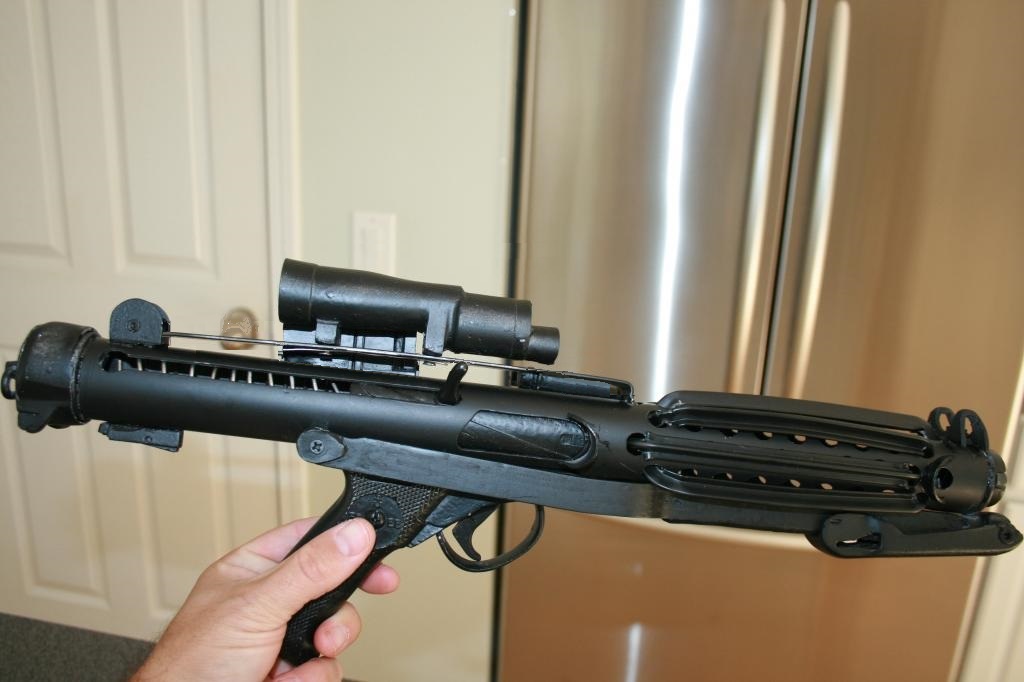
The scope rail should only sit about 3/8 inch above the receiver

-
Read your build and how to threads!!
-
ATA helmet has arrived and Im.....
gazmosis replied to Polar's topic in Build Threads Requireing Maintenance
Brian is going to clean the paint from between the teeth as well as slim down that left ear. -
TK-10466 Requesting ANH Stunt EIB Status [MTK][414]
gazmosis replied to starsaber25's topic in Request Expert Infantry Status
Hey there, Steve!! Thank you for your EIB application. MTK is a great armor and his little tweeks towards greater accuracy are great to see. Let's take a look at your armor!! CRL and EIB Application Requirements: There are two required photos that are missing. I will still move forward with your application seeing as one of them is a close-up of your Hovi-tips. I can't imagine that Troopermaster would provide you with bad tips with his helmet. The second pic is a close up of your crotch hardware. Although we can see the INSIDE on your interior strapping shot, I need to make sure you haven't painted this hardware which is not allowed for Centurion. I would need to mention it if it was. Please add these pics as soon as you can. Your armor, is excellent and well built. It contains all necessary elements required for Expert Infantry. With that, I would like to congratulate and welcome you to EIB!!! Other-Armor Fit/Assembly: WARNING!!! Someone shot a hole in your thermal detonator!!!!!! Anyway, this section is used by myself and your fellow troopers to point out suggestions to improve the overall look of your armor. These are suggestions that will not change the result of your applications. It was mentioned to install frown screen. Troopermaster doesn't install the frown screen because it was not on the helmets in the original film. Frown screen is an invention of the 501st to hide the costumer from close meetings with our fans. It is totally up to you to install it or leave your frown as it is. ​I would definitely work on securing your calf closure. In my experience working with the TE mold lineage armor, the shins have a tendency to splay open when assembled. If your grieves close freely around your calves when you squeeze them, you might want to consider giving them a boiling water bath. Tie string around the grieves compressing the closure together. Then place the shins into a 5 gallon bucket or tall garbage can. Boil a huge opt of water and slowly pour this over your shins. This requires a lot of water so boil two pots if you have them. Leave them in the water for about 5 min and you should be set. Using the strap and hook closure works as well. The only thing I can see as fixable is the scope rail on your blaster. As you can see in this shot, the scope rails were up off the receiver only about as far as the thickness of the bolt heads holding the scopes on the rail. About 1/4-3/8 inch. This is a pic of your blaster next to apic I re-did of your blaster with a lower rail: Centurion Suggestions: This is the section where I feel certain aspects should be changed prior to a Centurion application. I assume from your efforts and all the details that is your intention. Your shoulder bells do need to be raised. The tops should come darn near to or even touch the ribbed shoulder bridges. Raising them will also close that chest/shoulder gap that was mentioned. MTK shoulder bells are wide as they are. Much wider than the originals were at the bottom. I would stay away from widening them as you mentioned. It's an unnecessary step. The second is your waist belt, I would like to see the droop taken out and it raised a bit to touch or even slightly overlap the bottom of the button plates. Congratulations on a great set of armor!

-
I'm confused about the "notch to fit over the rear sight" With the middle portion of the sight being an "L" shape and always up, how does this fit over it?