Leaderboard


Popular Content
Showing content with the highest reputation on 04/23/2024 in all areas
-
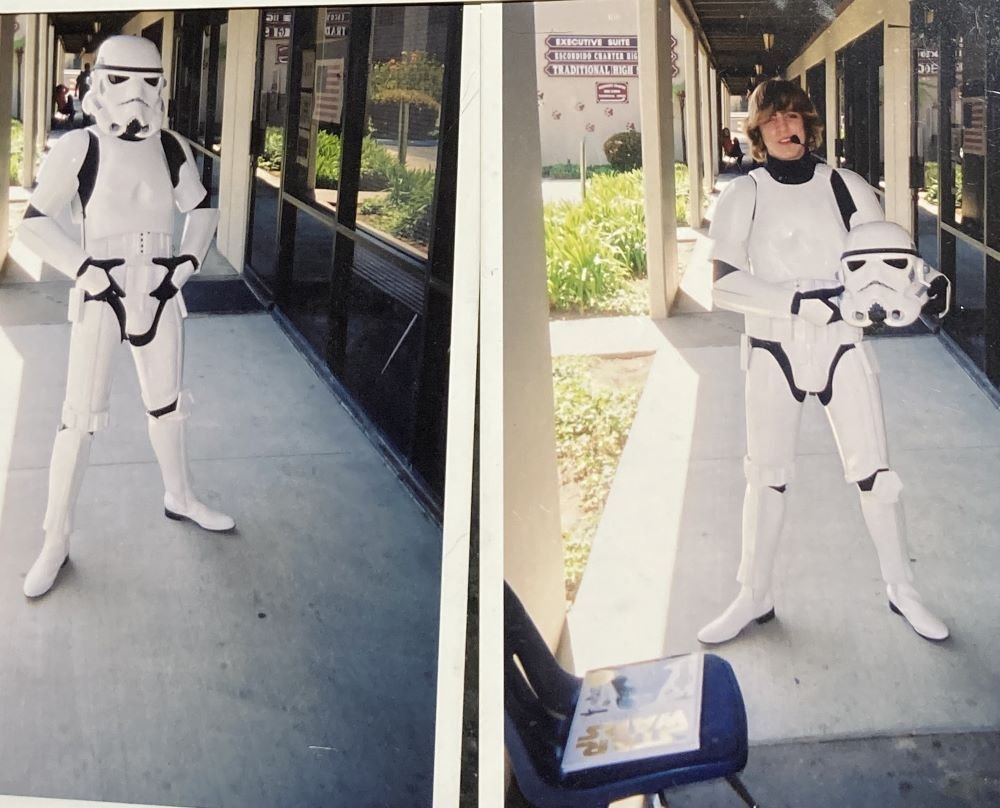
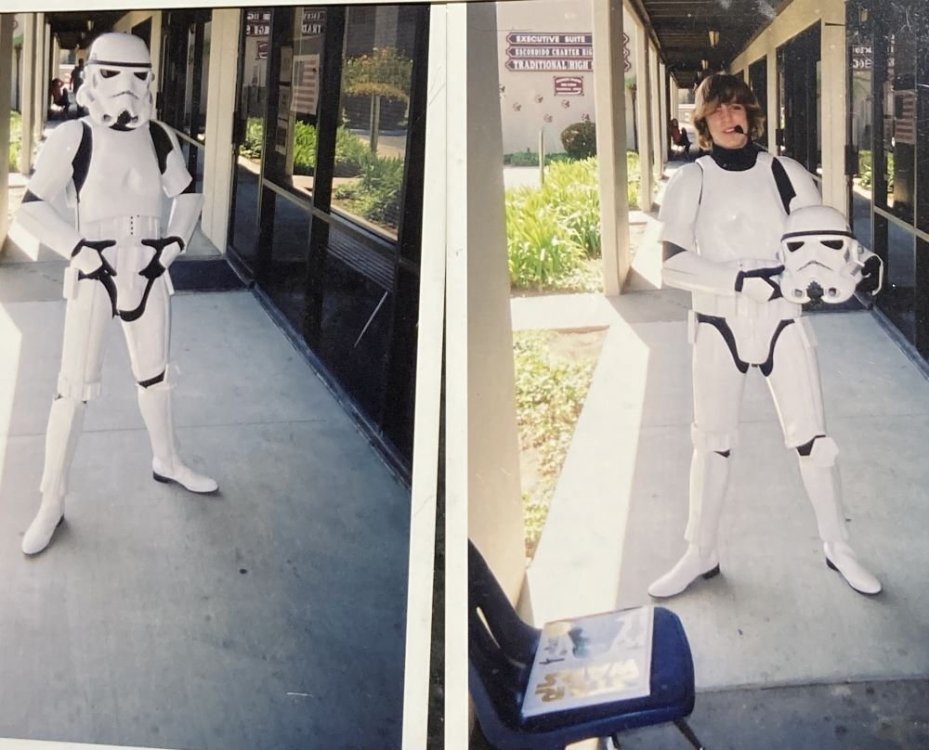
Howdy Folks. I found some photos of myself in high school wearing my MovieFX armor. This had a three peice helmet and was made of HIPS. I saved up three paychecks and sent two money orders to Germany IIRC. That was over twenty years ago and a lot has changed, I no longer have my old armor for one. Recently I found a rotocast of a screen used Move Along helmet in my garage from the same time period, it sparked interest in me to recreate some old props that I miss. Hopefully I can contribute more to the 3D Depositary as in the past two years have successfully self taught CAM/CAD. You can find my ANH Hovi tips and soon I will have some ROTJ tips as well. Have a great day! P.S. I Think I'm going to buy a MovieFX suit again, although I love the TM suit.
 4 points
 -
I got to spend the majority of the day working uninterrupted Anyway I took the clamps and magnets off the forearm and it looked good so I stuck the final cover strip on and hung it up, along with one of the interior cover strips on the right bicep. After I hung those up I discovered a simple but excellent way to catch ABS waste, that being a tupperware. I also got to work on the legs, and trimmed pretty much the entire left leg, only thing I didn't get done was the top of one of the shin halves. I trimmed the top of the thighs and bottoms of the shins completely, I left the bottom of the thighs at at 5mm and the tops of the shins at 10mm, tomorrow I'll work on the right leg, and fitting. Today was quite productive. (Pictures have been added!)2 points
-
86. Bradley's Honor Walk - Rancho Santa Margarita, CA - Sun. 4/21/24 (ANH-S #56, FTE #65) TK-61490 Celebrating TK-4/21 Day with TK-62345, SL-88667, TK-20413, and TK-50311 - we were at our post supporting organ donation awareness!2 points
-
Lighting of the Armor There are 4 parts that need lighting to be screen accurate: - The jetpack grill - The two gauntlets (2x red lights) - The chest armor (1 red light on right side) The jetpack grill was straight forward as I already had done the red transparent part (see thread above) inside the top grill. I simply put a white light you can find at any hardware store that has a remote and works on 3xAAA batteries. I will last several 10’s of hours before replacement, as with a remote no issue opening the top cover each time to power it or shutdown. For the other parts, I went with easiest way forward for me, which was to use discrete LED. The ones I picked are rectangular 2x5x7mm red LEDs that work with 15-20mA/1.9-2.2V from Amazon. I have put the link belowand hope it will stay there, but these are pretty standard and can be easily replaced by Digikey/Mouser equivalents. https://a.co/d/a1I6r5v I used a small 3xAAA battery pack with rechargeable batteries that generates 4.4V and will also last 10s of hours in the Gauntlet (around 8-10h on the chest), which is perfect for using with the LED (I put 2 diodes in series). I simply added a small resistor adjusted to number of diodes to limit current. (ex: 4ohms for 2 x 2 diodes). For the 4 squares in the gauntlets, I used 4 LEDs (2 x 2 in series), for the larger rectangle, I used 6. As for the large rectangle in the chest, I used 20 (10 sets of 2 diodes in series). I glued them on an aluminum sheet (from dollar store), it helps reflect back the light in the right direction. The reason for the aluminum is to dissipate the heat from the LEDs, you don't want those to heat up and melt the PLA. As those are still discrete LEDs, you have to diffuse their light to have a uniform red glow. I used 2x 0.3mm layers on white PLA sheets I printed, cut and glued in front of the transparent red plastic of the gauntlet/ chest armor. I soldered them, then added a layer of insulating tape between the leads and the aluminum sheet to avoid shorts. I also potted the lead in clear silicone to further insultate and prevent leads from moving around. and attached them to the gauntlet with white duct tape (so that they can be removed if broken). Took me around 3h to get it done for all the parts, pretty straight forward stuff. Could be nicer looking, but nobody sees it…! N.B. I added aluminum foil on top of the duct tape and secured it with yet another layer of duct tape to block the light... otherwise the armor was glowing from the inside 😊 Below is a schematic of the assembly and basic concept of LED assembly. You should do your own circuit and validate with someone familiar with these kind of circuits prior to assembling the lighting system Below is the LED arrays prior to soldering and insultating. Unfortunately, I forgot to take picture after final assembly... The inside of the gauntlets after assembly Very difficult to take pictures of the light with a phone without over exposing the light/ under exposing the armor (phones hate LEDs), but here is a first pic that show the functional light. The most realistic view is actually from reflection on the floor…! For nicer images, I did use my reflex on the chest with two light settings and take some longer exposure to get the color right, gives a pretty good idea.2 points
-
I agree that conservative trimming would be the best approach, thanks! I will keep that return edge on the notch, too.1 point
-
May I humbly suggest an ANH-stunt? Not that I'm biassed or anything. Glad to see your intro thread and I hope you hang around for a long time Vic!!!1 point
-
Thank you Tim and Sly11! You both encourage me. It goes a long way to feel welcomed like this. I really appreciate it! Ordered the rivets and washers with guidance from FISD threads. Was a big help. Next step will be the rivet gun itself. Slowly building up my tool chest for the armor.1 point
-
If I may, you could trim the red line first and if necessary, make another trim later on. Try to let a little return edge in the notch as shown bellow1 point
-
I didn't even make that connection! I'll have to put in a suggestion for their name change to get with the times.1 point
-
I ended up singing Barbie Girl in my head for the rest of the event.1 point
-
Hello Vic! Your Hovi-Mix files look great, and I can't wait to see what you conjure up next! Do you have any plans on joining the legion?1 point
-
I can't do too much today because my garage is freakin' cold despite it being sunny but for now I managed to get the right bicep correctly fit and cut so I'm very happy about that. Much better than the left one, which still needs fixing but I need a good way of collecting scrap for my paste. I'd glue it but I need to buy MOAR MAGNETS!!1 point
-
Troop 3+4 Gold Coast Supanova April 13+141 point
-
Republic airways, from the old days before the Empire!1 point
-
After a long, annoying, and frankly wasteful day of work I figured I'd try and make some good of today by cutting and gluing the cover strips on the right forearm, I got 2/3 (I already had one done prior) glued so there's only one left after this, did some trimming as well and got more scrap bits for the paste/slurry (which I am keeping free from contamination) also set up a radio for some tunes while I'm working, so woo Not too much for today but hey, progress is progress.1 point
-
7) April 20th, 2024 - Star Wars (for our UWS Bravo Explorers) (Greenville, SC)1 point
-
Troop #11 April 20th was a two-troop day for me! The second troop was at the Indianapolis Symphony Orchestra for Star Wars: The Force Awakens in Concert! We provided the proper atmosphere for the performance by trooping the lobby of the theater before the show and during intermission. Following Legion guidelines, we remained outside the ticketed areas. Many photos were taken, and I should receive those soon, but here's the one photo I have in the mean time: We took part in the Star Wars Indiana tradition of getting photos near the Soldiers & Sailors monument (the theater is right next to it) that Indianapolis is known for. I'll also post that photo when I get it!1 point
-
Troop #10 A favorite troop among many members in Star Wars Indiana is the Republic Airways Plane Pull. This is a charity event put on by Republic Airways to raise money for children's hospitals, and teams that sign up for the event (and raise money) are given their turn to, literally, pull a plane a short distance. The Republic maintenance hangar at the Indianapolis airport was set up for the plane pull itself, as well as included different food vendors, booths and activities with the local professional sports teams, and different aircraft on display. The event started with the mascots of the local sports teams pulling a small, single engine airplane. This was followed up with children directly benefiting from the charity event pulling the small plane! Star Wars Indiana was then given our turn, but we were given the rope to the plane all the other teams would be pulling, which was an Embraer 175 regional commercial airliner. Wikipedia notes the empty weight of an Embraer 175 as 21,890 kg (just above 24 tons). I was surprised that we were able to get the plane moving so quickly and covered the pull distance (15 feet) in such a short time, but we also had 18 of us pulling the plane, and aircraft are supposed to roll pretty easily. Someone was in the cockpit of the plane to apply the brake as soon as we reached the max pull distance, and they certainly weren't playing around with getting the plane stopped! Here's a photo of us pulling the plane! After we had our turn with the plane, we were let loose to roam around the open areas of the hangar and tarmac. I headed with some of our TIE pilots to go in the other commercial aircraft on display. We made sure to verify the credentials of the captain before the TIE pilots examined the controls of the plane. Not being able to negotiate the small space of the cockpit, I decided to make sure the coffee maker was in working order in the event our pilots needed coffee. Our pilots may have had the more exciting job: Plenty of photos were also taken with the smaller aircraft on display on the open areas of the tarmac! TIE pilots and rebel pilots alike had fun taking various cockpit photos, and like usual, the public absolutely loved us!1 point
-
Whoever says that you're done with working on your armor once you get approved is lying. So here I am, once again! Aside from the usual clean-up and crack repair, it was time for something more unusual: Bleaching my armor Now, if you've taken a look at my troop log, you might have noticed that every since June last year my armor color hasn't quite matched up with that of my fellow troopers. Long, long hours of trooping in the sun can do that to ABS. After a bit of looking around and researching, I stumbled across the fact that you can bleach your armor. Here is a good tutorial. First things first, I got rid of everything that didn't need bleaching or that might make the process more difficult. Just look at this part of my helmet: you can clearly spot which parts were covered by the ears and which had some sun exposure! By taking my helmet apart I could more or less guarantee equal sun exposure during the bleaching process, as well as making sure the screws, the lens foil or the rubber parts wouldn't get bleached by accident. The paint however won't be impacted by the bleach. Similarly, I made sure to remove padding and strapping wherever possible. For bleaching the armor I used this hair bleach. I put a dollop of it onto the cardboard and painted a layer onto my armor. I then wrapped the armor in clingfoil and sealed it as airtight as possible with see-through tape. Remember to only use bleach whilst wearing skin protection and being in a ventilated area -- I forgot the gloves at first and my skin got really itchy and a bit spotty. Once I had everything wrapped up, I put the armor parts out in the sun, making sure to give them the most sun exposure they could get. Originally, I had planned on leaving them there the entire afternoon whilst I relaxed inside, but it was a rather windy day and I instead spent the next two hours playing catch with it in the garden. After those two hours I decided enough was enough -- at this point it was fairly likely that all the tumbling around would mean risking cracks and there were storm clouds coming up anyways -- so I carefully removed the cling wrap and wiped off all the bleach with water. Since I was already dedicating that day towards armor maintenance, I decided to give everything a good clean up as well, getting rid of some of the scuffs with a magic eraser. At a first glance, my armor certainly appears to be less yellow than before. I didn't get around to bleaching the whole armor, but only the more yellowed parts -- shoulders, helmet... anything with sun exposure from the top -- so we'll have to see just how well I will fit in with my fellow TKs at the next troop.1 point
-
Troop #47 G-Note Comic Con Bellahouston We attended a small local comic con raising funds for Glasgow Children's Hospital charity today.1 point
-
Well, here we go. Looks like it is all here. There are a couple of pieces that I don't have a clue what they are, so I'm hoping that some of the build threads will be able to help me figure it out. But the first step is lots of flashing removal. Sent from my SM-N981U1 using Tapatalk1 point
-
Troop #9 It was an eventful evening with the Indy Eleven to put on Star Wars Night! The Indy Eleven is the professional soccer team in Indianapolis, Indiana, and they played Charleston Battery of Charleston, South Carolina (Charleston Battery won). Like usual, the Bloodfin Garrison teamed up with the Mos Espa base of the Rebel Legion and the Taakure Clan of the Mando Mercs to make this event a success! The Indy Eleven incorporated us into many different aspects of the evening to make Star Wars Night very immersive! They requested some of us to walk with the players as the players gradually arrived for the game, and the Indy Eleven social media team was quick to post photos of us walking alongside many of the players. We also got a photo of the crew for the players' walk. After the players' arrival, the Star Wars crew was guided into the stadium to provide the right atmosphere for some of the before-game activities, such as Star Wars bingo and visiting with many of the season ticket holders who were allowed to enter the stadium early. We were then stationed near the various entrances to greet the spectators as they entered the stadium! After some time greeting the spectators, we were then ushered near the stands to be part of the players' introductions as they entered the stadium. The Indy Eleven social media team made sure to take a photo of many of us with the game ball shortly before the players took to the pitch. Once the game began, we were then ushered over to the fun zone for families with kids, and I remained there until the troop was over. We made sure to get a group photo at this point. I also stumbled upon the rebel base! It was a tiring evening with lots of walking, but there's no doubt it was a super fun experience!1 point
-
Troop #46 BGCP comic con Livingston Another pleasant troop, putting smiles on faces and lots of photos taken. Today we were raising funds for Macmillan cancer support.1 point
-
If you are not going for any particular character, then I don’t think it matters. I built the “stop that ship” bucket and that one happens to have 13 stripes per side. The CRL calls for between 9 and 16 per side. Here’s mine. This one isn’t an Anon bucket (I have one on order though). Sent from my iPhone using Tapatalk1 point
-
Boots from Imperialboots1 point
-
Vintage hooks for screen accurate shin-closure1 point