Leaderboard


Popular Content
Showing content with the highest reputation on 08/03/2025 in all areas
-
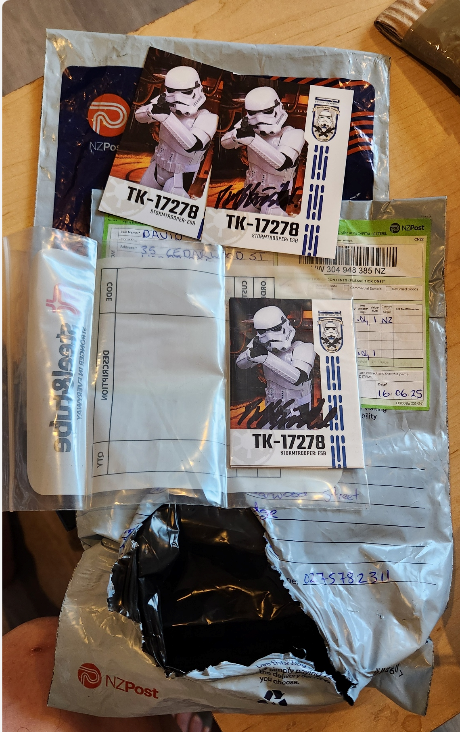
As you all know, I do love getting FISD trading cards from members and they go into the archives. In an abundance of caution, David Bristol aka TK-17278 sent me not one, but *two* packages all the way from New Zealand. Talk about over-achieving ;-) Thanks so much David - I truly appreciate these. :)
 2 points
 -
Hi, From my screenshot reviews I was not able to see any joint over the shoulders. The most accurate way I have found is to have the top portion in one piece. The screen grab above is most likely some white tape to hide the mic that I have found at sevral places :) The back section attaches to the front just like it is done on my armor in the CRL. To keep the back and front armor aligned, I used velcros, as it still allows for some motion and nothing is apparent on surface. In the reference pictures you will find stunt that have rivets on the top side, but the heroes do not have those. Is GA going to meet the level 1 approval will be up your GML to decide. Nobody has this armor approved yet. It has several inaccuracies, but we tried to have the CRL flexible enough on level 1 to allow an armor that would be close enough to the reference. As Glen mentioned, I used Big Fred as a starting point, but ended up modifying/ redrawing most of the armor, including the chest to several places for accuracy. Hopefully I will convince my girlfriend to finish up all the pieces of the armor to supply the full kit that is level 3 approvable. Several pieces are already available and you can ping me if you want additional mods. Cheers,2 points
-
2 points
-
The GA one is pretty much the same, front and back halves that connect together, just without the separate bits to make it easy to paint and sand smooth. I'm not very handy with 3d modelling but pretty handy with tools. Spent the day modifying the printed chest plate to separate the lower section from the shoulder section: First with a jewellers saw, would have been awesome if I could use the blade without the coping handle. Ended up using a hacksaw blade: And when separated the mess looked like: But after some clean up and filler, I'm close to having two sections that fit flush: The plan is to get these two parts mating nicely and I'll connect the shoulders permanently to the back half and attach the chest area with velcro or magnets. Or both.1 point
-
File Name: Tissue Box | That's no moon Designer: MonsieurCaron Last Update: 27/07/2025 File-URL: https://makerworld.com/en/models/1644939-tissue-box-that-s-no-moon?from=search#profileId-1738501 Description: This tissue box is so powerful, it could mak your nose blow up like Alderaan. - Snot Tarkin My desk is a geek haven, and my tissue box needed to fit in. So, I designed a Death Star-inspired tissue box cover that looks like it came straight from the Galactic Empire! It's held together with trusty Gorilla Glue and designed for a snug fit on most North American 🇨🇦 tissue boxes, so it won't slip off. Feel free to get creative with your colors, but dark gray is more movie-accurate. May the Print be with you! Images:1 point
-
Hi Paul, Thank you for your kind words and continued support. I truly appreciate it. I’m excited to begin working on my Expert Infantry submission and am very much looking forward to my next Troop already! It’s an honour to be part of such a fantastic organisation, and I’m proud to contribute wherever I can. Thanks again, Ben Sent from my iPhone using Tapatalk1 point
-
Hi Ben, it was truly an honor for me to be allowed to participate in your branding and getting to meet you. Your kit looked great, and you looked smashing in it. :) The UKG holds a very high standard for TKs in particular, so you should rightly feel proud of your accomplishment. I highly encourage you to submit your Expert Infantry submission photos soon, as I'm sure @jsilvius would love to get rid of the ones he has in stock. ;) I wish you all the success in your next troops with the UKG.1 point
-
1 point
-
Awesome score, I also managed to get a pair that someone had in a cupboard for years, love my TK Boots I like to add a drop of silicone over the top of the split rivets just so they don't catch on the undersuit.1 point
-
Congratulations trooper, looking smart1 point
-
Thank you guys. I know a snowie that's looking to make his e-111 point
-
Congratulations on your debut troop!1 point
-
Congratulations Ben and welcome aboard.1 point
-
Congratulations Ben, welcome to the UKG and FISD!1 point
-
Welcome! Not sure how short you are, but I'm 5' 3" (160cm) and here is my WTF build, which reached Centurion. I've found the WTF kit to be a good one for smaller folks. https://www.whitearmor.net/forum/topic/42868-sha-shas-wtf-anh-stunt-build-complete/1 point
-
File Name: Holo Communicator Wireless Charger Designer: MrCvok Last Update: 27/07/2025 File-URL: https://www.printables.com/model/1366539-star-wars-holo-communicator-wireless-charger Description: A 3D printed model of a wireless charger that recreates the holographic communicator from the Star Wars universe. Specifically, Qui-gon Jinn's communicator from The Phantom Menace. The model is created to the specifications of the ChoeTech Wireless Fast Charger Pad. https://www.alza.cz/choetech-wireless-fast-charger-pad-10w-black-d5881142.htm eBay link Images:1 point
-
Just to bring this discussion up to date with a good source for boots, Keep Trooping Boots offers classic TK boots that appear to be acceptable for EIB and Centurion by not having the seam up the front https://keeptrooping.com/product/421-classic-white/1 point
-
Put the TD together and decided to have the end caps removable for no real reason really..put some tape on the ends for a preasure fit. God thing because I think I will cut the pipe a bit shorter. Glued on the other parts and after some back and forth decided to use magnets to mount it on the belt. I didn’t take a photo but the inside of the mount got filled with magnets I had on hand and then tried it out. It had a good strong hold but wanted to ad some more stability and minimize the risk of it sliding off. Decided to use chicago screw post so taped the magnets to the belt and put the TD on and drilled through the belt and into the TD. Seem to work fine but if it’s not holding up during troops I can just use screws to attach. It’s just tape at the moment but I will carefully lift the tape (obviosly remove the posts first)from one end put some glue on the magnets and posts and then just put the tape with magnets back on the belt. Easy peasy:)1 point
-
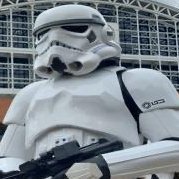
Added gold and grime (not overdoing it though) to the helmet, pretty happy with it and it made it into a display with Enoch during Summer Comic Con in Stockholm this weekend. However, this won’t be my main Trooping helmet as I bought Nico files and subsequenty was blessed with @TKModder421’s updated files. Really looking forward getting that printed.1 point