
Leaderboard


Popular Content
Showing content with the highest reputation on 05/19/2022 in all areas
-
Glen, I was unable to make the rounded part where the clip is "open" without ruining the whole spat. It was the way the BSP armor was designed and if it were cut on the rounded part there would not be enough ABS to work/have the clasp to close. I have spoken with my GML about this and he was fine with my fix. I do have that "noticeable seam" where you see it as it states in the CRL. I hope to use these for now then get another kit from Dino or WTF2 points
-
Heads down and getting a lot of completion done on Phasma with less than a week to go! I started by getting connections attached to my back abs, following the same method I've seen FOTKs do theirs. We started by velcroing the yolk/chest pieces, as this was important to get a good fit down the sides. I also put a small (barely noticeable) piece of velcro on the abs, so my yolk was sure to stay in place. Then I added snaps to the side of the breastplate and yolk, which will sandwich all together to form a nice tight form. Additional finishing touches completed include the thigh harness, got all the gaps filled and sanded down for final acrylic paint Shaped and added additional length to the spatz. These were not fitting well, so i'm going to cut them down and further shape them today We finished filling all the small joins on the TD and I added a bracket that will slide onto the abs And finished spraying gloss black onto the belt boxes, which will FINALLY be chicago screw attached while we silver the Top part of it2 points
-
Well, hello there! Welcome to the last part of my helmet build. Lenses, frown cover and padding Supplied with any RS helmet kit, you get a roll of this thin green foil that seems way to flimsy to actually be a part of the helmet. You can simply add this by poking first one hole into it, then fitting it, so it lays flat over the eye-openings and then poke a second hole in there. The foil is held in place via the upper ear screws. Then cut off areas that might hinder you in the future or where you simply don't need the foil, such as over the middle ear screws or at the frown. I tried my best to get the foil to lie flat over the eyes and got it into a position where there's few to no gaps between the plastic and the foil. Still had the same fabric as I used for my ANH Stunt, but only used one layer this time. This is thin, breathable fabric, so whilst it covers the view it does not completely prohibit air flow. I cut said fabric to about twice the size of the frown and then added glue to the areas marked in red. By only gluing those areas, I could glue it into the helmet in a way that allows for a visible teeth gap. Due to the fact that one can now see into the helmet by looking into the frown, I made sure to glue it high enough (higher than marked in the picture!) double-checking the position from below, to ensure that no hint of the inside of the helmet would be visible. Last, but not least, I added the padding. RS supplied chin straps, which go onto the ear screws and close underneath your chin, and star-shaped foam to stay close to screen accurate. In my humble opinion, the chin strap is super uncomfortable and useless if you got good padding (unless you're planning on doing wild stunts) and the star foam makes the helmet sit way too high and doesn't allow me space for my glasses. Tino (T-Jay) gave me some of this thick foam to use instead (thank you!), which goes over the green foil and allows for enough space to still wear glasses whilst trooping. Super useful, and without any padding at the top of the helmet it gives me this good fitting helmet.2 points
-
Awesome thanks everyone!2 points
-
Not many do this mod so don't stress to much, it won't affect higher level clearance, same as how many tabs are on the chest, not an issue1 point
-
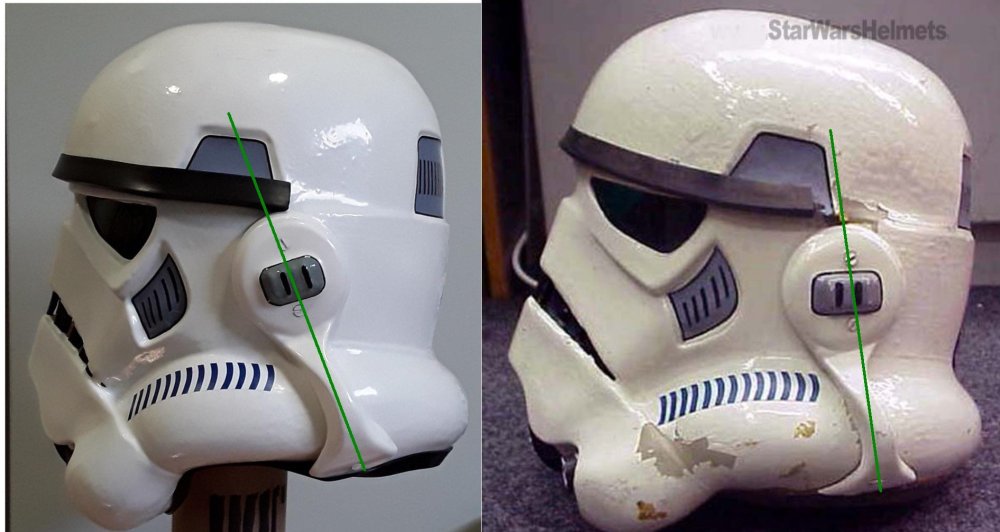
Beautiful work, came out a treat, if I would recommend anything to tweak it would be your left ear, the ear is a little more on an angle than a lot of references references
 1 point
 -
It didnt sit right with me to leave the 3D files the same since Ive learned a lot and made so many changes. I had a few hours free tonight and decided to fix it up. I present the V3 (I think its 3, lost count) Files. Some small tweaks to go but the majority is fixed. Changes include: - New eyes - Modified tears - New Vocoder - Correct Faceplate positioning - More pronounced cheeks - New ears (may need some tweaks) Comparison to V2 on the Left, V3 on right. As always let me know what you think1 point
-
Requesting access https://www.501st.com/members/displaymember.php?userID=30898&costumeID=126 TK 806831 point
-
I was able to get 3 little tabs on the chest plate. As Glen mentioned, anything more became a problem. Unfortunately I've already glued them on. Now I wish I would have trimming the front more like Dan mentioned.1 point
-
I like your thinking, Glen. I actually saw that a while ago but had never made the addition. Thread updated, so Joseph's love of sugru is now doubly represented on here.1 point
-
Glue time for the clips! Started with spats.1 point
-
A few threads which may be helpful, some trimming and reworking pieces https://www.whitearmor.net/forum/topic/38416-crickets-rs-stunt-build-for-the-vertically-challenged/ https://www.whitearmor.net/forum/topic/38842-fragarocks-rs-stunt-build-not-to-scale/ https://www.whitearmor.net/forum/topic/42868-sha-shas-wtf-anh-stunt-build-complete/1 point
-
Bit hard to see in the images but try to have no gaps between the lower ridges of the thigs If you have any gaps you can always add a small strip of ABS behind or fill with ABS paste or Sugru or other similar product Examples of filled gaps in screen used ridges1 point
-
You may want to reach out to your GML (garrison membership liaison) first as they normally set your MB profile to "detachment pending" when your costume is first approved, then normally before elections these pending are made :active". Our detachment leader Andrew @Sly11 could possibly do a manual update if you ask nicely him nicely Posting in the section mentioned by others will give you higher access here on our forum but not on your profile. You may also want to speak to your GWL (garrison web liaison) as you don't have any images on your legion profile1 point
-
looks good.1 point
-
Some more progress on my FOTK. With a coat of resin on the Thermal Detonator, Butt, Cod, Forearm and Bicep armour. Sent from my SM-G981B using Tapatalk1 point


.thumb.png.69856e02550a2e6d07e44a2b1bda020c.png)


