
DocDan
-
Posts
231 -
Joined
-
Last visited
-
Days Won
3
1 Follower

About DocDan

-

Modding the Icomm with an external battery.
DocDan replied to Sly11's topic in Assembly, Mods, and Painting
Just did this mod and it worked flawlessly. My first time soldering too!- 38 replies
-
- 3
-

-
- icomm
- electronics
- (and 1 more)
-
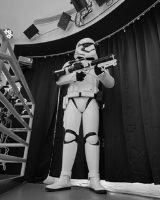
Great news all…I got approved by my NEG GML team! I want to thank everyone here especially @gmrhodes13 for the detailed guidance along the way. I plan to go for EI next. Here a few shots of my first 4 troops, with the very first being a performer with Weird Al! I am still pinching myself! Yup, that’s me!
-
Did a full suit up!
-
Ok thanks @gmrhodes13 for the tips. We did notice the butt was flaring out. Is there any specs on how to make the “v” tabs? I don’t quite understand without seeing them on the armor.
-
Did a test fit of the the abdomen piece and thighs.
-
Added some snaps to the thigh straps.
-
Started working on the shoulder bell strapping. Used a white paint maker to find the snaps. Also got the spacing for the screen accurate snaps and sewed them on.
-
Got a neighbor to stitch my thigh elastic! I may try to install snaps on these instead of glueing them to the thighs. I also bought a pair of suspenders to try that method for extra support.
-
I got some time on this rainy day so I sewed the buttons on to the shoulder straps. I placed them inwards towards my neck a bit more as @JBar suggested.
-
@gmrhodes13 I like the snap idea! About where do you place the snaps on the thigh? Up high or a bit lower? I have plenty of foam so will try a piece in the back. Again, this was the very first time I have worn it. I’ll make sure the belt is down in the back as well and think it will help to have the TD and the holster on.
-
I was able to try something on for the first time. I’m trying to get the sizing and gap correct for the black elastic thigh straps. How does fitment look before I go ahead and glue the straps to the inner front thighs and then stich the top parts to make a sleeve for the under belt to slide through?
-
Worked on adjusting the shoulder straps and getting them to the proper length for my build/torso. Then moved on to the elastic to hold down the top ribbed shoulder straps…tied them in a knot then applied some e6000 to hold them in place…
-
Ok-great @gmrhodes13! Knowing that, I will place the snaps in the shoulder strapping for the placement and add the retainment strap elastic x2. Felt good to actually wear something... I can finally start to put this thing together now!
-
I’m trying to get the length for the shoulder straps. How does this look for spacing and placement?
-
Got some work done on the shoulder straps. Used the marker method from @Cricket to get my cut points for the holes.