Leaderboard


Popular Content
Showing content with the highest reputation on 05/08/2022 in Posts
-
After five years of working on my Star Wars Fan Film (that prominently features an E-11 and a Trooper), I wanted to quickly reach out to say a big thank you to being so kind during my build time. This has been an awesome and helpful community when I got stuck, but mostly I was reading quietly. Also I wanted to share the result with you. Hope you enjoy:3 points
-
Gotta' say this is one of the best builds I have seen in a while, Paul. Lots of great attention to detail.. nice taper on the limbs, perfect gaps between the cod/thigh tops.. WOW! One thing that jumps out is what Luca mentioned, and that is gap at the top of the right thigh. I think that may be due to the fact that it is sitting a lot lower than it should because you haven't done the strapping yet, though. Once it's pulled up to the correct height it should be fine. Can you post up a pic or two of the rear thigh tops you are concerned about? You may want to trim down/round out the tab on the bottom of the posterior plate as well. Those angles can cause chafing after a while when trooping. Ouch. Keep up the fantastic work, sir, and keep those photos coming!2 points
-
Lenses info added to first post: Green Rogue One TK lenses to fit the Nico Henderson helmet Mr Paul's Shoretrooper Build https://www.facebook.com/totalgrunt2 points
-
I got 2nd place in Azzatru's Top 5 mods of the week. I made sure in the comments to again remind people of the great guys here that provided the helmet.1 point
-
Well, I get bored, sometimes right in the middle of a project… and that can be a dangerous thing. I was watching video of the RS Propmasters guys who built Brian Matyas’ Remnant TK concept troopers from the Mandalorian, and started thinking it’d be fun to put one together myself. I settled on this dude because I like the combo of TK and Scoutie bits, and it looks like the most comfortable to wear. Since I’m already building a Remnant scout trooper, that will give me the cummerbund and chest/back armor. For the rest I’ll try to keep true to the found part nature of this costume and reuse or scratch build as much of it as I can, and get most of the rest second hand off of people. Here’s my plan for the rest of the bits: Helmet - Purchased from a garrison mate who had it sitting in storage mostly built… Can’t figure out the maker, but it has most of the details of an RS Propmasters helmet, with just a few slight differences and a slightly softer pull than RS does. Undersuit - Originally was going to go for a dark grey flight suit or grey shirt and bdu style pants, but for now going to use my TIE pilot flight suit from my Remnant Scout. I think that’s more in keeping with the Imperial-army-surplus-scavenged idea. Easy enough to change in the future too. Pauldron - Since it’s a different shaped pauldron, and worn on the wrong side, this is one of the few bits that’ll have to be bespoke. I’m going for it and have ordered the marine vinyl to make this myself. Shoulder armor - I already have a spare TK shoulder bell lying around for the right side, and I can easily enough scratch build a bicep piece for the right arm and the left bell. Gloves - Took a liberty here and went for fingerless leather motorcycle gloves that I bought new. MP40 sandtrooper ammo pouches - Purchased from Trooperbay. Belt/holster - This will be scratch built from leather and metal I have laying around, including the codpiece which I’ll build from some scrap plastic. I’m a little unsure what the blaster is supposed to be, but I happen to have a MerrSonn Power5 and holster for my imperial officer, so I figure that makes sense for this guy to have picked up an officer’s pistol somewhere. I just need to figure out the thigh strap. Right and left belt pouches - I have a cellphone holster I’ve used with my imperial officer uniform that will work for the left hand one, and I’ll sew the right hand one myself using duck cloth. It appears to just be a third biker scout pouch with a belt attachment. Thigh pouches - hand sewn using black twill from an old pair of pants to match the flight suit. Left thigh armor - scratch built using my TK armor as a guide. Shin pouches - hand sewn from twill to match thigh pouches Boots - I debated this a lot, and ended up buying surplus jackboots from Hessen Antique. I’ll be making leather cuffs to go over the tops, and possibly gluing some leftover white vinyl from my Scout boots to make the white stripe on the soles. Here goes!1 point
-
Thanks everyone! Templates for biceps and thigh made up using my TK kit as a guide: Cut the pieces out of 1.5mm abs and started hot water treatment to form the biceps using a paint can as a rough guide: Thigh shaping comes next: Weather hasn’t been ideal for painting, but I’m trying to get all of the armor bits prepped and ready asap so as soon as we get a good day I can paint everything at once.1 point
-
Hey troopers I’ve painted the vocoder and, being me, filmed the process and talked tips and tricks about the originals. I also reworked one of the tears as I wasn’t happy with the vertical stripes. I’ve also added the acetate lenses and the chin strap. It’s a real thing of beauty, this RS lid. That’s all for now. :-)1 point
-
I *love* the remnant artwork and have considered doing one myself. I'll be following along on this one eagerly.1 point
-
Fantastic work Paul... Looking forward to seeing your next step !!!1 point
-
Today has been quite productive too adding the elastics to the bracket strapping... next stop shoulder straps & bridges.1 point
-
Hi Joseph, Here's some pics of the back of the thighs i'm planning on trimming for mobility. I've also took note and marked out the lower regions for comfort.1 point
-
Wow this is going to be way cool.1 point
-
Cant wait to see this also1 point
-
It may be the angle of the photo but the neck return edge isn't much of an issue yet, once I'm fully strapped I'll consider trimming some more Scariest part of the armour build so far fitting the split rivots, nasty little things...literally I did split two, luckily RS supplied some spares with the kit.1 point
-
Looking forward to seeing the progress of your build1 point
-
That's the word I was looking for. Exactly, having that much of a return edge there seems pretty uncomfortable, so I'd take that off. Aside from that I can only agree with Joseph and Andrew and I'm looking forward to seeing your torso put together1 point
-
I'll echo Joseph's sentiments, and such a clean build too. Fantastic work Paul.1 point
-
Thanks so much! None of what I've achieved so far would be possible without the knowledge here at FISD. I'll post some more pictures this evening... I'm currently attempting the torso elastics. Thank you.1 point
-
Yep, that's how this works Justin. members can certainly nominate others for their 3D contributions, then the staff have a discussion on the merits and value and we go from there. I shell take a look at these recommendations over the weekend.1 point
-
Update! Made mad progress today thanks to TKMAD1 helping me with some trimming and more! We matched up the pieces for sizing/fitting and have a good idea of what the armor will look like once we get down to gluing and strapping Here are some photos .1 point
-
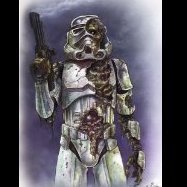
A little update for you lovely folks. I’ve started some weathering my RWA Tie Pilot helmet. Work in progress at this stage. I love that the Star Wars universe is used and gritty, just how I like replica props. [emoji2956][emoji2956][emoji2956] Need to throw it in a skip for a little bit for extra authenticity. [emoji23][emoji23][emoji23]1 point
-
Is this program still active? No awards since 2020... If so, I'd like highlight @trooper96 for the work put into his L2A1 Sterling design since his last award, as well as continuing work on his M38 scope, perhaps consolidating his previous silvers to a well-earned gold award? *Just re-read and noticed Gold is usually given after 5 Silver awards, but he's well on his way and deserving of another... something, I'd say! I'd also like to highlight @BigJasoni , perhaps for a silver award, for his work on the Rogue One ammo belt boxes! I don't know if that's how this works, but I'm happy to see people continuing to develop, submit, and support excellent 3D designs, and hope this program encourages people to continue to make great files available to the FISD family!1 point
-
Wow, the subtle changes really transform that bucket. It looks incredible now! Fight the urge to redo1 point
-
Thank you everyone for your kind words. Terrell was my older brother. He is surely missed. The weight of our grief is the love we still have for him that can’t be expressed. I’m so glad his legacy will live on in such a wonderful community.1 point
-
Just an update, I made the couple of finishing touches that were recommended. First up was trimming the thigh and cod area to give it a bit more black, and probably a bit less chafing on a parade troop: Updated. I can always trim more, but trying this for now: And then the classic "trooper butt" issue: @gmrhodes13 had a simple solution, and I decided to make it. He suggested they go out on the sides, but for how my armor was popping straight back, I found the ideal location was more toward the 1/3 points. I took some card stock to figure out the size I might need, and then took some of the cover strip plastic [EDIT: black plastic would be more ideal, because these clips will just be visible in the crack - I plan to paint mine black in that gap], and cut two rectangles, 3cm by 7.5cm. I used @ukswrath's focused heating technique, where you use a couple of pieces of wood on either side of a bend spot, and heat just that gap, for a more controlled bend. On mine, I needed about 1 cm of arch on the inside for it to work: Glued on one side with white E6000 (for this to work, it just gets mounted on one side. That way you can still detach the armor, and it can slide side to side a bit for some movement. These clips just keep the bottom from being able to pop out further than the other plate). I placed them 4 cm from the edges of the back rectangular detail. I tried it on, and it worked perfectly! No more trooper-butt! Thanks for the suggestions, team!1 point
-
I'm now at the point of the build where snaps are necessary. Not everyone uses snaps for connections, and that's okay. I like snaps- especially for the arms- because that allows me to fully nest the arm and leg parts inside each other (and all that goes inside the torso shell) when putting everything together in my half bin. I also like to make sure that my snaps are built with an extra layer of ABS in them. Not only does it make the snap strong, but it makes removing the snaps a breeze when dekitting! All you need to do is get the edge of your finger under the corner, and POP! Super easy. I start with some extra ABS pieces cut to the same width as the elastic. Mark the centers. Punch the holes. Make an ABS sandwich with the elastic. Punch your elastic holes so everything is lined up. You can also punch everything at one time if you have the strength to do so. And there ya go. I also melt the edges of the elastic with a lighter to ensure that the elastic doesn't fray. Works great! Another trick that I thought I'd share is marking snap positions. Here you can see I've got a snap plate installed on my chest. I like making a double snap here for extra security. Not everyone does (elastic glued here is canon), so do what works for you! The female halves will be assembled using an ABS plate inside the elastic strap, so the positions must be absolutely perfect because the female snap parts will be rigid. Now, I could spend time measuring, remeasuring, and remeasuring this in order to get the other halves of the snaps in the perfect positions. But instead of spending lots of time measuring it all, I just use a metallic sharpie on the snaps, making sure that there is a lot of ink on the snaps. You just need enough so that it doesn't dry before the next step. I like using the metallic sharpies for this because it takes a longer time for the metallic ink to dry- which gives me a little more time to work. Then I pressed the elastic exactly where I wanted it to go over the male halves. This ends up making a perfect mark for where I need my female snaps to go. Then I make my holes in the elastic and ABS plates. And install the snaps. Here is the snap before putting it together... Yay! Perfect fit!1 point
-
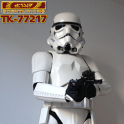
After more than 10 years of dreaming I decided to start my journey to become an imperial Stormtrooper by end of December 2016 to celebrate Star Wars’ and my 40th anniversary After a short dispute with my uncle I left his moisture farm and registered at the imperial academy of the FISD on Carida early in January. During my first steps towards the topic I was happy to find the great forum of the academy with its kind and helpful community. I started my research to find out which armour would be the best for me and could fulfill my requirements of getting a screen accurate looking Centurion Stormtrooper who just left the academy (clean and shiny ). At the end I had to make a decision between RS and TM. I decided to go with TM because I don’t like the bubbles on the RS helmet on the one hand and I like the original/organic look of TM’s armour and its overall appearance on the other hand. So master armourer Troopermaster got my order early in February 2017 after one month of very intensive research. Because I did not dare myself to assemble belt and helmet and paint it, I ordered Troopermaster to do this for me. I also decided to go with the snap strapping system because it is a bit handier than the original brackets. Yes I know, it is not screen accurate at the end, but my requirement was to build a stormtrooper which has a screen accurate appearance while taking the advantages of the allowed building methods While waiting for BBB-Day I forced the local imperial research department to focus on how to build the armour and what common mistakes I should and could avoid during the build. I also gathered the necessary materials and tools as well as the needed accessories like boots, neck seal, under suit and blaster. I also cleaned up my garage, the weapon test area and the workbench and installed a holonet interface (some call it laptop) to have an easy access to the imperial archives and its huge database of blueprints and holo-vids for answering upcoming questions during my work. This special developed interface was also capable of receiving audio transmissions from the imperial propaganda department, so I could listen to the latest news from all over the galaxy while working on the holy duraplast parts. From now on the garage was called “imperial armoury” whereas my wife called me just crazy, although she was the one who encouraged me to spend so much money for some pieces of plastic But anyway, when BBB-Day would come I will be prepared. However, some days of waiting were to go, so I had time to practice my patience. An easy thing for a Jedi, I guess, but for a simple Stormtrooper having an itch to jump in his armour and maintain peace and justice in the galaxy that is very very difficult But finally end of May the BBB arrived from UK. Full of beans and quite confident of having gathered enough knowledge I started right away, always one eye on the holonet, the helpful build threads and the requirements for Centurion (my final target). During my build I faced three major time-killing issues regarding the forearm fitting, the torso strapping and the ammo belt assembly. But at the end I could solve all problems thanks to Troopermaster‘s helpful advice. End of August, after three month of blood, sweat and tears, I finally managed to complete a wonderful piece of art. I prepared for the final test immediately, the approval to become an imperial Stormtrooper Only three days after TK-61276 aka T-Jay and I took the photos for 501st approval I got my own TK-ID. The imperial army command assigned me to the White Shadows Squad of the German Garrison. So, now I can call myself imperial Stormtrooper and member of “Vader’s Fist”, the 501st Legion. Great feeling and I am looking forward to my first mission on the front lines. Although my main mission objective was not completed with being a Stormtrooper and member of the 501st, a secondary objective, not less important, had to be accomplished to call the entire mission a full success. I wanted to become a Centurion of the Legion, so some more steps were still to go. But with attention to the Centurion requirements during my build I was confident to achieve this target too. Additional Director’s Cut content starts here With being assigned a unique TK-ID end of August, I got march orders from the imperial army command immediately. My squad should protect and secure an imperial recruiting event at the city archives (public library) of the neutral city of Bergheim at begin of November which would include patrolling the building environment also. Because the imperial reconnaissance unit reported hostile surroundings and a small possibility of rebel activities at the operation area, mission command ordered our squad to prepare for the upcoming mission carefully. So, in the meantime I enhanced the wearability of my armour to have better movability during combat, improved the filter system and the optical system of the helmet and corrected some minor issues regarding the armour part positions to improve the overall appearance. My intention was to show the galactic public how precise imperial Stormtrooper could look like and that is an honor to serve the Emperor by maintain peace and justice throughout the galaxy Confident to be well prepared I, fully armed, took part in my first ground mission at the front lines. With eight other fearless members of the White Shadows Squad of the 501st Legion, including my brother in arms T-Jay aka TK-61276, the deployed fire team accomplished the mission objective without any incident and no casualties. Thanks to this epic success the imperial command on Coruscant will welcome some new recruits in the future definitely. Encouraged by passing my baptism of fire successfully, I decided to go for my personal mission objective, becoming a Centurion of the Stormtrooper Corps at last. After my fellow war photographer and weapon specialist T-Jay had taken the required photos I prepared for the next step towards this target immediately. Only two days after requesting level 2 approval at the imperial army command I was promoted to the rank of Expert Infantry and got my badge on 21. November 2017 from Deployment Officer Tony, TK-10116. Reaching the second level without any complaint made me proud on the one hand and nervous on the other hand. Only one step was left to end a long journey and, after more than 10 years, let my dream come true. Excited and with my heart beating I prepared my request for third level approval right away. After 7 days of nail-biting suspense I was promoted to the rank of Centurion on 28. November 2017 by 501st Deployment Officer Tony, TK-10116. Being surprised positively, I reached this final target without no complaints again. According to some rumors, even Lord Vader himself was pleased with my work. That’s some kind of honor I never had expected. “Someone must have told them about my little maneuver at the Battle of Taanab, äähm I mean my first Mission at Bergheim.” Ok, what I want to say is, the hard work at the imperial research department and the imperial armoury payed out in a way which makes me very proud at the end. Finally, with being allowed to call myself Centurion of the Imperial Stormtrooper Corps, Member of “Vader’s Fist”, the 501st Legion, my personal mission is a full success. I am very pleased of reaching this target within a short year after starting that mission in December 2016 and within a very special year also, the 40th anniversary of Star Wars and myself. It’s a great honor to be part of this great community, connected by one of the greatest hobbies in the world. Additional Director’s Cut content ends here At last I want to thank some people, who helped me throughout this mission. Without their help it would have been much more difficult. First of all I have to thank my wife who tolerated my absence at several evenings during my armour build. She encouraged me to let a dream come true and furthermore helped me out when more than two hands were needed. So at the end it took three month of building only, what I never had expected when I started the project end of May. Second I want to thank Troopermaster of course, for providing me this wonderful piece of plastic and particularly for all his helpful advice during my build and his patience while answering my many many questions before and after BBB-Day. Third I have to thank T-Jay who gave me great support by building a very detailed and unique E-11, using his completion set. He also made his TM armour available for me to take it as a reference which helped me out a lot. I am pleased that he was part of my first troop, we together could maintain peace and justice in the galaxy and made children, big and small ones, smile I also have to thank JustJoseph63 and Darman for their stuff and the very fast delivery. Great job guys. Last but not least I have to thank you all, the community, for this forum with its depth of information which helped me to start my journey and stay on target. Great to be part of it. Thank you. TK-77to17 salutes you1 point