Leaderboard


Popular Content
Showing content with the highest reputation on 04/23/2022 in all areas
-
Lots of love for everyone mentioned here, you help keep the FISD alive and going! Also, shout out to MaskedVengeance for inspiring some of these - I appreciate the inspiration, Caleb All assignments to a character were completely random. Complaints can be lodged in the comments or my DM's. Please do not notify my Captain, he's sponsoring my concert tickets.3 points
-
A little wobbly, but I would have no issues passing it.2 points
-
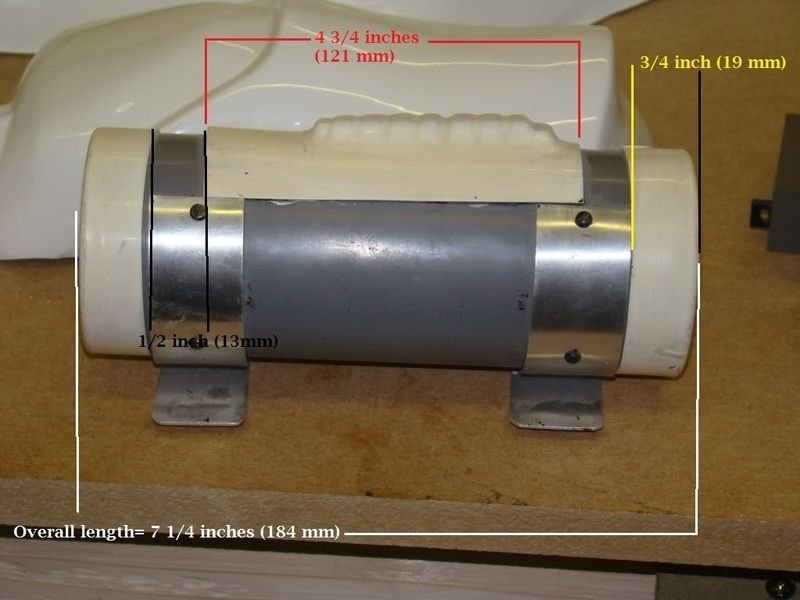
Thanks, those are the measurements I used. Here are the two together:1 point
-
Very nice, much appreciated for these pics1 point
-
Thanks Glen, I'll check it out. Thanks, M1 point
-
After adding foam I added some tabs to the sides to help stop them from coming outwards.1 point
-
Thanks Glen, I'll try the foam first and see how it all sits. Cutting my thighs may help a bit also. I'll leave my det as is for now and see what they say. Thanks, M1 point
-
Adding foam should help the sides come inwards You may be stuck with the detonator as I think RS use a permanent glue, they just seem to rush theses days and a little rough in spots, just look at the right side end cap, not a very straight line at all. Correct it was the metal brackets I was referring too but if you try to cut anything of the end of them you will either be left with a gap or have to move the holes, again I think you may be stuck the way they are. Really up to your DO's for higher level approval, for basic approval you should be fine1 point
-
Thanks, will try that! Thanks, M1 point
-
Be very careful using a heat gun on those, they are quite thin and can easily be cooked, I have in the past just given a little bend by hand, just in a few places to help them sit flush1 point
-
Thanks Chemi! I knew the butt plate was going to be an issue, so thanks for the tip on cutting the thighs. I will mark something up and post it, probably in my build thread? Maybe I'll post in both places. For the shoulders straps can I just use a heat gun and bend them? I also plan to add some foam inside my arms, thighs, and probably midsections as well. That will hopefully help with the "wideness" look. Thanks, M1 point
-
As Glen pointed, double checking before making the rivets holes is better. Strongly recommend to place the ab section rivets first and then align the kidney's ones Close reference1 point
-
I have marked out the split rivet location while I wait for the white paint to dry on them. For some reason putting holes in the armor is a little unnerving. The split rivets were pretty detailed in their location. But the Han's snap is a little more vague. Here is where I have chosen, let me know if any concerns.1 point
-
Today I continued with the shoulder bridges, now I need some help; Do I need to cut off some tabs as it is or does it look fine? (I have it taped with 3 tabs in the front.) Help is appreciated. For something else, I managed to begin work on the helmet, I added the screw on the dome but there were some gaps that made it move around so I added some e6000 to make it stop. I also added the cowl to the visor, not to bad if I do say so. (Also, sorry, but only one layer. )1 point
-
Looking good Matt, just in regards to your ab/kidney, being a skinnier guy myself I had to add some foam behind the kidney to help get the sides to sit correctly, @ 2", there is the option to trim some off the sides but I wanted to keep them standard sized if I ever wanted to on-sell the armor. Lastly just check the measurements on your detonator, also note the brackets don't get rounded off on the control panel side Wishing you the best of luck with approval, hope we see you with some numbers soon
 1 point
 -
Hi Matt. Overall looks good for basic to me, it would depend on your GML is you need to make some fix prior to approval. All points you marked are correct . This one is what I think is the core issue . Both sides of ab/kidney junction do not sit even. The kidney pushes up. (maybe add middle strap to the left side?) . As Chemi mentioned, trimming down the thighs a bit would release some pressure from the butt/kidney section allowing then to sit lower and even . Keep up the great work and looking forward for your approval ! Good Luck1 point
-
Hi Matt. I'll tell you some things I've seen in a first pass. Although some things would not be necessary for Basic, I would fix them, especially thinking about higher levels. -Shoulder bell Gap. The other shoulder is perfect, this one however, could be improved a bit. Reference image -It seems that the forearms are too wide.... Reference image -Alignment is very important. And you can also watch that the two parts do not overlap. -Shoulder bridges. I would bend them inwards a little bit... Reference image -This area is the most problematic. Your butt plate, it overlaps the thigh. I see that (in the front pic.) you don't have room to lower the thighs a little, so maybe the solution would be to trim the thighs a little in the back. This will avoid "noises" when walking and also, the annoying "bites". Reference image On the other hand, congratulations for the great job!!!! Especially the alignment of the helmet ears. One of the best I've seen in a very long time. Congratulations Matt. Remember that if you have any questions, you can contact us!!!! @Deployment Officer Team1 point
-
1 point
-
Looking good Rodney, you can do this and hit Centurion. I missed your 501st approved post so congratulations on the first mile stone.1 point
-
John, Sorry, I have no idea how I missed your original post back in August. I’ve been very busy, but I’ve also been active on the forum since then, so oops. Yes, this costume was approved but no, they’re not seen accurate as-is. Currently, these files are the most accurate ROTK files out there, but I had to really hack them up after printing to get them to an acceptable level. Additionally, I had to do some of my own modeling to create a few of the pieces. I also continue to find things that I don’t like and I keep altering it to get them right. Here’s a list of the things I’ve changed. 1. Printed a Nico Henderson helmet 2. Printed Paul Prentice shoulders, biceps, and forearms (Shoretrooper files) 3. Cut more accurate arm holes in the chest piece and fixed bottom “bell” 4. Cut rear of both thighs 5. Printed Paul Prentice calf armor (Shoretrooper files) 6. Likely replacing abdominal armor with Paul Prentice Shoretrooper abdominal piece and modeling my own ab greeblies 7. Modeled new belt boxes. Files found here 8. Bought the Jimmiroquai kit 9. Bought gray acrylic paint, Fuller’s Earth, sand, and a Soviet army plash in order to turn the 3D print TK into a Mimban TK. Your second comment about the brow may need a little more background info. There’s photos that have been floating around for a while that make the brow appear to sit directly on top of the eyes. However, we also have reference photos that show the brow sitting approximately 1/4” above the eyes. Additionally, almost all of the ROTK helmets available currently have the brow wrong anyways. We’ve since seen references that show that the brow trim was rubber similar to the OT buckets, which explains why it’s placement seems to fluctuate. Unfortunately I don’t have access to my reference photos right now otherwise I’d post a few that show this. Look, I encourage people to 3D print costumes; I’m a big fan of the hobby. But, there’s better options out there than the TK. The ICAT Driver and Mudtrooper files available via https://mudtrooper.co.uk courtesy of Empire3D are the most accurate costumes out there. Paul Prentice’s Shoretrooper files are insanely accurate. When finished properly, Mr. Poopie’s Scout Trooper files teamed with Jesus Salmeron’s helmet are capable of obtaining Lancer Certification. Basically, there’s awesome costumes out there that are ready to be finished and approved, but unfortunately TKs aren’t one of them. There’s just too much work needed to make it a good option. However, I will finish by saying this: Nico has stated that he’s building accurate TK files. But, he announced that over a year ago and when I spoke with him a few months back, he sounded like it was the least of his priorities. I feel like it’s only a matter of time before one of our heavy hitting 3D designers comes up with something that doesn’t require the same level of blood sweat and tears I spilled. When these files are made, I expect to see many 3d print kits getting approved.1 point