Leaderboard
.thumb.jpg.6d328112c293e966a129e9e62a88b910.jpg)


Popular Content
Showing content with the highest reputation on 01/15/2022 in Posts
-
Face it, brother... you have the eye for detail now and there's no getting around it.. (we should start a 12 step program for those of us who are bitten by this bug)!3 points
-
Greetings! In this thread, I am going to try and document my journey from Expert Infantry to Centurion. Any tips, tricks and general pointers welcome I'll start by going through the improvements I plan to make before submitting for Centurion: Part 1 - E11 Upgrades - Completed! 1a) Upgrade Hengster Counter to have an actual "counter number" and plastic face. Ideally to have my own TK number as the number on the counter Completed 1b) Upgrade the scope so that it has real lens and a proper "scope decal" Completed 1c) Fill in as many gaps / bubbles in the moulding as much as possible (probably using green stuff or liquid green stuff) Completed 1d) Cut out the trigger area so that it isn't one huge piece and looks more realistic Completed 1e) Repaint the whole blaster so that it has a more "factory finished" look to it with light weather (following guide Here) Completed Part 2 - Helmet Upgrades - Completed! 2a) Move s-band so that the connect sits under the vocoder for better concealment Completed 2b) Improve the internal helmet padding so that i don't have to totally rely on the chin strap to hold the helmet in place Completed 2c) purchase and install a fan system (Troopacoola) Completed 2d) cut down and install the eye lens individually using sugru for a better internal look Completed 2e) Countersink ear screws Completed 2f) Trim screws internally so they don't stick out as much Completed 2g) touch up vocoder to make more symetrical Completed 2h) paint the internals of the helmet black once all of the above has finished Completed 2i) black duct piping to cover the electronics at the back of the helmet and to further reduce visability into the helmet from a low angle Completed Part 3 - Armour Upgrades Completed! 3a) Ab plate buttons - get the corners as close to 90 degress as possible Completed 3b) shorten the smaller ab-plate button Completed 3c) New thigh armour strapping system so that it sits better when moving around Completed 3d) Replace existing slightly warped hand guards - silicone or latex? Order in progress 3e) Reduce gap between shoulder armour and chest armour - return edge/strapping/larger shoulder armour? Completed 3f) reduce gap between abdomen and kidney plates - diet/going for a run! Completed 3g) voice amplifier system (Aker MR1505) Completed Part 4 - Carry Case Upgrades Completed! 4a) E11 holster Completed 4b) Handle for carry case Completed 4c) TK number and Imperial cog stencil on sides of case Completed 4d) Painting pattern on lid Completed 4e) Repair kit? Completed 4f) Long shoe horn Completed Aaaaand i think that is pretty much everything. I've started this a little late as I've already started the work on a few of the above and have got parts/bits on order already. Will try and update as often as I can with how things are going but the biggest one for me is going to be losing the weight i need to fit into the armour so i can meet "3f"! I'm currently doing Dry Jan and I'm going to try and start going for a run once a week. Looking forward to the "March to Centurion" and thank you to all who have helped me get this far and have continue to provide support and advice. All the best, Ben1 point
-
Name: Ardeshir Radpour Username: equuspolo TK-42128 Southern California Garrison Los Angeles Squadron Height = 5'10 Weight = 165 Armor Maker = KB Armor - Trimmed to fit like Anovos Helmet Maker = Anovos Premium Fiberglass and Anovos Plastic Helmet Boot Maker = Imperial Boots Gloves = Endor Finders Belt = Trooperbay Belt Pouches = Trooperbay Pauldron = Trooperbay Neck Seal = Imperial Seamstress Holster Maker = Dan Sczudlik Gaskets = production made silicon rubber gaskets F-11 = Branfuhr Studios Resin Kit- Custom built by me with custom light system. SE-44C = 3DPrintMerchant Electronics = Wireless Microphone with Acker Amp Custom Parts = Chest yoke and Backplate welded together with ABS Slurry. Chest Pills and Chest cut out backed with Textured Fabric, TD slurry welded. Entire armor painted with Rustoleum 2x Glossy White. Belt, Cod, Butt Plate attached to armer with Anovos leather waist tassets EIB Approved FIBERGLASS HELMET PLASTIC HELMET updated blaster1 point
-
Good shout - had a spare racket grip lying around though, so i've used that for the moment. Very soft! Will use that until it wears out and then source some pipe/tubing1 point
-
Thank you brother. This and the executioner are both up with all the changes requested made. It was always the plan just got delayed a bit by excellent personal things going on hahaha.1 point
-
Hey Ardeshir ! great to see you're back for Centurion !!1 point
-
Roger that. Thank you!1 point
-
Started to fill the gaps/bubbles on the E11 Sent from my iPhone using Tapatalk1 point
-
Touch up work started on the E11 - metal looks much better now in my opinion Sent from my iPhone using Tapatalk1 point
-
Created a stencil and sponged white paint onto it - seems to have worked quite well. Have one of these on each side of the case Sent from my iPhone using Tapatalk1 point
-
Case handle installed - Pretty basic but it is comfy and gets the job done! Sent from my iPhone using Tapatalk1 point
-
Hi Ardeshir... I want to congratulate you for this fantastic submission... I've received messages from members of my Garrison, who are impressed with your submission. Congratulations. We're working on it...1 point
-
Best of luck!1 point
-
A blaster is required for EIB and Centurion its only optional for basic approval1 point
-
Dank Farrik, this is gorgeous. Good luck!!! Though I don't think you'll need it.1 point
-
As per usual (and to echo Andrew's comment) this is one fantastic submission, brother (not that I expected any less from you)! You are in the queue, sir!1 point
-
Nice work Garrett, congratulations.1 point
-
Beautiful application brother!1 point
-
Hi and welcome to the FISD. Both are good choices. RS might be more screen accurate but AP gives you a bit more room in some of the more critical parts (i.e. around the gut area). The cost and shipping times will likely play a part in the decision. I've built both a TK and TD from a AP kit and I have no complaints - although I had to source a few TD specific parts from other vendors. As much as I love my AP kits, I would lean to RS if you want a really accurate TD build. I think the links Glen provided above gives a bit more detail on the differences. Either way, you'll be happy.1 point
-
That sight is broken on my QD E-11, so I'm definitely going to look into this as well. Thanks @justjoseph63 & @T-Jay!!1 point
-
Great minds think alike! I had also found that video and my next step was to try my heat gun, so far i had tried very hot water but it didn't seem to have much of an effect.1 point
-
Thighs done! Click link below to see video build. https://youtu.be/XMZYaHh-J_U1 point
-
Awesome! Thanks. Not my cat, but just one from the YouTube video. I do have a cat, and will make sure to include him in another post just for your daughter He does look like this little kitten though1 point
-
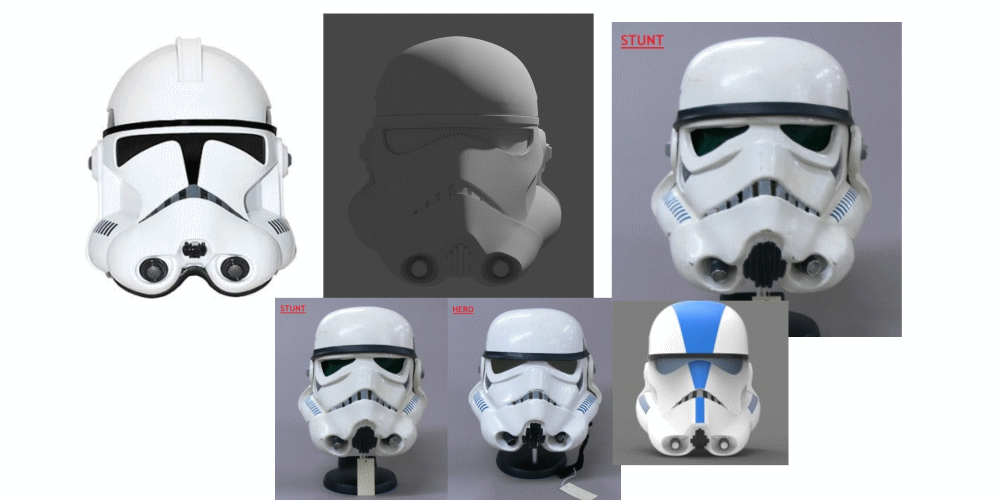
Considering Clone Troopers and most Stunt Stormtroopers have a spacing between the visor and head band, I believe the best route, at least for me, is to have a space between the visor and band. What do you guys feel about the spacing? Do you agree or do you like the visor and band touching? Thanks again for the files. I made a Blender render of the V2 helmet but since there are no textures it may be hard to see.
 1 point
 -
Thank you!! I’m so stoked. Keep catching myself just staring at it1 point
-
First purchased a 3M Standard Hard Hat for $6.49 @ Lowe's. I will be removing the suspension liner from inside the helmet and will be cutting out the portions of the helmet in which the liner snaps in to. --------1 point